


一、效果演示
二、逻辑分析
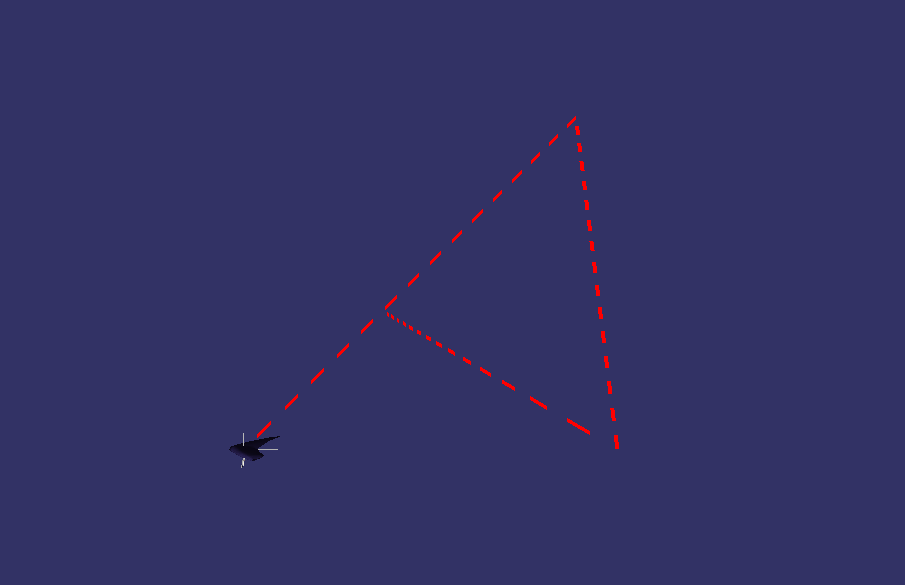
给出关键的点,然后每两点之间根据空间直线的参数方程进行插值获取顶点,绘制出虚线样式的线段,再然后设置更新回调,回调中设置交替绘制,使其看起来就像一直流动的样子
三、整体代码实现
#include <iostream>
#include <ctime>
#include <chrono>

#include <osgDB/ReadFile>
#include <osgViewer/Viewer>
#include <osg/Node>
#include <osg/Geode>
#include <osg/Geometry>
#include <osg/LineWidth>

using namespace std;

static int g_vertexSize = 0;

osg::ref_ptr<osg::Node> CreateLine(vector<osg::Vec3f> points, float divCount);

class CCustomCallback : public osg::Drawable::UpdateCallback
{
public:
    void update(osg::NodeVisitor*, osg::Drawable* drawable) override
    {
        static time_t oldTime = 0;
        //获取当前时间,毫秒级
        std::chrono::milliseconds dur_ms =
                std::chrono::duration_cast<std::chrono::milliseconds>(
                    std::chrono::high_resolution_clock::now().
                    time_since_epoch());
        time_t nowTime = dur_ms.count();
        //设置间隔300ms更新一次
        if(nowTime - oldTime < 200)
        {
            return;
        }
        oldTime = nowTime;
        //获取目标对象
        osg::Geometry* pGeom = drawable->asGeometry();
        if(!pGeom)
        {
            return;
        }
        osg::PrimitiveSet* pSet = pGeom->getPrimitiveSet(0);
        if(!pSet)
        {
            return;
        }
        osg::DrawElementsUInt* pDrawEleUInt = dynamic_cast<osg::DrawElementsUInt*>(pSet);
        if(!pDrawEleUInt)
        {
            return;
        }
        //交替更新绘制顺序,以此模仿线条流动的效果
        pDrawEleUInt->clear();
        static bool flag = true;
        if(flag)
        {
            for(int i = 0; i < g_vertexSize; i++)
            {
                pDrawEleUInt->push_back(i);
            }
        }
        else
        {
            for(int i = 1; i < g_vertexSize; i++)
            {
                pDrawEleUInt->push_back(i);
            }
        }
        pDrawEleUInt->dirty();
        flag = !flag;
    }
};


int main()
{
    osgViewer::Viewer viewer;
    osg::ref_ptr<osg::Group> pRoot = new osg::Group;

    vector<osg::Vec3f> points;
    points.push_back(osg::Vec3f(0.0, 0.0, 0.0));
    points.push_back(osg::Vec3f(5.0, 5.0, 5.0));
    points.push_back(osg::Vec3f(5.0, 0.0, 0.0));
    points.push_back(osg::Vec3f(0.0, 50.0, 0.0));

    osg::ref_ptr<osg::Node> pShape = CreateLine(points, 30);

    osg::ref_ptr<osg::Node> pNode = osgDB::readNodeFile("glider.osg");
    pRoot->addChild(pNode);
    pRoot->addChild(pShape);

    viewer.setSceneData(pRoot);
    viewer.setUpViewInWindow(100, 100, 800, 600);
    viewer.run();
    return 0;
}

//生成顶点数组,divCount是等分多少段,可以自由设置
void GenerateVertex(osg::Vec3f p1,
                    osg::Vec3f p2,
                    float divCount,
                    osg::ref_ptr<osg::Vec3Array> pVertexArray,
                    osg::ref_ptr<osg::Vec4Array> pColorArray)
{
    //点p1到p2的方向向量
    osg::Vec3f vectorV = p2 - p1;
    //直线的参数方程: x = mt+x0; y = nt+y0; z = pt+z0;
    float step = 1.0/divCount;
    for(float t = 0.0; t < 1.0; t += step)
    {
        float x = vectorV.x() * t + p1.x();
        float y = vectorV.y() * t + p1.y();
        float z = vectorV.z() * t + p1.z();

        pVertexArray->push_back(osg::Vec3f(x, y, z));
        pColorArray->push_back(osg::Vec4(1.0, 0.0, 0.0, 1.0));
    }
}

osg::ref_ptr<osg::Node> CreateLine(vector<osg::Vec3f> points, float divCount)
{
    //初始化相关对象
    osg::ref_ptr<osg::Geometry> pGeom = new osg::Geometry;
    osg::ref_ptr<osg::Vec3Array> pVertexArray = new osg::Vec3Array;
    pGeom->setVertexArray(pVertexArray.get());
    osg::ref_ptr<osg::Vec4Array> pColorArray = new osg::Vec4Array;
    pGeom->setColorArray(pColorArray.get());
    pGeom->setColorBinding(osg::Geometry::BIND_PER_VERTEX);
    pGeom->setUpdateCallback(new CCustomCallback);

    //先初始化顶点
    for(vector<osg::Vec3f>::iterator it = points.begin(); it != --points.end(); it++)
    {
        GenerateVertex(*it, *(it+1), divCount, pVertexArray, pColorArray);
    }
    g_vertexSize = pVertexArray->size();
    //初始化顶点绘制顺序,其实这个顺序跟你选择的绘制方式有关osg::PrimitiveSet::LINE_STRIP_ADJACENCY,可以玩出各种花儿来
    osg::ref_ptr<osg::DrawElementsUInt>	pDrawEleUInt = new osg::DrawElementsUInt(osg::PrimitiveSet::LINES);
    for(int i = 0; i < (int)pVertexArray->size(); i++)
    {
        pDrawEleUInt->push_back(i);
    }
    //初始化EBO缓冲,并将上述顶点绘制顺序关联
    osg::ref_ptr<osg::ElementBufferObject> pEboBuffer = new osg::ElementBufferObject;
    pDrawEleUInt->setElementBufferObject(pEboBuffer.get());
    pGeom->addPrimitiveSet(pDrawEleUInt.get());
    pGeom->setUseVertexBufferObjects(true);

    osg::ref_ptr<osg::Geode> pGeode = new osg::Geode;
    pGeode->addDrawable(pGeom);

    //关闭光照,每个面看起来都一样
    osg::StateSet* stateSet = pGeode->getOrCreateStateSet();
    stateSet->setMode(GL_LIGHTING, osg::StateAttribute::OFF);
    stateSet->setMode(GL_DEPTH_TEST, osg::StateAttribute::OFF);
    stateSet->setMode(GL_BLEND, osg::StateAttribute::ON);
    //设置点的大小
    osg::LineWidth* pWidth = new osg::LineWidth;
    pWidth->setWidth(4.0);
    stateSet->setAttribute(pWidth);

    return  pGeode.get();
}


 632
632

 被折叠的 条评论
为什么被折叠?
被折叠的 条评论
为什么被折叠?
 到【灌水乐园】发言


