


目录
1\ module
1\ module
知识点:
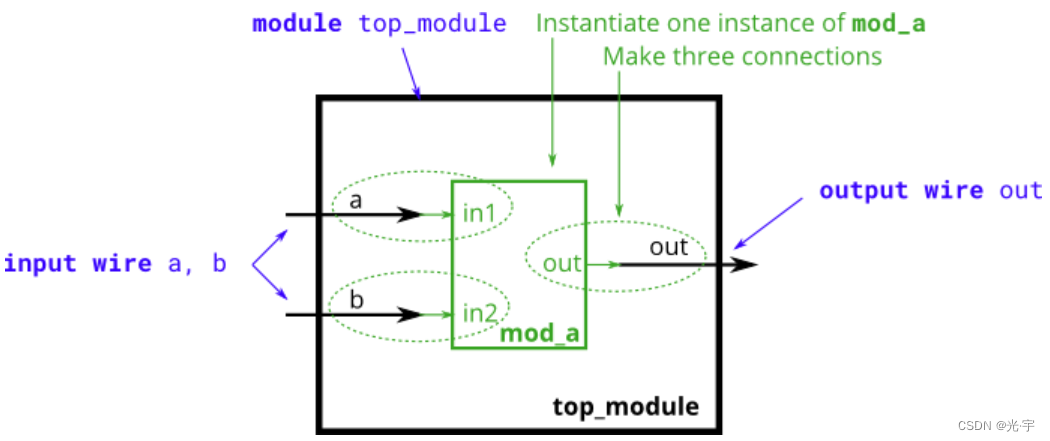
将信号连接到模块端口
将电线连接到端口有两种常用的方法:按位置或按名称。
按位置
按位置将电线连接到端口的语法应该很熟悉,因为它使用类似 C 的语法。实例化模块时,端口根据模块的声明从左到右连接。例如:
mod_a instance1 ( wa, wb, wc );
这将实例化一个类型的模块mod_a并为其提供实例名称“instance1”,然后将信号wa(在新模块之外)连接到新模块的第一个端口 ( in1)、wb第二个端口 ( in2) 和wc第三个端口 ( out)。这种语法的一个缺点是,如果模块的端口列表发生更改,则还需要找到并更改模块的所有实例以匹配新模块。
按名字
按名称将信号连接到模块的端口可以使电线保持正确连接,即使端口列表发生更改。然而,这种语法更加冗长。
mod_a instance2 ( .out(wc), .in1(wa), .in2(wb) );
上面的行实例化了一个mod_a名为“instance2”类型的模块,然后将信号wa(模块外部)连接到名为的端口、 名为in1的wb端口和名为的端口。请注意这里的端口顺序是如何无关的,因为无论其在子模块端口列表中的位置如何,都将使用正确的名称进行连接。还要注意此语法中端口名称之前的句点。
2\ module pos
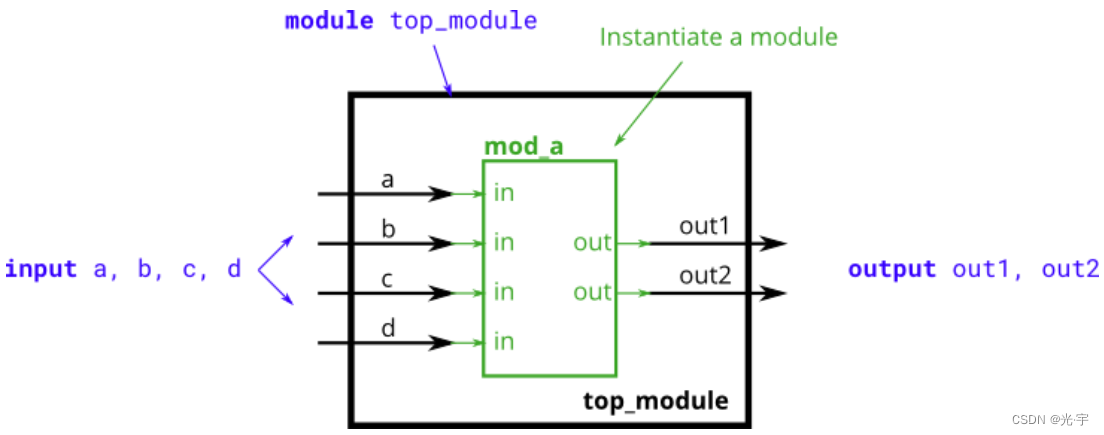
You must connect the 6 ports by position to your top-level module's ports out1, out2, a, b, c, and d, in that order.
ERRO:
module top_module (
input a,
input b,
input c,
input d,
output out1,
output out2
);
mod_a inst(.out(out1),.out(out2),.in(a),.in(b),.in(c),.in(d));
endmodule
CORRECT:
module top_module (
input a,
input b,
input c,
input d,
output out1,
output out2
);
mod_a inst(out1,out2,a,b,c,d);//按位置连接
endmodule
相比于按位置连接,我还是喜欢按名字连接,比较清晰明朗。
3\ MODULE SHIFT
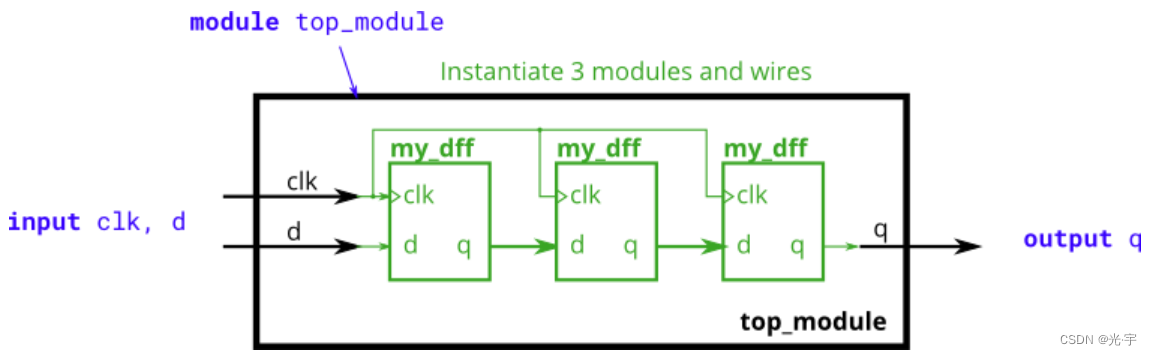
ERRO:
module top_module ( input clk, input d, output q );
wire clk1,clk2,clk3;
wire d1,d2,d3;
wire q1,q2,q3;
mydff1 inst1(.clk1(clk),.d1(d),.q1(d2));
mydff2 inst2(.clk2(clk),.d2(q1),.q2(d3));
mydff3 inst3(.clk13(clk),.d3(q2),.q3(q));
endmodule
CORRECT:
module top_module ( input clk, input d, output q );
wire temp1;
wire temp2;
my_dff block1(clk,d,temp1);
my_dff block2(clk,temp1,temp2);
my_dff block3(clk,temp2,q);
endmodule
HINT:
my_dff里的各个信号都没有名称,因此肯定是按位置进行搭建。然后有多个子模块,这种问题的处理办法就是设置中间变量。
4\ MODILE SHIFT8
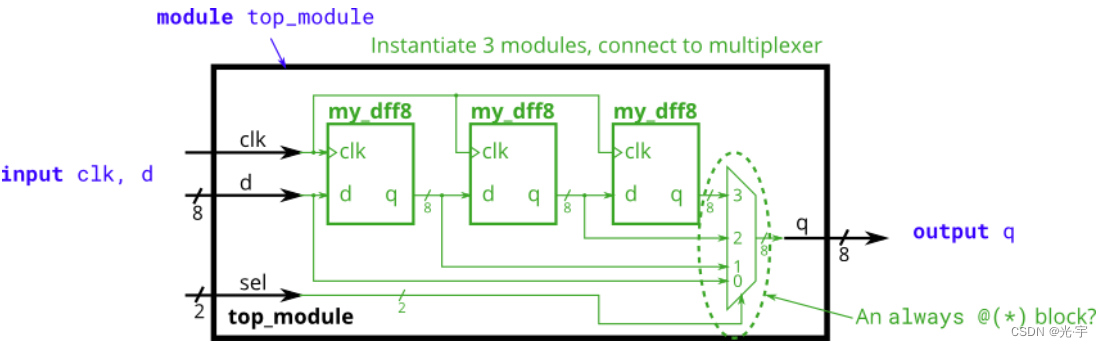
ERRO:
module top_module (
input clk,
input [7:0] d,
input [1:0] sel,
output [7:0] q
);
wire [7:0] t1,t2,t3;
my_dff8 inst1(clk,d,t1);
my_dff8 inst2(clk,t1,t2);
my_dff8 inst3(clk,t2,t3);
case(sel):
begin
00:q<=d;
01:q<=t1;
10:q<=t2
11:q<=t3;
default
end
endcase
endmodule
CORRECT:
module top_module (
input clk,
input [7:0] d,
input [1:0] sel,
output [7:0] q
);
wire [7:0] t1,t2,t3;
my_dff8 inst1(clk,d,t1);
my_dff8 inst2(clk,t1,t2);
my_dff8 inst3(clk,t2,t3);
// This is one way to make a 4-to-1 multiplexer
always @(*)// Combinational always block
begin
case(sel)
2'b00:q<=d;
2'b01:q<=t1;
2'b10:q<=t2;
2'b11:q<=t3;
default;
endcase
end
endmodule
HINT:
case要放在always块里面;always写完后随机写上begin和end;00,01这种记得加上数据类型和位数;每行记得加分号。
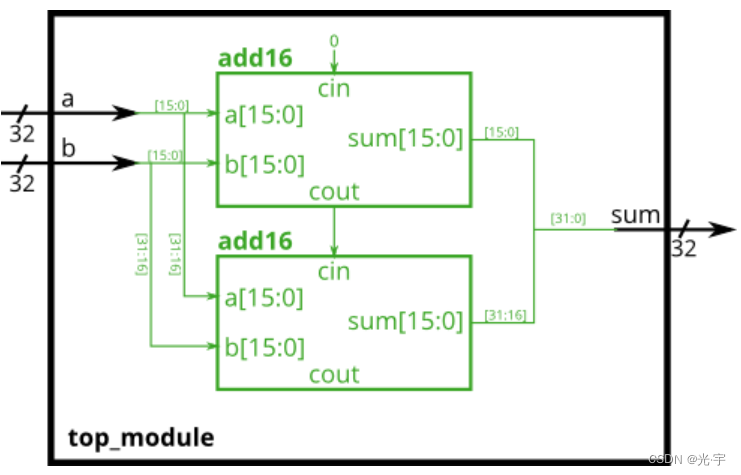
5\ MODULE ADD
Connect the modules together as shown in the diagram below. The provided module add16 has the following declaration:
module add16 ( input[15:0] a, input[15:0] b, input cin, output[15:0] sum, output cout );
ERRO:
module top_module(
input [31:0] a,
input [31:0] b,
output [31:0] sum
);
wire [15:0] low_out;
wire [15:0] high_out;
wire temp_cout;
wire cout;
add16 low (a[15:0],b[15:0],0,temp_cout,low_out);
add16 high(a[31:16],b[31:16],temp_cout,cout,high_out);
assign sum={high_out,low_out};
endmodule
CORRECT:
module top_module(
input [31:0] a,
input [31:0] b,
output [31:0] sum
);
wire [15:0] low_out;
wire [15:0] high_out;
wire temp_cout;
wire cout;
add16 low (a[15:0],b[15:0],0,low_out,temp_cout);
add16 high(a[31:16],b[31:16],temp_cout,high_out,cout);
assign sum={high_out,low_out};
endmodule
HINT:
要注意题干所给信息,不要把信号位置弄反。
6\ MODULE FADD
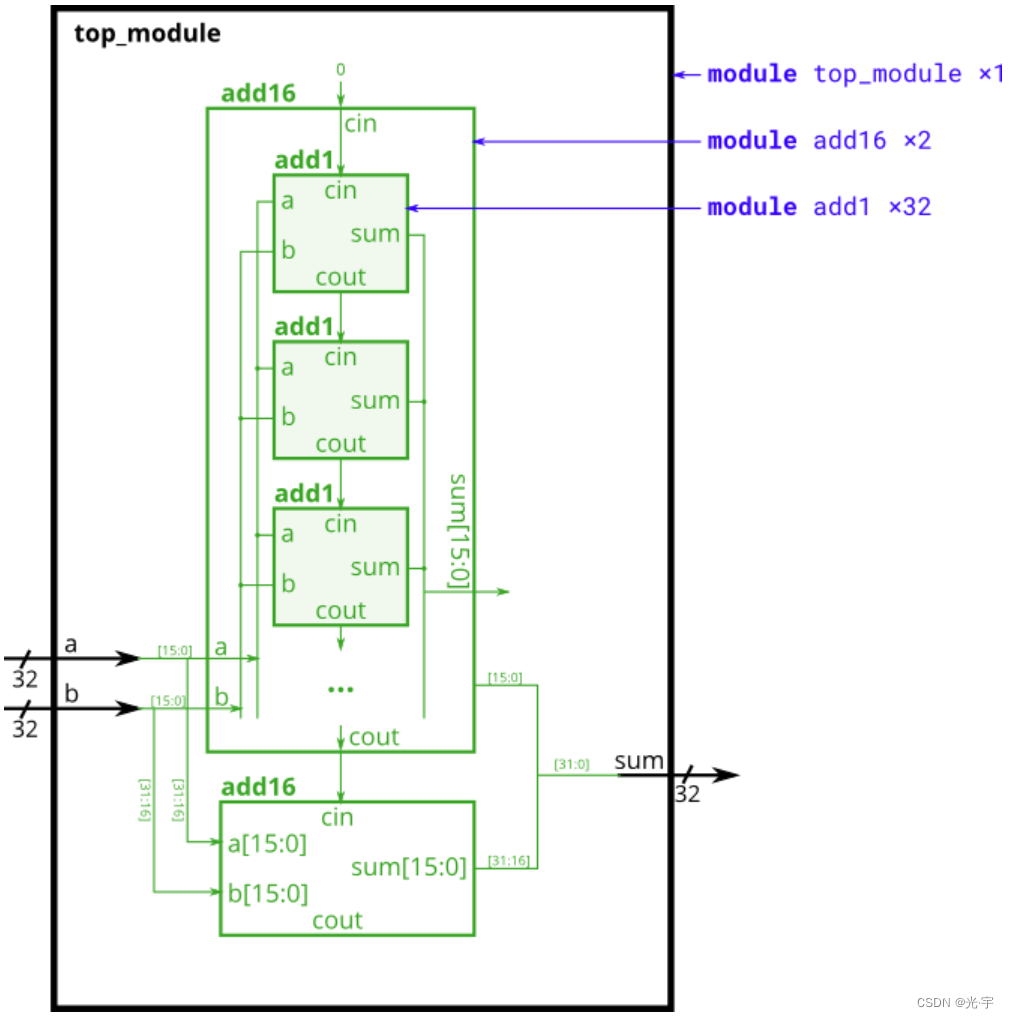
In this exercise, you will create a circuit with two levels of hierarchy. Your top_module will instantiate two copies of add16 (provided), each of which will instantiate 16 copies of add1 (which you must write). Thus, you must write two modules: top_module and add1.
ERRO:
记得写add1代码!!!!!!!!!!!!!!!!
CORRECT:
module top_module (
input [31:0] a,
input [31:0] b,
output [31:0] sum
);
wire temp_cout;
add16 low (a[15:0],b[15:0],0,sum[15:0],temp_cout);
add16 high (a[31:16],b[31:16],temp_cout,sum[31:16]);
endmodule
module add1 ( input a, input b, input cin, output sum, output cout );
assign sum=a^b^cin;
assign cout=a&b|a&cin|b&cin;
/* assign {cout,sum} = a + b + cin; *///表示将加法的进位位和求和位进行拼接,正好等于a+b+cin
endmodule
HINT:
Full adder equations:
sum = a ^ b ^ cin
cout = a&b | a&cin | b&cin
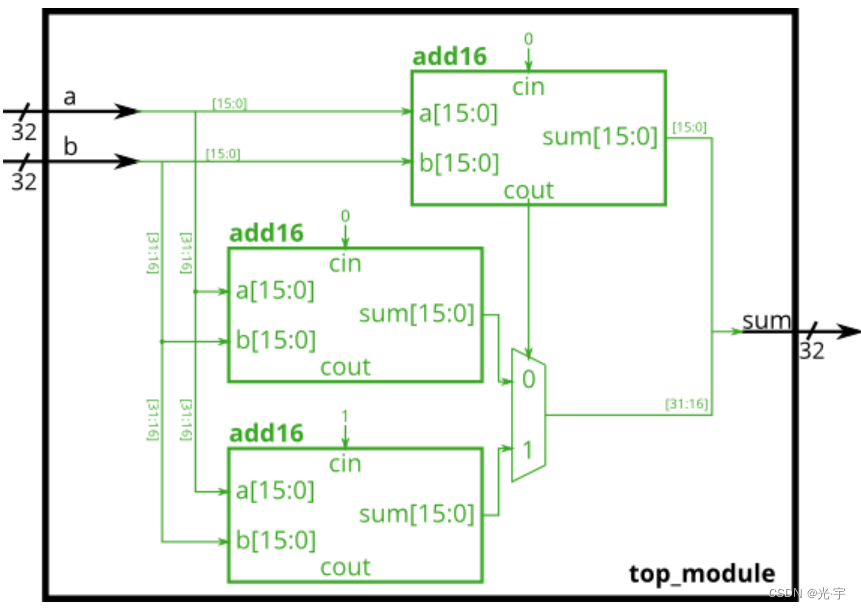
7\ MODULE CSELADD
In this exercise, you are provided with the same module add16 as the previous exercise, which adds two 16-bit numbers with carry-in and produces a carry-out and 16-bit sum. You must instantiate three of these to build the carry-select adder, using your own 16-bit 2-to-1 multiplexer.
Connect the modules together as shown in the diagram below. The provided module add16 has the following declaration:
module add16 ( input[15:0] a, input[15:0] b, input cin, output[15:0] sum, output cout );
CORRECT1:
module top_module(
input [31:0] a,
input [31:0] b,
output [31:0] sum
);
wire cout1,cout2,cout3;
wire [15:0] e,f;
add16 high1 (a[31:16],b[31:16],0,e,cout1);
add16 high2 (a[31:16],b[31:16],1,f,cout2);
add16 low (a[15:0],b[15:0],0,sum[15:0],cout3);
always @(*)
begin
case(cout3)
2'b00:
sum[31:16]<=e;
2'b01:
sum[31:16]<=f;
default;
endcase
end
endmodule
CORRECT2:
module top_module(
input [31:0] a,
input [31:0] b,
output [31:0] sum
);
wire [15:0] highout0;
wire [15:0] highout1;
wire cout;
add16 low(a[15:0],b[15:0],0,sum[15:0],cout);
add16 high0(a[31:16],b[31:16],0,highout0);
add16 high1(a[31:16],b[31:16],1,highout1);
assign sum[31:16]=cout? highout1:highout0;
endmodule
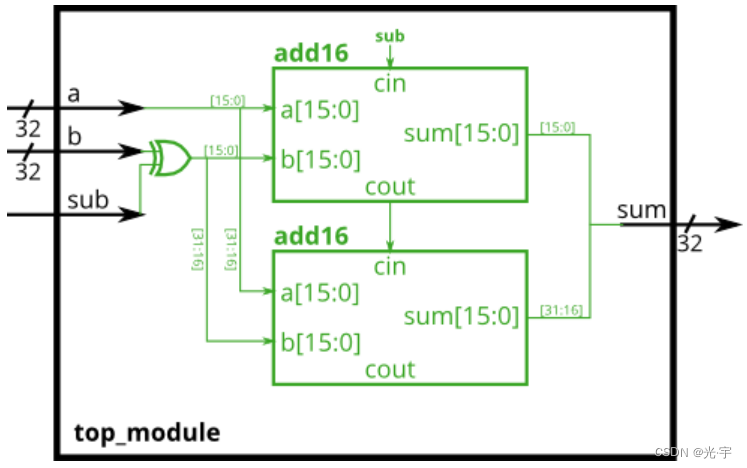
8\ MODULE ADDSUB
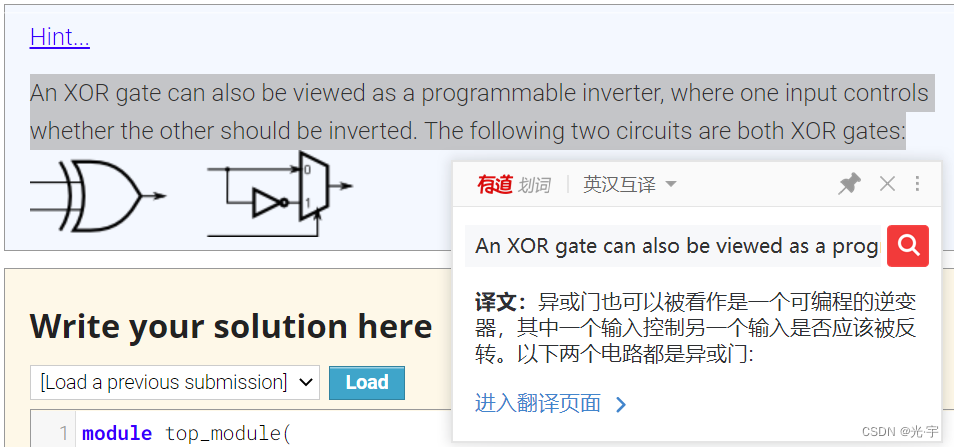
An adder-subtractor can be built from an adder by optionally negating one of the inputs, which is equivalent to inverting the input then adding 1. The net result is a circuit that can do two operations: (a + b + 0) and (a + ~b + 1). See Wikipedia if you want a more detailed explanation of how this circuit works.
Build the adder-subtractor below.
You are provided with a 16-bit adder module, which you need to instantiate twice:
module add16 ( input[15:0] a, input[15:0] b, input cin, output[15:0] sum, output cout );
Use a 32-bit wide XOR gate to invert the b input whenever sub is 1. (This can also be viewed as b[31:0] XORed with sub replicated 32 times. See replication operator.). Also connect the sub input to the carry-in of the adder.
ERRO:
module top_module(
input [31:0] a,
input [31:0] b,
input sub,
output [31:0] sum
);
wire t,cout;
wire [31:0] B;
assign B=b^sub;
add16 inst1(a[15:0],B[15:0],sub,sum[15:0],t);
add16 inst2(a[31:16],B[31:16],t,sum[31:16],cout);
endmodule
CORRECT:
module top_module(
input [31:0] a,
input [31:0] b,
input sub,
output [31:0] sum
);
wire t,cout;
wire [31:0] B;
assign B=b^{32{sub}};
add16 inst1(a[15:0],B[15:0],sub,sum[15:0],t);
add16 inst2(a[31:16],B[31:16],t,sum[31:16],cout);
endmodule
HINT:


 239
239


 被折叠的 条评论
为什么被折叠?
被折叠的 条评论
为什么被折叠?
 到【灌水乐园】发言


