


Spark3.1.2与Iceberg0.12.1整合
Spark可以操作Iceberg数据湖,这里使用的Iceberg的版本为0.12.1,此版本与Spark2.4版本之上兼容。由于在Spark2.4版本中在操作Iceberg时不支持DDL、增加分区及增加分区转换、Iceberg元数据查询、insert into/overwrite等操作,建议使用Spark3.x版本来整合Iceberg0.12.1版本,这里我们使用的Spark版本是3.1.2版本。
版本问题: hadoop 版本 2.7.6
hive 版本 2.3.9(开始用的是3.+的版本,失败)
spark 版本 3.1.2
然后使用的是spark-sql,通过hive来管理spark的表。
我们可以在hive中查看到创建的iceberg的表,也可以在spark-sql中查看表,但是不能操作(查询,增加等等)
如:我们使用hive来操作iceberg的表(表是通过spark代码来创建的)

如果只是通过简单的sqark-sql命令,查询等也会报错:

使用spark-sql查询,在后面加上参数,如:
spark-sql --conf spark.sql.catalog.hive_prod=org.apache.iceberg.spark.SparkCatalog --conf spark.sql.catalog.hive_prod.type=hive --conf spark.sql.catalog.hive_prod.uri=thrift://master:9083 --conf iceberg.engine.hive.enabled=true此时做查询就不会报错,也可进行操作:

1.8.1 向pom文件导入依赖
在Idea中创建Maven项目,在pom文件中导入以下关键依赖:
<properties>
        <maven.compiler.source>8</maven.compiler.source>
        <maven.compiler.target>8</maven.compiler.target>
    </properties>

    <dependencies>
        <!-- Spark-core -->
        <dependency>
            <groupId>org.apache.spark</groupId>
            <artifactId>spark-core_2.12</artifactId>
            <version>3.1.2</version>
        </dependency>

        <!-- Spark与Iceberg整合的依赖包-->
        <dependency>
            <groupId>org.apache.iceberg</groupId>
            <artifactId>iceberg-spark3</artifactId>
            <version>0.12.1</version>
        </dependency>
        <dependency>
            <groupId>org.apache.iceberg</groupId>
            <artifactId>iceberg-spark3-runtime</artifactId>
            <version>0.12.1</version>
        </dependency>

        <!-- avro格式 依赖包 -->
        <dependency>
            <groupId>org.apache.avro</groupId>
            <artifactId>avro</artifactId>
            <version>1.10.2</version>
        </dependency>

        <!-- parquet格式 依赖包 -->
        <dependency>
            <groupId>org.apache.parquet</groupId>
            <artifactId>parquet-hadoop</artifactId>
            <version>1.12.0</version>
        </dependency>

        <!-- SparkSQL -->
        <dependency>
            <groupId>org.apache.spark</groupId>
            <artifactId>spark-sql_2.12</artifactId>
            <version>3.1.2</version>
        </dependency>
        <!-- SparkSQL  ON  Hive-->
        <dependency>
            <groupId>org.apache.spark</groupId>
            <artifactId>spark-hive_2.12</artifactId>
            <version>3.1.2</version>
        </dependency>
        <!--<!–mysql依赖的jar包–>-->
        <!--<dependency>-->
        <!--<groupId>mysql</groupId>-->
        <!--<artifactId>mysql-connector-java</artifactId>-->
        <!--<version>5.1.47</version>-->
        <!--</dependency>-->
        <!--SparkStreaming-->
        <dependency>
            <groupId>org.apache.spark</groupId>
            <artifactId>spark-streaming_2.12</artifactId>
            <version>3.1.2</version>
        </dependency>
        <!-- SparkStreaming + Kafka -->
        <dependency>
            <groupId>org.apache.spark</groupId>
            <artifactId>spark-streaming-kafka-0-10_2.12</artifactId>
            <version>3.1.2</version>
        </dependency>
        <!--<!– 向kafka 生产数据需要包 –>-->
        <!--<dependency>-->
        <!--<groupId>org.apache.kafka</groupId>-->
        <!--<artifactId>kafka-clients</artifactId>-->
        <!--<version>0.10.0.0</version>-->
        <!--<!– 编译和测试使用jar包,没有传递性 –>-->
        <!--<!–<scope>provided</scope>–>-->
        <!--</dependency>-->
        <!-- StructStreaming + Kafka -->
        <dependency>
            <groupId>org.apache.spark</groupId>
            <artifactId>spark-sql-kafka-0-10_2.12</artifactId>
            <version>3.1.2</version>
        </dependency>

        <!-- Scala 包-->
        <dependency>
            <groupId>org.scala-lang</groupId>
            <artifactId>scala-library</artifactId>
            <version>2.12.14</version>
        </dependency>

        <dependency>
            <groupId>org.scala-lang</groupId>
            <artifactId>scala-compiler</artifactId>
            <version>2.12.14</version>
        </dependency>

        <dependency>
            <groupId>org.scala-lang</groupId>
            <artifactId>scala-reflect</artifactId>
            <version>2.12.14</version>
        </dependency>

        <dependency>
            <groupId>log4j</groupId>
            <artifactId>log4j</artifactId>
            <version>1.2.12</version>
        </dependency>
        <dependency>
            <groupId>com.google.collections</groupId>
            <artifactId>google-collections</artifactId>
            <version>1.0</version>
        </dependency>
        <dependency>
            <groupId>mysql</groupId>
            <artifactId>mysql-connector-java</artifactId>
            <version>5.1.49</version>
        </dependency>
        <dependency>
            <groupId>org.apache.hive</groupId>
            <artifactId>hive-exec</artifactId>
            <version>1.2.1</version>
        </dependency>
        <dependency>
            <groupId>org.apache.hive</groupId>
            <artifactId>hive-jdbc</artifactId>
            <version>1.2.1</version>
        </dependency>
        <dependency>
            <groupId>com.alibaba</groupId>
            <artifactId>fastjson</artifactId>
            <version>1.2.79</version>
        </dependency>

        <!-- https://mvnrepository.com/artifact/org.scala-tools/maven-scala-plugin -->
        <dependency>
            <groupId>org.scala-tools</groupId>
            <artifactId>maven-scala-plugin</artifactId>
            <version>2.15.1</version>
        </dependency>
    </dependencies>
    <!--注意这两个依赖要加,这样才能将我的spark代码编译生成class文件。-->
    <build>
        <plugins>
            <!-- Java Compiler -->
            <plugin>
                <groupId>org.apache.maven.plugins</groupId>
                <artifactId>maven-compiler-plugin</artifactId>
                <version>3.1</version>
                <configuration>
                    <source>1.8</source>
                    <target>1.8</target>
                </configuration>
            </plugin>

            <plugin>
                <groupId>org.scala-tools</groupId>
                <artifactId>maven-scala-plugin</artifactId>
                <version>2.15.2</version>
                <executions>
                    <execution>
                        <goals>
                            <goal>compile</goal>
                        </goals>
                    </execution>
                </executions>
                <configuration>
                    <scalaVersion>2.12.11</scalaVersion>
                </configuration>
            </plugin>
        </plugins>
    </build>
</project>
1.8.2 SparkSQL设置catalog配置
然后将iceberg官网中的0.12.1 Spark 3.x runtime Jar jar包放到spark的jars目录下:(不知道不放会不会报错,我先放进去了然后再跑任务的。)

以下操作主要是SparkSQL操作Iceberg,同样Spark中支持两种Catalog的设置:hive和hadoop,Hive Catalog就是iceberg表存储使用Hive默认的数据路径,Hadoop Catalog需要指定Iceberg格式表存储路径。
在SparkSQL代码中通过以下方式来指定使用的Catalog:
val spark: SparkSession = SparkSession.builder().master("local").appName("SparkOperateIceberg")
  //指定hive catalog, catalog名称为hive_prod
  .config("spark.sql.catalog.hive_prod", "org.apache.iceberg.spark.SparkCatalog")
  .config("spark.sql.catalog.hive_prod.type", "hive")
  .config("spark.sql.catalog.hive_prod.uri", "thrift://node1:9083")
  .config("iceberg.engine.hive.enabled", "true")

  //指定hadoop catalog,catalog名称为hadoop_prod
  .config("spark.sql.catalog.hadoop_prod", "org.apache.iceberg.spark.SparkCatalog")
  .config("spark.sql.catalog.hadoop_prod.type", "hadoop")
  .config("spark.sql.catalog.hadoop_prod.warehouse", "hdfs://mycluster/sparkoperateiceberg")
  .getOrCreate()
1.8.3 使用Hive Catalog管理Iceberg表
使用Hive Catalog管理Iceberg表默认数据存储在Hive对应的Warehouse目录下,在Hive中会自动创建对应的Iceberg表,SparkSQL 相当于是Hive客户端,需要额外设置“iceberg.engine.hive.enabled”属性为true,否则在Hive对应的Iceberg格式表中查询不到数据。
- 创建表
//创建表 ,hive_pord:指定catalog名称。default:指定Hive中存在的库。test:创建的iceberg表名。
spark.sql(
      """
        | create table if not exists hive_prod.default.test(id int,name string,age int) using iceberg
      """.stripMargin)

注意:
1)创建表时,表名称为:${catalog名称}.${Hive中库名}.${创建的Iceberg格式表名}
2)表创建之后,可以在Hive中查询到对应的test表,创建的是Hive外表,在对应的Hive warehouse 目录下可以看到对应的数据目录。
- 插入数据
//插入数据
spark.sql(
  """
    |insert into hive_prod.default.test values (1,"zs",18),(2,"ls",19),(3,"ww",20)
""".stripMargin)- 查询数据
//查询数据
spark.sql(
  """
    |select * from hive_prod.default.test
  """.stripMargin).show()
结果如下:

在Hive对应的test表中也能查询到数据:

- 删除表
//删除表,删除表对应的数据不会被删除
spark.sql(
  """
    |drop table hive_prod.default.test
  """.stripMargin)
注意:删除表后,数据会被删除,但是表目录还是存在,如果彻底删除数据,需要把对应的表目录删除。
1.8.4 使用Hadoop Catalog管理Iceberg表
使用Hadoop Catalog管理表,需要指定对应Iceberg存储数据的目录。
- 创建表
//创建表 ,hadoop_prod:指定Hadoop catalog名称。default:指定库名称。test:创建的iceberg表名。
spark.sql(
  """
    | create table if not exists hadoop_prod.default.test(id int,name string,age int) using iceberg
  """.stripMargin)
注意:
1)创建表名称为:${Hadoop Catalog名称}.${随意定义的库名}.${Iceberg格式表名}
2)创建表后,会在hadoop_prod名称对应的目录下创建该表
- 插入数据
//插入数据
spark.sql(
  """
    |insert into hadoop_prod.default.test values (1,"zs",18),(2,"ls",19),(3,"ww",20)
""".stripMargin)- 查询数据
spark.sql(
  """
    |select * from hadoop_prod.default.test
  """.stripMargin).show()
- 创建对应的Hive表映射数据
在Hive表中执行如下建表语句:
CREATE TABLE hdfs_iceberg  (
  id int,
  name string,
  age int
)
STORED BY 'org.apache.iceberg.mr.hive.HiveIcebergStorageHandler'
LOCATION 'hdfs://mycluster/sparkoperateiceberg/default/test'
TBLPROPERTIES ('iceberg.catalog'='location_based_table');
在Hive中查询“hdfs_iceberg”表数据如下:

- 删除表
spark.sql(
  """
    |drop table hadoop_prod.default.test
  """.stripMargin)
注意:删除iceberg表后,数据被删除,对应的库目录存在。
1.8.5 Spark与Iceberg整合DDL操作(我使用的是使用hive的Catalog来管理表)
这里使用Hadoop Catalog 来演示Spark 与Iceberg的DDL操作。
1.8.5.1 CREATE TABLE 创建表
Create table 创建Iceberg表,创建表不仅可以创建普通表还可以创建分区表,再向分区表中插入一批数据时,必须对数据中分区列进行排序,否则会出现文件关闭错误,代码如下:
val spark: SparkSession = SparkSession.builder().master("local").appName("SparkOperateIceberg")
  //指定hadoop catalog,catalog名称为hadoop_prod
  .config("spark.sql.catalog.hadoop_prod", "org.apache.iceberg.spark.SparkCatalog")
  .config("spark.sql.catalog.hadoop_prod.type", "hadoop")
  .config("spark.sql.catalog.hadoop_prod.warehouse", "hdfs://mycluster/sparkoperateiceberg")
  .getOrCreate()

//创建普通表
spark.sql(
  """
    | create table if not exists hadoop_prod.default.normal_tbl(id int,name string,age int) using iceberg
  """.stripMargin)

//创建分区表,以 loc 列为分区字段
spark.sql(
  """
    |create table if not exists hadoop_prod.default.partition_tbl(id int,name string,age int,loc string) using iceberg partitioned by (loc)
  """.stripMargin)

//向分区表中插入数据时,必须对分区列排序,否则报错:java.lang.IllegalStateException: Already closed files for partition:xxx
spark.sql(
  """
    |insert into table hadoop_prod.default.partition_tbl values (1,"zs",18,"beijing"),(3,"ww",20,"beijing"),(2,"ls",19,"shanghai"),(4,"ml",21,"shagnhai")
  """.stripMargin)
spark.sql("select * from hadoop_prod.default.partition_tbl").show()

================================================我的代码===========================================================
def main(args: Array[String]): Unit = {
    val spark: SparkSession = SparkSession
      .builder()
      .appName("SparkOperateIceberg")
      //指定hive catalog, catalog名称为hive_prod
      .config("spark.sql.catalog.hive_prod", "org.apache.iceberg.spark.SparkCatalog")
      .config("spark.sql.catalog.hive_prod.type", "hive")
      .config("spark.sql.catalog.hive_prod.uri", "thrift://master:9083")
      .config("iceberg.engine.hive.enabled", "true")
      .enableHiveSupport()
      .getOrCreate()

    //创建普通表
    spark.sql(
      """
        | create table if not exists hive_prod.iceberg.normal_tbl(id int,name string,age int) using iceberg
  """.stripMargin)

    //创建分区表,以 loc 列为分区字段
    spark.sql(
      """
        |create table if not exists hive_prod.iceberg.partition_tbl(id int,name string,age int,loc string) using iceberg partitioned by (loc)
  """.stripMargin)

    //向分区表中插入数据时,必须对分区列排序,否则报错:java.lang.IllegalStateException: Already closed files for partition:xxx
    //进过测试虽然报错但是还是讲数据插入进去了、
    spark.sql(
      """
        |insert into table hive_prod.iceberg.partition_tbl values
        |(2,"小花",29,"anqing"),
        |(5,"小男",22,"anhui"),
        |(6,"小伟",24,"anhui"),
        |(2,"小郎",19,"chuzhou"),
        |(3,"小申",20,"fuyang"),
        |(4,"小强",21,"fuyang"),
        |(3,"小龙",25,"fuyang"),
        |(1,"小勃",18,"suzhou")
        |
  """.stripMargin)

    //查询数据
    spark.sql("select * from hive_prod.iceberg.partition_tbl").show()

    //spark-submit --master yarn --class com.shujia.spark.iceberg.CatalogDDL spark-1.0.jar
  }
查询结果如下:


创建Iceberg分区时,还可以通过一些转换表达式对timestamp列来进行转换,创建隐藏分区 ,常用的转换表达式有如下几种:
- years(ts):按照年分区
//创建分区表 partition_tbl1 ,指定分区为year
spark.sql(
  """
    |create table if not exists hadoop_prod.default.partition_tbl1(id int ,name string,age int,regist_ts timestamp) using iceberg
    |partitioned by (years(regist_ts))
  """.stripMargin)

//向表中插入数据,注意,插入的数据需要提前排序,必须排序,只要是相同日期数据写在一起就可以
//(1,'zs',18,1608469830) --"2020-12-20 21:10:30"
//(2,'ls',19,1634559630) --"2021-10-18 20:20:30"
//(3,'ww',20,1603096230) --"2020-10-19 16:30:30"
//(4,'ml',21,1639920630) --"2021-12-19 21:30:30"
//(5,'tq',22,1608279630) --"2020-12-18 16:20:30"
//(6,'gb',23,1576843830) --"2019-12-20 20:10:30"
spark.sql(
  """
    |insert into hadoop_prod.default.partition_tbl1 values
    |(1,'zs',18,cast(1608469830 as timestamp)),
    |(3,'ww',20,cast(1603096230 as timestamp)),
    |(5,'tq',22,cast(1608279630 as timestamp)),
    |(2,'ls',19,cast(1634559630 as timestamp)),
    |(4,'ml',21,cast(1639920630 as timestamp)),
    |(6,'gb',23,cast(1576843830 as timestamp))
  """.stripMargin)

//查询结果
spark.sql(
  """
    |select * from hadoop_prod.default.partition_tbl1
  """.stripMargin).show()

//我的代码
  def main(args: Array[String]): Unit = {

    val spark: SparkSession = SparkSession
      .builder()
      .appName("SparkOperateIceberg")
      //指定hive catalog, catalog名称为hive_prod
      .config("spark.sql.catalog.hive_prod", "org.apache.iceberg.spark.SparkCatalog")
      .config("spark.sql.catalog.hive_prod.type", "hive")
      .config("spark.sql.catalog.hive_prod.uri", "thrift://master:9083")
      .config("iceberg.engine.hive.enabled", "true")
      .enableHiveSupport()
      .getOrCreate()

    //创建分区表 partition_tbl1 ,指定分区为year
    spark.sql(
      """
        |create table if not exists hive_prod.iceberg.hidepartition_tbl(id int ,name string,age int,regist_ts timestamp) using iceberg
        |partitioned by (years(regist_ts))
  """.stripMargin)

    //向表中插入数据,注意,插入的数据需要提前排序,必须排序,只要是相同日期数据写在一起就可以
    //(1,'zs',18,1608469830) --"2020-12-20 21:10:30"
    //(2,'ls',19,1634559630) --"2021-10-18 20:20:30"
    //(3,'ww',20,1603096230) --"2020-10-19 16:30:30"
    //(4,'ml',21,1639920630) --"2021-12-19 21:30:30"
    //(5,'tq',22,1608279630) --"2020-12-18 16:20:30"
    //(6,'gb',23,1576843830) --"2019-12-20 20:10:30"
    spark.sql(
      """
        |insert into hive_prod.iceberg.hidepartition_tbl values
        |(1,'zs',18,cast(1608469830 as timestamp)),
        |(3,'ww',20,cast(1603096230 as timestamp)),
        |(5,'tq',22,cast(1608279630 as timestamp)),
        |(2,'ls',19,cast(1634559630 as timestamp)),
        |(4,'ml',21,cast(1639920630 as timestamp)),
        |(6,'gb',23,cast(1576843830 as timestamp))
  """.stripMargin)

    //查询结果[['m
    spark.sql(
      """
        |select * from hive_prod.iceberg.hidepartition_tbl
  """.stripMargin).show()

    //spark-submit --master yarn --class com.shujia.spark.iceberg.HidePartition spark-1.0.jar
  }
数据结果如下:


在HDFS中是按照年进行分区 :


- months(ts):按照“年-月”月级别分区
//创建分区表 partition_tbl2 ,指定分区为months,会按照“年-月”分区
spark.sql(
  """
    |create table if not exists hadoop_prod.default.partition_tbl2(id int ,name string,age int,regist_ts timestamp) using iceberg
    |partitioned by (months(regist_ts))
  """.stripMargin)

//向表中插入数据,注意,插入的数据需要提前排序,必须排序,只要是相同日期数据写在一起就可以
//(1,'zs',18,1608469830) --"2020-12-20 21:10:30"
//(2,'ls',19,1634559630) --"2021-10-18 20:20:30"
//(3,'ww',20,1603096230) --"2020-10-19 16:30:30"
//(4,'ml',21,1639920630) --"2021-12-19 21:30:30"
//(5,'tq',22,1608279630) --"2020-12-18 16:20:30"
//(6,'gb',23,1576843830) --"2019-12-20 20:10:30"
spark.sql(
  """
    |insert into hadoop_prod.default.partition_tbl2 values
    |(1,'zs',18,cast(1608469830 as timestamp)),
    |(5,'tq',22,cast(1608279630 as timestamp)),
    |(2,'ls',19,cast(1634559630 as timestamp)),
    |(3,'ww',20,cast(1603096230 as timestamp)),
    |(4,'ml',21,cast(1639920630 as timestamp)),
    |(6,'gb',23,cast(1576843830 as timestamp))
  """.stripMargin)

//查询结果
spark.sql(
  """
    |select * from hadoop_prod.default.partition_tbl2
  """.stripMargin).show()
数据结果如下:

在HDFS中是按照 “年-月” 进行分区 :

- days(ts)或者date(ts):按照“年-月-日”天级别分区
//创建分区表 partition_tbl3 ,指定分区为 days,会按照“年-月-日”分区
spark.sql(
  """
    |create table if not exists hadoop_prod.default.partition_tbl3(id int ,name string,age int,regist_ts timestamp) using iceberg
    |partitioned by (days(regist_ts))
  """.stripMargin)

//向表中插入数据,注意,插入的数据需要提前排序,必须排序,只要是相同日期数据写在一起就可以
//(1,'zs',18,1608469830) --"2020-12-20 21:10:30"
//(2,'ls',19,1634559630) --"2021-10-18 20:20:30"
//(3,'ww',20,1603096230) --"2020-10-19 16:30:30"
//(4,'ml',21,1639920630) --"2021-12-19 21:30:30"
//(5,'tq',22,1608279630) --"2020-12-18 16:20:30"
//(6,'gb',23,1576843830) --"2019-12-20 20:10:30"
spark.sql(
  """
    |insert into hadoop_prod.default.partition_tbl3 values
    |(1,'zs',18,cast(1608469830 as timestamp)),
    |(5,'tq',22,cast(1608279630 as timestamp)),
    |(2,'ls',19,cast(1634559630 as timestamp)),
    |(3,'ww',20,cast(1603096230 as timestamp)),
    |(4,'ml',21,cast(1639920630 as timestamp)),
    |(6,'gb',23,cast(1576843830 as timestamp))
  """.stripMargin)

//查询结果
spark.sql(
  """
    |select * from hadoop_prod.default.partition_tbl3
  """.stripMargin).show()
数据结果如下:

在HDFS中是按照 “年-月-日” 进行分区 :

- hours(ts)或者date_hour(ts):按照“年-月-日-时”小时级别分区
//创建分区表 partition_tbl4 ,指定分区为 hours,会按照“年-月-日-时”分区
spark.sql(
  """
    |create table if not exists hadoop_prod.default.partition_tbl4(id int ,name string,age int,regist_ts timestamp) using iceberg
    |partitioned by (hours(regist_ts))
  """.stripMargin)

//向表中插入数据,注意,插入的数据需要提前排序,必须排序,只要是相同日期数据写在一起就可以
//(1,'zs',18,1608469830) --"2020-12-20 21:10:30"
//(2,'ls',19,1634559630) --"2021-10-18 20:20:30"
//(3,'ww',20,1603096230) --"2020-10-19 16:30:30"
//(4,'ml',21,1639920630) --"2021-12-19 21:30:30"
//(5,'tq',22,1608279630) --"2020-12-18 16:20:30"
//(6,'gb',23,1576843830) --"2019-12-20 20:10:30"
spark.sql(
  """
    |insert into hadoop_prod.default.partition_tbl4 values
    |(1,'zs',18,cast(1608469830 as timestamp)),
    |(5,'tq',22,cast(1608279630 as timestamp)),
    |(2,'ls',19,cast(1634559630 as timestamp)),
    |(3,'ww',20,cast(1603096230 as timestamp)),
    |(4,'ml',21,cast(1639920630 as timestamp)),
    |(6,'gb',23,cast(1576843830 as timestamp))
  """.stripMargin)

//查询结果
spark.sql(
  """
    |select * from hadoop_prod.default.partition_tbl4
  """.stripMargin).show()
数据结果如下:

在HDFS中是按照 “年-月-日-时” 进行分区 :

Iceberg支持的时间分区目前和将来只支持UTC,UTC是国际时,UTC+8就是国际时加八小时,是东八区时间,也就是北京时间,所以我们看到上面分区时间与数据时间不一致。
除了以上常用的时间隐藏分区外,Iceberg还支持bucket(N,col)分区,这种分区方式可以按照某列的hash值与N取余决定数据去往的分区。truncate(L,col),这种隐藏分区可以将字符串列截取L长度,相同的数据会被分到相同分区中。
1.8.5.2 CREATE TAEBL ... AS SELECT
Iceberg支持“create table .... as select ”语法,可以从查询语句中创建一张表,并插入对应的数据,操作如下:
- 创建表hadoop_prod.default.mytbl,并插入数据
val spark: SparkSession = SparkSession.builder().master("local").appName("SparkOperateIceberg")
  //指定hadoop catalog,catalog名称为hadoop_prod
  .config("spark.sql.catalog.hadoop_prod", "org.apache.iceberg.spark.SparkCatalog")
  .config("spark.sql.catalog.hadoop_prod.type", "hadoop")
  .config("spark.sql.catalog.hadoop_prod.warehouse", "hdfs://mycluster/sparkoperateiceberg")
  .getOrCreate()

//创建普通表
spark.sql(
  """
    | create table hadoop_prod.default.mytbl(id int,name string,age int) using iceberg
  """.stripMargin)

//向表中插入数据
spark.sql(
  """
    |insert into table hadoop_prod.default.mytbl values (1,"zs",18),(3,"ww",20),(2,"ls",19),(4,"ml",21)
  """.stripMargin)

//查询数据
spark.sql("select * from hadoop_prod.default.mytbl").show()- 使用“create table ... as select”语法创建表mytal2并查询
spark.sql(
  """
    |create table hadoop_prod.default.mytbl2 using iceberg as select id,name,age from hadoop_prod.default.mytbl
  """.stripMargin)
spark.sql(
  """
    |select * from hadoop_prod.default.mytbl2
  """.stripMargin).show()
结果如下:

我的测试:成功
测试代码:
def main(args: Array[String]): Unit = {

    /**
     *
     * Iceberg支持“create table .... as select ”语法,可以从查询语句中创建一张表,并插入对应的数据,操作如下
     *
     *
     */

    val spark: SparkSession = SparkSession
      .builder()
      .appName("SparkOperateIceberg")
      //指定hive catalog, catalog名称为hive_prod
      .config("spark.sql.catalog.hive_prod", "org.apache.iceberg.spark.SparkCatalog")
      .config("spark.sql.catalog.hive_prod.type", "hive")
      .config("spark.sql.catalog.hive_prod.uri", "thrift://master:9083")
      .config("iceberg.engine.hive.enabled", "true")
      .enableHiveSupport()
      .getOrCreate()

    //创建普通表
    spark.sql(
      """
        |
        | create  table if not exists hive_prod.iceberg.mytbl(id int,name string,age int) using iceberg
        |
  """.stripMargin)

    //向表中插入数据
    spark.sql(
      """
        |insert into table hive_prod.iceberg.mytbl values
        |(5,"李逵",18),(6,"宋江",20),(7,"鲁智深",19),(8,"李青",21)
        |
        |
  """.stripMargin)

    //查询数据
    spark.sql("select * from hive_prod.iceberg.mytbl").show()


    /**
     * 使用“create table ... as select”语法创建表mytal2并查询
     *
     */

    spark.sql(
      """
        |create table hive_prod.iceberg.mytbl2 using iceberg as select id,name,age from hive_prod.iceberg.mytbl
        |
  """.stripMargin)
    spark.sql(
      """
        |
        |select * from hive_prod.iceberg.mytbl2
        |
  """.stripMargin).show()

    //spark 提交任务的命令
    //spark-submit --master yarn --class com.shujia.spark.iceberg.CreateTAsSelect spark-1.0.jar

  }
1.8.5.3 REPLACE TABLE ... AS SELECT
Iceberg支持“replace table .... as select ”语法,可以从查询语句中重建一张表,并插入对应的数据,操作如下:
- 创建表“hadoop_prod.default.mytbl3”,并插入数据、展示
spark.sql(
  """
    |create table hadoop_prod.default.mytbl3 (id int,name string,loc string,score int) using iceberg
  """.stripMargin)
spark.sql(
  """
    |insert into table hadoop_prod.default.mytbl3 values (1,"zs","beijing",100),(2,"ls","shanghai",200)
  """.stripMargin)
spark.sql(
  """
    |select * from hadoop_prod.default.mytbl3
  """.stripMargin).show
- 重建表“hadoop_prod.default.mytbl3”,并插入对应数据
spark.sql(
  """
    |replace table hadoop_prod.default.mytbl2 using iceberg as select * from hadoop_prod.default.mytbl3
  """.stripMargin)

spark.sql(
  """
    |select * from hadoop_prod.default.mytbl2
  """.stripMargin).show()
我的代码如下:测试失败!
def main(args: Array[String]): Unit = {
      /**
       *
       * Iceberg支持“replace table .... as select ”语法,可以从查询语句中重建一张表,并插入对应的数据,操作如下:
       *
       */

      val spark: SparkSession = SparkSession
        .builder()
        .appName("SparkOperateIceberg")
        //指定hive catalog, catalog名称为hive_prod
        .config("spark.sql.catalog.hive_prod", "org.apache.iceberg.spark.SparkCatalog")
        .config("spark.sql.catalog.hive_prod.type", "hive")
        .config("spark.sql.catalog.hive_prod.uri", "thrift://master:9083")
        .config("iceberg.engine.hive.enabled", "true")
        .enableHiveSupport()
        .getOrCreate()

      //创建普通表
      spark.sql(
        """
          |create table if not exists hive_prod.iceberg.mytb3 (id int,name string,loc string,score int) using iceberg
          |
  """.stripMargin)
      spark.sql(
        """
          |insert into hive_prod.iceberg.mytb3 values
          |(1,"宋江","beijing",100),(2,"花和尚","shanghai",200)
          |,(3,"杨志","anhui",600),(2,"扈三娘","fuyang",800)
          |,(2,"时迁","anqing",200),(2,"牛二","yunnan",300)
          |
          |
  """.stripMargin)
      spark.sql(
        """
          |select * from hive_prod.iceberg.mytb3
          |
  """.stripMargin).show

      spark.sql(
        """
          |
          |replace table hive_prod.iceberg.mytb4 using iceberg as select * from hive_prod.iceberg.mytb3
          |
  """.stripMargin)

      spark.sql(
        """
          |select * from hive_prod.iceberg.mytb4
          |
  """.stripMargin).show()


      //spark 提交任务的命令
      //spark-submit --master yarn --class com.shujia.spark.iceberg.ReplaceTableAsSelect spark-1.0.jar


    /**
     *
     * 测试失败
     * 报错:
     * Exception in thread "main" org.apache.spark.sql.catalyst.analysis.CannotReplaceMissingTableException:
     * Table iceberg.mytb4 cannot be replaced as it did not exist. Use CREATE OR REPLACE TABLE to create the table.
     *
     */

    }
1.8.5.4 DROP TABLE
删除iceberg表时直接执行:“drop table xxx”语句即可,删除表时,表数据会被删除,但是库目录存在。
//删除表
spark.sql(
  """
    |drop table hadoop_prod.default.mytbl
  """.stripMargin)
我的测试:
测试代码如下:
def main(args: Array[String]): Unit = {

    /**
     *
     * 删除iceberg表时直接执行:“drop table xxx”语句即可,删除表时,表数据会被删除,但是库目录存在。
     * 测试删除一张iceberg的表
     *
     */

      val spark: SparkSession = SparkSession
        .builder()
        .appName("SparkOperateIceberg")
        //指定hive catalog, catalog名称为hive_prod
        .config("spark.sql.catalog.hive_prod", "org.apache.iceberg.spark.SparkCatalog")
        .config("spark.sql.catalog.hive_prod.type", "hive")
        .config("spark.sql.catalog.hive_prod.uri", "thrift://master:9083")
        .config("iceberg.engine.hive.enabled", "true")
        .enableHiveSupport()
        .getOrCreate()

      spark.sql(
        """
          |
          |drop table hive_prod.iceberg.mytbl2
          |
          |""".stripMargin)

      //删除之后,再次查询表   Table or view not found: hive_prod.iceberg.partition_tbl
      //spark.sql("select * from hive_prod.iceberg.partition_tbl").show()
    /**
     * 将表删除之后,在spark-sql中查不到表,但是在hdfs中还能查到表目录,里面信息包括data和metadata但是
     * 在其中查不到任何数据
     *
     */
    //spark-submit --master yarn --class com.shujia.spark.iceberg.CatalogUpDateT spark-1.0.jar

  }
1.8.5.5 ALTER TABLE
Iceberg的alter操作在Spark3.x版本中支持,alter一般包含以下操作:
- 添加、删除列
添加列操作:ALTER TABLE ... ADD COLUMN
删除列操作:ALTER TABLE ... DROP COLUMN
//1.创建表test,并插入数据、查询
spark.sql(
  """
    |create table hadoop_prod.default.test(id int,name string,age int) using iceberg
  """.stripMargin)
spark.sql(
  """
    |insert into table hadoop_prod.default.test values (1,"zs",18),(2,"ls",19),(3,"ww",20)
  """.stripMargin)
spark.sql(
  """
    | select * from hadoop_prod.default.test
  """.stripMargin).show()


//2.添加字段,给 test表增加 gender 列、loc列
spark.sql(
  """
    |alter table hadoop_prod.default.test add column gender string,loc string
  """.stripMargin)

//3.删除字段,给test 表删除age 列
spark.sql(
  """
    |alter table hadoop_prod.default.test drop column age
  """.stripMargin)

//4.查看表test数据
spark.sql(
  """
    |select * from hadoop_prod.default.test
  """.stripMargin).show()
最终表展示的列少了age列,多了gender、loc列:

- 重命名列
重命名列语法:ALTER TABLE ... RENAME COLUMN,操作如下:
//5.重命名列
spark.sql(
  """
    |alter table hadoop_prod.default.test rename column gender to xxx
    |
  """.stripMargin)
spark.sql(
  """
    |select * from hadoop_prod.default.test
  """.stripMargin).show()
最终表展示的列 gender列变成了xxx列:

我的测试:
测试代码如下:
/**
* Iceberg的alter操作在Spark3.x版本中支持,alter一般包含以下操作:添加、删除列
* 添加列操作:ALTER TABLE ... ADD COLUMN
* 删除列操作:ALTER TABLE ... DROP COLUMN
*
*/
val spark: SparkSession = SparkSession
.builder()
.appName("SparkOperateIceberg")
//指定hive catalog, catalog名称为hive_prod
.config("spark.sql.catalog.hive_prod", "org.apache.iceberg.spark.SparkCatalog")
.config("spark.sql.catalog.hive_prod.type", "hive")
.config("spark.sql.catalog.hive_prod.uri", "thrift://master:9083")
.config("iceberg.engine.hive.enabled", "true")
.enableHiveSupport()
.getOrCreate()
//1.创建表column1,并插入数据、查询
spark.sql(
"""
|create table hive_prod.iceberg.column1(id int,name string,age int) using iceberg
|
""".stripMargin)
//插入数据
spark.sql(
"""
|insert into table hive_prod.iceberg.column1 values (1,"小红",18),(2,"小蓝",19),(3,"小紫",20)
|
""".stripMargin)
//查询数据
spark.sql(
"""
| select * from hive_prod.iceberg.column1
|
""".stripMargin).show()
//2.添加字段,给 test表增加 gender 列、loc列 (id,name,age,gender,loc)
spark.sql(
"""
|alter table hive_prod.iceberg.column1 add column gender string,loc string
|
""".stripMargin)
//执行增加列之后 查询数据
spark.sql(
"""
| select * from hive_prod.iceberg.column1
|
""".stripMargin).show()
//3.删除字段,column1 表删除age 列 (id,name,gender,loc)
spark.sql(
"""
|
|alter table hive_prod.iceberg.column1 drop column age
|
""".stripMargin)
//执行删除列之后 查询数据
spark.sql(
"""
|select * from hive_prod.iceberg.column1
|
""".stripMargin).show()
//给执行添加列和删除列之后的表 插入数据 此时的 (id,name,gender,loc)
spark.sql(
"""
|insert into table hive_prod.iceberg.column1 values
|(4,"小花","女","anhui"),(5,"小草","男","fuyang"),(6,"小心","女","tianjing")
|
""".stripMargin)
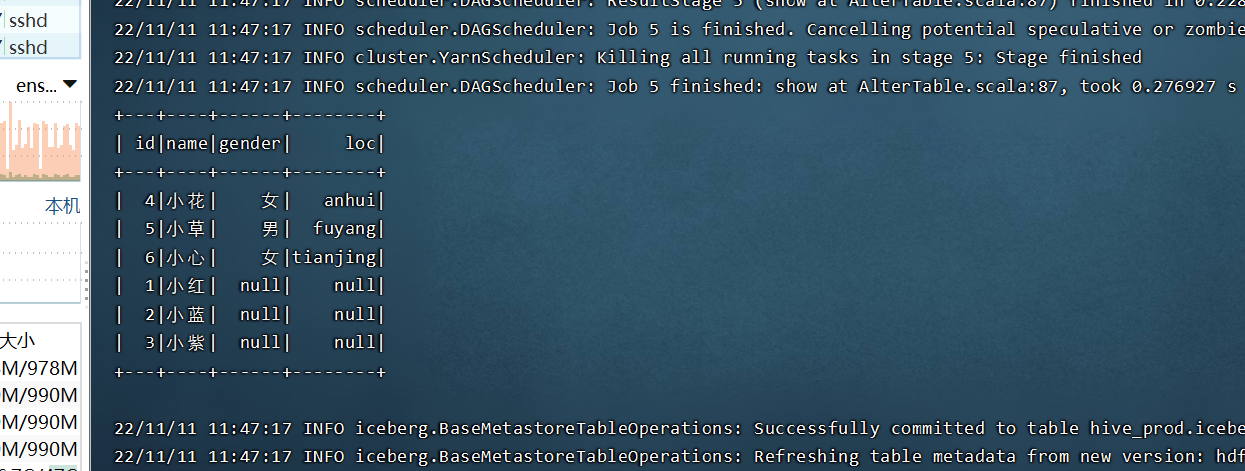
//4.在表中执行添加数据之后查询 查看表column1数据
spark.sql(
"""
|
|select * from hive_prod.iceberg.column1
|
|
""".stripMargin).show()
/*
* 重命名列重命名列语法:ALTER TABLE ... RENAME COLUMN,操作如下:
*/
//5.重命名列
spark.sql(
"""
|alter table hive_prod.iceberg.column1 rename column loc to address
|
""".stripMargin)
spark.sql(
"""
|select * from hive_prod.iceberg.column1
""".stripMargin).show()
//spark 提交任务的命令
//spark-submit --master yarn --class com.shujia.spark.iceberg.AlterTable spark-1.0.jar
}- 查询插入的数据

- 增加两列(由于没有赋值,所以值为空)

- 删除 age 列

- 给剩下的列赋值


 4568
4568


 被折叠的 条评论
为什么被折叠?
被折叠的 条评论
为什么被折叠?
 到【灌水乐园】发言


