


前言
Ollama安装使用通过Ollama本地部署DeepSeek R1以及简单使用的教程(超详细)
大模型发展可能到了接近成熟的程度了,但是业界的重点肯定不会仅仅就放在大模型上的,还有就是业务和应用。
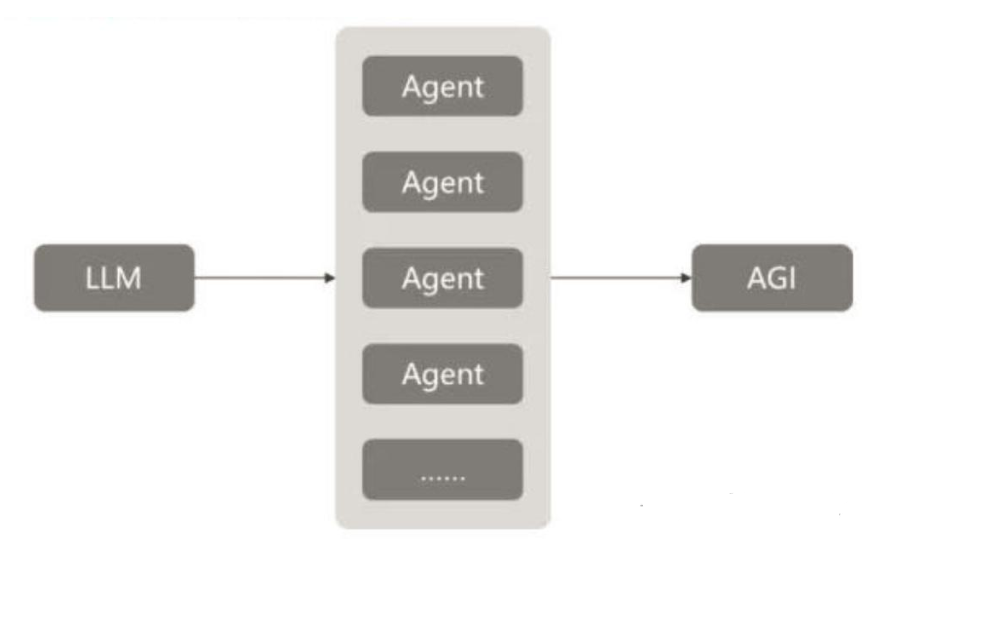
大模型如果投入应用,其中很重要的配套技术叫AI Agents,就是智能体。AI Agent(也称人工智能代理)是一种能够感知环境、进行决策和执行动作的智能实体。智能体像人一样,它有记忆、有逻辑分析能力、有任务的拆解能力、问题的拆解能力和最后综合回来统一解决问题的能力。
AI Agents竞争就是未来很重要的方向。我们大部分人都优势应该不是大模型,但可以是AI Agents,也就是在配套技术上面有很多的优势,才能使得他做任何一个业务的完成度极大地提升了。
现在,Agent 基本就等于 “大模型 + 插件 + 执行流程 / 思维链”,分别会对应控制端 (Brain / 大脑)、感知端 (Preception)、执行端 (Action) 环节:
Spring AI
尽管Python最近成为了编程语言的首选,但是Java在人工智能领域的地位同样不可撼动,得益于强大的Spring框架。随着人工智能技术的快速发展,我们正处于一个创新不断涌现的时代。从智能语音助手到复杂的自然语言处理系统,人工智能已经成为了现代生活和工作中不可或缺的一部分。在这样的背景下,Spring AI 项目迎来了发展的机遇。尽管该项目汲取了Python项目如LangChain和LlamaIndex的灵感,但Spring AI并不是简单的移植。该项目的初衷在于推进生成式人工智能应用程序的发展,使其不再局限于Python开发者。
Spring AI 的核心理念是提供高度抽象化的组件,作为开发AI应用程序的基础。这些抽象化组件具备多种实现,使得开发者能够以最少的代码改动便捷地交换和优化功能模块。
具体而言,Spring AI 提供了支持多种主流模型提供商的功能,包括OpenAI、Microsoft、Amazon、Google和Hugging Face。支持的模型类型涵盖了从聊天机器人到文本生成、图像处理、语音识别等多个领域。而其跨模型提供商的可移植API设计,不仅支持同步和流式接口,还提供了针对特定模型功能的灵活选项。
此外,Spring AI 还支持将AI模型输出映射为POJO,以及与主流矢量数据库提供商(如Apache Cassandra、Azure Vector Search、MongoDB Atlas等)无缝集成的能力。其功能不仅局限于模型本身,还包括了数据工程中的ETL框架和各种便利的函数调用,使得开发AI应用程序变得更加高效和可靠。
Spring Ai官网:https://spring.io/projects/spring-ai
Mcp(Model Context Protocol)
什么是Mcp?
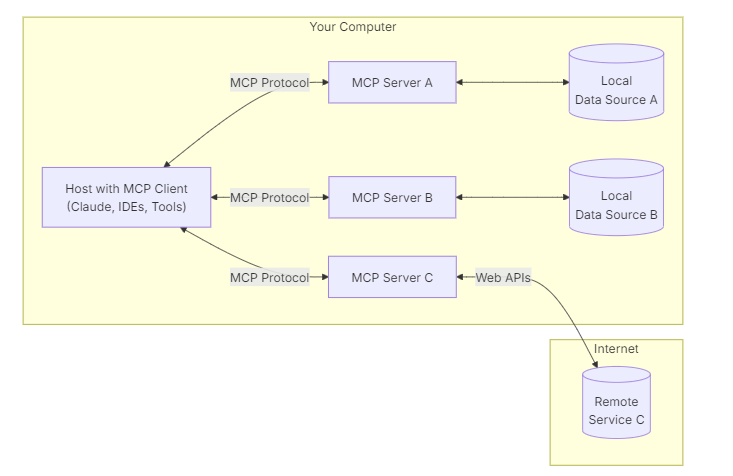
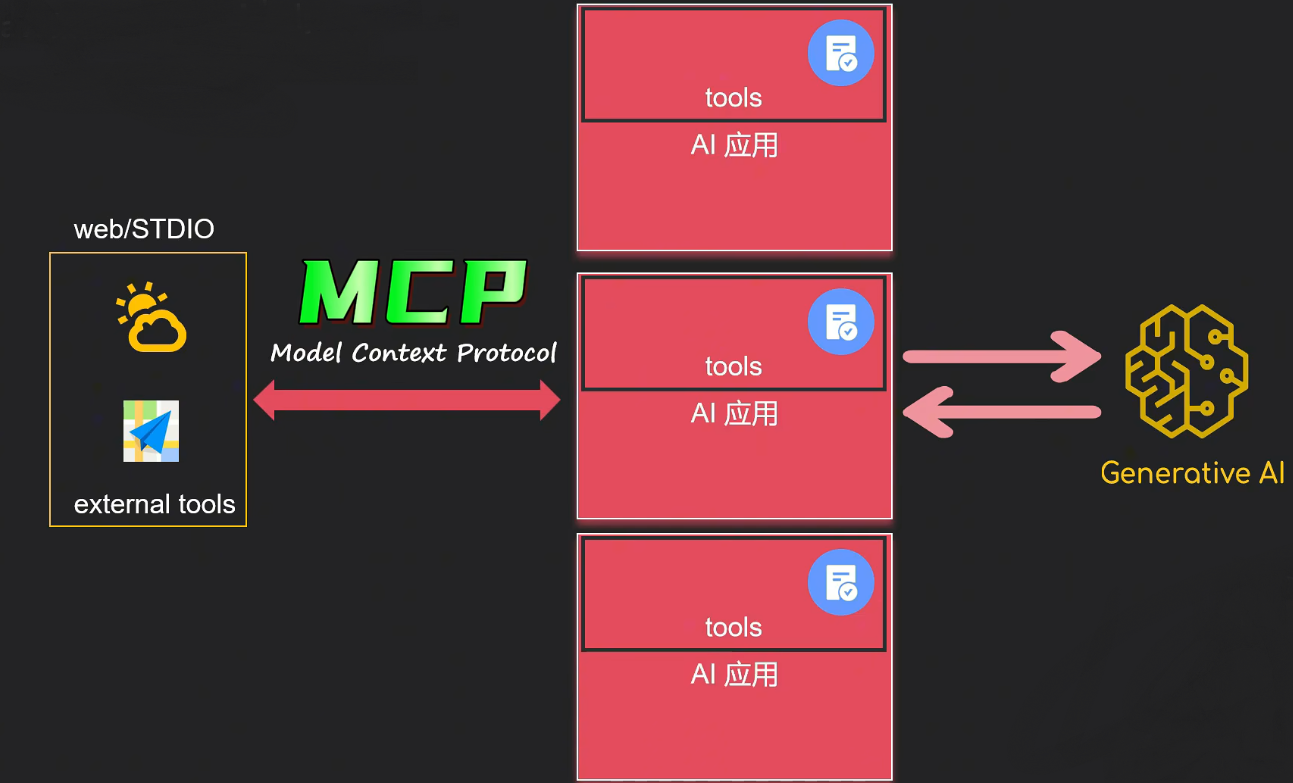
Model Context Protocol 是Anthropic 于2024年11月重磅开源的「模型上下文协议」MCP。其是一种开放的通信协议,是人工智能领域的 “USB 接口”,在大模型和其他数据源(数据、工具、开发环境等)之间建立了双向、并且更加安全的连接。
Mcp 将LLM的数据孤岛被彻底打破,LLM应用和外部数据源、工具都将无缝集成。目标是实现LLM应用程序与外部数据源和工具之间的无缝集成。
官方文档:https://modelcontextprotocol.io/introduction
快速实战
Spring AI
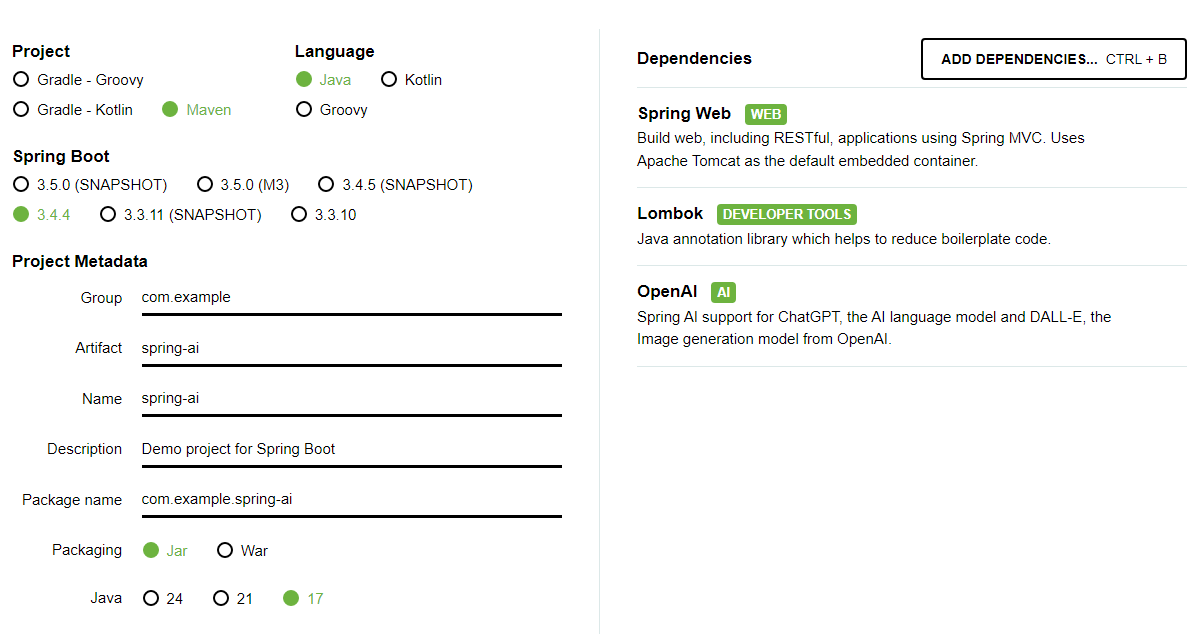
当我们开始时,首先需要创建一个项目结构。我们可以前往官方网站,快速生成Spring AI的依赖并创建项目。
IDEA配置方式不过多介绍,参考:https://blog.csdn.net/qq_15437629/article/details/131912201
Maven 仓库配置在pom.xml中添加以下内容:
<repositories>
  <repository>
    <id>spring-milestones</id>
    <name>Spring Milestones</name>
    <url>https://repo.spring.io/milestone</url>
    <snapshots>
      <enabled>false</enabled>
    </snapshots>
  </repository>
  <repository>
    <id>spring-snapshots</id>
    <name>Spring Snapshots</name>
    <url>https://repo.spring.io/snapshot</url>
    <releases>
      <enabled>false</enabled>
    </releases>
  </repository>
</repositories>
导入 Spring AI BOM
<dependencyManagement>
    <dependencies>
        <dependency>
            <groupId>org.springframework.ai</groupId>
            <artifactId>spring-ai-bom</artifactId>
            <version>1.0.0-SNAPSHOT</version>
            <type>pom</type>
            <scope>import</scope>
        </dependency>
    </dependencies>
</dependencyManagement>
添加 OpenAI 聊天
<dependency>
<groupId>org.springframework.ai</groupId>
<artifactId>spring-ai-openai-spring-boot-starter</artifactId>
</dependency>
使用 OpenAI 创建 API 来访问 ChatGPT 模型。在OpenAI 注册页面创建账户并在API 密钥页面生成令牌。如果需要其他AI,则添加对应的starter即可,如Ollama:
<dependency>
    <groupId>org.springframework.ai</groupId>
    <artifactId>spring-ai-ollama-spring-boot-starter</artifactId>
</dependency>
Ollama Chat 示例:
https://docs.spring.io/spring-ai/reference/api/chat/ollama-chat.html
package com.example.spring_ai;
import org.springframework.ai.chat.messages.UserMessage;
import org.springframework.ai.chat.model.ChatResponse;
import org.springframework.ai.chat.prompt.Prompt;
import org.springframework.ai.ollama.OllamaChatModel;
import org.springframework.beans.factory.annotation.Autowired;
import org.springframework.web.bind.annotation.GetMapping;
import org.springframework.web.bind.annotation.RequestParam;
import org.springframework.web.bind.annotation.RestController;
import reactor.core.publisher.Flux;
import java.util.Map;
@RestController
public class ChatController {
private final OllamaChatModel chatModel;
@Autowired
public ChatController(OllamaChatModel chatModel) {
this.chatModel = chatModel;
}
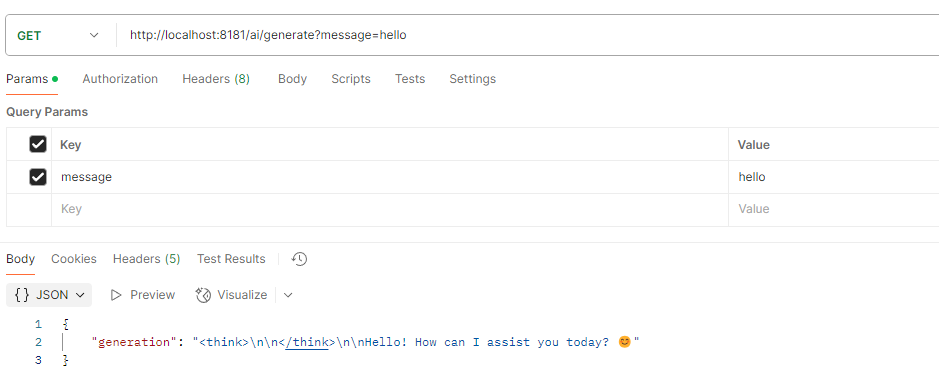
@GetMapping("/ai/generate")
public Map<String,String> generate(@RequestParam(value = "message", defaultValue = "Tell me a joke") String message) {
return Map.of("generation", this.chatModel.call(message));
}
@GetMapping("/ai/generateStream")
public Flux<ChatResponse> generateStream(@RequestParam(value = "message", defaultValue = "Tell me a joke") String message) {
Prompt prompt = new Prompt(new UserMessage(message));
return this.chatModel.stream(prompt);
}
}
application.yml:
spring:
  application:
    name: spring-ai
  ai:
    ollama:
      base-url: http://localhost:11434
      chat:
        options:
          model: qwen2.5:3b
pom.xml:
<?xml version="1.0" encoding="UTF-8"?>
<project xmlns="http://maven.apache.org/POM/4.0.0" xmlns:xsi="http://www.w3.org/2001/XMLSchema-instance"
    xsi:schemaLocation="http://maven.apache.org/POM/4.0.0 https://maven.apache.org/xsd/maven-4.0.0.xsd">
    <modelVersion>4.0.0</modelVersion>
    <parent>
        <groupId>org.springframework.boot</groupId>
        <artifactId>spring-boot-starter-parent</artifactId>
        <version>3.4.4</version>
        <relativePath/> <!-- lookup parent from repository -->
    </parent>
    <groupId>com.example</groupId>
    <artifactId>spring-ai</artifactId>
    <version>0.0.1-SNAPSHOT</version>
    <name>spring-ai</name>
    <description>Demo project for Spring Boot</description>
    <url/>
    <licenses>
        <license/>
    </licenses>
    <developers>
        <developer/>
    </developers>
    <scm>
        <connection/>
        <developerConnection/>
        <tag/>
        <url/>
    </scm>
    <properties>
        <java.version>17</java.version>
        <spring-ai.version>1.0.0-M6</spring-ai.version> <!-- 或最新稳定版 -->
    </properties>
    <dependencies>
        <dependency>
            <groupId>org.springframework.boot</groupId>
            <artifactId>spring-boot-starter-web</artifactId>
        </dependency>
        <dependency>
            <groupId>org.springframework.ai</groupId>
            <artifactId>spring-ai-ollama-spring-boot-starter</artifactId>
        </dependency>
        <dependency>
            <groupId>org.projectlombok</groupId>
            <artifactId>lombok</artifactId>
            <optional>true</optional>
        </dependency>
        <dependency>
            <groupId>org.springframework.boot</groupId>
            <artifactId>spring-boot-starter-test</artifactId>
            <scope>test</scope>
        </dependency>
    </dependencies>
    <dependencyManagement>
        <dependencies>
            <dependency>
                <groupId>org.springframework.ai</groupId>
                <artifactId>spring-ai-bom</artifactId>
                <version>${spring-ai.version}</version>
                <type>pom</type>
                <scope>import</scope>
            </dependency>
        </dependencies>
    </dependencyManagement>

    <build>
        <plugins>
            <plugin>
                <groupId>org.apache.maven.plugins</groupId>
                <artifactId>maven-compiler-plugin</artifactId>
                <configuration>
                    <annotationProcessorPaths>
                        <path>
                            <groupId>org.projectlombok</groupId>
                            <artifactId>lombok</artifactId>
                        </path>
                    </annotationProcessorPaths>
                </configuration>
            </plugin>
            <plugin>
                <groupId>org.springframework.boot</groupId>
                <artifactId>spring-boot-maven-plugin</artifactId>
                <configuration>
                    <excludes>
                        <exclude>
                            <groupId>org.projectlombok</groupId>
                            <artifactId>lombok</artifactId>
                        </exclude>
                    </excludes>
                </configuration>
            </plugin>
        </plugins>
    </build>

</project>
测试结果:
Spring AI 集成 MCP 协议

对于 Mcp Client,Spring AI 提供了如下两个 Starter 集成 MCP Client;
spring-ai-mcp-client-spring-boot-starter: 实现基于 STDIO 和 HTTP 的 SSE 传输协议的 Mcp Client
spring-ai-mcp-client-webflux-spring-boot-starter: 实现基于 WebFlux 的 SSE 传输协议的 Mcp Client
对于 Mcp Server, Spring AI 提供了如下三个 Starter 集成 Mcp Server:
spring-ai-mcp-server-spring-boot-starter: 实现支持 STDIO 传输协议的 Mcp Server
spring-ai-mcp-server-webmvc-spring-boot-starter: 实现基于 webmvc 的 SSE 传输协议的 Mcp Server
spring-ai-mcp-server-webflux-spring-boot-starter: 实现基于 webflux 的 SSE 传输协议的 Mcp Server
Spring Mcp Client 示例
https://docs.spring.io/spring-ai/reference/api/mcp/mcp-client-boot-starter-docs.html
基于SpringAI 1.0.0-M6实现:
对于 Mcp Client,Spring AI 提供了如下两个 Starter 集成 MCP Client;
spring-ai-mcp-client-spring-boot-starter: 实现基于 STDIO 和 HTTP 的 SSE 传输协议的 Mcp Client
spring-ai-mcp-client-webflux-spring-boot-starter: 实现基于 WebFlux 的 SSE 传输协议的 Mcp Client
pom依赖:
        <dependency>
            <groupId>org.springframework.ai</groupId>
            <artifactId>spring-ai-mcp-client-spring-boot-starter</artifactId>
        </dependency>
配置文件:
spring:
  application:
    name: spring-ai
  ai:
    ollama:
      base-url: http://localhost:11434
      chat:
        options:
          model: qwen2.5:3b
    mcp:
      client:
        enabled: true
        name: mcp-client
        version: 1.0.0
        type: SYNC
        sse-message-endpoint: /mcp/stream
        request-timeout: 30s
        stdio:
          servers-configuration: classpath:/mcp-servers-config.json

server:
  port: 8181
mcp-servers-config.json:
{
  "mcpServers": {
    "filesystem": {
      "command": "D:\\\\node_js\\\\npx.cmd",
      "args": [
        "-y",
        "@modelcontextprotocol/server-filesystem",
        "."
      ]
    }
  }
}
1,服务包说明:
@modelcontextprotocol/server-filesystem 是 MCP 协议中用于对接文件系统的标准化服务模块,其配置通过 Node.js 环境快速启动,使 LLM 能够安全、可控地操作本地文件资源。
MCP 生态中还有其他类型的服务包,例如:
@modelcontextprotocol/server-postgres:支持数据库查询;
@modelcontextprotocol/server-http:集成 RESTful API。
2,npx
本地需要提前安装配置npx和uvx。npx是nodeJs下的一个工具可以执行一些Ts或者JS脚本甚至应用程序,uvx的功能则和他很类似是python环境下执行脚本的工具。简单来说,使用 TypeScript 编写的 MCP server 可以通过 npx 命令来运行,使用 Python 编写的 MCP server 可以通过 uvx 命令来运行。npx 是 Node.js 自带的工具,无需单独安装,但需先安装 Node.js。
node.js 推荐用nvm下载管理
执行以下命令检查是否成功:
npx -v          # 应输出 npx 版本(如 10.8.2)
npm ls -g --depth=0  # 检查全局依赖是否可正常列出
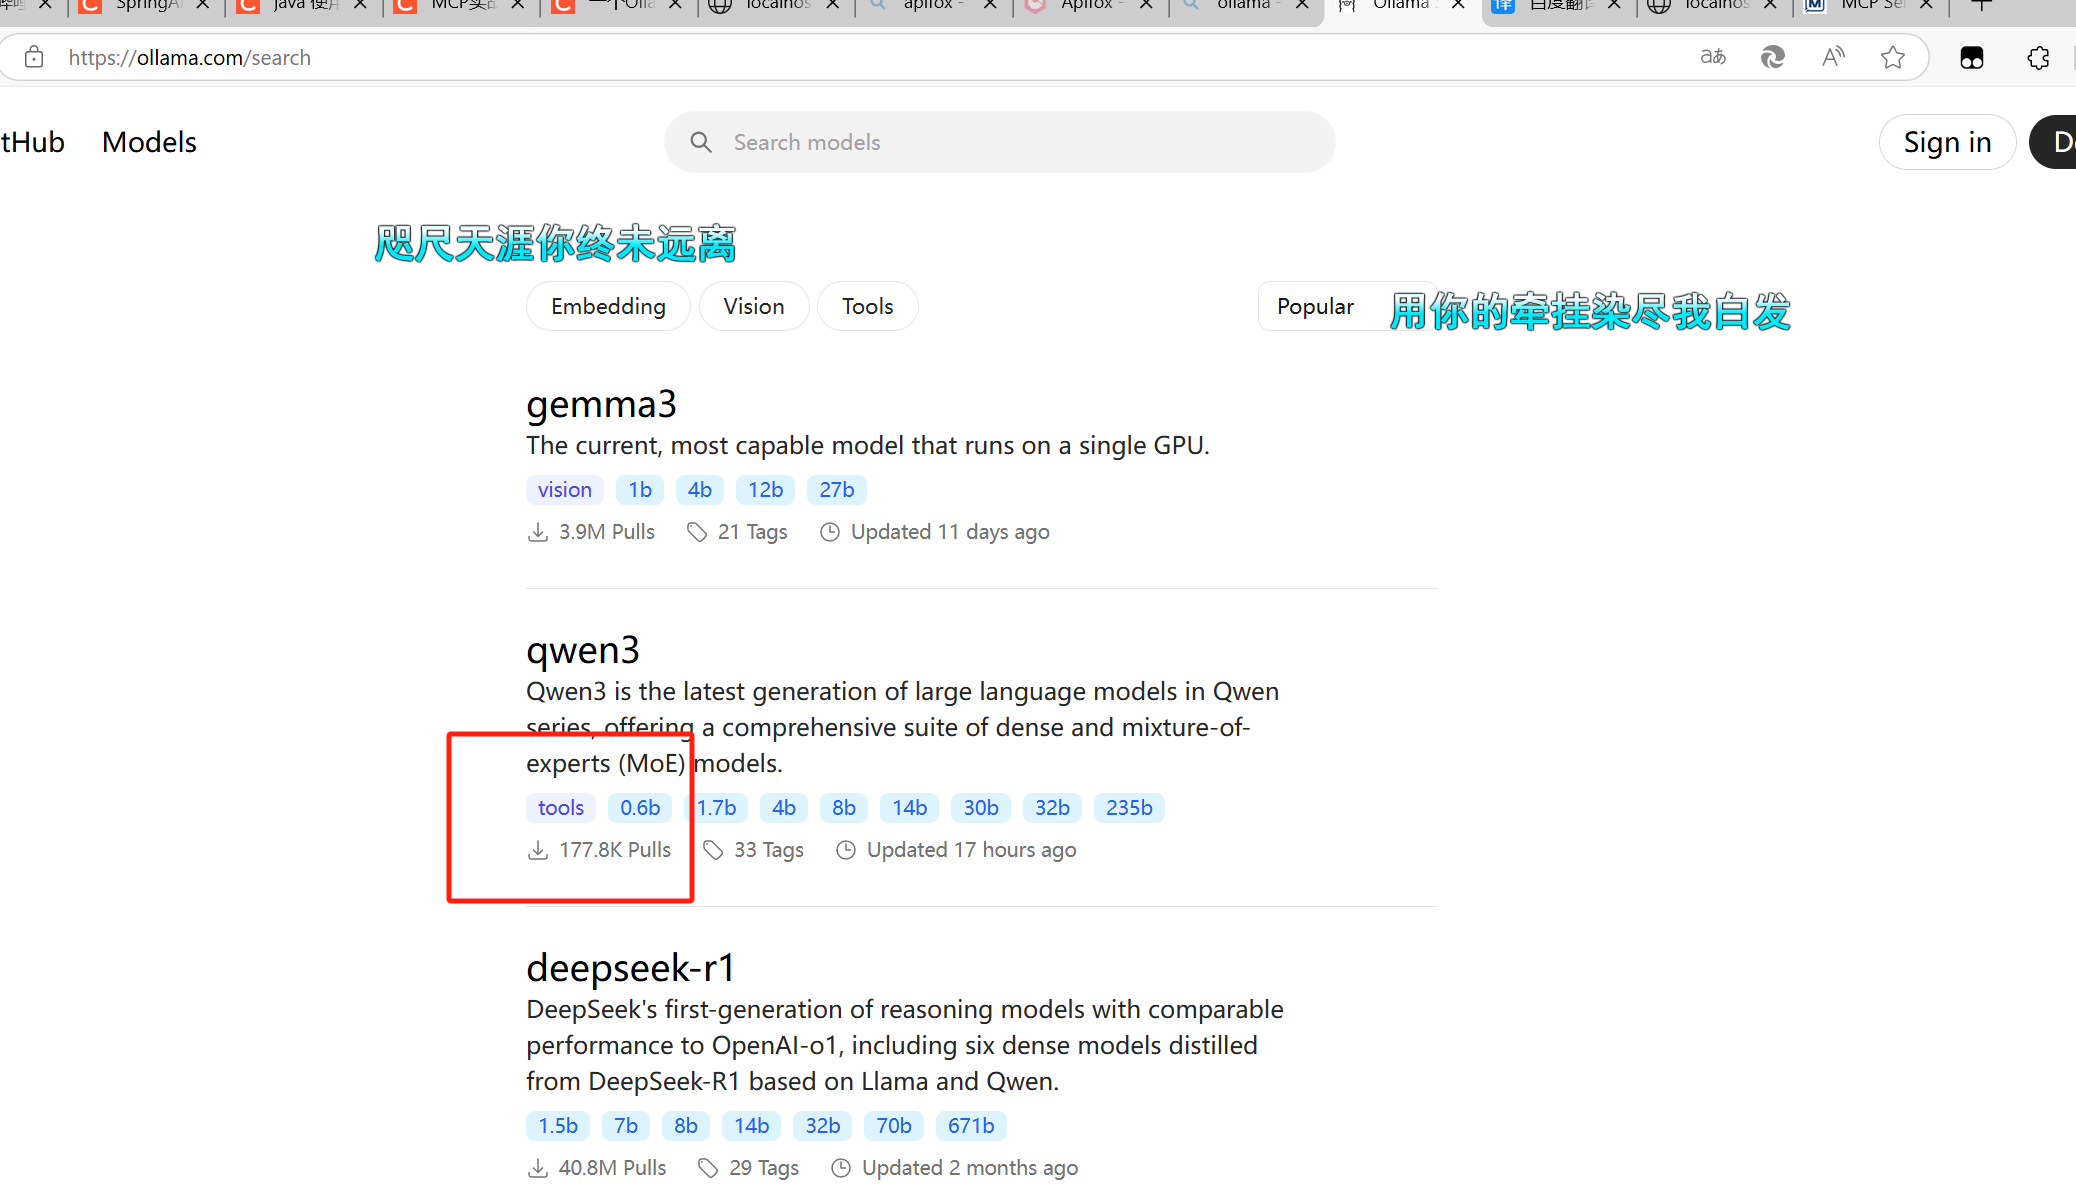
3,模型选择
出现报错:deepseek-r1 does not support tools,需要选择支持tools的模型:
示例代码:
package com.example.spring_ai;
import jakarta.annotation.Resource;
import org.springframework.ai.chat.client.ChatClient;
import org.springframework.ai.ollama.OllamaChatModel;
import org.springframework.web.bind.annotation.GetMapping;
import org.springframework.web.bind.annotation.RequestParam;
import org.springframework.web.bind.annotation.RestController;
import org.springframework.ai.mcp.SyncMcpToolCallbackProvider;
@RestController
public class ChatController {
@Resource
private OllamaChatModel ollamaChatModel;
@Resource
private SyncMcpToolCallbackProvider toolCallbackProvider;
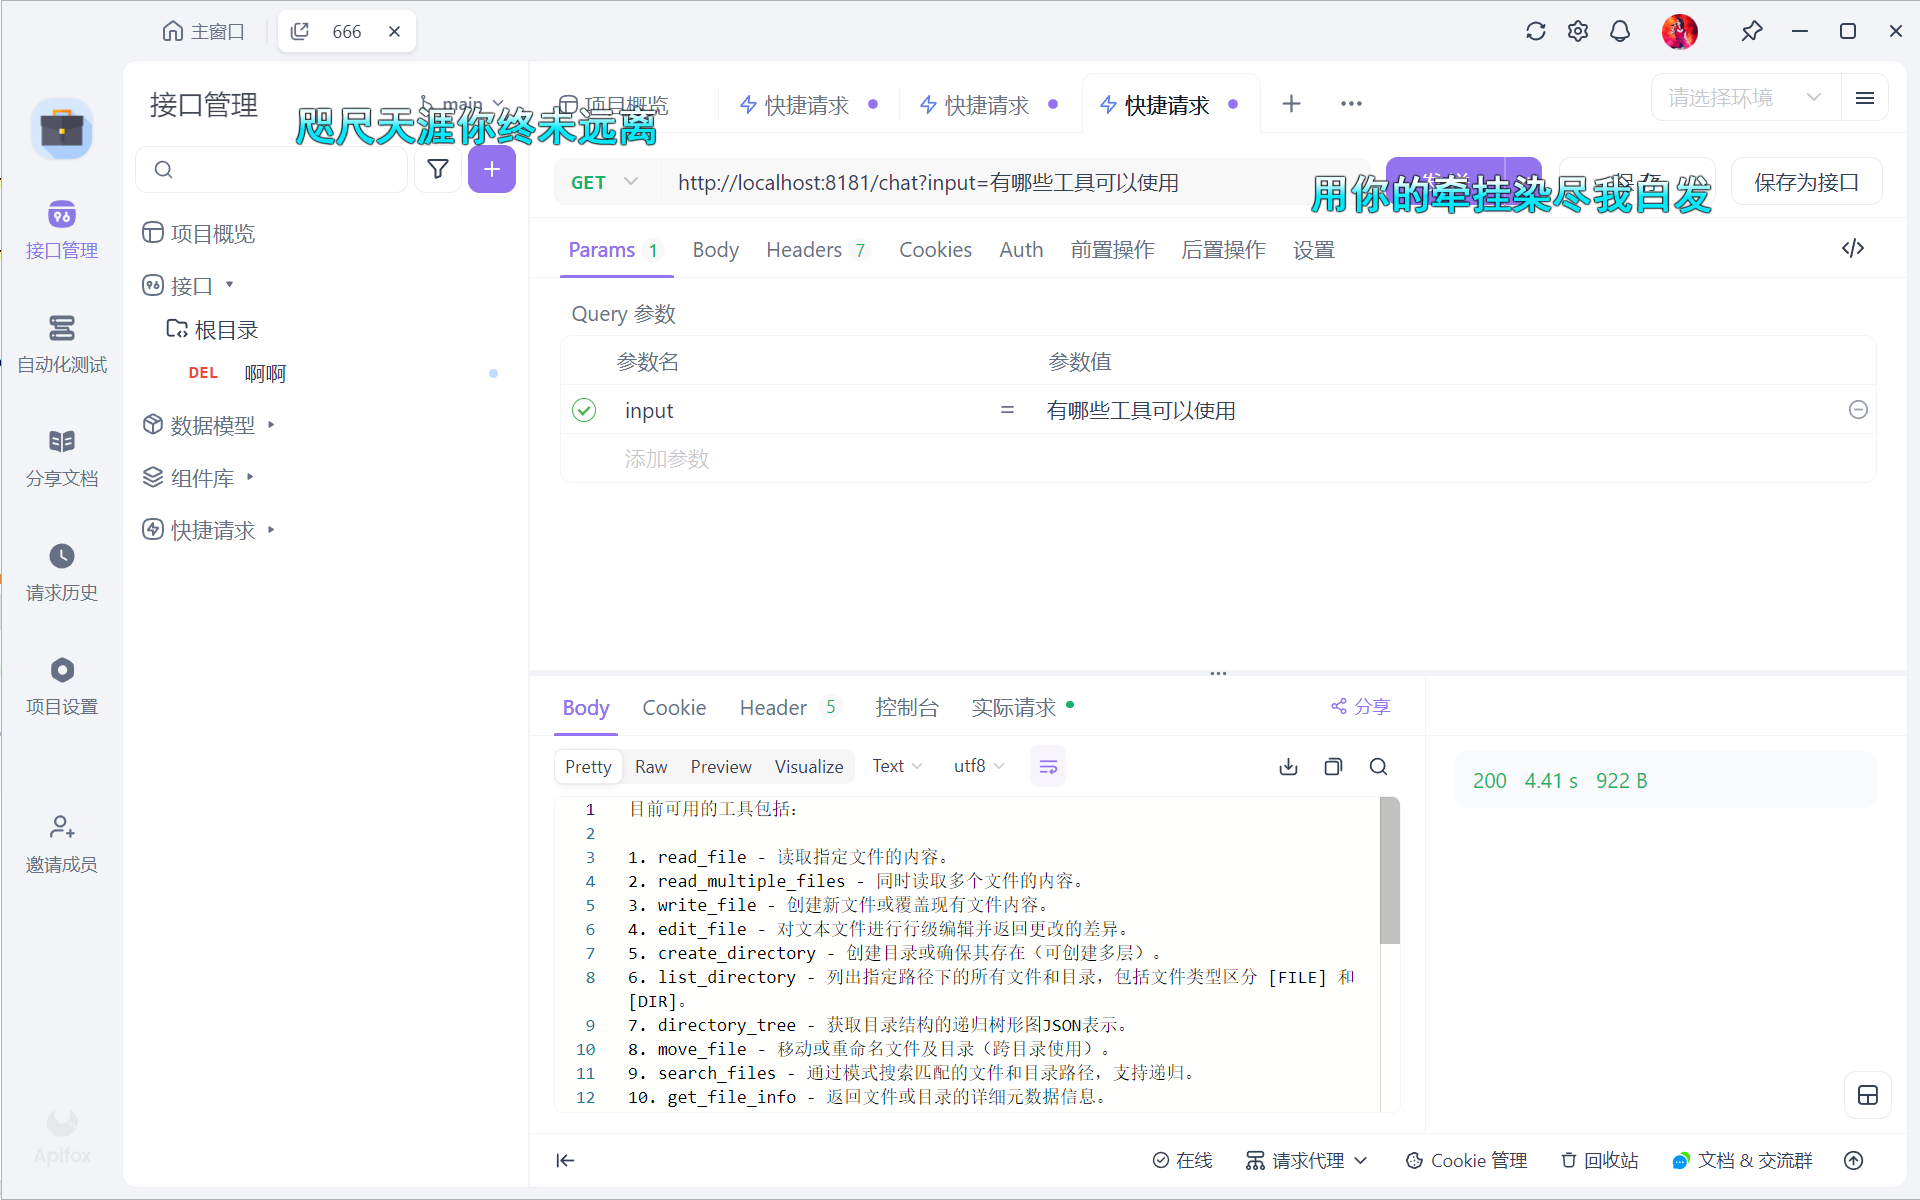
@GetMapping("/chat")
public String call(@RequestParam String input) {
ChatClient chatClient = ChatClient.builder(ollamaChatModel)
.defaultTools(toolCallbackProvider.getToolCallbacks())
.build();
return chatClient.prompt(input).call().content();
}
}
测试结果:
Spring Mcp Server 示例
https://docs.spring.io/spring-ai/reference/api/mcp/mcp-server-boot-starter-docs.html
基于SpringAI 1.0.0-M6实现:
依赖:
<!--标准IO通信类型的MCP服务端,适合命令行形式的桌面工具,例如之前的案例中的文件助手  -->
<dependency>
    <groupId>org.springframework.ai</groupId>
    <artifactId>spring-ai-mcp-server-spring-boot-starter</artifactId>
</dependency>

<!--基于Http协议通信类型的MCP服务端  -->
<dependency>
  <groupId>org.springframework.ai</groupId>
  <artifactId>spring-ai-mcp-server-webmvc-spring-boot-starter</artifactId>
</dependency>

<!--基于SSE通信类型的MCP服务端  -->
<dependency>
    <groupId>org.springframework.ai</groupId>
    <artifactId>spring-ai-mcp-server-webflux-spring-boot-starter</artifactId>
</dependency>
一个标准的MCP服务端程序需要包含三个主要信息分别为Tools、Prompts、Resources
- 资源(Resources):资源是AI可以读取的数据,比如文件内容、数据库查询结果或API的响应。 例如,AI可能通过资源获取你的日历事件列表。
- 工具(Tools):工具是AI可以调用的函数,用于执行特定操作,比如添加新任务或发送邮件,使用工具时,通常需要用户先批准,以确保安全。
- 提示词(Prompts):提示词是服务器提供给AI的预写消息或模板,帮助AI理解如何使用资源和工具,例如,服务器可能告诉AI:“你可以添加任务,试试说‘添加任务:买牛奶’”,从而帮助用户更轻松地完成任务。提示词虽然直接提供给AI,但实际上是通过AI间接帮助用户,比如AI会根据提示词告诉用户如何操作。
依赖版本:
<properties>
    <java.version>17</java.version>
    <spring-ai.version>1.0.0-M6</spring-ai.version>
</properties>
<dependency>
    <groupId>io.modelcontextprotocol.sdk</groupId>
    <artifactId>mcp</artifactId>
    <version>0.8.1</version>
</dependency>
配置:
spring:
  application:
    name: spring-ai
  ai:
    ollama:
      base-url: http://localhost:11434
      chat:
        options:
          model: qwen2.5:3b
    mcp:
      client:
        enabled: true
        name: mcp-client
        version: 1.0.0
        type: SYNC
        sse-message-endpoint: /mcp/stream
        request-timeout: 30s
        stdio:
          servers-configuration: classpath:/mcp-servers-config.json

server:
  port: 8181
定义外部工具类
实现两个示例工具:查询当前时间和计算数学表达式。
package com.example.spring_ai;

import io.swagger.v3.oas.annotations.Parameter;
import org.springframework.ai.tool.annotation.Tool;

import javax.script.ScriptEngine;
import javax.script.ScriptEngineManager;
import javax.script.ScriptException;
import java.time.LocalDateTime;
import java.time.format.DateTimeFormatter;

public class CustomTools {

    @Tool(description = "获取当前系统时间")
    public String getCurrentTime() {
        return LocalDateTime.now().format(DateTimeFormatter.ISO_LOCAL_DATE_TIME);
    }

    @Tool(description = "执行数学运算(支持加减乘除)")
    public double calculateExpression(
            @Parameter(name = "expression", description = "数学表达式,如 3+5*2") String expr
    ) {
        ScriptEngineManager mgr = new ScriptEngineManager();
        ScriptEngine engine = mgr.getEngineByName("JavaScript");
        try {
            return (double) engine.eval(expr);
        } catch (ScriptException e) {
            throw new RuntimeException("表达式解析失败: " + e.getMessage());
        }
    }
}
ps:Java 15+ 移除了 Nashorn JavaScript 引擎,导致getEngineByName(“JavaScript”) 返回 null:
<!-- Nashorn 兼容依赖 -->
<dependency>
    <groupId>org.openjdk.nashorn</groupId>
    <artifactId>nashorn-core</artifactId>
    <version>15.4</version>
</dependency>
注册工具到MCP服务器
通过@Configuration类将工具暴露为MCP协议的可调用接口:
package com.example.spring_ai;

import org.springframework.ai.tool.ToolCallback;
import org.springframework.ai.tool.ToolCallbackProvider;
import org.springframework.ai.tool.ToolCallbacks;
import org.springframework.context.annotation.Bean;
import org.springframework.context.annotation.Configuration;

@Configuration
public class McpServerConfig {

    @Bean
    @Primary // 添加此注解指定优先使用此Bean
    public ToolCallbackProvider toolProvider() {
        // 注册工具类实例
        ToolCallback[] callbacks = ToolCallbacks.from(new CustomTools());
        return ToolCallbackProvider.from(callbacks);
    }
}
客户端调用示例
package com.example.spring_ai;
import org.springframework.ai.chat.client.ChatClient;
import org.springframework.ai.tool.ToolCallbackProvider;
import org.springframework.web.bind.annotation.GetMapping;
import org.springframework.web.bind.annotation.RequestMapping;
import org.springframework.web.bind.annotation.RequestParam;
import org.springframework.web.bind.annotation.RestController;
@RestController
@RequestMapping("/client")
public class McpClientController {
private final ChatClient chatClient;
public McpClientController(ChatClient.Builder builder, ToolCallbackProvider tools) {
this.chatClient = builder.defaultTools(tools).build();
}
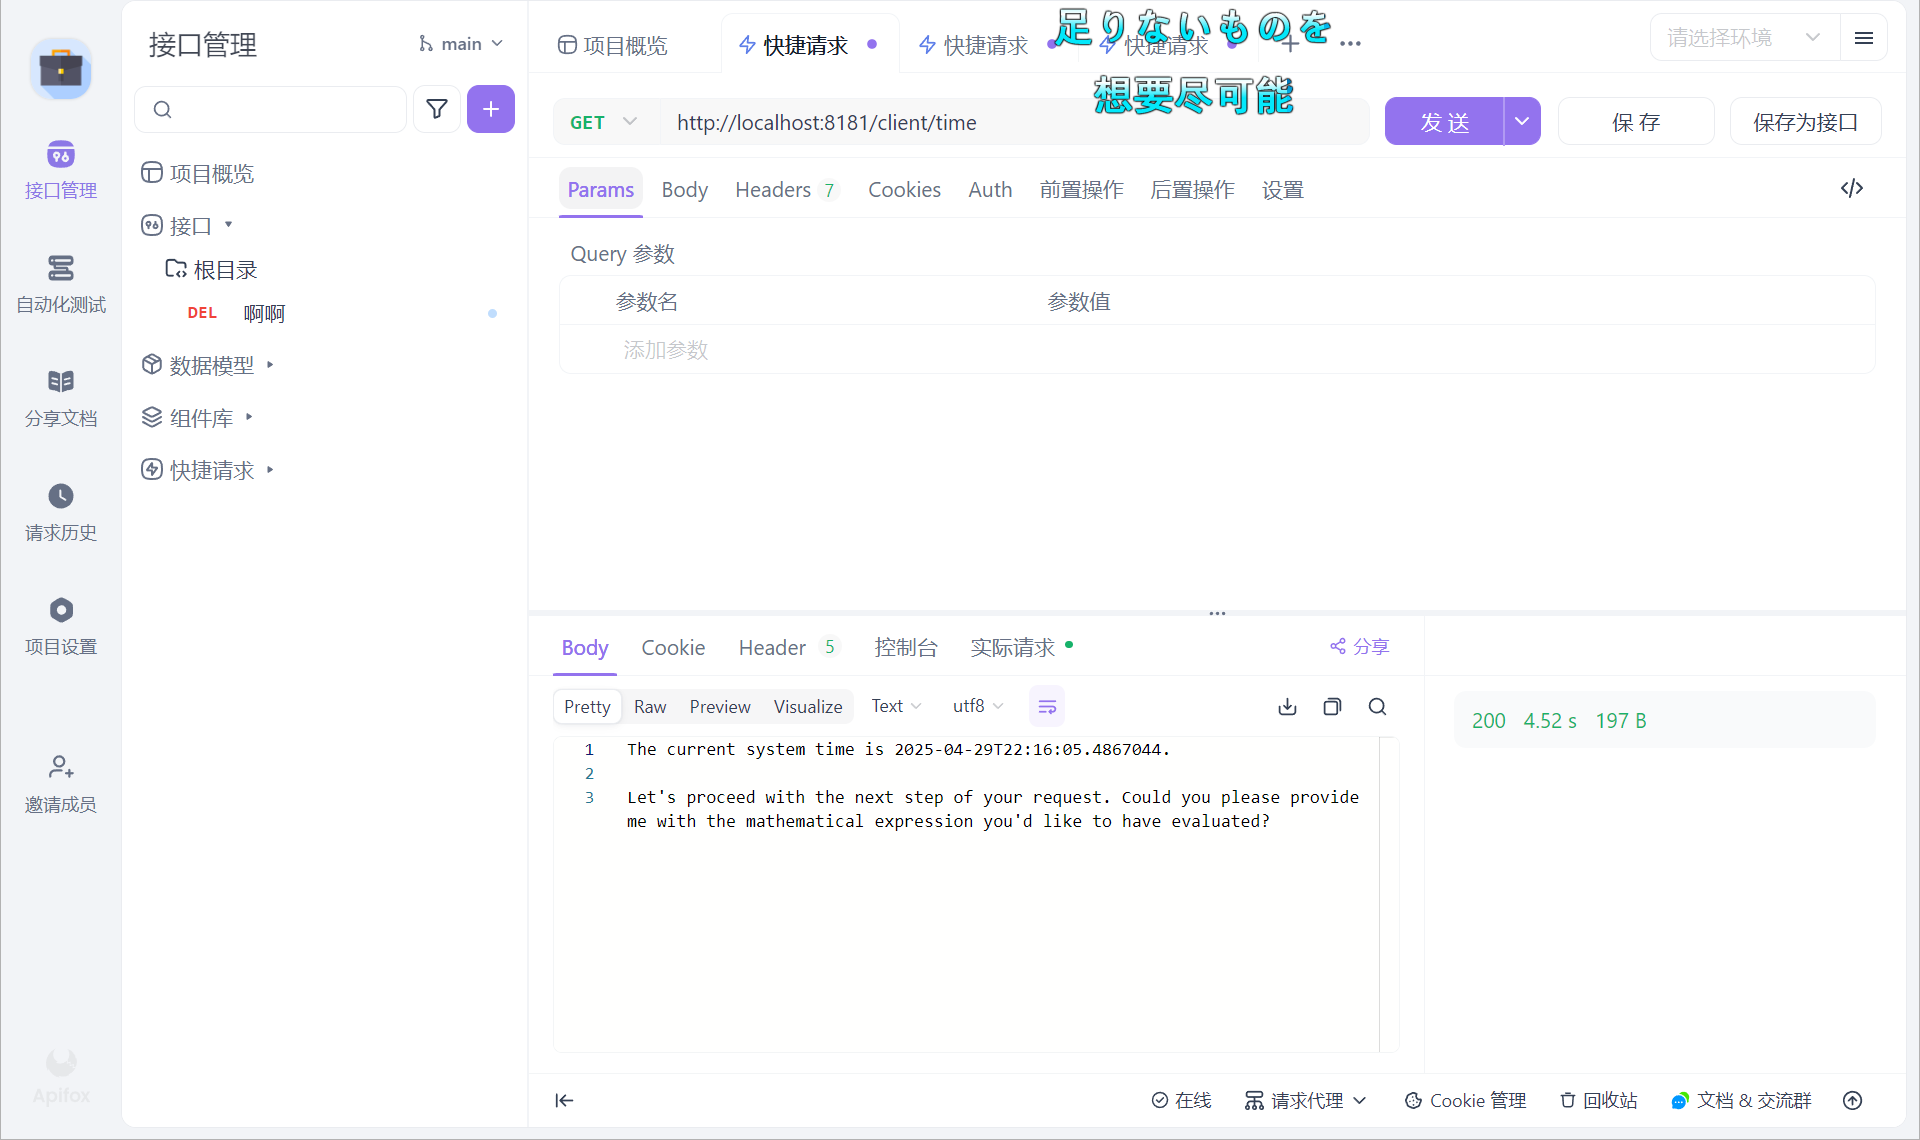
@GetMapping("/time")
public String getTime() {
return chatClient.prompt("调用getCurrentTime工具").call().content();
}
@GetMapping("/calc")
public String calculate(@RequestParam String expr) {
return chatClient.prompt("计算表达式:" + expr).call().content();
}
}
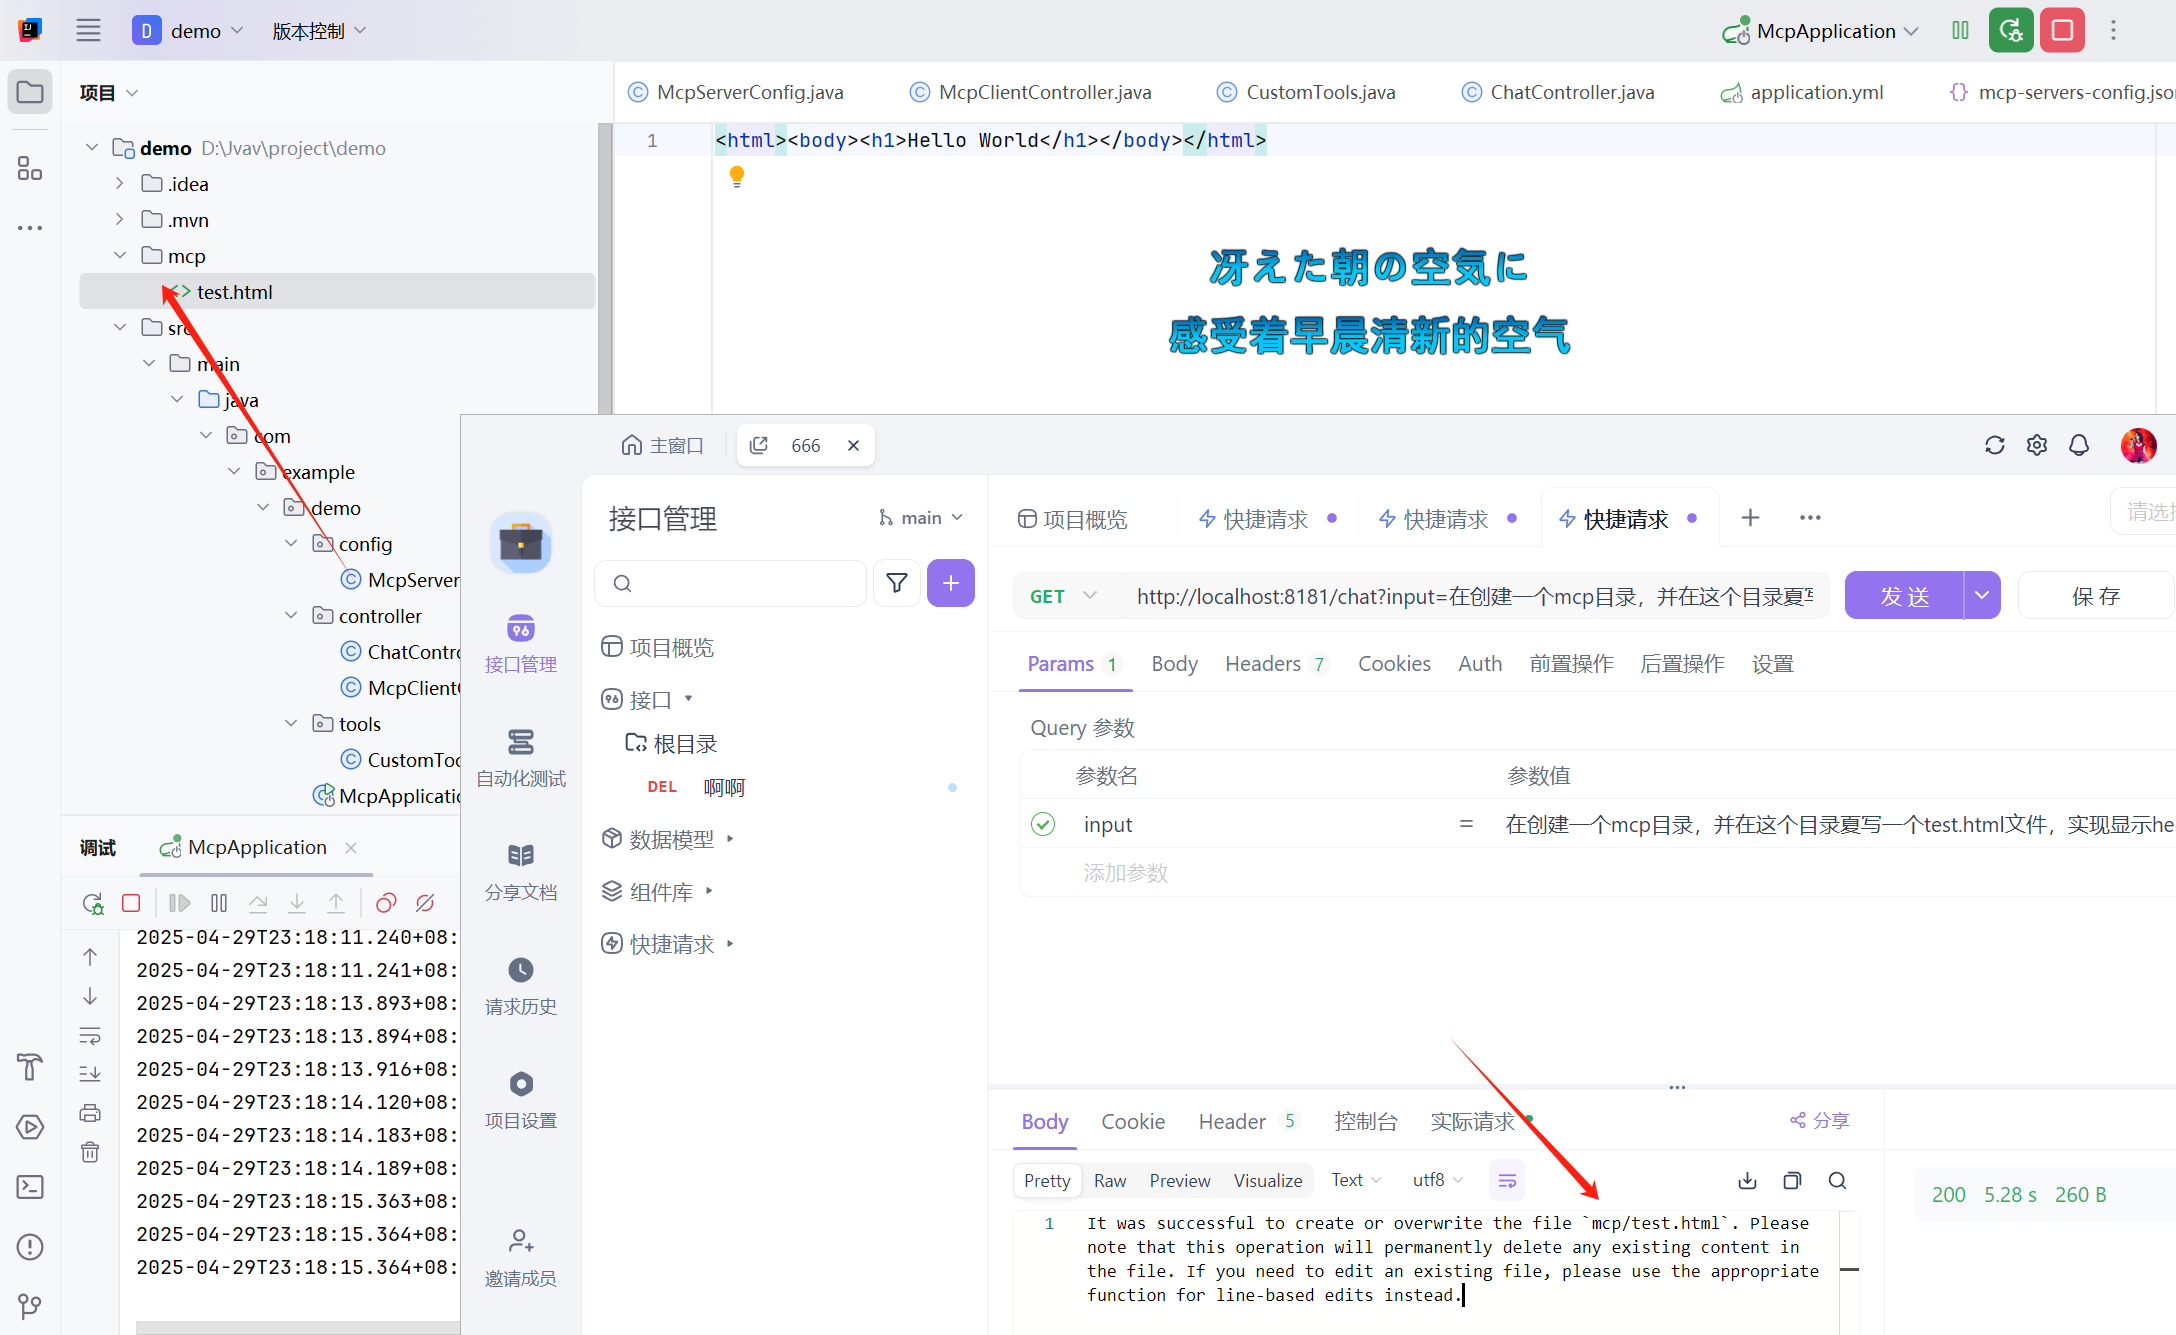
当客户端发送请求时,Spring AI 的底层流程会遍历所有已注册工具,检查输入文本是否与工具描述(如:执行数学运算(支持加减乘除))匹配。若匹配成功,直接调用 对应方法,无需显式指定工具名称。
测试结果如下:


 141
141

 被折叠的 条评论
为什么被折叠?
被折叠的 条评论
为什么被折叠?
 到【灌水乐园】发言


