


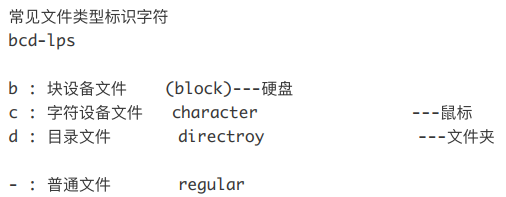
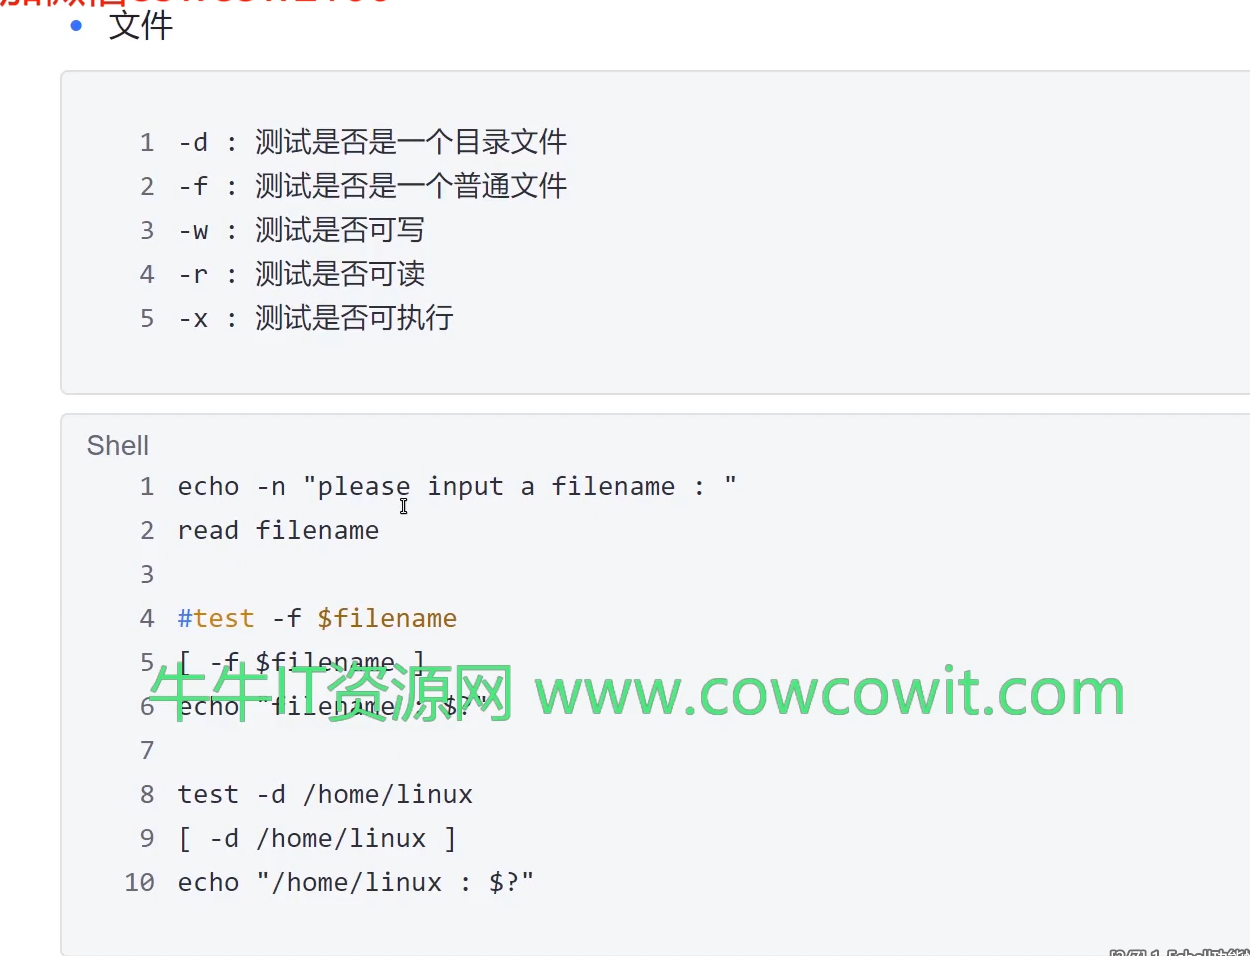
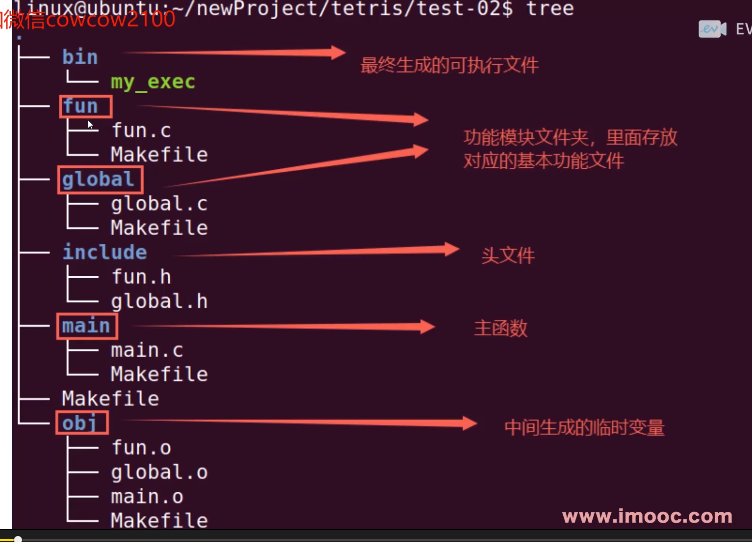
目录文件介绍
m 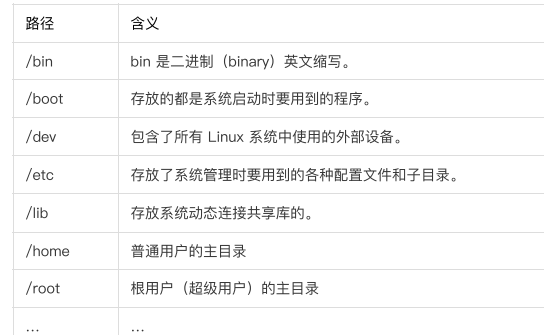
ctrl+alt+t 打开终端
ctrl+alt+回⻋ 重启终端
clear Ctrl+l 清屏
ctrl加shift加+ 放大终端 ctrl± 缩小终端
绝对路径 :    以 / 为起点,遍历到⼦⽬录。
相对路径 :以当前⽬录为起点,遍历到⼦⽬录。
常⽤⽬录:
. 当前目录  .. 上层目录  cd -  上一次操作所在路径
cd ~  相当于/home/用户名的路径,  对于root用户,它可能是 /root/

 pwd                              #显示当前⽬录
 cd /home/linux              #进⼊linux⽂件夹中
 cd ..                                #进⼊上层⽬录
 cd ./linux                        #进⼊当前⽬录下的linux⽂件夹中

 rm log1.txt log2.txt          #删除log1.txt log2.txt⽂件
 rm -rf dirTest #删除dirTest⽂件夹
功能:复制⽂件 / ⽂件夹到指定⽬录
格式 1: 拷⻉指定⽬录
cp hello.c /home/linux/Cbase #把hello.c拷⻉到Cbase⽂件中
格式 2: 创建⽂件副本
cp hello.c world.c #把hello.c 复制⼀份命名为world.c
格式 3: 拷⻉⽂件夹
cp Cbase ../ -a #把Cbase⽂件夹拷⻉到上层⽬录
功能:移动⽂件格式
- 1: 移动指定⽬录格式
mv hello.c /home/linux/Cbase #把hello.c移动到Cbase⽂件夹中
- 2: 把源⽂件重命名为⽬标⽂件格式
mv hello.c world.c #把hello.c重命名为world.c
- 3: 把源⽂件移动到⽬标⽂件夹
mv Cbase ../ #把Cbase⽂件夹移动到上层⽬录
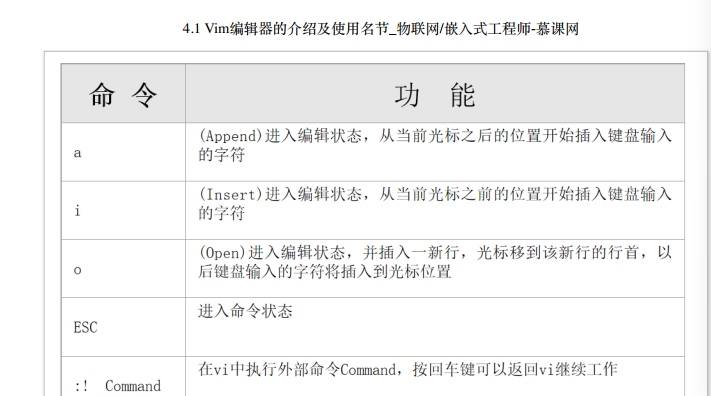
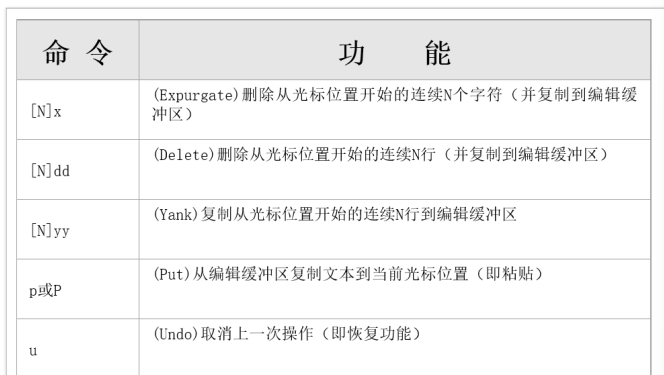
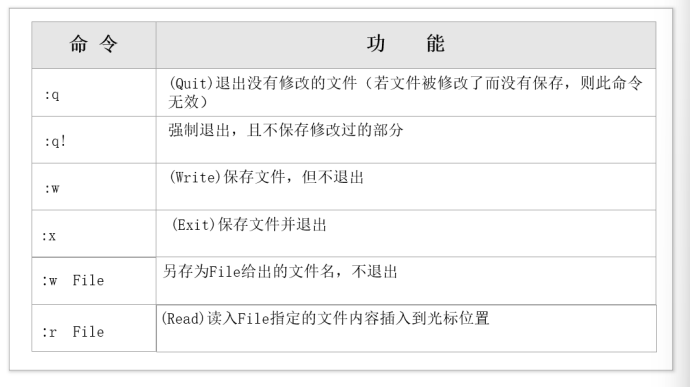
vim编辑器
全选(高亮显示):按esc后,然后ggvG或者ggVG
全部复制:命令:+y
全部删除:按esc后,然后dG
解析:
gg:是让光标移到首行,在vim才有效,vi中无效
v : 是进入Visual(可视)模式
G :光标移到最后一行
选中内容以后就可以其他的操作了,比如:
d 删除选中内容
y 复制选中内容到0号寄存器
"+y 复制选中内容到+寄存器,也就是系统的剪贴板,供其他程序用
VIM将编辑内容复制并黏贴到外部(windows)
方式一:
VIM如何将全部内容复制并粘贴到外部ubuntu默认安装的vim是不支持系统剪切、粘贴版的,需要执行以下安装:
sudo apt-get install vim-gnome
注意要让vim支持系统粘贴板,首先执行sudo apt-get install vim-gui-common安装支持系统剪切板的vim。
PS:以上两个步骤是否是必须待求证(自己电脑虚拟机测试:只要安装了第一个命令中的vim-gnome版本的vim就可以了)
1.光标在第一个字符处,按V进入可视模式
2.G,光标跳转到末尾,自动全选全部内容
3.按“+y,复制到系统剪切板
4.在外部CTRL+V即可粘贴过来
方式二:
1.安装支持系统剪切板的vim
sudo apt-get install vim-gui-commo
2.关闭vim鼠标(打开在vim中鼠标右键使用不了)
vim ~/.vimrc
输入 set mouse(set mouse=a为打开vim鼠标),不写等同于没打开,写了,每次编辑器会有一句mouse=root@abc-virtual-machine:/Class# ,并且每次打开编辑器要按回车确认,麻烦,所以不屑即可
vnoremap <C -c>:w !xclip -selection clipboard<CR>
这句为ctrl + c为复制快捷键,试了不管用
3.选中文本使用ctrl + shift + c复制文本到系统剪切板
代码编译
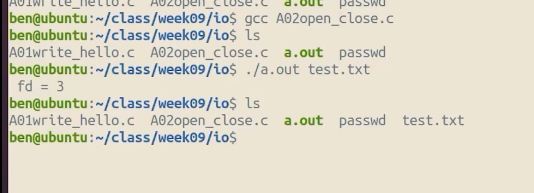
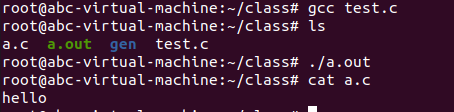
gcc hello.c                       //编译代码, 系统默认会在当前⽬录下⽣成⼀个叫做 a.out 的⽂件.
./a.out                            //执⾏ a.out ⽂件,输出对应的结果.
gcc hello.c -o exec               //编译代码, ⽤户⾃定义⽣成的可执⾏⽂件名字。
./exec                            //执⾏./exec ⽂件,输出对应的结果.
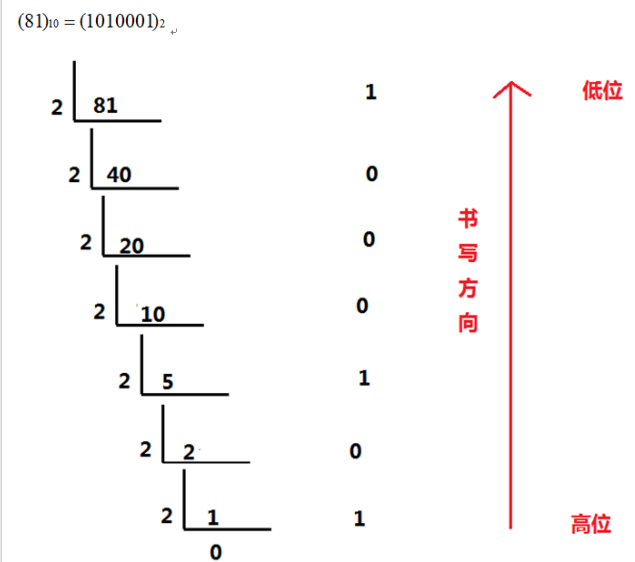
进制转换
十进制转二进制
除基取余法(处理整数部分):
⽤我们的⼗进制数去除以我们⽬标的基数,第⼀次相除所得余数为⽬的数的最低位, 将所得商再除以基数,反复执⾏上述过程,直到商为 “0”,所得余数为⽬的数的最⾼位。
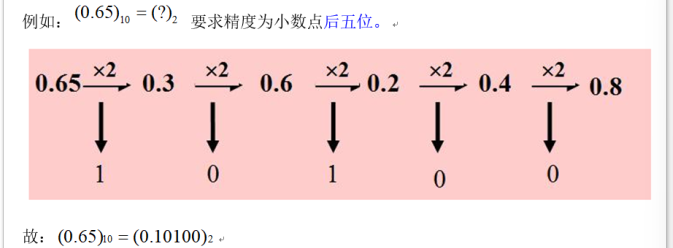
乘基取整法(处理小数部分):
⽤⼩数乘以⽬标数值的基数,第⼀次相乘结果的整数部分为⽬的数的最⾼位,将其⼩数部分再乘基数依次记下整数部分,反复进⾏下去,直到⼩数部分为 “0”,或满⾜要求的精度为⽌。
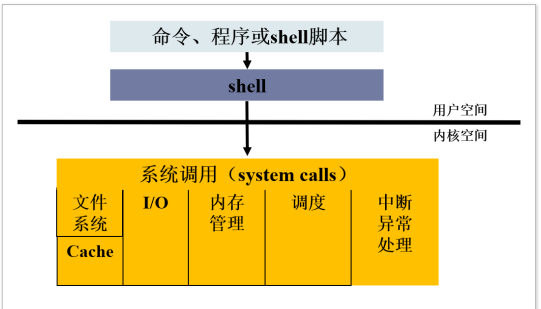
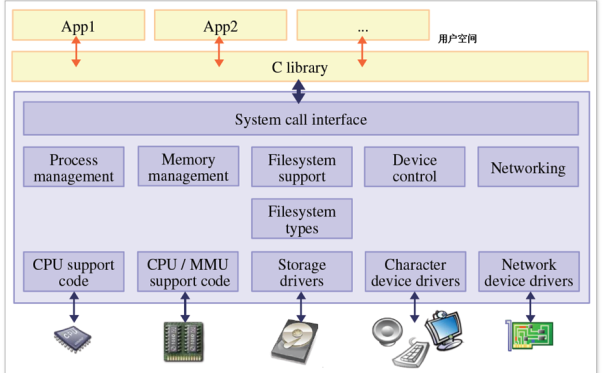
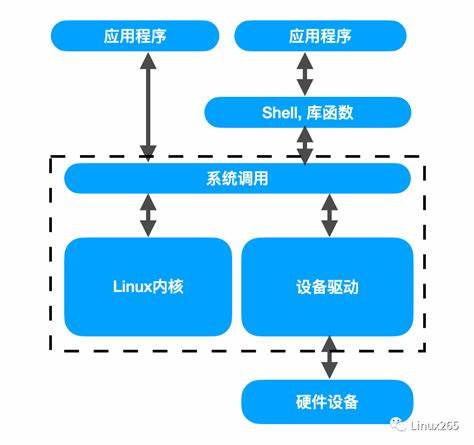
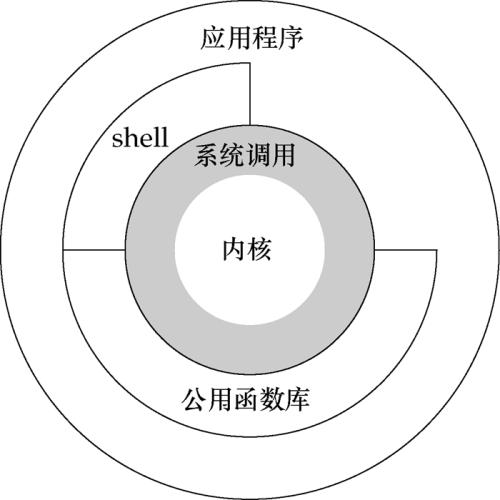
Linux内核
内核是Linux系统的最底层,提供了系统的核⼼功能并允许进程以⼀种有序的⽅式访问硬件。⽤于控制进程、输⼊、输出设备、⽂件系统操作、管理内存。
这些都不需要⽤户参与,系统⾃⾏完成
/etc/apt/sources.list[⽂件]->镜像站点服务器地址(可以理解成软件包的下载⽹站)
/var/lib/apt/lists[⽬录]->每个镜像站点软件包的索引⽂件(可以理解成我们软件包下载⽹站具体内容的缓存,例如:软件版本,软件名等等)
/var/cache/apt/archives[⽬录]->下载下来软件包存放路径
常用登录命令
//切换到管理员命令
sudo -i
sudo  su root
//切换到普通用户
sudo su 用户名
//删除用户名
sudo deluser

关机命令
sudo shutdown -h now   //立即关机
sudo reboot         //立即重启
linux文件系统
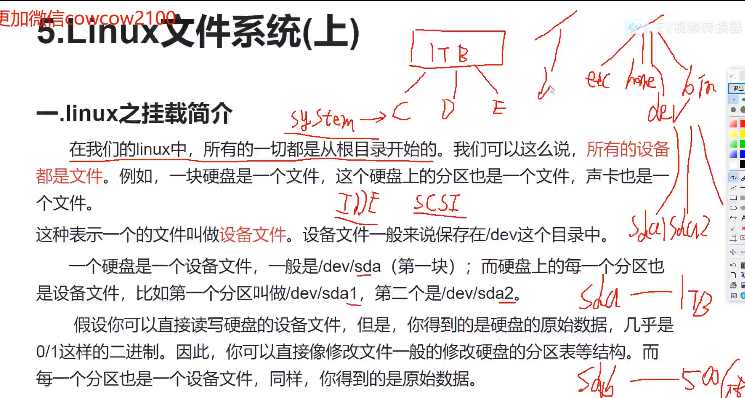
cd ~ //回到home下
ls -a -> 显示所有的⽂件,包括隐藏⽂件
ls -lh -> 带单位(G,K,M)显示⽂件⼤⼩
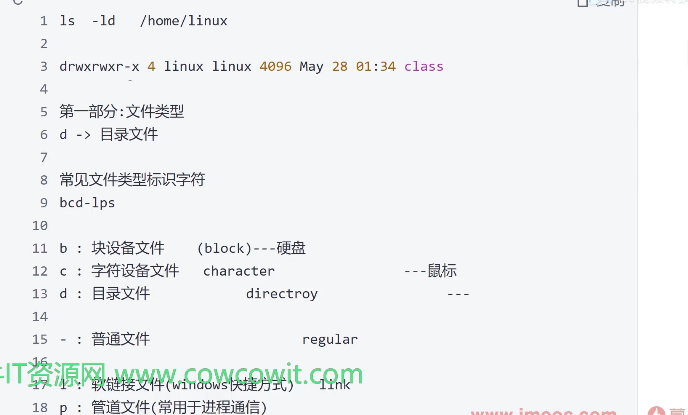
root@abc-virtual-machine:~# ls -ld snap
drwx------ 4 root root 4096 4月 15 10:41 snap
第⼀部分:
⽂件类型d ->
⽬录⽂件常⻅⽂件类型标识字符 bcd-lps

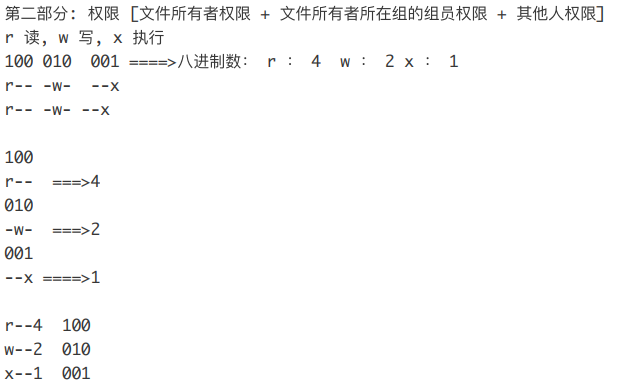
rwx权限是一个组合,0777表示文件所有者和文件所有者所在组权限+其他人权限,这几个人都有读写执行的权限
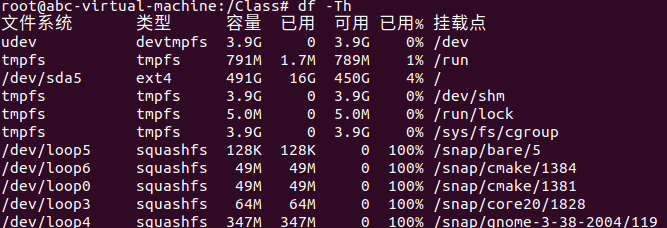
df -Th //用于显示磁盘分区情况
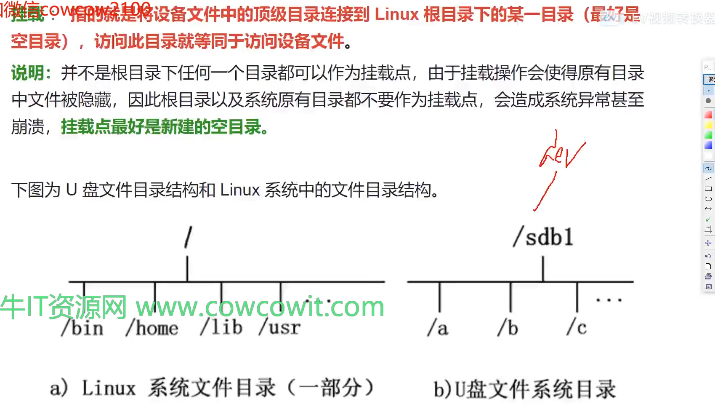
挂载目录
sudo mount /dev/sda5  /Class/gen          //把磁盘根目录挂载到/Class/gen  目录中

sudo umount /Class/gen			    //取消挂载   注意:要跳出挂载的目录,自己不能打自己

文件压缩与解压
压缩文件
zip test.zip hello.c log.c   //将hello.c文件和log.c文件压缩为test.zip

解压文件
uzip  test.zip
linux ⽀持常⽤的两种压缩格式
gzip : linux ⽀持的压缩格式的⼀种,优点是压缩速度较快
bzip2 :linux ⽀持的压缩格式的⼀种,优点是压缩后存储空间占⽤较⼩。
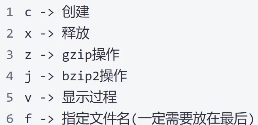
tar : 该命令一般用来压缩/解压gzip/bzip2的文件
参数:
文件压缩
sudo tar  -czvf ac.tar.gz a.c b.c			//将a.c和b.c文件打包压缩为 ac.tar.gz

sudo tar  -czvf work.tar.gz work			//将work文件打包压缩

文件解压
sudo tar -xzvf work.tar.gz
sudo tar -xjvf work.tar.bz2
sudo tar -xvf work.tar.gz -C 指定的目录

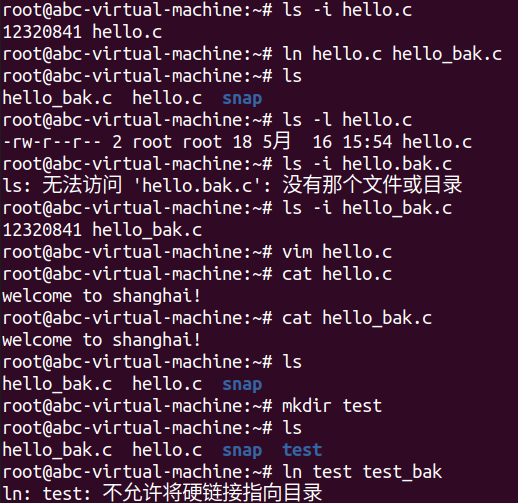
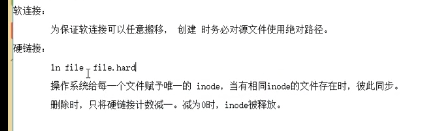
软连接和硬链接

ln  源文件名  硬链接文件名
//硬链接可以用来创建备份
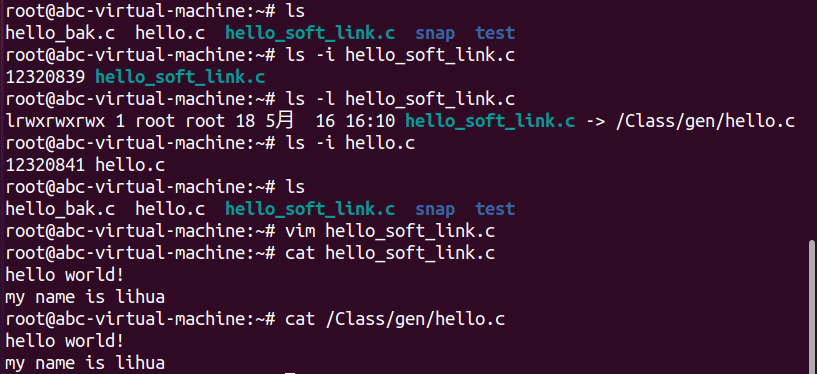
软链接
本质:类似于windows的快捷方式,用来记录我们目标的路径,一般使用绝对路径来创建软连接,保证可以访问
特点:
1.占用磁盘空间
2.对目录进行操作
命令
ln -s 源文件 软链接文件
硬链接和软链接的区别
1、本质不同
硬链接:同一个文件,多个名称。
软链接:不同的文件。
2、跨分区
硬链接:不支持跨分区。
软链接:支持跨分区。
3、目录
硬链接:不支持对目录创建。
 软链接:支持对目录创建。
4、相互关系
 硬链接:删除某一个硬链接,另一个硬链接不影响使用。
 软链接:原始文件和软链接有依赖关系,原始文件删了,软链接就失效了。
5、inode编号
 硬链接:inode编号是相同的。
 软链接:inode编号不同。
6、链接数
 硬链接:删除一个硬链接,硬链接的链接数会有变化。
 软链接:删除一个软链接,链接数不会有变化,删除的相当于是一个文件(或快捷方式)。
7、相对路径:原始文件路径
 硬链接:硬链接的相对路径,是相对的当前工作目录的相对路径。
 软链接:软链接的原始文件路径是,相对的软链接的相对路径,而不是相对当前工作目录。
8、文件类型
 硬链接:硬链接的文件类型是,原来是什么就是什么,例如:原来是普通文件,还是普通文件。
 软链接:软链接的文件类型是L
9、命令的实现不一样
 硬链接:ln
 软链接:ln -s
命令进阶
1.grep:从文件中搜索字符串
root@abc-virtual-machine:/Class/gen# grep "hello" hello.c //在hello.c中搜索hello字符
hello world!
root@abc-virtual-machine:/Class/gen# grep -n  "hello" hello.c
1:hello world!
grep "my" * -nR //查找当前目录及其子目录中含有字符串"my"的文件
root@abc-virtual-machine:/Class# grep "my" * -nR
匹配到二进制文件 exec
匹配到二进制文件 gen/exec
gen/hello.c:2:my name is lihua
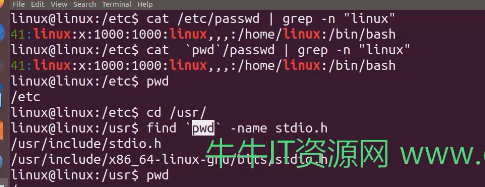
2.find:在指定路径下搜索文件
find 路径  -name  文件名
例如:
find /home/linux -name hello.c  //在/home/linux目录下搜索hello.c
root@abc-virtual-machine:/usr# find . -name stdio.h
./include/stdio.h
./include/x86_64-linux-gnu/bits/stdio.h
./include/c++/9/tr1/stdio.h
3.管道连接符 |
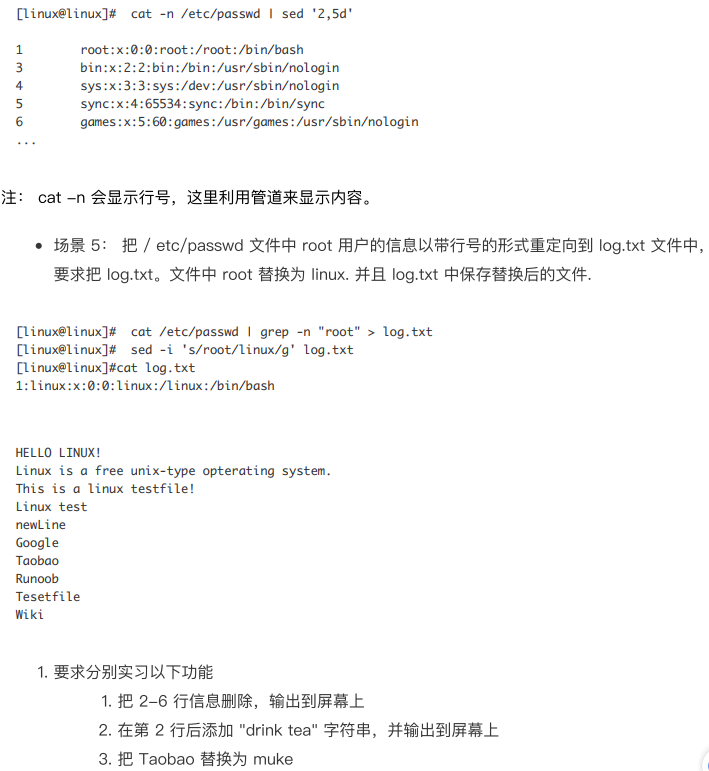
说明:管道就是将一个命令的输出当作另一个命令的输入.通过|连接多个命令 (理解:后一个命令的操作,是在前一个命令的基础上进行的)
root@abc-virtual-machine:/etc# cat /etc/passwd | grep -n "abc"
47:abc:x:1000:1000:abc,,,:/home/abc:/bin/bash
root@abc-virtual-machine:/etc# ls /usr/include | grep "stdio.h"
stdio.h
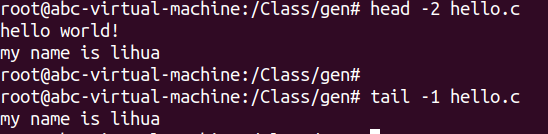
4.head 显示文件开头的内容
head -行数  文件
	例如
	head  -10 /etc/passwd    //显示/etc/passwd文件开头前10行
5.tail : 显示文件尾部指定的行数
tail  -行数  文件
	例如
	tail -1 /etc/passwd  //显示/etc/passwd文件最后一行的信息
6.cut 字符串裁剪函数
注意: 一般于管道联合使用
cut -d "分割字符" -f 字段
参数:
-d  指定我们的分割字符
-f  指定我们显示的区域
示例:

root@abc-virtual-machine:/etc# cat /etc/passwd | head -1 | cut -d ":" -f 2,4
x:0
root@abc-virtual-machine:/etc# cat /etc/passwd | head -1 | cut -d ":" -f 2,6
x:/root
7.wc : 统计某个文件的行数 / 单词个数 /字节书
格式:
- -l 显示一个文件的行数
- -w 显示一个文件的单词个数
- -c 显示一个文件的字节数字
root@abc-virtual-machine:/etc# wc -l /etc/passwd
51 /etc/passwd
root@abc-virtual-machine:/etc# wc -w /etc/passwd
89 /etc/passwd
root@abc-virtual-machine:/etc# wc -c /etc/passwd
3026 /etc/passwd
echo:打印单词
root@abc-virtual-machine:/etc# echo "hello world"
hello world
root@abc-virtual-machine:/etc# printf "hello world\n"
hello world
root@abc-virtual-machine:/etc# echo -n "hello world"
hello worldroot@abc-virtual-machine:/etc#
shell中的常用特殊字符
shell中的通配符
含义:当用户需要用命令处理一组文件,例如,file1.txt,file2.txt,file3.txt…用户不必一一输入文件名,可以使用shell
通配符.
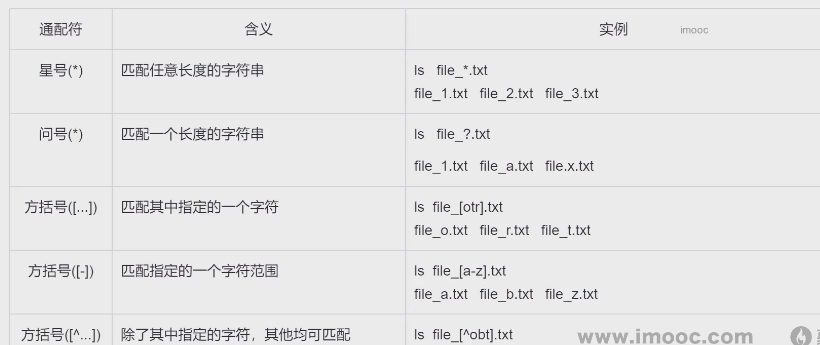
root@abc-virtual-machine:~/class# ls
log_12.txt  log_1.txt  log_23.txt  log_2.txt  log_3.txt
root@abc-virtual-machine:~/class# ls log_*.txt
log_12.txt  log_1.txt  log_23.txt  log_2.txt  log_3.txt
root@abc-virtual-machine:~/class# ls log_?.txt
log_1.txt  log_2.txt  log_3.txt
root@abc-virtual-machine:~/class# ls log_??.txt
log_12.txt  log_23.txt
root@abc-virtual-machine:~/class# ls log_[123].txt
log_1.txt  log_2.txt  log_3.txt

输入/输出/错误重定向
简介:
- 输入/输出重定向是改变shell命令或程序默认的标准输入/输出目标,重新定向到新目标
- linux中默认的标准输入定义为键盘,标准输出定义为终端窗口(显示器)
- 用户可以为当前操作改变输入或者输出, 迫使某个特定命令的输入或输出来源作为外部文件.
详细说明:
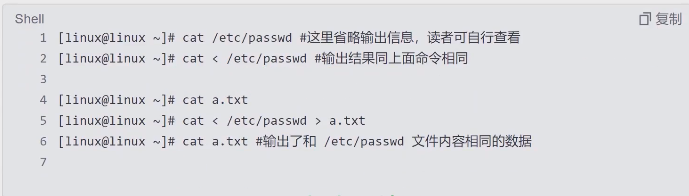
- 输出重定向
含义:把本来应该输出到屏幕上的正确数据,修改输出到其他的地方(文件)
注意: > 重定向输出会覆盖,>>重定向输出是追加, > 文件名, 可以用来创建文件, 类似与touch命令.
root@abc-virtual-machine:~/class# echo "welcome" > log_1.txt
root@abc-virtual-machine:~/class# cat log_1.txt
welcome
root@abc-virtual-machine:~/class# echo "chengdu" > log_1.txt
root@abc-virtual-machine:~/class# cat log_1.txt
chengdu
root@abc-virtual-machine:~/class# echo "12313" >> log_1.txt
root@abc-virtual-machine:~/class# cat log_1.txt
chengdu
12313
root@abc-virtual-machine:~/class# > word.c
root@abc-virtual-machine:~/class# ls
log_12.txt  log_1.txt  log_23.txt  log_2.txt  log_3.txt  word.c
- 输入重定向
含义:改变默认的输入源,把本来应该从键盘输入的信息改从其他位置获取, (例如从文件中获取)
注意: 输入重定向在需要从一个命令的输出作为另一个命令的输入时更为有用
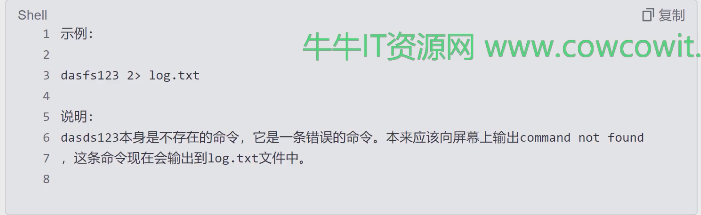
- 错误重定向:
含义:把本来应该输出到屏幕上的错误的信息改输出到文件中
命令置换
含义:将一个命令的输出当作另一个命令的参数,我们叫做命令置换
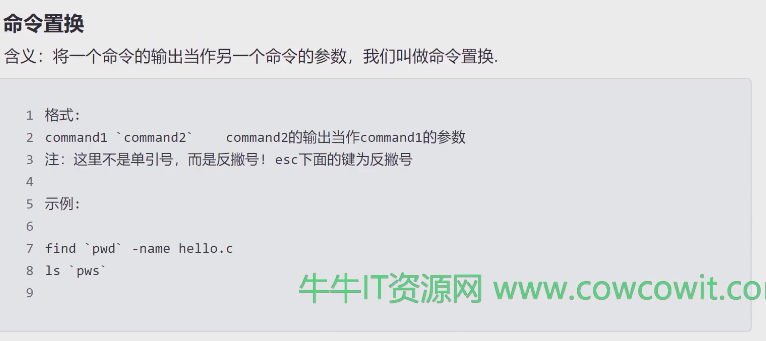
pwd输出当前目录
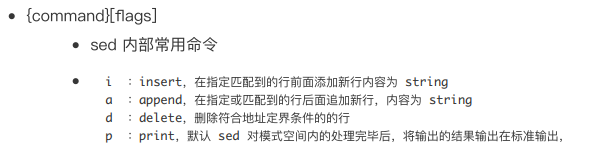
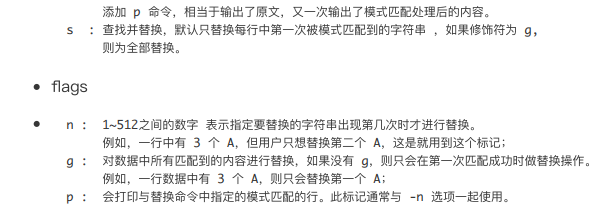
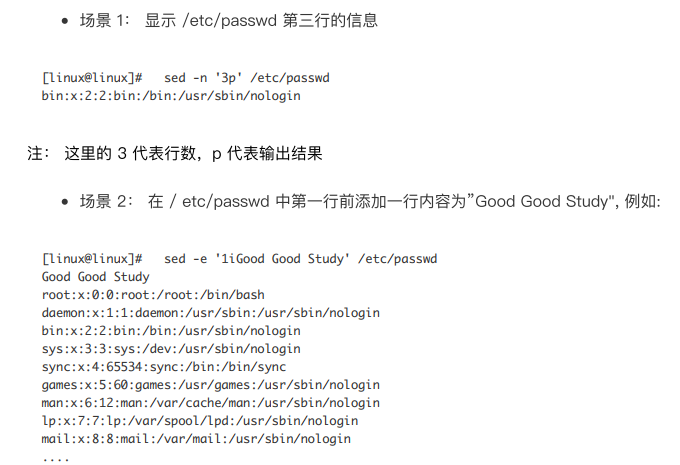
sed命令详解

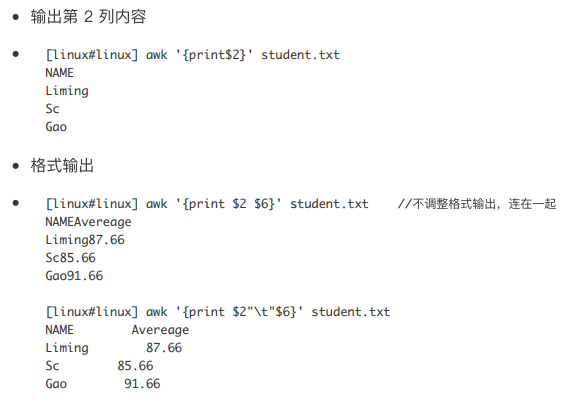
awk
AWK 语⾔的基本功能是在⽂件或者字符串中基于指定规则浏览和抽取信息。awk 抽取信息后,才能对其他⽂本操作。它是⼀个强⼤的⽂本分析⼯具。简单来说 awk 就是把⽂件逐⾏的读⼊,以空格为默认分隔符将每⾏切⽚,切开的部分再进⾏各种分析处理。之所以叫 AWK 是因为其取了三位创始⼈lfred Aho,Peter Weinberger, 和 Brian Kernighan 的 Family Name 的⾸字符。
注: sed 命令常⽤于⼀整⾏的处理。⽽ awk 更倾向于把⼀⾏分为多个 “字段” 然后进⾏处理。
awk 的适⽤场景
- 超⼤⽂件处理;
- 输出格式化的⽂本报表;
- ⾏算数运算;
- 执⾏字符串操作等。
语法
格式
awk [options] 'pattern {action}' filename
- options : 可选参数
-F : 指明输⼊时⽤到的字段分隔符,默认分隔符为空格或tab键
v (var=VALUE) : ⾃定义变量
- pattern :匹配规则
action :某些计算操作/格式化数据/流控制语句
ilename:⽂件名
- 示例:
- awk -F “:” ‘{print $1}’ /etc/passwd
- awk '条件1 {动作1} 条件2 {动作2} … ’ ⽂件名
条件 (pattern) :
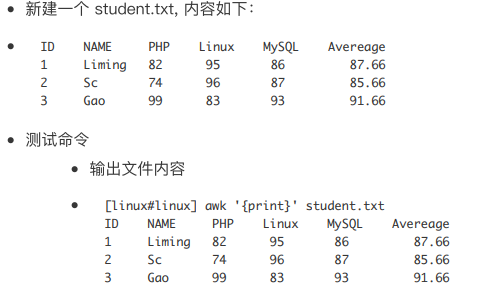
注意命令不要输错:print不是printf

shell脚本
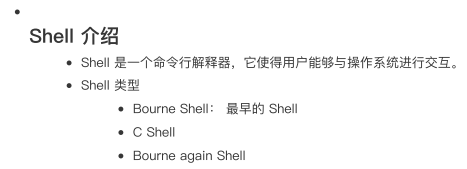
- shell :shell是一个命令行解释
- shell脚本: 是shell命令的有序集合
- shell脚本运行方法:
方法1:
1 建立XX.sh文件
2 赋予我们shell文件执行权限
3 执行shell文件

方法2:01
1 建立.sh文件
2 bash   +   XX.sh
注意:shell脚本中有代码出错,会跳过出错的代码继续执行下面的命令
方法2 : 可以执行但是没法分配权限,加了权限后会变绿


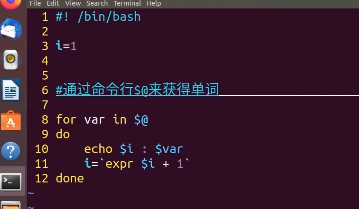
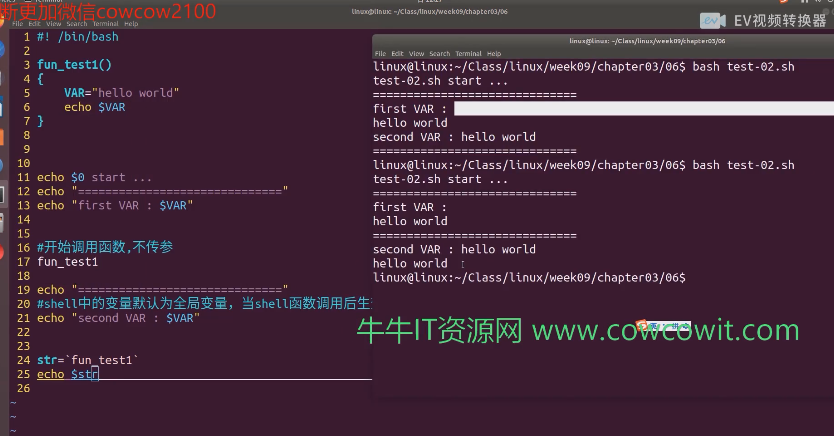
shell中的变量

//命令行运行
root@abc-virtual-machine:/Class/gen# DATA=1
root@abc-virtual-machine:/Class/gen# echo $DATA
1
注意:脚本中第一行#! /bin/bash 说明#!表示我们使用的解释器类型
vi test02.txt
chmod 0777 test02.sh

变量分类
- 用户自定义变量
特点:变量没有类型,不需要定义,直接使用,所有的内容被解释为字符串(整形和字符串还是有的)
说明:
- 在shell中引用一个变量必须要加$
- 在shell中,对变量赋值的时候,"="两边不能有空格
- 单引号引用的数据会全部转换为字符串
root@abc-virtual-machine:/Class/gen# vim test03.sh
root@abc-virtual-machine:/Class/gen# chmod 0777 test03.sh
root@abc-virtual-machine:/Class/gen# ls
exec  hello.c  test01.sh  test02.sh  test03.sh
root@abc-virtual-machine:/Class/gen# ./test03.sh
my_data = hello world

root@abc-virtual-machine:/Class/gen# ./test03.sh
say :hello world
cmd : exec
hello.c
test01.sh
test02.sh
test03.sh

注意:命令替换哪里cmd和=号之间不能有空格,空格会报错,未发现命令
- 位置变量
$0     : shell  脚本的名字
$1-$9  : 第一个参数~第九个参数,空格作为分隔符
$#     : 位置参数的个数[位置参数的个数不包含shell脚本本身
$*     :所有的位置参数

$?     : 上一条命令的执行状态或者获取shell函数的返回值
       注:0代表装填为真,非0代表状态为假
$$     : 获取当亲shell脚本的进程号

ps  -ef       //查看系统进程
注意:想要输出第10行$10,需要加入{}
单引号只会将命令当字符串输出, 双引号才会执行命令,read是在控制行读取输入,模拟进程,可以另开一个控制台查看进程号ps -ef
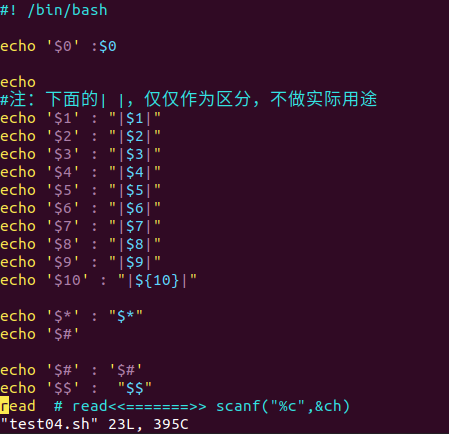
root@abc-virtual-machine:/Class/gen# ./test04.sh 10 20 30 40 50 60 70 80 90 400
$0 :./test04.sh

$1 : |10|
$2 : |20|
$3 : |30|
$4 : |40|
$5 : |50|
$6 : |60|
$7 : |70|
$8 : |80|
$9 : |90|
$10 : |400|
$* : 10 20 30 40 50 60 70 80 90 400
$#
$# : $#
$$ : 4351
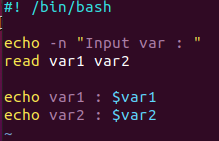
shell功能性语句
输入功能----read
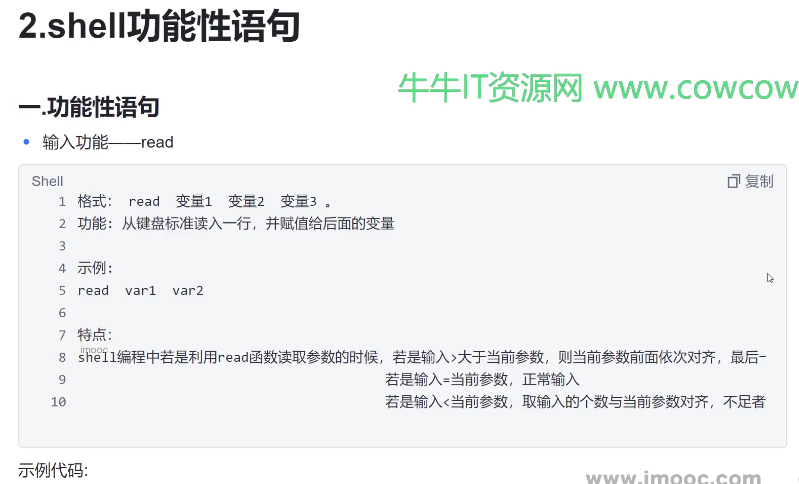
root@abc-virtual-machine:/Class/gen# bash test01.sh
Input var : 1 2 34
var1 : 1
var2 : 2 34
expr表达式
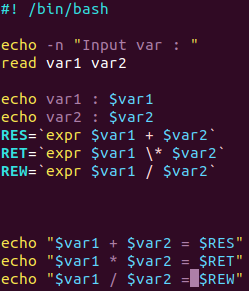
注意:*在表达式中不表示乘法,\*表示乘法
root@abc-virtual-machine:/Class/gen# bash test01.sh
Input var : 21 23
var1 : 21
var2 : 23
21 + 23 = 44
21 * 23 = 483
21 / 23 = 0
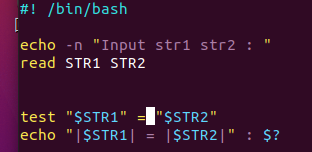
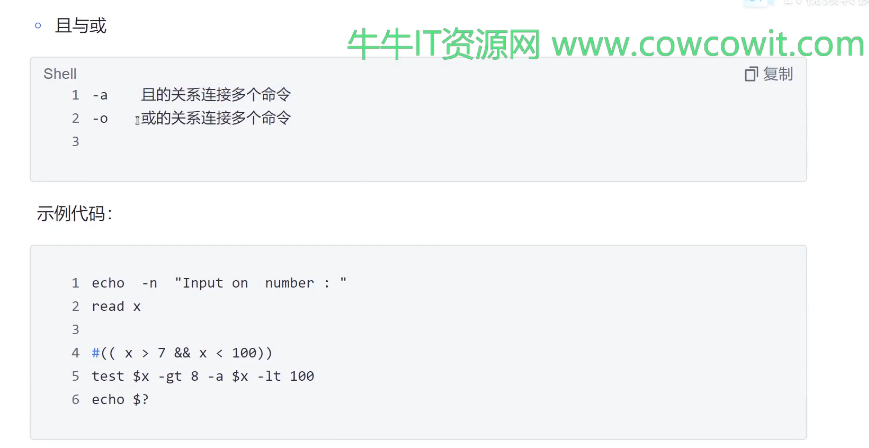
test表达式
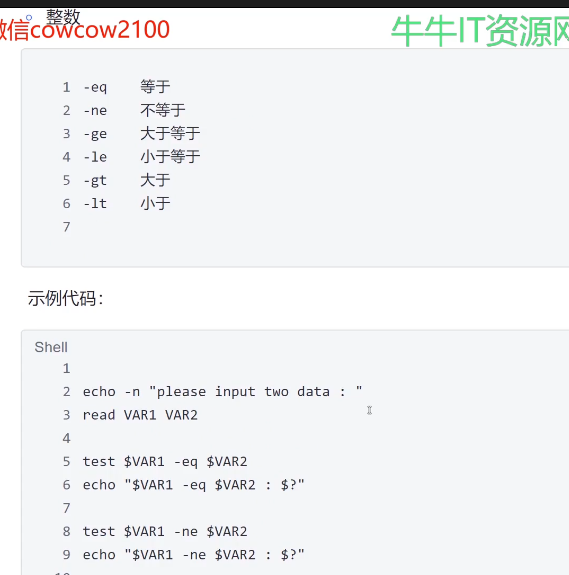
用于比较
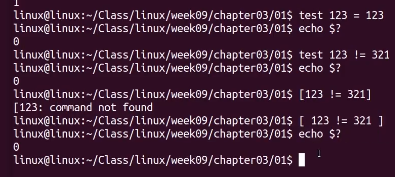
::
root@abc-virtual-machine:/Class/gen# bash test02.sh
Input str1 str2 : abc bca
|abc| = |bca| : 1
整数的比较
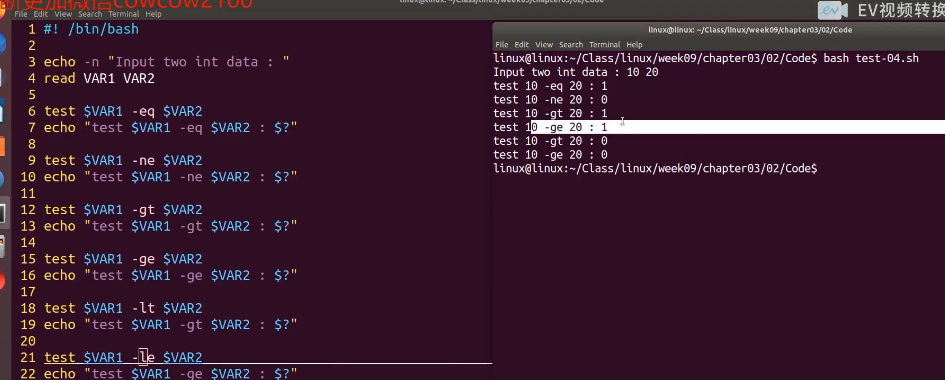
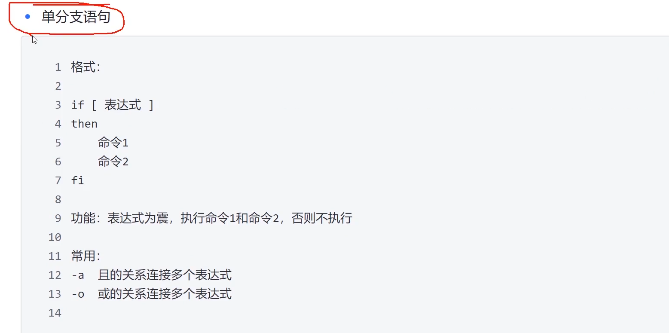
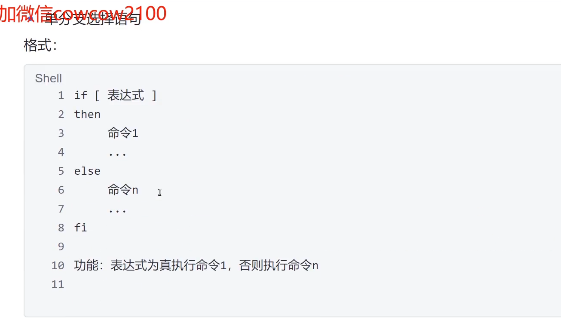
shell中的if语句
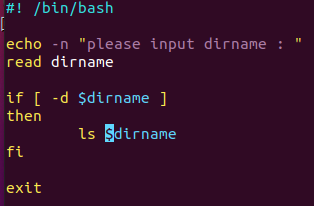
root@abc-virtual-machine:/Class/gen# bash test03.sh
please input dirname : /usr
bin    include	lib32  libexec	local  share
games  lib	lib64  libx32	sbin   src
exit退出脚本执行
if-else多分枝
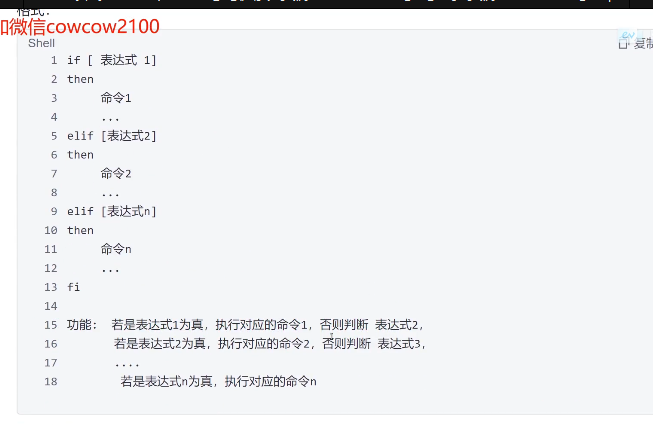
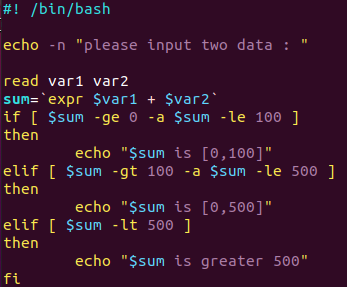
root@abc-virtual-machine:/Class/gen# bash test04.sh
please input two data : 244 12
256 is [0,500]
shell中的case格式
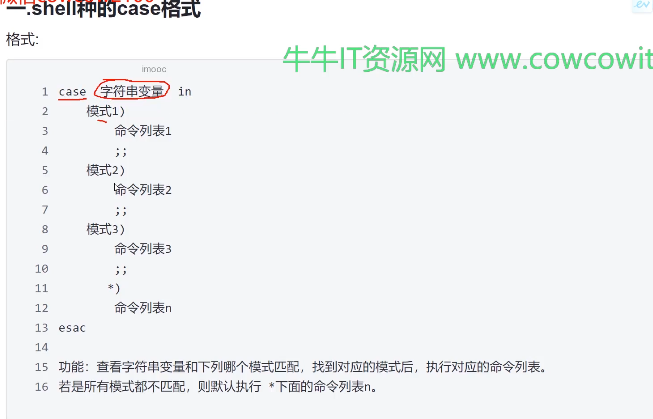
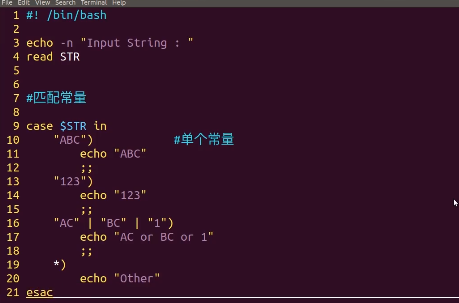
//第一张图
root@abc-virtual-machine:~/class/gen# bash test01.sh
input string : ABC
ABC
root@abc-virtual-machine:~/class/gen# bash test01.sh
input string : hello
hello
root@abc-virtual-machine:~/class/gen# vi test01.sh
root@abc-virtual-machine:~/class/gen# bash test01.sh
input string : hello
12343
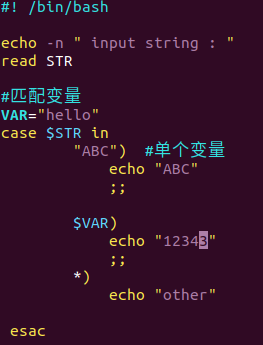
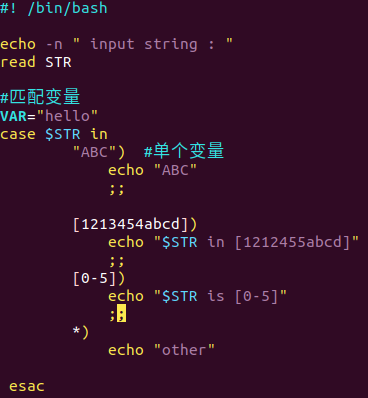
//第二张图
root@abc-virtual-machine:~/class/gen# bash test01.sh
input string : abc
other
root@abc-virtual-machine:~/class/gen# bash test01.sh
input string : b
b in [1212455abcd]
root@abc-virtual-machine:~/class/gen# bash test01.sh
input string : 4
4 in [1212455abcd]
root@abc-virtual-machine:~/class/gen# bash test01.sh
input string : 0
0 is [0-5]
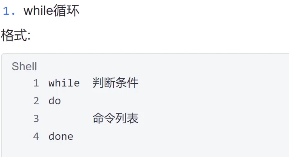
shell中的循环语句
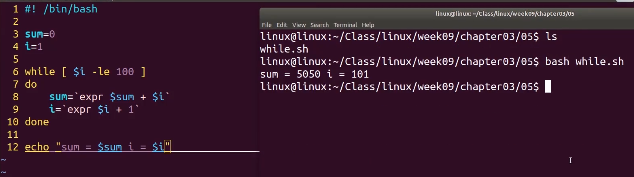
1.while循环
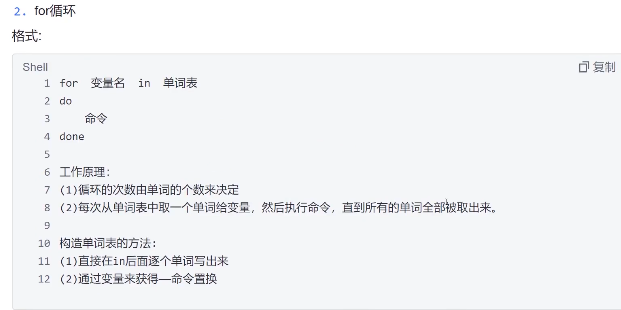
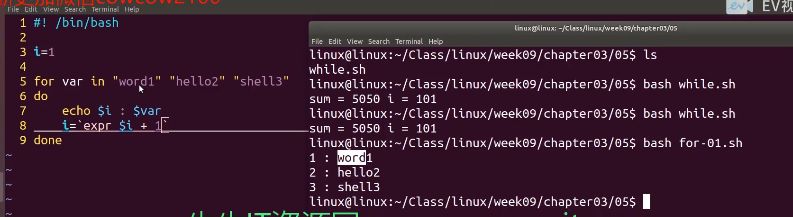
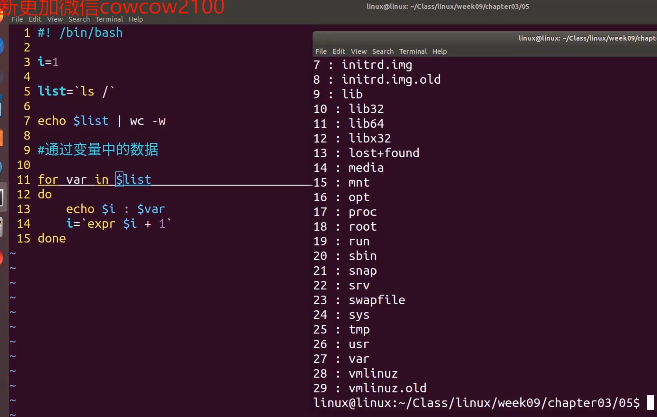
2.for循环
root@abc-virtual-machine:~/class/gen# bash  test03.sh 123 456 abc def
1 : 123
2 : 456
3 : abc
4 : def
shell中的数组
数组定义

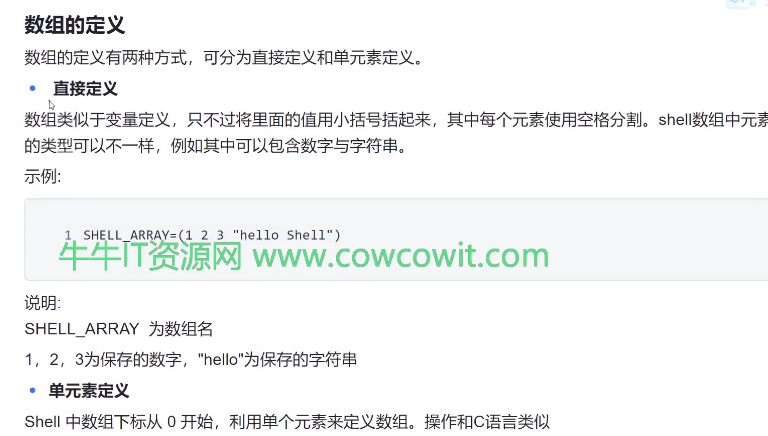
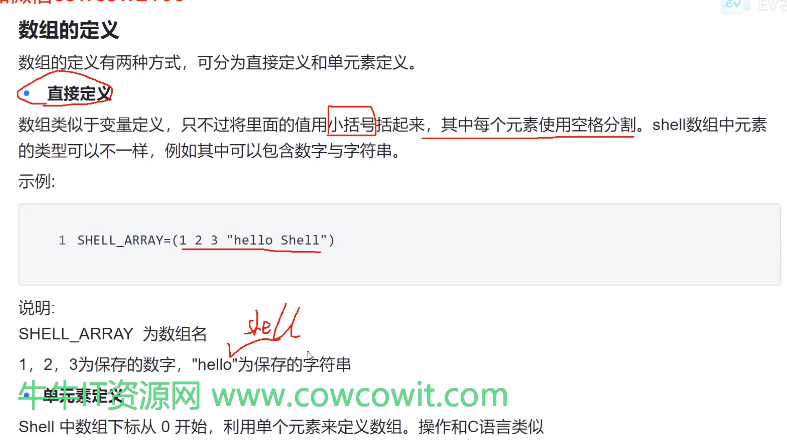
元素获取
用大括号括起来说明是一个整体,数组元素之间用空格分隔
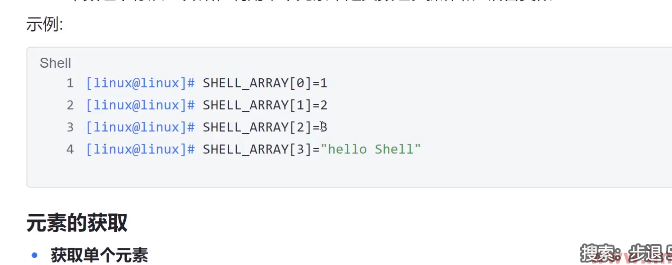
root@abc-virtual-machine:~/class/gen# array=(1 2 3 abc)
root@abc-virtual-machine:~/class/gen# echo ${array[0]}
1
root@abc-virtual-machine:~/class/gen# echo ${array[1]}
2
root@abc-virtual-machine:~/class/gen# echo ${array[3]}
abc
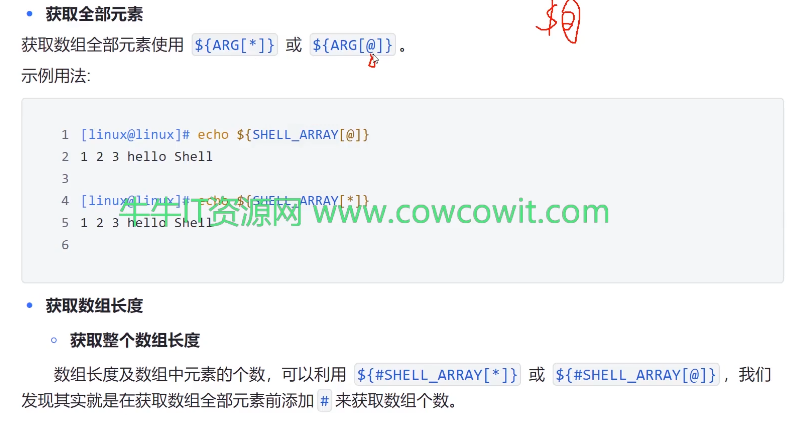
//获取全部元素
root@abc-virtual-machine:~/class/gen# echo ${array[@]}
1 2 3 abc
root@abc-virtual-machine:~/class/gen# echo ${array[*]}
1 2 3 abc
//获取数组长度
root@abc-virtual-machine:~/class/gen# echo ${#array[*]}
4
root@abc-virtual-machine:~/class/gen# echo ${#array[@]}
4

//获取单个元素数组长度
root@abc-virtual-machine:~/class/gen# echo ${array[3]}
abc
root@abc-virtual-machine:~/class/gen# echo ${#array[3]}
3
操作数组
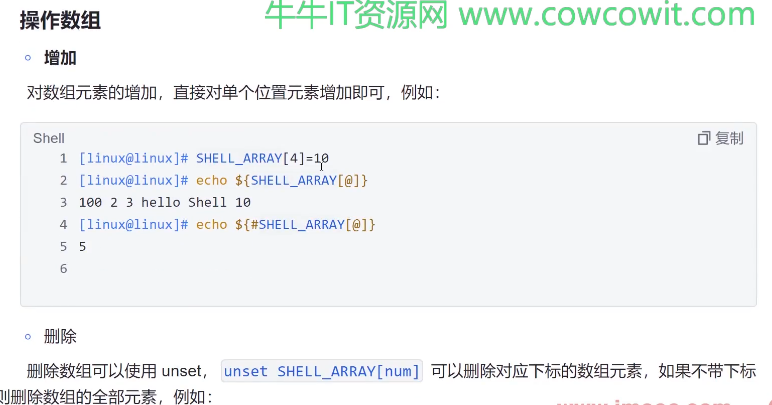
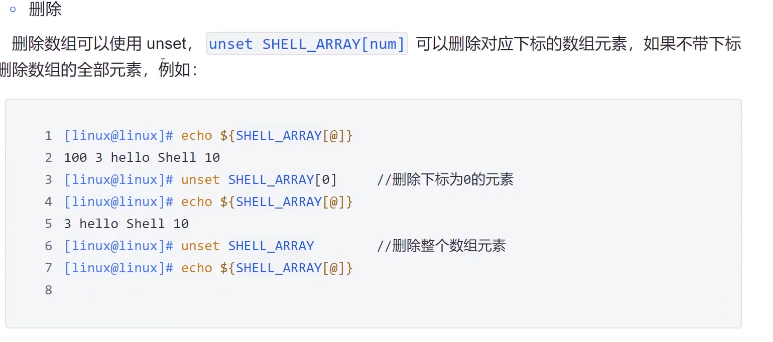
root@abc-virtual-machine:~/class/gen# unset array[1]
root@abc-virtual-machine:~/class/gen# echo ${array[@]}
1 3 abc
root@abc-virtual-machine:~/class/gen# unset array
root@abc-virtual-machine:~/class/gen# echo ${array[@]}
类似于c++map键值对
关联数组
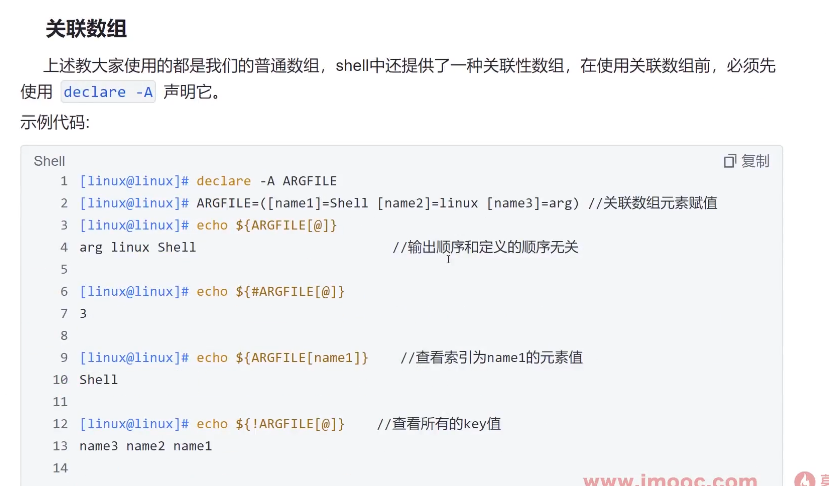

加!可以显示key值

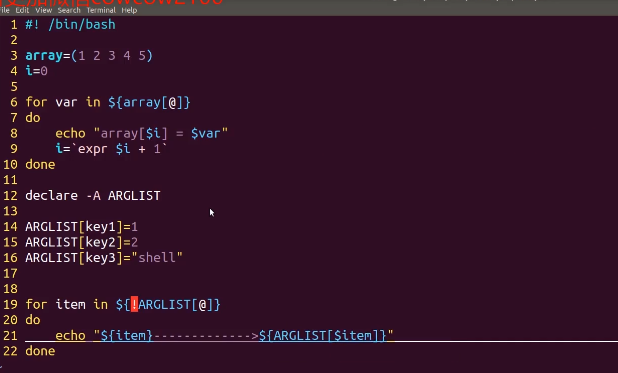
键值对绑定
root@abc-virtual-machine:~/class/gen# bash test04.sh
array[0] = 1
array[1] = 2
array[2] = 3
array[3] = 4
array[4] = 5
key2--------->2
key3--------->shell
key1--------->1
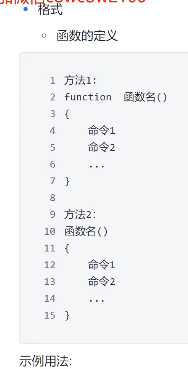
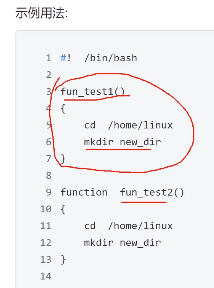
shell中的函数


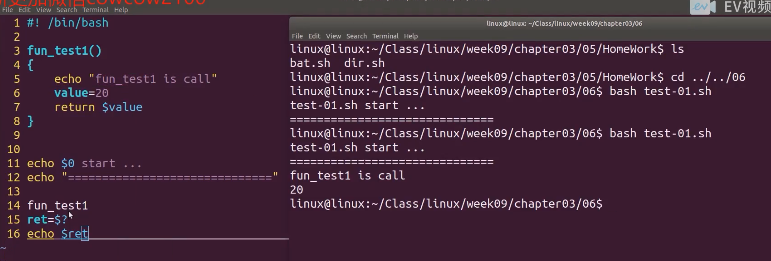
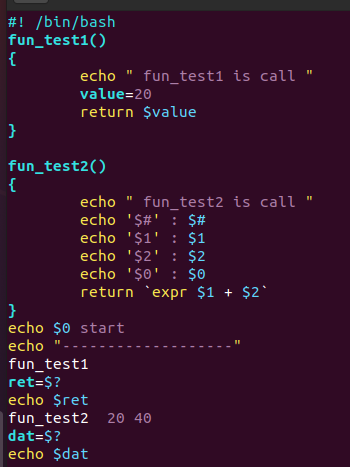
root@abc-virtual-machine:~/class/gen# bash test05.sh
test05.sh start
-------------------
 fun_test1 is call
20
 fun_test2 is call
$# : 2
$1 : 20
$2 : 40
$0 : test05.sh
60
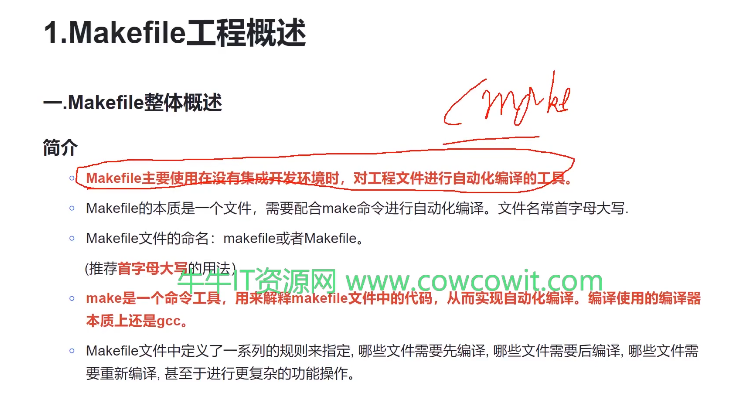
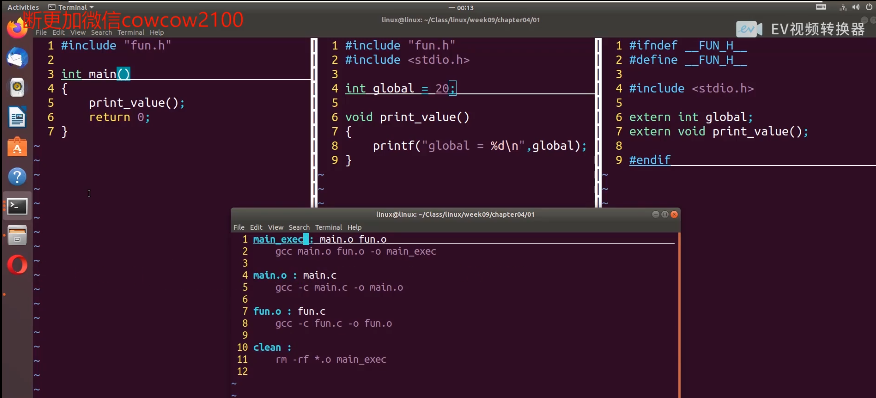
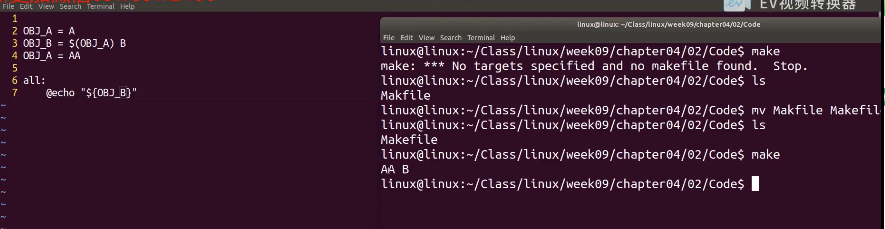
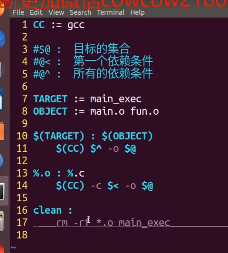
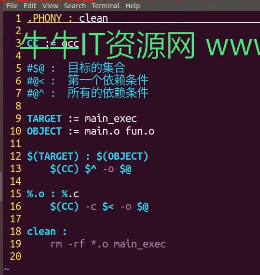
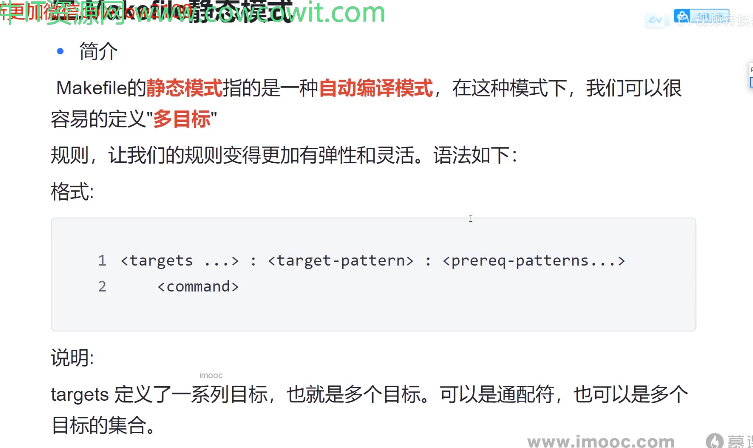
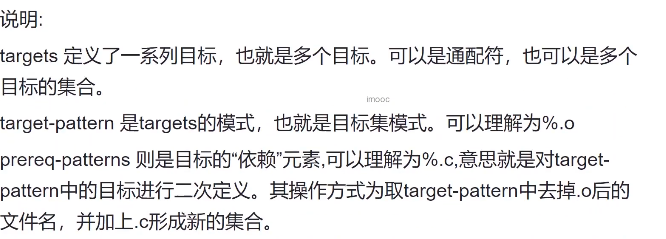
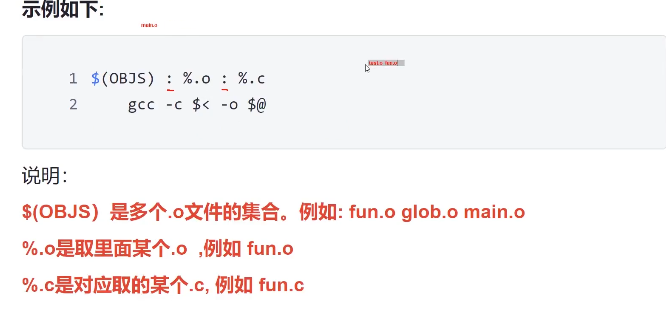
MakeFile工程概述


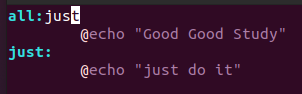
root@abc-virtual-machine:/Class/student# make  //默认make输出第一个
Good Good Study
root@abc-virtual-machine:/Class/student# make just
just do it
root@abc-virtual-machine:/Class/student# make   //图二  目标加了依赖条件后,先依赖
just do it
Good Good Study

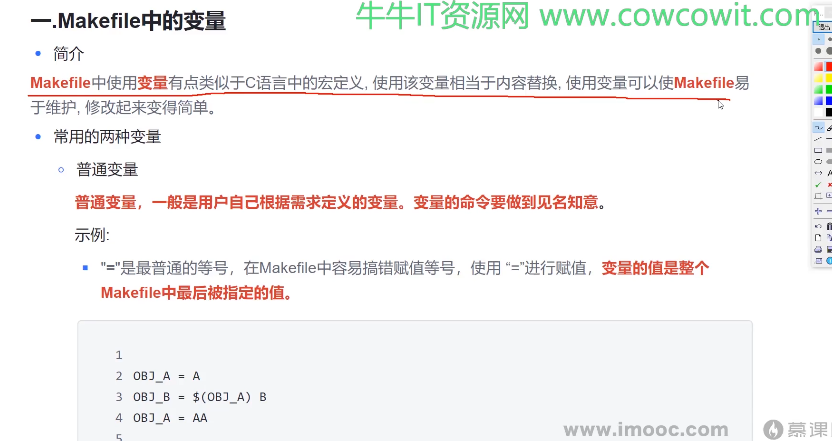
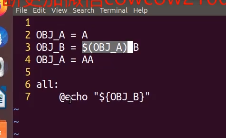
MakeFile中的变量


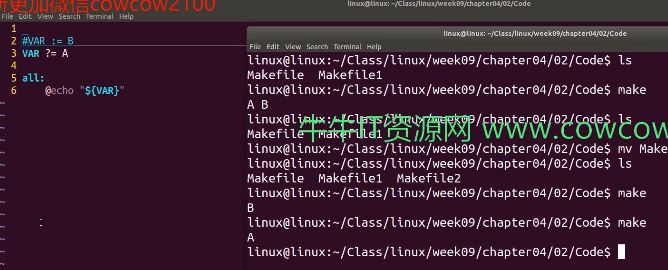
设置默认值
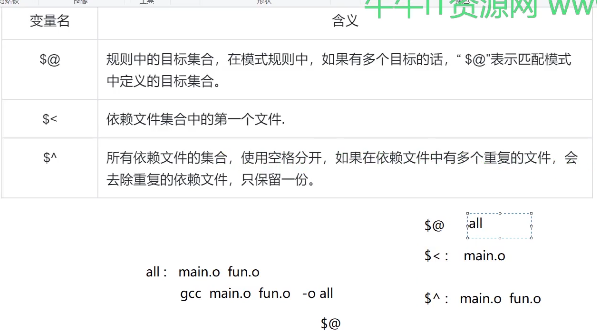
自动变量
Makefile伪文件,函数和库


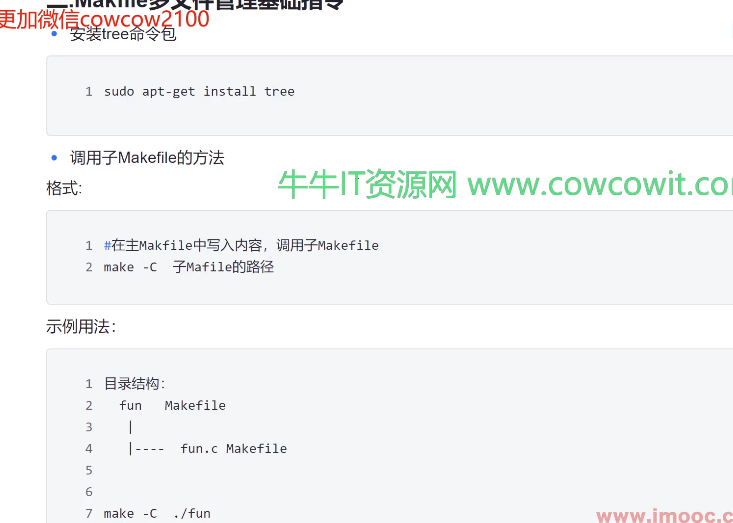
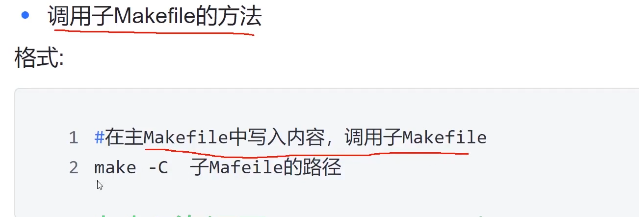
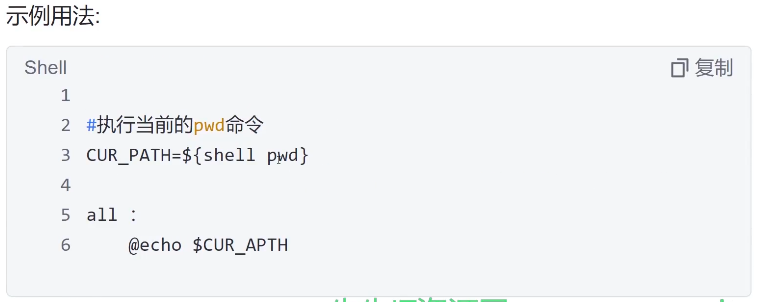
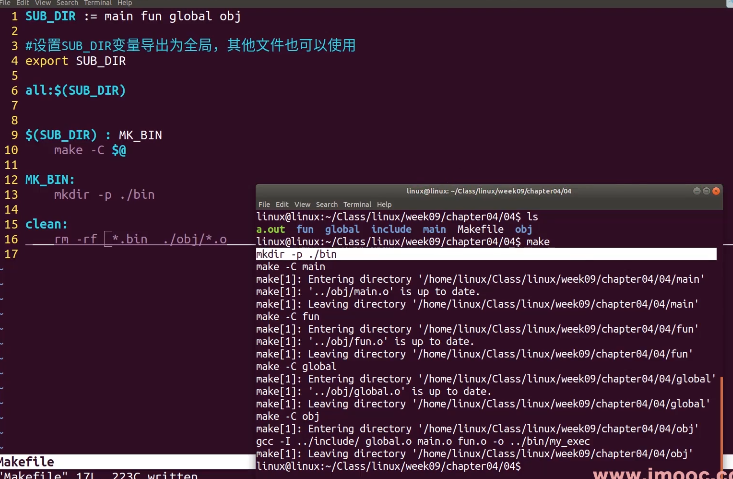
Makefile 多文件管理


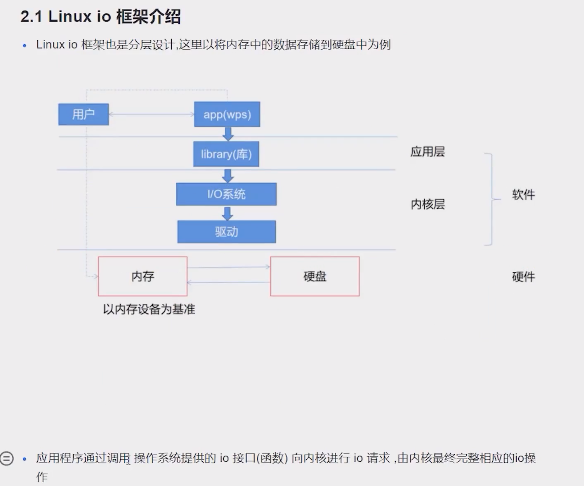
Linux文件IO
input:应用程序从其他设别获取数据暂存到内存中
output:应用程序将内存暂存的数据写入到其他设备
操作系统中相关概念
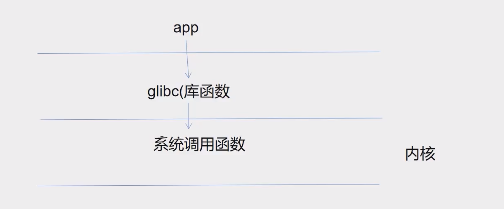
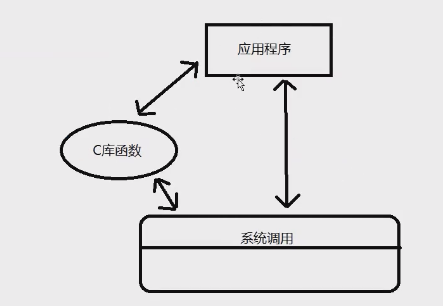
库函数:为了实现某个功能而封装起来的API集合,能够提供统一的编程接口,更加便于应用程序的移植
系统调用:是Linux内核提供给应用程序的访问接口
glibc:标准c函数集合和系统调用
- 标准c库函数是跨平台的,可以在Linux、windows下调用
- 系统调用是Linux内核提供给用户的访问接口,但在glibc中封装了系统调用接口而形成了glibc的库函数

文件描述 符
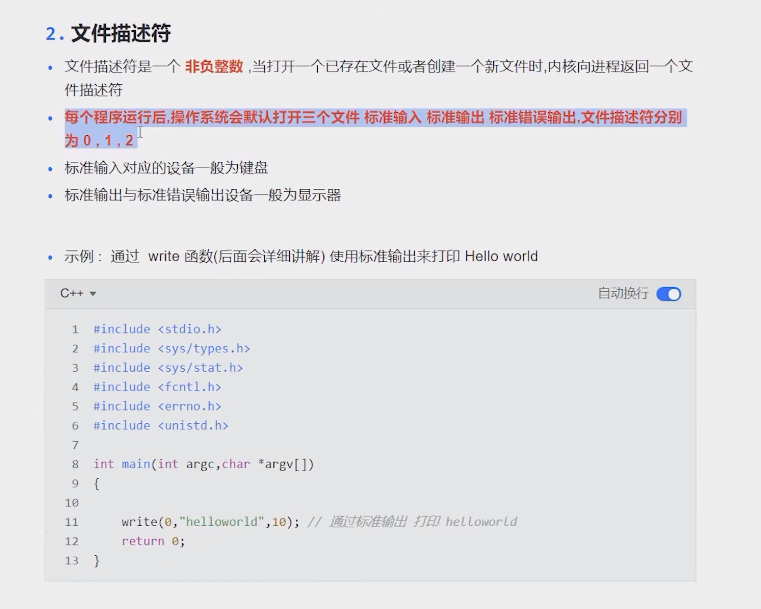
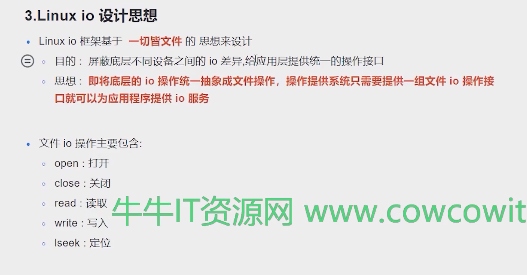
文件io
在命令行可以利用man 函数名查看使用说明
man open


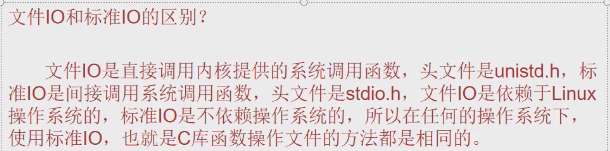
文件io
文件io就是直接调用内核提供的系统调用函数
标准io;
标准io是间接调用系统调用函数,是c库函数

文件IO
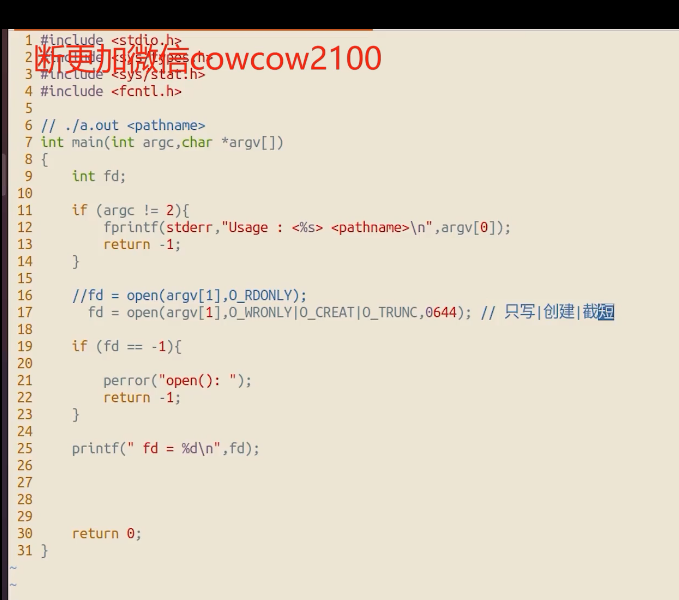
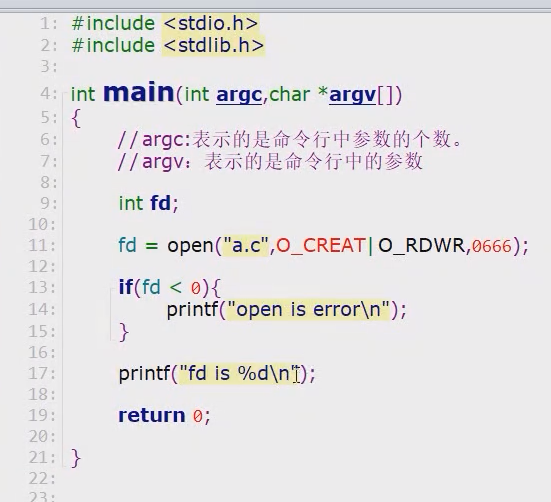
open函数
文件的访问权限
- 可执行—》1
- 可写-----》2
- 可读-----》4
- 可读可写可执行,就是相加之和7
1 #include <stdio.h>
2 #include <stdlib.h>
3 #include <sys/types.h>
4 #include <sys/stat.h>
5 #include <fcntl.h>
6 #include <unistd.h>
7
8 int main(int argc,char* argv[])
9 {
10
11 //文件描述付
12 | | int fd;
13 //以可读可写打开a.c,不存在则创建,0666为权限
14 | | fd = open("a.c",O_CREAT|O_RDWR,0666);
15 //返回-1说明文件打开错误
16
17 | | if(fd < 0){
18 | | | | printf("open is error\n");
19 | | }
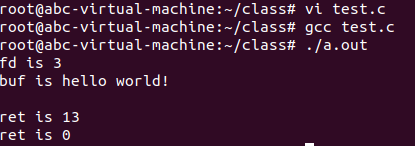
20 | | printf("fd is %d\n",fd);
21
22 | | return 0;
23 }
~

close函数
文件关闭之后,fd=3的文件描述符重新被系统所使用::
1 #include <stdio.h>
  2 #include <stdlib.h>
  3 #include <sys/types.h>
  4 #include <sys/stat.h>
  5 #include <fcntl.h>
  6 #include <unistd.h>
  7
  8 int main(int argc,char* argv[])
  9 {
 10
 11 //文件描述付
 12         int fd;
 13 //以刻度可写打开a.c,不存在则创建,0666为权限
 14         fd = open("a.c",O_CREAT|O_RDWR,0666);
 15 //返回-1说明文件打开错误
 16
 17         if(fd < 0){
 18                 printf("open is error\n");
 19         }
 20         printf("fd is %d\n",fd);
 21
 22         close(fd);
 23
 24         return 0;
 25 }
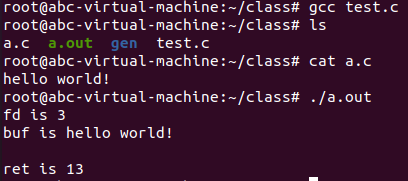
read函数
ssize_t read(int fd,void *buf,size_t count)
  #include <stdio.h>
  #include <stdlib.h>
  #include <sys/types.h>
  #include <sys/stat.h>
  #include <fcntl.h>
  #include <unistd.h>

  int main(int argc,char* argv[])
  {

         char buf[32]={0};//缓冲区数组
         ssize_t ret;//read函数返回值,读取的字符个数
         int fd;
         fd = open("a.c",O_RDWR);//文件描述符

         if(fd < 0){
                 printf("open is error\n");
                 return -1;
         }
         printf("fd is %d\n",fd);
	  //返回值大于0,说明读取完成
         ret = read(fd,buf,32);
         if(ret < 0){
                 printf("read is error\n");
                 return -2;
         }
 //打印读取到缓冲区数组中的数据,并打印读取的字符个数
         printf("buf is %s\n,buf);
         printf("ret is %d\n",ret);

         close(fd);

         return 0;
 }
注意:到文件末尾,read函数调用会返回0
        ret = read(fd,buf,32);
        if(ret < 0){
                printf("read is error\n");
                return -2;
        }

        printf("buf is %s\n",buf);
        printf("ret is %ld\n",ret);

		//已经到了文件末尾,在打印一次结果
        ret = read(fd,buf,32);
        printf("ret is %ld\n",ret);
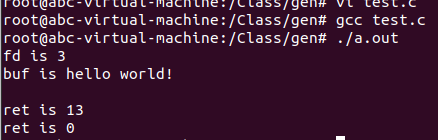
write函数``
`ssize_t write(int fd,const void *buf,size_t count);`````
int main(int argc,char* argv[])
{
      char buf[32]={0};
      ssize_t ret;
      int fd;

      fd = open("a.c",O_RDWR);

      if(fd < 0){
              printf("open is error\n");
              return -1;
      }

	//向文件描述符为a.c的文件中写入hello
      write(fd,"hello\n",6);

      close(fd);

      return 0;
}
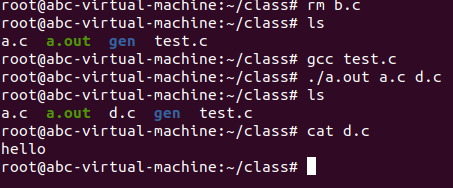
综合练习一
``通过命令行操作,把a.c的文件内容写入到b.c里面
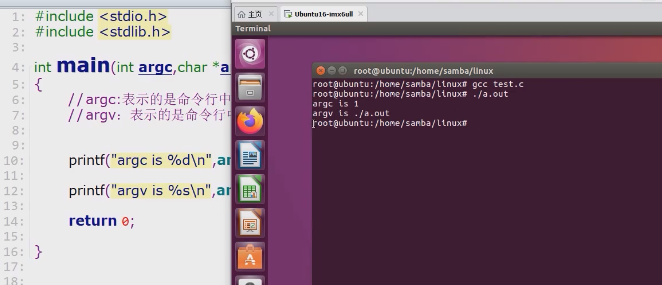
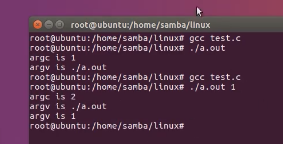
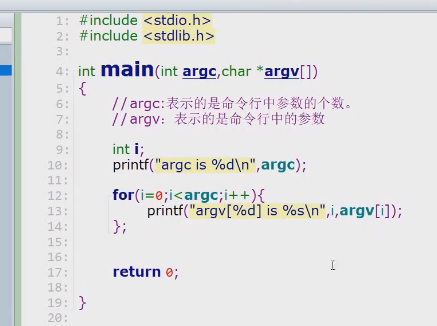
int main(int argc, char* argv[])
{
    //1.控制台命令行输入参数
    if (argc != 3) {
        printf("Usage : %s <src file> <obj file>\n", argv[0]);
    }

    //2.设置变量
    char buf[32] = { 0 };//缓冲区数组
    ssize_t ret;//read函数返回值,读取的字符个数
    int fd_src,fd_obj;

    //3.打开文件
    fd_src = open(argv[1],O_RDONLY);//文件描述符
    if (fd_src < 0) {
        printf("open is error\n");
        return -1;
    }
    //根据命令行第二个参数的文件是否存在,不存在则创建
    fd_obj = open(argv[2], O_RDWR| O_CREAT, 0666);//文件描述符
    if (fd_obj < 0) {
        printf("open is error\n");
        return -1;
    }

    //4.循环写入
	//没有读取到源文件末尾,继续读取
    while ((ret = read(fd_src, buf, 32)) != 0) {
        write(fd_obj, buf, ret);
    };

    //5.关闭文件
    close(fd_src);
    close(fd_obj);

    return 0;
}
Iseek定位函数

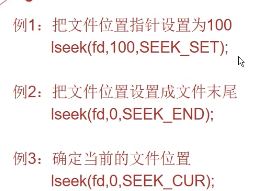
#include<stdlib.h>
#include <sys/types.h>
#include <unistd.h>
#include <stdio.h>
#include <sys/stat.h>
#include <fcntl.h>

int main()
{
    char buf[32] = { 0 };//缓冲区数组
    ssize_t ret;//read函数返回值,读取的字符个数
    int fd;
    fd = open("a.c", O_RDWR);//文件描述符

    if (fd < 0) {
        printf("open is error\n");
        return -1;

}
    printf("fd is %d\n", fd);
    //返回值大于0,说明读取完成
    ret = read(fd, buf, 32);
    if (ret < 0) {
        printf("read is error\n");
        return -2;
    }

    //打印读取到缓冲区数组中的数据,并打印读取的字符个数
    printf("buf is %s\n",buf);
    printf("ret is %ld\n", ret);

	//从文件头开始偏移0位
    ret = lseek(fd, 0, SEEK_SET);
    printf("ret is %ld\n", ret);

    close(fd);

    return 0;
}

目录IO
mkdir函数

#include<stdlib.h>
#include <sys/types.h>
#include <unistd.h>
#include <stdio.h>
#include <sys/stat.h>
#include <fcntl.h>

int main(int argc,char * argv[])
{
    //int mkdir(const char *pathname, mode_t mode);
    int ret;
    if (argc != 2) {
        printf("Usage %s <name file> \n",argv[0]);
        return -1;
    }
    ret = mkdir(argv[1], 0666);
    if (ret < 0) {
        printf("mkdir is error\n");
        printf("ret is %d\n", ret);
        return -1;
    }

    printf("mkdir is ok!\n");

    printf("ret is %d\n", ret);
    return 0;
}

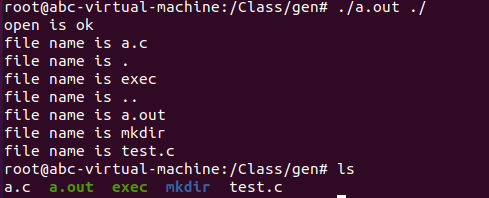
opendir函数
readdir函数
closedir函数
#include<stdlib.h>
#include <sys/types.h>
#include <unistd.h>
#include <stdio.h>
#include <sys/stat.h>
#include <fcntl.h>
#include <dirent.h>

int main(int argc,char * argv[])
{
    //int mkdir(const char *pathname, mode_t mode);
    int ret;
    DIR* dp;

    struct dirent *dir;

    if (argc != 2) {
        printf("Usage %s <name file> \n",argv[0]);
        return -1;
    }

    dp = opendir(argv[1]);

    if (dp != NULL) {
        printf("open is ok\n");
    }

    dir = readdir(dp);

    if (dir == NULL) {
        printf("readdir is NULL\n");
    }
    printf("file name is %s\n", dir->d_name);

    closedir(dp);
    return 0;
}

#include<stdlib.h>
#include <sys/types.h>
#include <unistd.h>
#include <stdio.h>
#include <sys/stat.h>
#include <fcntl.h>
#include <dirent.h>

int main(int argc,char * argv[])
{
    //int mkdir(const char *pathname, mode_t mode);
    int ret;
    DIR* dp;

    struct dirent *dir;

    if (argc != 2) {
        printf("Usage %s <name file> \n",argv[0]);
        return -1;
    }
    dp = opendir(argv[1]);

    if (dp != NULL) {
        printf("open is ok\n");
    }
    //加入while循环读取目录
    while (1) {
        dir = readdir(dp);
        if (dir != NULL) {
            printf("file name is %s\n", dir->d_name);
        }
        else
            break;
    }

    closedir(dp);
    return 0;
}
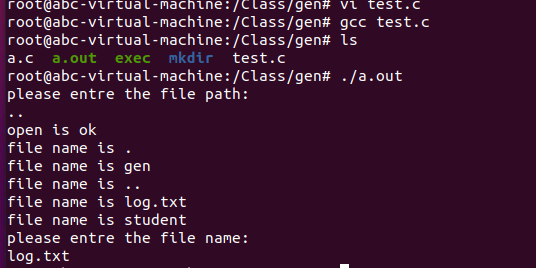
综合练习2

scanf和main函数从命令行中输入有什么区别
scanf 用于从标准输入(如键盘)读取数据。
main 函数的命令行参数允许你从命令行直接传递参数给程序。
这两者是不同的输入机制,用于不同的目的。scanf 通常用于与用户进行交互式输入,
而命令行参数则用于配置程序的行为或提供必要的数据。
#include<stdlib.h>
#include <sys/types.h>
#include <unistd.h>
#include <stdio.h>
#include <sys/stat.h>
#include <fcntl.h>
#include <dirent.h>
#include<string.h>

int main(int argc,char * argv[])
{
    //步骤一:定义变量
    int fd_src, fd_obj;
    char buf[32] = { 0 };
    char file_path[32] = { 0 };
    char file_name[32] = { 0 };
    ssize_t ret;
    struct dirent* dir;
    DIR* dp;

    //步骤二:从键盘输入文件路径
    printf("please entre the file path:\n");
    scanf("%s", file_path);

    //步骤三:打开目录,获取目录留置针,然后读取目录打印文件名

    dp = opendir(file_path);

    if (dp == NULL) {
        printf("open is NULL\n");
        return -1;
    }

    printf("open is ok\n");
    while (1) {
        dir = readdir(dp);

        if (dir != NULL) {
            printf("file name is %s\n", dir->d_name);
        }
        else
            break;
    }

    //步骤四:获取我们想要复制的文件名
    printf("please entre the file name:\n");
    scanf("%s", file_name);


    //步骤五:获得文件描述符
    fd_src = open(strcat(strcat(file_path, "/"), file_name), O_RDWR);

    if (fd_src < 0) {
        printf("open is error\n");
        return -1;
    }

    fd_obj = open(file_name, O_RDWR | O_CREAT, 0666);
    if (fd_obj < 0) {
        printf("open is error\n");
        return -1;
    }

    //步骤六:读写操作
    while ((ret = read(fd_src, buf, 32) != 0)) {
        write(fd_obj, buf, ret);
    }

    //步骤七:读写操作
    close(fd_src);
    closedir(dp);
    close(fd_obj);

    return 0;
}
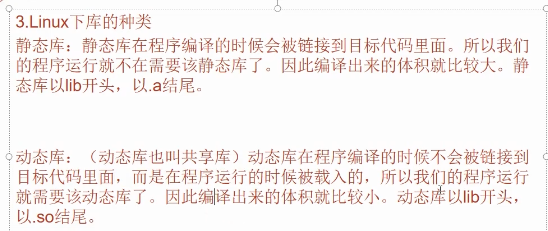
静态库和动态库

什么时候使用分场景
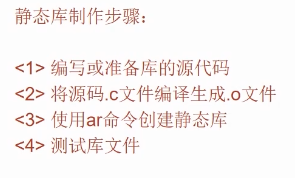
静态库的制作

测试文件mylib.c 和test.c
//test.c
#include<stdio.h>
void mylib(void);
int main()
{
        mylib();
        return 0;
}

//mylib.c
#include<stdio.h>
void mylib(void);

void mylib(void)
{
        printf("this is mylib");
}
1.编译生成.o文件
gcc -c mylib.c
2.-ar命令生成静态库文件
ar cr libmylib.a   mylib.o
静态库的使用

2.链接静态库编译
gcc test.c -lmylib -L
动态库的制作


动态库的使用


第二种方法只对当前终端有效,属于临时修改

第三种,向配置文件中添加当前动态库路径,然后使用ldconfig更新目录

gdb调试工具
检查程序逻辑错误,处理思路为分析现象–>假设错误原因—>产生新的现象去验证假设
gdb调试工具: 大前提:程序是你自己写的。 —逻辑错误
程序中快速根据函数名定位到库函数定义,快捷键大写k,定位到自定义的函数*或者#
操作步骤:
1.生成可调式的文件
gcc test.c -o a.out -g
2.gdb调试
gdb a.out gdb 可执行文件
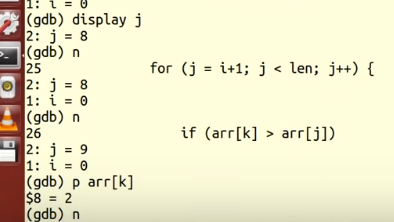
3.常见调试命令
设置断点 b 行数
设置条件断点 b 20 if i = 5
查看断点信息表 info b
删除断点 d 断点号数(info b)
run/r: 运行程序
n/next: 下一条指令(会越过函数)
s/step: 下一条指令(会进入函数)
p/print:p i 查看变量的值。
continue:继续执行断点后续指令。
finish:结束当前函数调用。
quit:退出gdb当前调试。
其他指令:
run:使用run查找段错误出现位置。
set args: 设置main函数命令行参数 (在 start、run 之前)
run 字串1 字串2 ...: 设置main函数命令行参数
ptype:查看变量类型。
bt:列出当前程序正存活着的栈帧。
frame: 根据栈帧编号,切换栈帧。
start: 直接启动调试,不需要先设置断点,在接着run
display:设``置跟踪变量
undisplay:取消设置跟踪变量。 使用跟踪变量的编号。
#include<stdio.h>
#include<stdlib.h>
#include<time.h>
#define N 10

char *str = "hello";
int var  = 0;

void init_arr(int *arr,int len)
{
	int i =0 ;
	for(i = 0; i < len;i++)
	{
		arr[i] = rand() % 20 + i;
	}

}

void select_sort(int *arr,int len)
{

	int i,j,k,tmp = 0;

	for(i = 0;i < len-1;i++)
	{
		k = i;
		for(j = i + 1; j < len; j++){
			if(arr[k] > arr[j])
				k = j;
		}
		if(i !=k){
			tmp = arr[i];
			arr[i] = arr[k];
			arr[k] = tmp;
		}
	}
}

void print_arr(int *arr,int len)
{

	int i;
	for(i = 0; i< len ; i++ )
		printf("arr[%d] = %d\n",i,arr[i]);

}

int main(void)
{

	int arr[N];
	char *p = "hellod";
	srand(time(NULL));
	init_arr(arr,N);
	print_arr(arr,N);

    printf("line:%d\n", __LINE__);
	select_sort(arr,N);

	printf("line:%d\n", __LINE__);
	printf("----------after sort -----------------");

	print_arr(arr,N);

	return 0;
}
1.生成可调式的文件
gcc test.c -o a.out -g
2.gdb调试
gdb a.out gdb 可执行文件
3.常见调试命令
设置断点 b 行数
设置条件断点 b 20 if i = 5
查看断点信息表 info b
删除断点 d 断点号数(info b)
run/r: 运行程序
n/next: 下一条指令(会越过函数)
s/step: 下一条指令(会进入函数)
p/print:p i 查看变量的值。
continue:继续执行断点后续指令。
finish:结束当前函数调用。
quit:退出gdb当前调试。
其他指令:
run:使用run查找段错误出现位置。
set args: 设置main函数命令行参数 (在 start、run 之前)
run 字串1 字串2 ...: 设置main函数命令行参数
ptype:查看变量类型。
bt:列出当前程序正存活着的栈帧。
frame: 根据栈帧编号,切换栈帧。
start: 直接启动调试,不需要先设置断点,在接着run
display:设``置跟踪变量
undisplay:取消设置跟踪变量。 使用跟踪变量的编号。


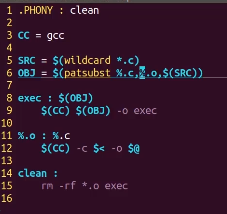
makefile: 管理项目。
命名:makefile Makefile --- make 命令
1 个规则:
目标:依赖条件
(一个tab缩进)命令
1. 目标的时间必须晚于依赖条件的时间,否则,更新目标
2. 依赖条件如果不存在,找寻新的规则去产生依赖条件。
ALL:指定 makefile 的终极目标。
2 个函数:
src = $(wildcard ./*.c): 匹配当前工作目录下的所有.c 文件。将文件名组成列表,赋值给变量 src。 src = add.c sub.c div1.c
obj = $(patsubst %.c, %.o, $(src)): 将参数3中,包含参数1的部分,替换为参数2。 obj = add.o sub.o div1.o
clean: (没有依赖)
-rm -rf $(obj) a.out “-”:作用是,删除不存在文件时,不报错。顺序执行结束。
3 个自动变量:
$@: 在规则的命令中,表示规则中的目标。
$^: 在规则的命令中,表示所有依赖条件。
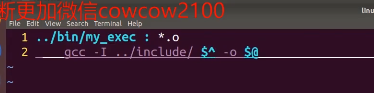
$<: 在规则的命令中,表示第一个依赖条件。如果将该变量应用在模式规则中,它可将依赖条件列表中的依赖依次取出,套用模式规则。
模式规则:
%.o:%.c
gcc -c $< -o %@
静态模式规则:
$(obj):%.o:%.c
gcc -c $< -o %@
伪目标:
.PHONY: clean ALL
参数:
-n:模拟执行make、make clean 命令。
-f:指定文件执行 make 命令。 xxxx.mk
作业:编写一个 makefile 可以将其所在目录下的所有独立 .c 文件编译生成同名可执行文件。
open函数:


栈帧切换

display跟踪
没有加-g调试命令出先

阻塞和非阻塞
产生阻塞的场景,读设备文件,读网络文件,
读取常规文件没有阻塞概念
阻塞、非阻塞: 是设备文件、网络文件的属性。
产生阻塞的场景。 读设备文件。读网络文件。(读常规文件无阻塞概念。)
/dev/tty -- 终端文件。
open("/dev/tty", O_RDWR|O_NONBLOCK) --- 设置 /dev/tty 非阻塞状态。(默认为阻塞状态)
fcntl:
int (int fd, int cmd, ...)
int flgs = fcntl(fd, F_GETFL);
flgs |= O_NONBLOCK
fcntl(fd, F_SETFL, flgs);
获取文件状态: F_GETFL
设置文件状态: F_SETFL
lseek函数:
off_t lseek(int fd, off_t offset, int whence);
参数:
fd:文件描述符
offset: 偏移量
whence:起始偏移位置: SEEK_SET/SEEK_CUR/SEEK_END
返回值:
成功:较起始位置偏移量
失败:-1 errno
应用场景:
1. 文件的“读”、“写”使用同一偏移位置。
2. 使用lseek获取文件大小
3. 使用lseek拓展文件大小:要想使文件大小真正拓展,必须引起IO操作。
使用 truncate 函数,直接拓展文件。 int ret = truncate("dict.cp", 250);
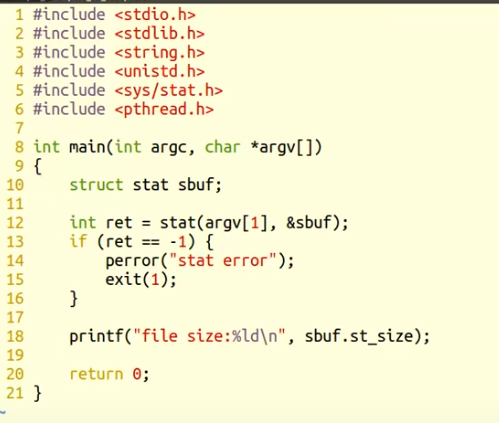
stat/lstat 函数:
int stat(const char *path, struct stat *buf);
参数:
path: 文件路径
buf:(传出参数) 存放文件属性。
返回值:
成功: 0
失败: -1 errno
获取文件大小: buf.st_size
获取文件类型: buf.st_mode
获取文件权限: buf.st_mode
符号穿透:stat会。lstat不会。
link/unlink:
隐式回收。
目录操作函数:
DIR * opendir(char *name);
int closedir(DIR *dp);
struct dirent *readdir(DIR * dp);
struct dirent {
inode
char dname[256];
}
#include <unistd.h>
#include <fcntl.h>
#include <stdlib.h>
#include <stdio.h>
#include <errno.h>
#include <string.h>

#define MSG_TRY "try again\n"
#define MSG_TIMEOUT "time out\n"

int main(void)
{
    char buf[10];
    int fd, n, i;

    fd = open("/dev/tty", O_RDONLY|O_NONBLOCK);
    if(fd < 0){
        perror("open /dev/tty");
        exit(1);
    }
    printf("open /dev/tty ok... %d\n", fd);

    for (i = 0; i < 5; i++){
        n = read(fd, buf, 10);
        if (n > 0) {                    //说明读到了东西
            break;
        }
        if (errno != EAGAIN) {          //EWOULDBLOCK
            perror("read /dev/tty");
            exit(1);
        } else {
			//再试一次
            write(STDOUT_FILENO, MSG_TRY, strlen(MSG_TRY));//STDOUT_FILENO标准输出
            sleep(2);
        }
    }

    //5次都没有输入数据,标准输出打印超时提醒
    if (i == 5) {
		//标准输出超时
        write(STDOUT_FILENO, MSG_TIMEOUT, strlen(MSG_TIMEOUT));
    } else {
        write(STDOUT_FILENO, buf, n);
    }

    close(fd);

    return 0;
}
lseek
在打开的文件中改变文件的偏移
#include <stdio.h>
#include <stdlib.h>
#include <unistd.h>
#include <string.h>
#include <fcntl.h>

int main(void)
{
	int fd, n;
	char msg[] = "It's a test for lseek\n";
	char ch;

	fd = open("lseek.txt", O_RDWR|O_CREAT, 0644);
	if(fd < 0){
		perror("open lseek.txt error");
		exit(1);
	}

	write(fd, msg, strlen(msg));    //使用fd对打开的文件进行写操作,问价读写位置位于文件结尾处。

	lseek(fd, 0, SEEK_SET);         //修改文件读写指针位置,位于文件开头。 注释该行会怎样呢?

	while((n = read(fd, &ch, 1))){
		if(n < 0){
			perror("read error");
			exit(1);
		}
		write(STDOUT_FILENO, &ch, n);   //将文件内容按字节读出,写出到屏幕
	}

	close(fd);

	return 0;
}
传入传出参数
传入参数:
1. 指针作为函数参数。
2. 通常有const关键字修饰。
3. 指针指向有效区域, 在函数内部做读操作。
传出参数:
1. 指针作为函数参数。
2. 在函数调用之前,指针指向的空间可以无意义,但必须有效。
3. 在函数内部,做写操作。
4。函数调用结束后,充当函数返回值。
传入传出参数:
1. 指针作为函数参数。
2. 在函数调用之前,指针指向的空间有实际意义。
3. 在函数内部,先做读操作,后做写操作。
4. 函数调用结束后,充当函数返回值。
/*此例子中,num1称为传入参数,num2称为传出参数。传入参数为本身有值,传入函数让函数使用;传出参数本身没值,从函数中带出值(相当于函数的返回值)。

如何实现一个传出参数?
定义一个变量,将这个变量的地址传过去,在函数中实现对这个变量的操作。

函数如何返回多个值?
使用传出参数,可以实现返回多个值。*/

#include <stdio.h>

int func(int num1, int *num2)
{
    *num2 = 5;
    return num1 + *num2;
}

int main()
{
    int num1 = 5;
    int num2;
    int result = func(num1, &num2);

    printf("num2 = %d\n",num2);
    printf("result = %d\n",result);

    return 0;
}
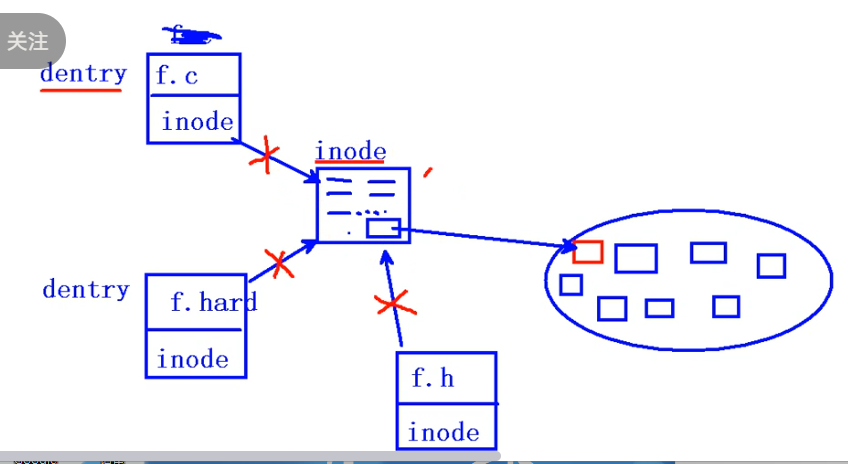
inode和dentry
inode其本质为结构体,存储文件的属性信息。如:权限、类型、大小、时间、用户、盘块位置……也叫作文件属性管理结构,大多数的inode都存储在磁盘上。
**dentry **目录项,其本质依然是结构体,重要成员变量有两个{文件名,inode,…},而文件内容(data)保存在磁盘盘块中
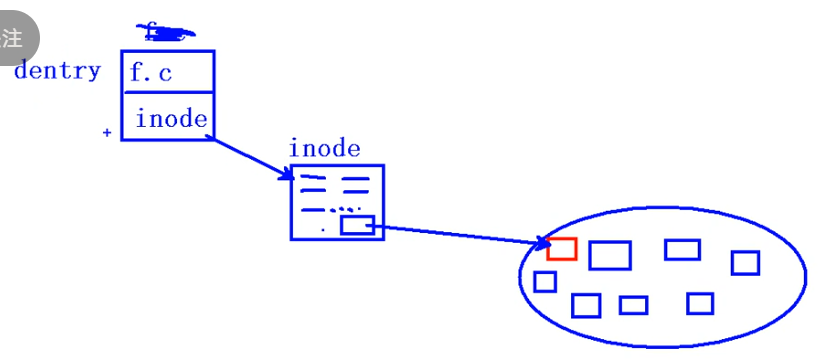
硬链接就是添加dentry,数据恢复就是重新建立目录项,建立inode
stat函数
**获取文件属性(从inode结构体中获取),文件属性将通过传出参数返回给调用者。成功返回0; 失败返回-1 设置errno为恰当值。 **
**int stat(const char *path, struct stat *buf); 参数1:文件名 参数2: inode结构体指针(传出参数)**
link函数

递归遍历目录
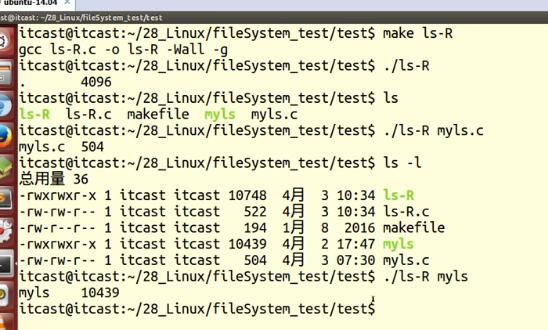
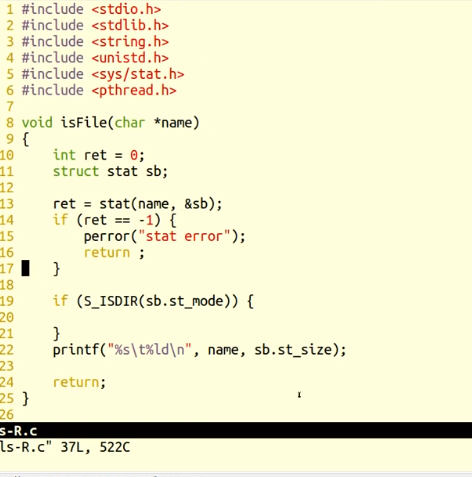
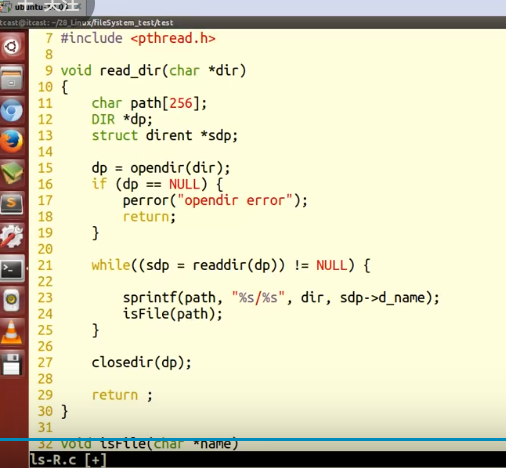
ls -R 目录 遍历目录命令行
递归遍历目录:ls-R.c

	1. 判断命令行参数,获取用户要查询的目录名。	int argc, char *argv[1]

		argc == 1  --> ./

	2. 判断用户指定的是否是目录。 stat  S_ISDIR(); --> 封装函数 isFile() {   }

	3. 读目录: read_dir() {

		opendir(dir)

		while (readdir()){

			普通文件,直接打印

			目录:
				拼接目录访问绝对路径。sprintf(path, "%s/%s", dir, d_name)

				递归调用自己。--》 opendir(path) readdir closedir
		}

		closedir()

		}
		read_dir() --> isFile() ---> read_dir()
===================================================================================================
#include <stdio.h>
#include <stdlib.h>
#include <dirent.h>
#include <string.h>
#include <sys/types.h>
//const char *path传入参数,(是个指针,有const,只做读取操作)
void traverse_directory(const char *path) {
    DIR *dir;
    struct dirent *entry;
    char full_path[1024];

    if (!(dir = opendir(path))) {
		//目录打开失败,dir为NULL ,!NULL表示真,所以执行{}里
        perror("opendir");
        return;
    }
  //为什么要用while,有好多个目录
    while ((entry = readdir(dir)) != NULL) {
		//类型是一个目录
        if (entry->d_type == DT_DIR) {
            // 忽略当前目录(.)和上级目录(..)
            if (strcmp(entry->d_name, ".") == 0 || strcmp(entry->d_name, "..") == 0) {
                continue;
            }

            // 构建完整的子目录路径
            snprintf(full_pat5h, sizeof(full_path), "%s/%s", path, entry->d_name);

            // 递归遍历子目录
            printf("Entering directory: %s\n", full_path);
            traverse_directory(full_path);
            printf("Exiting directory: %s\n", full_path);
        } else {
            // 处理文件
            printf("File: %s/%s\n", path, entry->d_name);
        }
    }

    closedir(dir);
}

int main(int argc, char *argv[]) {
    if (argc != 2) {
        fprintf(stderr, "Usage: %s <directory_path>\n", argv[0]);
        return 1;
    }
  //两个参数,第一个是可执行文件,第二个是目录的路径
    traverse_directory(argv[1]);

    return 0;
}
dup和dup2函数
dup 和 dup2 是两个用于复制文件描述符的库函数,这些函数定义在 <unistd.h> 头文件中。这些函数在进程内部创建文件描述符的副本,使得两个或更多的文件描述符引用相同的打开文件、管道或套接字。
dup 函数
dup 函数用于复制当前进程中文件描述符表上的最低未用文件描述符(即最小的未打开的描述符),并使其成为指定文件描述符(oldfd)的副本。
#include <unistd.h>
int dup(int oldfd);
- oldfd:要复制的文件描述符。
返回值:
- 成功时,返回新文件描述符的编号(即最小的未使用的文件描述符)。
- 失败时,返回 -1 并设置 errno。
dup2 函数
dup2 函数的行为与 dup 类似,但允许调用者指定新文件描述符的编号。如果指定的新文件描述符 newfd 已经打开,则 dup2 在复制 oldfd 之前会先关闭 newfd。
int dup2(int oldfd, int newfd); 文件描述符复制。重定向。
- oldfd:要复制的文件描述符。
- newfd:新文件描述符的编号。
返回值:
- 成功时,返回新文件描述符的编号(即 newfd)。
- 失败时,返回 -1 并设置 errno。
#include <stdio.h>
#include <stdlib.h>
#include <string.h>
#include <fcntl.h>
#include <unistd.h>
#include <pthread.h>

int main(int argc, char *argv[])
{
    int fd1 = open(argv[1], O_RDWR);       // 012  --- 3

    int fd2 = open(argv[2], O_RDWR);       // 012  --- 3

    int fdret = dup2(fd1, fd2);     // 返回 新文件描述符fd2
    printf("fdret = %d\n", fdret);

    int ret = write(fd2, "1234567", 7); // 写入 fd1 指向的文件
    printf("ret = %d\n", ret);

	// 将屏幕输出,重定向给 fd1所指向的文件.这意味着之后写入标准输出的任何内容都将被写入fd1所指向的文件
    dup2(fd1, STDOUT_FILENO);

    printf("-----------------------------886\n");

	return 0;
}
fcntl 函数实现 dup:
int fcntl(int fd, int cmd, ....)
cmd: F_DUPFD
参3: 被占用的,返回最小可用的。
未被占用的, 返回=该值的文件描述符。


操作系统

进程
1.什么是进程?
进程指的是正在运行的程序
2.进程ID
每个进程都有一个唯一的标识符,既进程ID,简称pid
3.进程间的通信的几种方法?
- 管道通信:有名管道,无名管道
- 信号通信:信号的发送,信号的接受,信号的处理
- IPC通信:共享内存,消息队列,信号灯
- Socket通信
3.进程的三种基本状态以及转换

PCB进程控制块
重要的信息:
- 进程的状态,
- 当前的工作目录
- 文件描述符表,
- umask掩码
- 用户id和组id
- 和信号相关的信息

env输出所有的环境变量


umask
进程控制
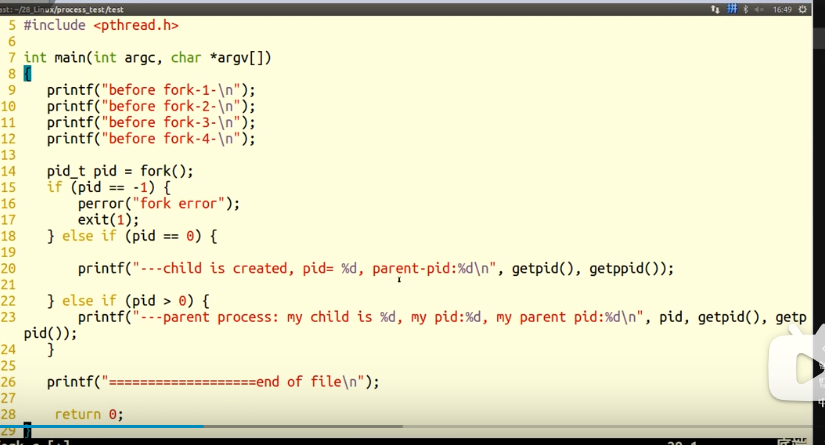
fork函数
fork()
	pid_t fork(void);
返回值:

	如果成功,则在父进程中返回子进程的PID,并在子进程中返回0。
	如果失败,在父进程中返回-1,不创建子进程,并适当设置errno。

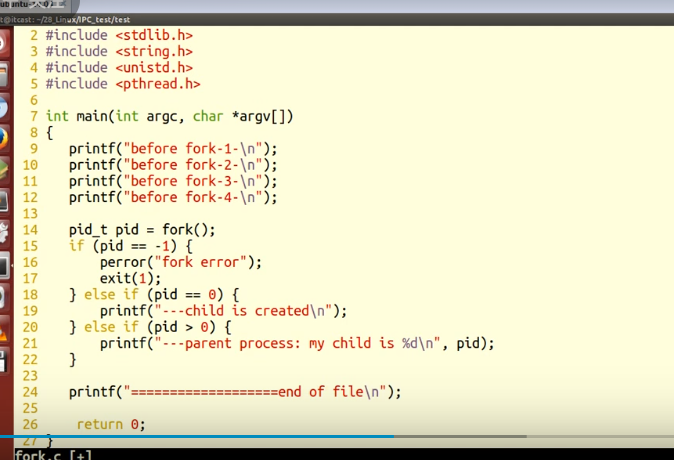
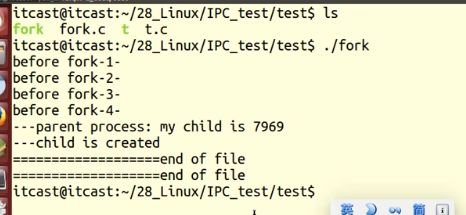
fork之后的程序,父子进程都会出现并且运行,end of file 就是这样运行两次
循环创建n个子进程
getpid函数
getppid函数
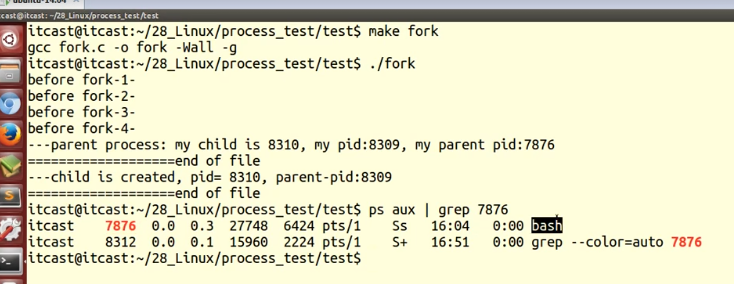


int main(int argc,char *argv[]){
	int i;
	pid_t pid;
	for(i=0; i< 5;i ++){
		 pid = fork();//fork之后,程序会执行两次,子进程和父进程都会执行下面的代码
		 printf("pid is %dth\n",pid);
		//pid=0的哪些子线程相当于在另外一个程序中,直接就退出循环了
		 if(pid == 0){
		     break;
	    }
	}
	if(5 == i){
		sleep(1);
		printf("I'm parent \n");
	}else{
		printf("I'm %dth child\n",i+1);
	}

	 return 0;
}

进程共享
**父子进程之间在刚fork 之后: **
相同处:
全局变量、data、.text、栈、堆、环境变量、用户 ID、宿主目录、进程工作目录、信号处理方式...
不同处:
1.进程ID
2.fork返回值
3.父进程ID
4.进程运行时间
5.闹钟(定时器)
6.未决信号集·
父子进程共享:
** 读时共享,写时复制。 ----------改变的是全局变量**
**1.文件描述符 2. mmap映射区**
特别的,fork之后父进程先执行还是子进程先执行不确定,取决于内核所使用的调度算法
#include<stdio.h>
#include<stdlib.h>
#include<string.h>
#include<unistd.h>
#include<pthread.h>
int var =100;
int main(int argc,char *argv[])
{
	int i;
	pid_t pid;
	pid = fork();
	if(pid == -1){
	    perror("fork error");
	    exit(1);
	}else if(pid > 0)  {

	    var =288;
            printf("parent,var = %d\n",var);
	    printf("i am prent pid = %d,getppid = %d\n",getpid(),getppid());

	}else if(pid ==0) {

	    var = 200;
	    printf("i am child pid = %d,ppid = %d\n",getpid(),getppid());
	    printf("child,var = %d\n",var);
	}


	printf("------------finish------------------\n");
	return 0;

}
root@abc-virtual-machine:~# ./a.out
parent,var = 288
i am prent pid = 1911,getppid = 1766
------------finish------------------
i am child pid = 1912,ppid = 1911
child,var = 200
------------finish------------------
父子进程gdb调式

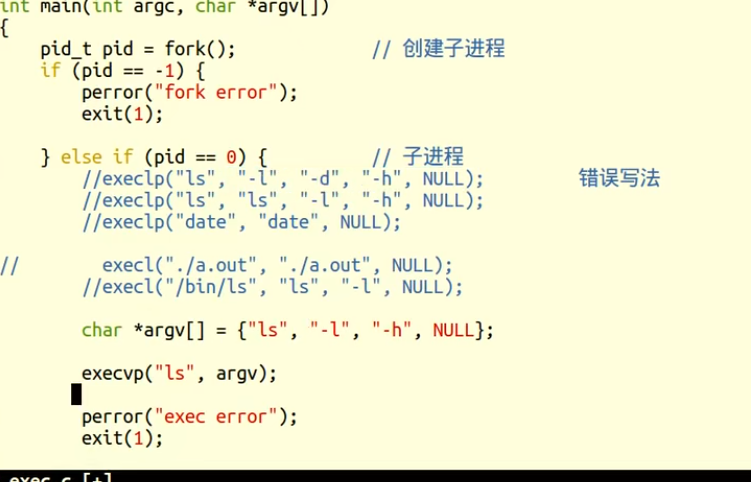
exec函数族
使进程执行某一程序。成功无返回值,失败返回 -1
int execlp(const char *file, const char *arg, ...);		借助 PATH 环境变量找寻待执行程序

		参1: 程序名

		参2: argv0

		参3: argv1

		...: argvN

		哨兵:NULL
	int execl(const char *path, const char *arg, ...);		自己指定待执行程序路径。

	int execvp();

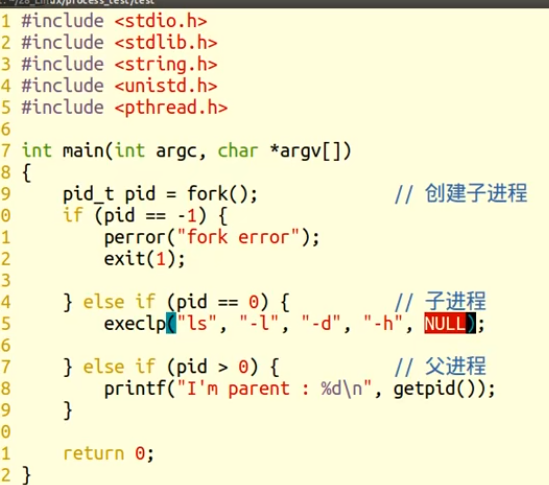
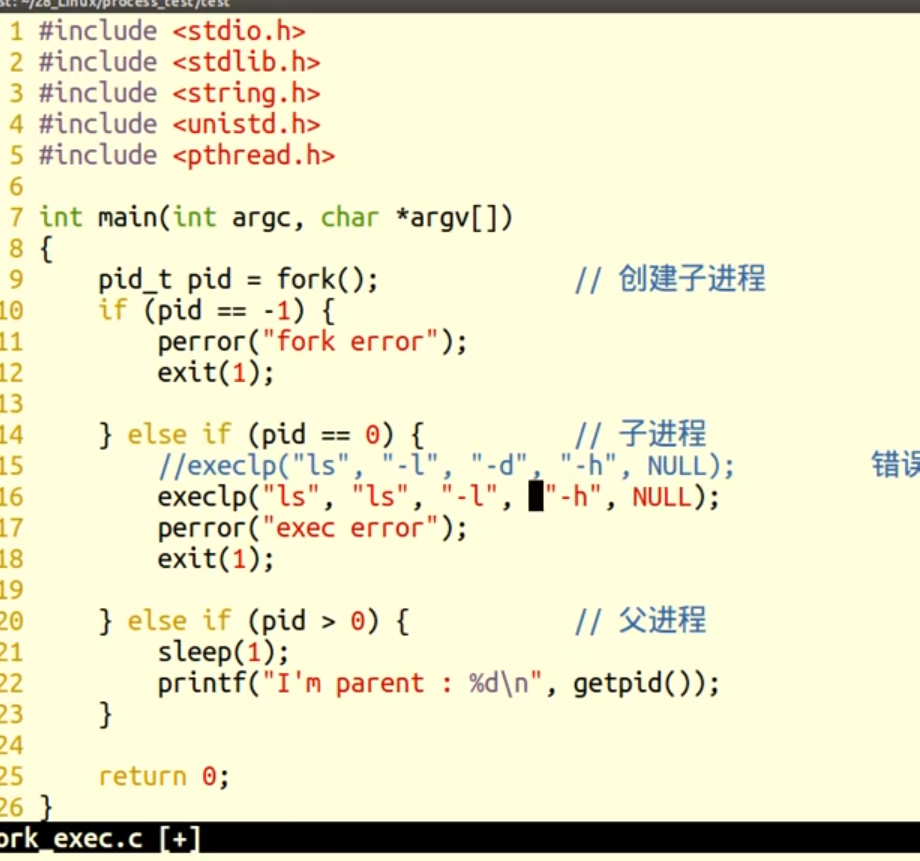
NULL函数参数结束标志
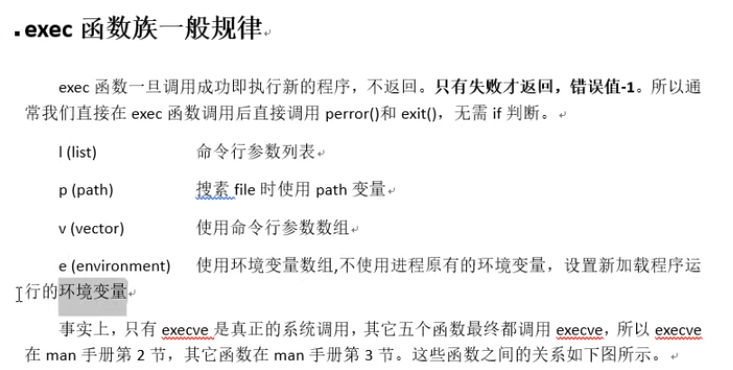
在 Linux 中,exec 函数族是用于在当前进程上下文中执行另一个程序的。这些函数会替换当前进程的映像(即代码、数据、堆和栈)为新程序,并从新程序的 main() 函数开始执行。exec 函数族有多个变体,每个变体在参数处理和行为上略有不同。以下是一些常见的 exec 函数及其区别:
- execl()、execp()、execle()(这些函数实际上是 POSIX 标准中不存在的,但在某些系统中可能作为别名或扩展存在)
这些函数名可能是某些系统或库提供的特定版本或别名,但通常不建议使用,因为它们不是标准的。
2. execlp()、execvp()
这些函数接受程序名作为第一个参数,并在环境变量 PATH 中搜索该程序。如果找到,则执行该程序。execlp() 使用固定的参数列表,而 execvp() 允许使用参数向量(即字符指针数组)。
3. execv()、execve()、execvp()
这些函数接受一个参数向量(字符指针数组),该数组以 NULL 结尾。其中,execv() 需要完整的路径名,而 execvp() 会在 PATH 中搜索程序。execve() 还允许传递一个新的环境变量向量(这是 exec 函数族中唯一允许这样做的函数)。
4. execl()、execlp()、execle()(如果存在的话)
这些函数接受一个可变的参数列表,就像 printf() 那样。但是,由于 C 语言不支持真正的可变参数列表函数(与 C++ 的模板参数或 C# 的可变参数列表不同),这些函数可能是某些系统或库提供的特定版本或别名,并且不是标准的。
5. l (list)、p (path)、v (vector)、e (environment) 后缀
- l (list): 通常表示接受一个固定的参数列表(不是指针数组)。但在实际的 POSIX 标准中,没有以 l 结尾的 exec 函数。
- p (path): 表示函数会在 PATH 环境变量中搜索要执行的程序。
- v (vector): 表示函数接受一个以 NULL 结尾的字符串指针数组作为参数。
- e (environment): 表示函数允许传递一个新的环境变量向量(仅 execve())。


#include<fcntl.h>
#include<stdio.h>
#include<stdlib.h>

int main(void)
{
  int fd;

  fd = open("ps.out",O_WRONLY|O_CREAT|O_TRUNC,0644);
  if(fd < 0 ){
          perror("open ps.out error");
          exit(1);

  //使用 dup2() 函数将文件描述符 fd(即 "ps.out" 文件的描述符)复制到标准输出(STDOUT_FILENO通常是 1)。这意味着之后写入标准输出的任何内容都将被写入 "ps.out" 文件。
  dup2(fd,STDOUT_FILENO)

 //由于 execlp()是一个替换当前进程的函数,如果它成功执行,那么后面的代码(包括 "execlp error" 的 perror() 调用)将不会被执行
  execlp("ps","ps","ax",NULL);

  perror("execlp error");
  return 0;

          }

回收子进程

孤儿进程
父进程先于子进终止,子进程沦为“孤儿进程”,会被 init 进程领养。
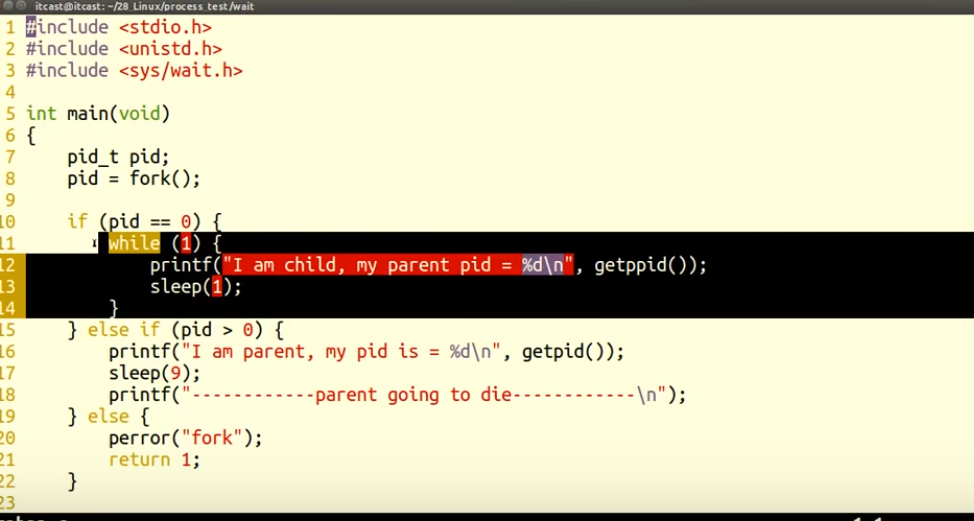
僵尸进程
子进程终止,父进程尚未对子进程进行回收,在此期间,子进程为“僵尸进程”。 kill 对其无效。

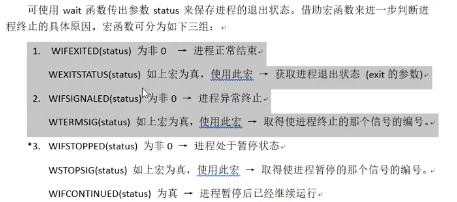
wait函数
父进程一旦调用了wait就立即阻塞自己,由wait自动分析是否当前进程的某个子进程已经退出,如果让它找到了这样一个已经变成僵尸的子进程,wait就会收集这个子进程的信息,并把它彻底销毁后返回;如果没有找到这样一个子进程,wait就会一直阻塞在这里,直到有一个出现为止。

为什么这里pid == 0这里 执行一下,就说明子进程结束了,也就是说子进程是怎么结束的,结束是因为后面没语句了

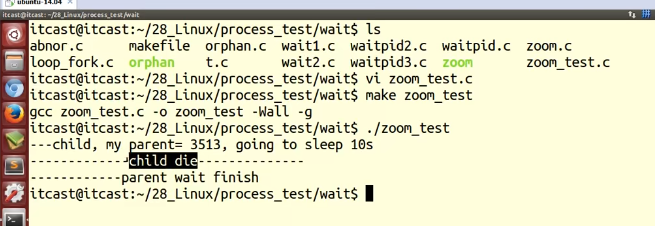
这段代码比较重要
int main(void) {
	pid_t pid, wpid;
	int status;

	pid = fork();
	if (pid == 0) {
		printf("---child,my id = %d,going to sleep 10s\n", getpid());
		sleep(10);
		printf("-----------child die----------------");
		return 53;
	}
	else if (pid > 0) {
		//如果子进程未终止,父进程阻塞在这个函数上,成功会返回收集的子进程id
		//参数status用来保存被收集进程退出时的一些状态,它是一个指向int类型的指
		wpid = wait(&status);
		if (wpid == -1) {
			perror("wait error");
			exit(1);
		}
	}if (WIFEXITED(status)) {//为真,子进程已经终止
		printf("child exit with %d\n", WEXITSTATUS(status));
	}
	if (WIFSIGNALED(status)) {//为真,子进程被信号终止
		printf("child kill with signal %d\n", WTERMSIG(status));
	}

	printf("--------parent wait finish: %d\n", wpid);
}
else {
	perror("fork");
	return 1;
}
所有异常终止都是由于异常引起的

waitpid函数
可以指定某一个进程回收
waitpid函数:	指定某一个进程进行回收。可以设置非阻塞。
waitpid(-1, &status, 0) == wait(&status);

pid_t waitpid(pid_t pid, int *status, int options)

参数:
		pid:指定回收某一个子进程pid

			> 0: 待回收的子进程pid

			-1:任意子进程

			0:同组的子进程。

		status:(传出) 回收进程的状态。

		options:WNOHANG 指定回收方式为,非阻塞。


返回值:

		> 0 : 表成功回收的子进程 pid

		0 : 函数调用时, 参3 指定了WNOHANG, 并且,没有子进程结束。

		-1: 失败。errno


总结:

	wait、waitpid	一次调用,回收一个子进程。

			想回收多个。while

ps ajx --显示系统中所有进程的详细信息,包括它们的层次结构,即使某些进程没有关联的控制终端。

a: 显示所有进程(包括其他用户的进程)

j:显示进程的层次结构,例如父进程和子进程的关系

x:显示没有控制终端的进程。

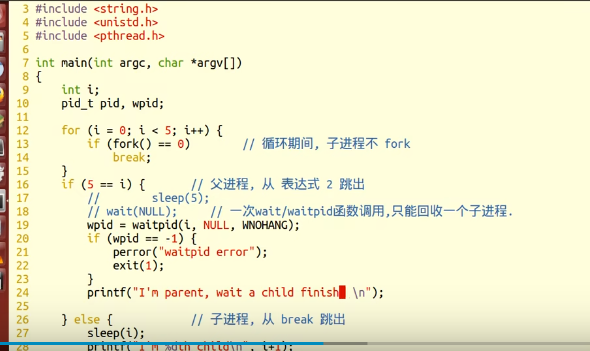
#include <stdio.h>
#include <stdlib.h>
#include <string.h>
#include <unistd.h>
#include <sys/wait.h>
#include <pthread.h>
int main(int argc, char *argv[])
{
int i;
pid_t pid, wpid, tmpid;
for (i = 0; i < 5; i++) {
pid = fork();
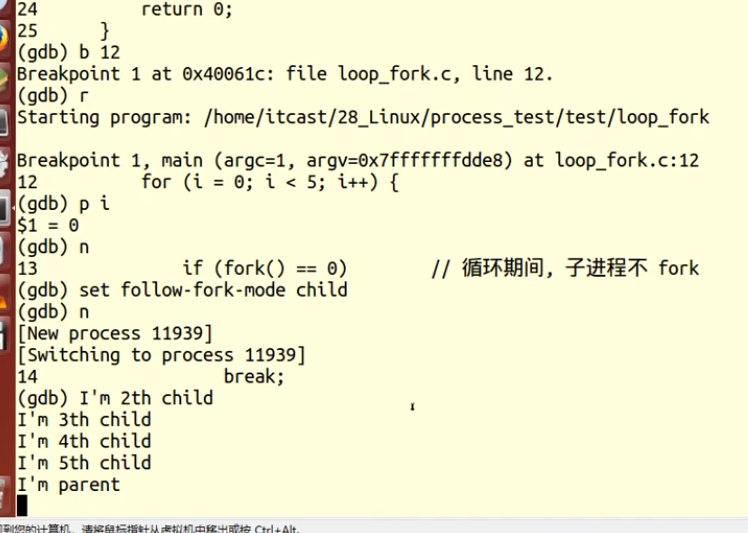
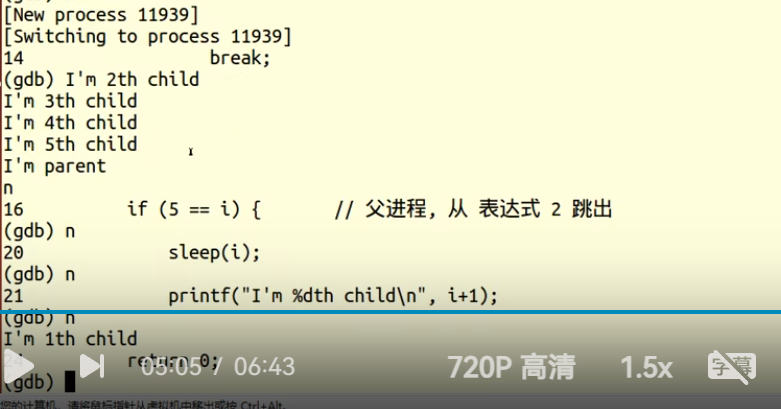
if (pid == 0) { // 循环期间, 子进程不 fork
break;
}
if (i == 2) {
tmpid = pid;
printf("--------pid = %d\n", tmpid);
}
}
if (5 == i) { // 父进程, 从 表达式 2 跳出
// sleep(5);
//wait(NULL); // 一次wait/waitpid函数调用,只能回收一个子进程.
//wpid = waitpid(-1, NULL, WNOHANG); //回收任意子进程,没有结束的子进程,父进程直接返回0
//wpid = waitpid(tmpid, NULL, 0); //指定一个进程回收, 阻塞等待
printf("i am parent , before waitpid, pid = %d\n", tmpid);
//wpid = waitpid(tmpid, NULL, WNOHANG); //指定一个进程回收, 不阻塞
wpid = waitpid(tmpid, NULL, 0); //指定一个进程回收, 阻塞回收
if (wpid == -1) {
perror("waitpid error");
exit(1);
}
printf("I'm parent, wait a child finish : %d \n", wpid);
} else { // 子进程, 从 break 跳出
sleep(i);
printf("I'm %dth child, pid= %d\n", i+1, getpid());
}
return 0;
}

// 回收 多个子进程
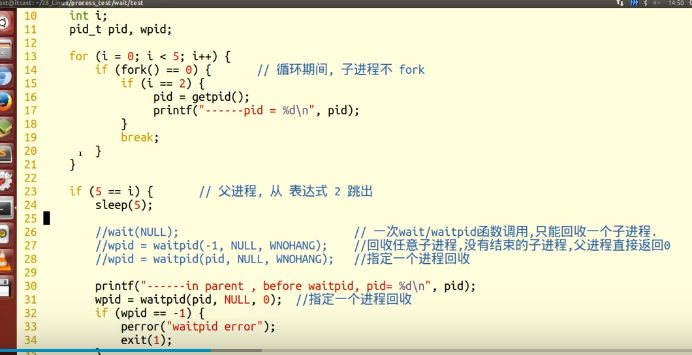
#include <stdio.h>
#include <stdlib.h>
#include <string.h>
#include <sys/wait.h>
#include <unistd.h>
#include <errno.h>
#include <pthread.h>
void sys_err(const char *str)
{
perror(str);
exit(1);
}
int main(int argc, char *argv[])
{
pid_t pid, wpid;
int i;
for (i = 0; i < 10; i++) {
pid = fork();
if (pid == 0) {// 循环期间, 子进程不 fork
break;
}
}
if (i == 10) { // 父进程, 从 表达式 2 跳出
#if 0//相当于注释
sleep(1);
while ((wpid = waitpid(-1, NULL, WNOHANG))) { //非阻塞方式回收
if (wpid == 0) {
sleep(1);
continue;
}
if (wpid > 0) {
printf("wait child pid = %d\n", wpid);
}
if (wpid == -1) {
perror("waitpid error");
break;
}
}
#else
//大于0表示成功回收的子进程pid
while ((wpid = waitpid(-1, NULL, 0)) > 0) {
printf("wait child pid = %d\n", wpid);
}
if (wpid == -1) {
perror("waitpid error");
exit(1);
}
#endif
printf("----parent----- pid: %d\n", getpid());
} else { 子进程, 从 break 跳出
printf("----%dth child----- pid: %d\n", i+1, getpid());
}
return 0;
}
回收一个回收多个

进程间通信(IPC)
Linux 环境下,进程地址空间相互独立,每个进程各自有不同的用户地址空间。任何一个进程的全局变量在另一个进程中都看不到,所以进程和进程之间不能相互访问,要交换数据必须通过内核,在内核中开辟一块缓冲区,进程1把数据从用户空间拷到内核缓冲区,进程2再从内核缓冲区把数据读走,内核提供的这种机制称为进程问通信(IPc)
进程间常见的通信方式有:
- 管道(使用最简单)
- 信号(开销最小)
- 共享映射区(无血缘关系)
- 本地套接字(最稳定)
管道
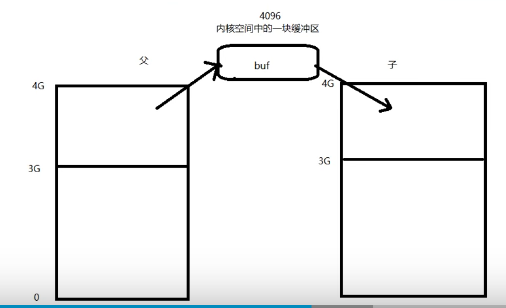
管道是一种最基本的IPC机制,作用于有血缘关系的进程之间,完成数据传递。调用pipe系统函数即可创建一全管道。有如下特质:
- 其本质是一个伪文件(实为内核缓冲区)。
- 由两个文件描述符引用,一个表示读端,一个表示写端。
- 规定数据从管道的写端流入管道,丛读端流出。·
管道的原理:
管道实为内核使用环形队列机制,借助内核缓冲区(4k)实现。
管道的局限性:
- 数据不能进程自己写,自己读。
- 管道中数据不可反复读取。一旦读走,管道中不再存在。
- 采用半双工通信方式,数据只能在单方向上流动。
int pipe(int pipefd[2])
参数: fd[0] 读端
fd[1] 写端
返回值:
成功: 返回0
失败: 返回-1
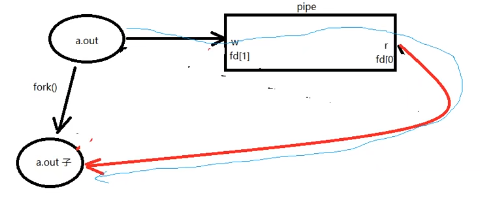
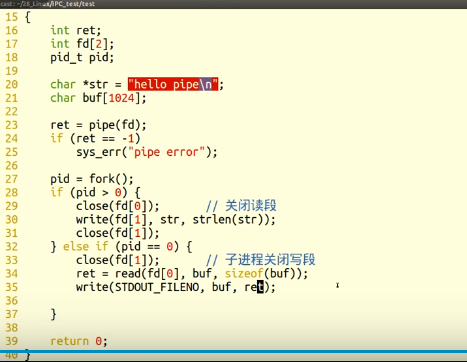
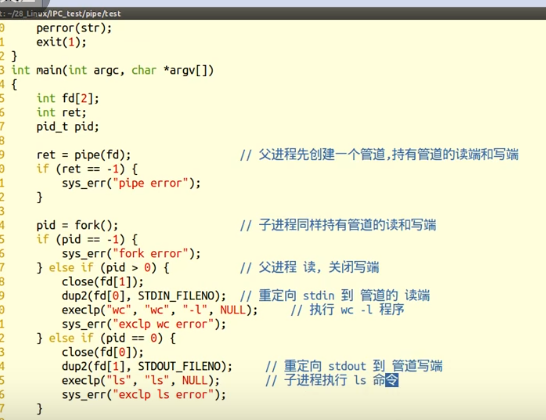
父子进程之间管道通信
#include <stdio.h>
#include <unistd.h>
#include <sys/wait.h>

int main(void)
{
	pid_t pid;
	int fd[2];

	pipe(fd);
	pid = fork();

	if (pid == 0) {  //child
		close(fd[1]);	                //子进程从管道中读数据,关闭写端
		dup2(fd[0], STDIN_FILENO);		//让wc从管道中读取数据
		execlp("wc", "wc", "-l", NULL);	//wc命令默认从标准读入取数据

	} else {

		close(fd[0]);	//父进程向管道中写数据,关闭读端
		dup2(fd[1], STDOUT_FILENO);		//将ls的结果写入管道中
		execlp("ls", "ls", NULL);		//ls输出结果默认对应屏幕
	}

	return 0;
}


/*
 *  程序不时的会出现先打印$提示符,再出程序运行结果的现象。
 *  这是因为:父进程执行ls命令,将输出结果给通过管道传递给
 *  子进程去执行wc命令,这时父进程若先于子进程打印wc运行结果
 *  之前被shell使用wait函数成功回收,shell就会先于子进程打印
 *  wc运行结果之前打印$提示符。
 *  解决方法:让子进程执行ls,父进程执行wc命令。或者在兄弟进程间完成。
 */
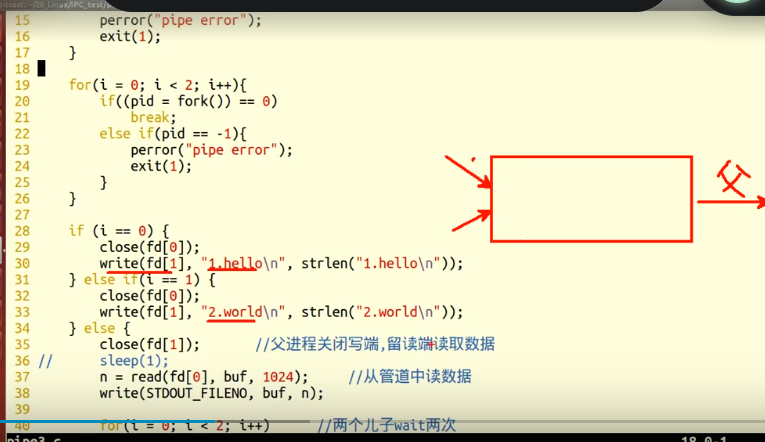
兄弟进程之间管道通信
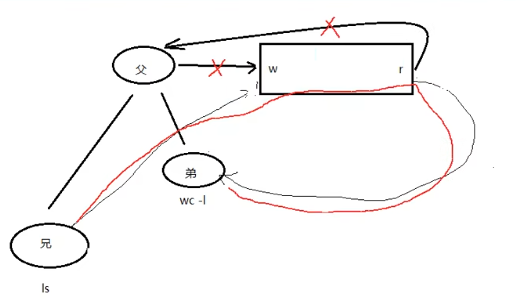
#include <stdio.h>
#include <unistd.h>
#include <sys/wait.h>

int main(void)
{
	pid_t pid;
	int fd[2], i;

	pipe(fd);

	for (i = 0; i < 2; i++) {
		if((pid = fork()) == 0) {
			break;
        }
    }

	if (i == 0) {			//兄
		close(fd[0]);				//写,关闭读端
		dup2(fd[1], STDOUT_FILENO);
		execlp("ls", "ls", NULL);
	} else if (i == 1) {	//弟
		close(fd[1]);				//读,关闭写端
		dup2(fd[0], STDIN_FILENO);
		execlp("wc", "wc", "-l", NULL);
	} else {//父进程
        close(fd[0]);
        close(fd[1]);
		for(i = 0; i < 2; i++)		//两个儿子wait两次
			wait(NULL);
	}

	return 0;
}


管道使用总结
读管道:
- 管道中有数据,read返回实际读到的字节数.
- 管道中无数据:
(1)管道写端被全部关闭,read返回0(好像读到文件结尾)
(2)写端没有全部被关闭,read阻塞等待(不久的将来可能有数据递达,此时会让出 cpu)
写管道:
- 管道读端全部被关闭,进程异常终止(也可使用捕捉SIGPIPE信号,使进程不终止)
- 管道读端没有全部关闭:
(1)管道已满,write阻塞
(2)管道未满,write将数据写入,并返回实际写入的字节数。
重点掌握

管道和共享内存映射重点掌握
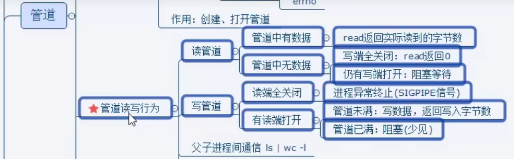


创建兄弟进程方法:
不让子进程创建孙子进程,所以循环fork后的两个进程互为兄弟,下面i=0和i=1就是

一个读端和多个写端
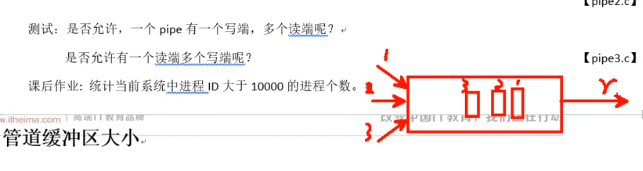
ulimit -a ----查看管道缓冲区大小
管道缓冲区大小:512字节
管道的优劣:
优点: 简单,相比信号,套接字实现进程间通信,简单很多。
缺点: 1.只能单向通信,双向通信需建立两个管道。·
2.只能用于父子、兄弟进程(有共同祖先)间通信。该问题后来使用fifo有名管道解决。
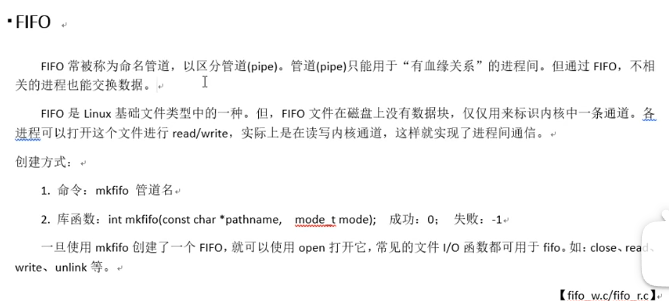
FIFO命名管道(有名管道)
FIFO可以实现没有血缘关系的进程之间的通信, 没有血缘关系的进程之间通过内核空间实现进程之间的通信
int mkfifo(const char *pathname, mode_t mode);
参数:
返回值:成功 0;  失败 -1
#include <stdio.h>
#include <unistd.h>
#include <sys/stat.h>
#include <sys/types.h>
#include <fcntl.h>
#include <stdlib.h>
#include <string.h>

void sys_err(char *str)
{
    perror(str);
    exit(1);
}

int main(int argc, char *argv[])
{
    int fd, len;
    char buf[4096];

    if (argc < 2) {
        printf("./a.out fifoname\n");
        return -1;
    }
    //int fd = mkfifo("testfifo", 644);
    //open(fd, ...);
    fd = open(argv[1], O_RDONLY);   // 打开管道文件
    if (fd < 0)
        sys_err("open");
    while (1) {
        len = read(fd, buf, sizeof(buf));   // 从管道的读端获取数据
        write(STDOUT_FILENO, buf, len);
        sleep(3);           //多個读端时应增加睡眠秒数,放大效果.
    }
    close(fd);

    return 0;
}
#include <stdio.h>
#include <unistd.h>
#include <sys/stat.h>
#include <sys/types.h>
#include <fcntl.h>
#include <stdlib.h>
#include <string.h>

void sys_err(char *str)
{
    perror(str);
    exit(-1);
}

int main(int argc, char *argv[])
{
    int fd, i;
    char buf[4096];

    if (argc < 2) {
        printf("Enter like this: ./a.out fifoname\n");
        return -1;
    }
    fd = open(argv[1], O_WRONLY);       //打开管道文件,这里从终端传入的就是myfifo
    if (fd < 0)
        sys_err("open");

    i = 0;
    while (1) {
        sprintf(buf, "hello itcast %d\n", i++);

        write(fd, buf, strlen(buf));    // 向管道写数据
        sleep(1);
    }
    close(fd);

    return 0;
}
#include <stdio.h>
#include <stdlib.h>
#include <string.h>
#include <unistd.h>
#include <sys/stat.h>
#include <errno.h>
#include <pthread.h>

void sys_err(const char *str)
{
	perror(str);
	exit(1);
}

int main(int argc, char *argv[])
{
     int ret = mkfifo("mytestfifo", 0664);//生成管道
     if (ret == -1)
         sys_err("mkfifo error");

	return 0;
}
生成的fifo管道

一个终端写入

读取的终端


可以一个读端,多个写端,也可以一个写端,多个端,数据流向是单向的,一旦读走就没有了
共享存储映射

回收子进程没理解
文件实现进程间通信
没有血缘关系的进程之间通过内核空间实现进程之间的通信
/*
 *父子进程共享打开的文件描述符------使用文件完成进程间通信.
 */
#include <stdio.h>
#include <unistd.h>
#include <string.h>
#include <stdlib.h>
#include <fcntl.h>
#include <sys/wait.h>


int main(void)
{
    int fd1, fd2; pid_t pid;
    char buf[1024];
    char *str = "---------test for shared fd in parent child process-----\n";

    pid = fork();
    if (pid < 0) {
        perror("fork error");
        exit(1);
    } else if (pid == 0) {
        fd1 = open("test.txt", O_RDWR);
        if (fd1 < 0) {
            perror("open error");
            exit(1);
        }
        sleep(3);
        write(fd1, str, strlen(str));
        printf("child wrote over...\n");

    } else {
        fd2 = open("test.txt", O_RDWR);
        if (fd2 < 0) {
            perror("open error");
            exit(1);
        }
//        sleep(1);                   //保证子进程写入数据

        int len = read(fd2, buf, sizeof(buf));
        printf("------parent read len = %d\n", len);
        len = write(STDOUT_FILENO, buf, len);
        printf("------parent write len = %d\n", len);

        wait(NULL);
    }

    return 0;
}
/*
 * 后执行,尝试读取另外一个进程写入文件的内容
 */
#include <stdio.h>
#include <unistd.h>
#include <stdlib.h>
#include <fcntl.h>
#include <string.h>

int main(void)
{
    char buf[1024];
    char *str = "----------test2 write secesuss--------\n";
    int ret;

    sleep(2);   //睡眠2秒,保证test1将数据写入test.txt文件

    int fd = open("test.txt", O_RDWR);

    //尝试读取test.txt文件中test1写入的数据
    ret = read(fd, buf, sizeof(buf));

    //将读到的数据打印至屏幕
    write(STDOUT_FILENO, buf, ret);

    //写入数据到文件test.txt中, 未修改读写位置
    write(fd, str, strlen(str));

    printf("test2 read/write finish\n");

    close(fd);

    return 0;
}
/*
 * 先执行,将数据写入文件test.txt
 */
#include <stdio.h>
#include <unistd.h>
#include <fcntl.h>
#include <stdlib.h>
#include <string.h>

#define N 5

int main(void)
{
    char buf[1024];
    char *str = "--------------secesuss-------------\n";
    int ret;

    int fd = open("test.txt", O_RDWR|O_TRUNC|O_CREAT, 0664);

    //直接打开文件写入数据
    write(fd, str, strlen(str));
    printf("test1 write into test.txt finish\n");

    sleep(N);

    lseek(fd, 0, SEEK_SET);
    ret = read(fd, buf, sizeof(buf));
    ret = write(STDOUT_FILENO, buf, ret);

    if (ret == -1) {
        perror("write second error");
        exit(1);
    }

    close(fd);

    return 0;
}


总结
父子间进程通信
存储映射I/O
使一个磁盘文件与存储空间中的一个缓冲区相映射,于是当从缓冲区中取得数据,就相当于读文件中的相应字节,与此类似,将数据存入缓冲区,则相应的字节就自动写入文件,这样,就可以在不适用read和write函数的情况下,使用地址(指针)完成I/O操作。
创建共享内存映射
void *mmap(void *addr, size_t length, int prot, int flags, int fd, off_t offset);		创建共享内存映射

	参数:
		addr: 	指定映射区的首地址。通常传NULL,表示让系统自动分配

		length:共享内存映射区的大小。(<= 文件的实际大小)

		prot:	共享内存映射区的读写属性。PROT_READ、PROT_WRITE、PROT_READ|PROT_WRITE

		flags:	标注共享内存的共享属性。MAP_SHARED、MAP_PRIVATE

		fd:	用于创建共享内存映射区的那个文件的 文件描述符。

		offset:默认0,表示映射文件全部。偏移位置。需是 4k 的整数倍。

	返回值:

		成功:映射区的首地址。

		失败:MAP_FAILED (void*(-1)), errno


int munmap(void *addr, size_t length);		释放映射区。

	addr:mmap 的返回值

	length:大小

#include <stdio.h>
#include <stdlib.h>
#include <unistd.h>
#include <fcntl.h>
#include <sys/mman.h>
#include <sys/wait.h>

int var = 100;

int main(void)
{
    int *p;
    pid_t pid;

    int fd;
    fd = open("temp", O_RDWR|O_CREAT|O_TRUNC, 0644);
    if(fd < 0){
        perror("open error");
        exit(1);
    }
    ftruncate(fd, 4);

    //p = (int *)mmap(NULL, 4, PROT_READ|PROT_WRITE, MAP_SHARED, fd, 0);
    p = (int *)mmap(NULL, 4, PROT_READ|PROT_WRITE, MAP_PRIVATE, fd, 0);
    if(p == MAP_FAILED){		//注意:不是p == NULL
        perror("mmap error");
        exit(1);
    }
    close(fd);					//映射区建立完毕,即可关闭文件

    pid = fork();				//创建子进程
    if(pid == 0){
       *p = 7000;               // 写共享内存
        var = 1000;
        printf("child, *p = %d, var = %d\n", *p, var);
    } else {
        sleep(1);
        printf("parent, *p = %d, var = %d\n", *p, var);     // 读共享内存
        wait(NULL);

        int ret = munmap(p, 4);				//释放映射区
        if (ret == -1) {
            perror("munmap error");
            exit(1);
        }
    }

    return 0;
}
mmap注意事项
使用注意事项:

	1. 用于创建映射区的文件大小为 0,实际指定非0大小创建映射区,出 “总线错误”。

	2. 用于创建映射区的文件大小为 0,实际制定0大小创建映射区, 出 “无效参数”。

	3. 用于创建映射区的文件读写属性为,只读。映射区属性为 读、写。 出 “无效参数”。

	4. 创建映射区,需要read权限。当访问权限指定为 “共享”MAP_SHARED是, mmap的读写权限,应该 <=文件的open权限。只写不行。

	5. 文件描述符fd,在mmap创建映射区完成即可关闭。后续访问文件,用地址访问。

	6. offset 必须是 4096的整数倍。(MMU 映射的最小单位 4k )

	7. 对申请的映射区内存,不能越界访问。

	8. munmap用于释放的地址,必须是mmap申请返回的地址。

	9. 映射区访问权限为 “私有”MAP_PRIVATE, 对内存所做的所有修改,只在内存有效,不会反应到物理磁盘上。

	10.  映射区访问权限为 “私有”MAP_PRIVATE, 只需要open文件时,有读权限,用于创建映射区即可。


mmap函数的保险调用方式:

	1. fd = open("文件名", O_RDWR);

	2. mmap(NULL, 有效文件大小, PROT_READ|PROT_WRITE, MAP_SHARED, fd, 0);


父子进程使用 mmap 进程间通信:

	父进程 先 创建映射区。 open( O_RDWR) mmap( MAP_SHARED );

	指定 MAP_SHARED 权限

	fork() 创建子进程。

	一个进程读, 另外一个进程写。

无血缘关系进程间 mmap 通信:  				【会写】

	两个进程 打开同一个文件,创建映射区。

	指定flags 为 MAP_SHARED。

	一个进程写入,另外一个进程读出。

	【注意】:无血缘关系进程间通信。mmap:数据可以重复读取。

					fifo:数据只能一次读取。

匿名映射:只能用于 血缘关系进程间通信。

	p = (int *)mmap(NULL, 40, PROT_READ|PROT_WRITE, MAP_SHARED|MAP_ANONYMOUS, -1, 0);


读时共享,写时复制 没理解


无血缘关系之间的mmap通信这个得搞一个例子
信号
信号共性:
1.简单 2.不能携带大量信息 3.满足某个特定条件才发送,linux中信号是信息的载体
信号的特质:
**信号是软件层面上的“中断”**。一旦信号产生,无论程序执行到什么位置,必须立即停止运行,处理信号,处理结束,再继续执行后续指令。
**所有信号的产生及处理全部都是由【内核】完成的。**
与事件相关的事件和状态
- 按键产生 如: ctrl + c …
2. 系统调用产生 如: kill,raise,abort
3. 软件条件产生 如: 定时器alarm
4. 硬件异常产生 如:非法访问内存(段错误),除0(浮点数例外),内存对齐出错(总线错误)
5. 命令产生 如:kill命令
概念:
未决:产生与递达之间状态。
递达:产生并且送达到进程。直接被内核处理掉。
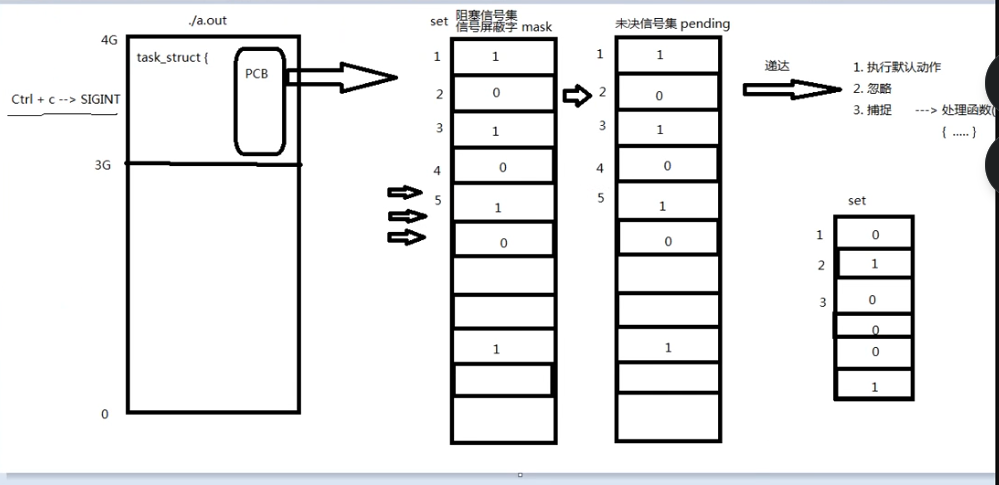
信号的处理方式:
     1.执行默认动作
      2.忽略(丢弃),忽略:是指信号到达,但是程序忽略
      3.捕捉(自定义)
阻塞信号集(信号屏蔽字)
将某些信号加入集合,对他们设置屏蔽,当屏蔽x信号后,在收到该信号,该信号的处理将退后(解除屏蔽后) ; 本质:位图。用来记录信号的屏蔽状态。一旦被屏蔽的信号,在解除屏蔽前,一直处于未决态。
未决信号集
本质:位图。用来记录信号的处理状态。该信号集中的信号,表示,已经产生,但尚未被处理。

信号4要素:
信号使用之前,应先确定其4要素,而后再用!!!
**编号、名称、对应事件、默认处理动作。**

常规信号(1-31)


**17号默认的处理动作时忽略,前面的20个重点掌握 **

规范化使用信号名字


进程ID没有负数,负数表示组ID


这个练习需要检查所有系统调用 kill(0,SIGCHLD)参数0表示在同一个组ID

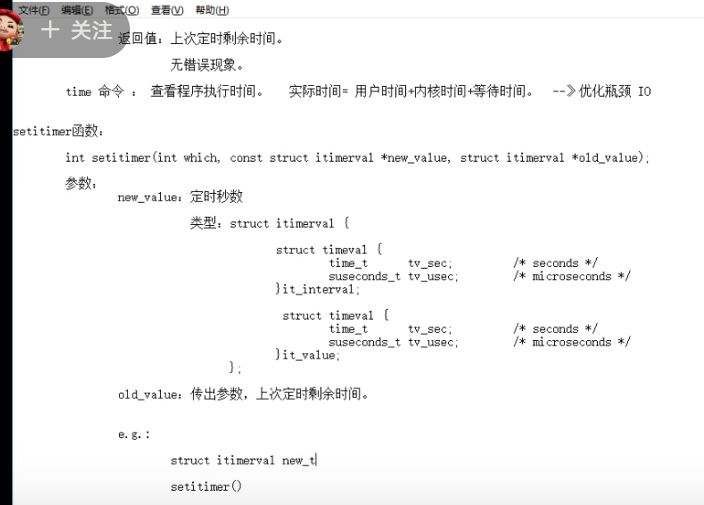
alarm函数(定时器)
设置定时器(闹钟),在指定seconds后,内核会给当前进程发送14)SIGALRM进程终止信号,进程收到信号后,进程终止, 每个进程都有且有唯一一个定时器, 定时,与进程状态无关,!就绪,运行,挂起(阻塞,暂停).终止,僵尸…无论进程处于何种状态
unsigned int alarm(unsigned int seconds);

参数: seconds    定时秒数
返回值:返回0或者上次定时剩余时间,没有错误现象


alarm(0);   ---------常用来取消定时器
练习:
int count;
//计数1秒结束程序
//开始计数
if(alarm(1)){
  while(1){
    count++;
  }
}
printf(count);


//标准程序
int main(void){
  int i;
  alarm(1);
  for(i = 0; ;i++)
      printf("%d\n",i);

  return 0;
}
time ./程序
real 真正执行时间 user 在用户空间运行的时间, sys 在内核空间所运行的时间
实际执行时间 = 系统时间 + 用户时间 + 等待时间

优化IO程序效率最高

setitimer函数


信号集操作函数


信号机操作函数需要跟着视频写涉及到信号屏蔽,使得信号到达不了


信号捕捉


内核实现信号捕捉的过程

借助SIGCHLD信号回收子进程

回收子进程只能是父进程回收,兄弟之间不能回收之间的进程
#include <stdio.h>
#include <stdlib.h>
#include <string.h>
#include <unistd.h>
#include <signal.h>
#include <sys/wait.h>
#include <errno.h>
#include <pthread.h>

void sys_err(const char *str)
{
    perror(str);
    exit(1);
}

void catch_child(int signo)
{
    pid_t wpid;
    int status;

    //while((wpid = wait(NULL)) != -1) {
    while((wpid = waitpid(-1, &status, 0)) != -1) {         // 循环回收,防止僵尸进程出现.
        if (WIFEXITED(status))
            printf("---------------catch child id %d, ret=%d\n", wpid, WEXITSTATUS(status));
    }

    return ;
}

int main(int argc, char *argv[])
{
    pid_t pid;
//阻塞
	sigset_t set;
	sigemptyset(&set);
	sigaddset(&set,SIGCHLD);
	sigprocmask(SIG_BLOCK,&set,NULL);


    int i;
    for (i = 0; i < 15; i++)
        if ((pid = fork()) == 0)                // 创建多个子进程
            break;

    if (15 == i) {
        struct sigaction act;

        act.sa_handler = catch_child;           // 设置回调函数
        sigemptyset(&act.sa_mask);              // 设置捕捉函数执行期间屏蔽字
        act.sa_flags = 0;                       // 设置默认属性, 本信号自动屏蔽

		//SIGCHLD 子进程产生信号,父进程会受到,默认动作忽略,信号产生后,调用catch_child回调函数处理信号
        sigaction(SIGCHLD, &act, NULL);         // 注册信号捕捉函数
//解除阻塞
		sigprocmask(SIG_UNBLOCK,&set,NULL);

		printf("I'm parent, pid = %d\n", getpid());

        while (1); //模拟父进程后续逻辑操作

    } else {
        printf("I'm child pid = %d\n", getpid());
        return i;
    }

    return 0;
}

/*
	struct sigaction {
               void     (*sa_handler)(int);
               void     (*sa_sigaction)(int, siginfo_t *, void *);
               sigset_t   sa_mask;
               int        sa_flags;
               void     (*sa_restorer)(void);
           };

*/
回调函数:把一个函数当作另外一个函数的参数,当某个事件或条件发生时,已注册的回调函数会被自动调用。
中断系统调用
系统调用分为两种,慢速系统调用和其他系统调用
1**.慢速系统调用**: 会使进程永远阻塞,如果在阻塞期间收到一个信号,该系统就发生中断,不在继续执行,也可以设定系统调用是否重启.如,read,write,pause,wait
2.其他系统调用: getpid,getppid,fork…
进程组和会话
进程组(Process Group):
- 进程组是一个或多个进程的集合。
- 每个进程组都有一个唯一的进程组ID(PGID),该ID通常与进程组的第一个进程的PID相同(即组领导进程的PID)。
- 进程组通常用于终端会话的管理,使得操作系统能够发送信号给整个进程组(例如,当用户关闭终端窗口时,操作系统会发送一个SIGHUP信号给该终端关联的进程组)。
- 使用getpgrp()或tcgetpgrp()系统调用可以获取当前进程组的PGID。
会话(Session):
- 会话是一个或多个进程组的集合。
- 每个会话都有一个唯一的会话ID(SID)。
- 通常,一个会话开始于用户登录到系统,并终止于用户登出或系统关闭。
- 会话的第一个进程(通常是登录shell)被称为会话领导(Session Leader),它拥有该会话的SID,并且其PGID也等于SID。
- 会话内的进程组之间可以通过信号进行通信。
- 使用getsid()系统调用可以获取当前进程的SID。


**tty是文字终端(xshell....等工具) pts 是虚拟终端 (bash) ?是没有控制终端**
#include <stdio.h>
#include <stdlib.h>
#include <unistd.h>

int main(void)
{
    pid_t pid;

    if ((pid = fork()) < 0) {
        perror("fork");
        exit(1);

    } else if (pid == 0) {

        printf("child process PID is %d\n", getpid());
        printf("Group ID of child is %d\n", getpgid(0));
        printf("Session ID of child is %d\n", getsid(0));

        sleep(10);
        setsid();       //子进程非组长进程,故其成为新会话首进程,且成为组长进程。该进程组id即为会话进程

        printf("Changed:\n");

		//三者合一
        printf("child process PID is %d\n", getpid());
        printf("Group ID of child is %d\n", getpgid(0));
        printf("Session ID of child is %d\n", getsid(0));

        sleep(20);

        exit(0);
    }

    return 0;
}
守护进程
Daemon(精灵)进程,是linux中的后台服务进程,通常独立于控制终端并且周期性的执行某种任务或等待处理某些发生的事件,一般采用以d结尾的名字.如(httpd, sshd,vsftpd,nfsd,telnet),
linux后台的一些系统服务器,没有控制终端,不能直接和用户交互,不受用户登录,注销的影响,一直在运行着,它们都是守护进程,如: 预读入缓输出机制的实现,ftp服务器,nfs服务器等.
创建守护进程,最关键的一步是调用setsid函数创建一个新的session,并成为session leader
创建守护进程步骤
**1. fork子进程,让父进程终止。**
** 2. 子进程调用 setsid() 创建新会话**
** 3. 通常根据需要,改变工作目录位置 chdir(), 防止目录被卸载。**
** 4. 通常根据需要,重设umask文件权限掩码,影响新文件的创建权限。 022 – 755 0345 — 432 r—wx-w- 422**
** 5. 通常根据需要,关闭/重定向 文件描述符**
** 6. 守护进程 业务逻辑。while()**
重点掌握
#include <stdio.h>
#include <sys/stat.h>
#include <fcntl.h>
#include <stdlib.h>
#include <string.h>
#include <unistd.h>
#include <errno.h>
#include <pthread.h>

void sys_err(const char *str)
{
	perror(str);
	exit(1);
}

int main(int argc, char *argv[])
{
    pid_t pid;
    int ret, fd;

    pid = fork();
    if (pid > 0)                // 父进程正常退出终止
        exit(0);

    pid = setsid();           //1.创建新会话
    if (pid == -1)
        sys_err("setsid error");

    ret = chdir("/home/itcast/28_Linux");       //2, 改变工作目录位置
    if (ret == -1)
        sys_err("chdir error");

    umask(0022);            //3. 改变文件访问权限掩码 --755

    close(STDIN_FILENO);    // 4.关闭文件描述符 0--标准输入文件描述符

    fd = open("/dev/null", O_RDWR);  //  fd --> 0
    if (fd == -1)
        sys_err("open error");

    dup2(fd, STDOUT_FILENO); // 5.重定向 stdout(标准输出)和stderr(标准错误输出)
    dup2(fd, STDERR_FILENO);

    while (1);              // 6.模拟 守护进程业务.

	return 0;
}
			在守护进程中,chdir() 通常被用来改变进程的工作目录到一个安全的位置,如/根目录,以避免由于工作目录被卸载(unmount)或删除而导致的问题。chdir() 系统调用, chdir() 是一个Unix/Linux系统调用,用于改变当前进程的工作目录(working directory)。当你调用chdir(path)时,你告诉进程将其当前工作目录更改为指定的path。


挂载(Mounting)目录
挂载目录是一个更底层和更广泛的概念,它涉及到文件系统。当你挂载一个文件系统时,你实际上是将一个存储设备(如硬盘分区、USB驱动器、网络文件系统等)上的文件系统与一个目录树中的某个目录关联起来。这样,你就可以通过该目录访问存储设备上的文件了。

在守护进程中,挂载目录通常不是必须的,除非你的守护进程需要访问一个特定的文件系统(例如,从网络位置读取配置文件)。但是,守护进程本身并不负责挂载或卸载文件系统;这些操作通常由系统管理员或init系统(如systemd)在守护进程启动之前或之后执行。

区别
目的:chdir() 用于改变进程的工作目录,而挂载目录则涉及将文件系统与目录树中的某个目录关联起来。
权限:chdir() 只需要对目标目录有读取和执行权限。而挂载目录通常需要root权限,因为它涉及到系统级别的操作。
上下文:chdir() 是在进程上下文中执行的,而挂载目录通常是在系统上下文中执行的(例如,在系统启动时或在管理员手动执行挂载命令时)。
对守护进程的影响:chdir() 可以影响守护进程如何解析相对路径(因为相对路径是基于当前工作目录的)。而挂载目录则通常不会直接影响守护进程的行为,除非守护进程需要访问新挂载的文件系统中的文件。
线程


进程:有独立的,进程地址空间,有独立的pcb. 分配资源的最小单位.
线程: 有独立的pcb,没有独立的进程地址空间,主要指栈和寄存器
ps -Lf 进程id ----线程号(LWP)CPU 执行的最小单位
查看火狐浏览器的进程线程


线程共享(./text ./data ./rodataa ./bss/heap )全局变量,但是不共享errno
独享 栈空间(内核栈,用户栈)

创建线程
线程id:在进程中表示线程

线程控制原语:

	pthread_t pthread_self(void);	获取线程id。 线程id是在进程地址空间内部,用来标识线程身份的id号。

		返回值:本线程id


	检查出错返回:  线程中。

		fprintf(stderr, "xxx error: %s\n", strerror(ret));


int pthread_create(pthread_t *tid, const pthread_attr_t *attr,
				   void *(*start_rountn)(void *), void *arg); 创建子线程。

		参1:传出参数,表新创建的子线程 id

		参2:线程属性。传NULL表使用默认属性。

		参3:子线程回调函数。创建成功,ptherad_create函数返回时,该函数会被自动调用。

		参4:参3的参数。没有的话,传NULL

		返回值:成功:0

			失败:errno
用pthread_self()获取线程id


循环创建N个子线程:

		for (i = 0; i < 5; i++)

			pthread_create(&tid, NULL, tfn, (void *)i);   // 将 int 类型 i, 强转成 void *, 传参。
void 和int类型在32位和64位系统中分别占了多少位*
**int 类型在32位和64位系统中都是4字节,但是void* 32位中占4字节, 64位系统中占8字节**
#include <pthread.h>
#include <stdio.h>
#include <unistd.h>
#include <stdlib.h>

void *tfn(void *arg)
{
	int i;

	i = (int)arg;
	sleep(i);	 //通过i来区别每个线程
	printf("I'm %dth thread, Thread_ID = %lu\n", i+1, pthread_self());

	return NULL;
}

int main(int argc, char *argv[])
{
	int n = 5, i;
	pthread_t tid;

	if (argc == 2)
		n = atoi(argv[1]);//将字符串转换为整数

	for (i = 0; i < n; i++) {
		pthread_create(&tid, NULL, tfn, (void *)i);
		//将i转换为指针,在tfn中再强转回整形。
	}
	sleep(n);
	printf("I am main, and I am not a process, I'm a thread!\n"
			"main_thread_ID = %lu\n", pthread_self());

	return 0;
}

错误写法


退出线程:


pthread_join 函数
用于阻塞等待指定的线程结束,并获取线程的退出状态。
回收线程和wait回收进程类似
阻塞等待线程退出,获取线程退出状态, 起作用,对应进程中 waitpid()函数
int pthread_join(pthread_t thread, void **retval);	阻塞 回收线程。

		thread: 待回收的线程id

		retval:传出参数。 回收的那个线程的退出值。

			线程异常借助,值为 -1。

		返回值:成功:0

			失败:errno
指针了解还有问题, pthread_join(tid, (void **)&retval);传出参数搞明白,还有一个很难的结构体案例
#include <stdio.h>
#include <unistd.h>
#include <pthread.h>
#include <stdlib.h>

typedef struct {
	int a;
	int b;
} exit_t;

void *tfn(void *arg)
{
	exit_t *ret;
	ret = malloc(sizeof(exit_t));

	ret->a = 100;
	ret->b = 300;

	pthread_exit((void *)ret);
}

int main(void)
{
	pthread_t tid;
	exit_t *retval;

	pthread_create(&tid, NULL, tfn, NULL);

	/*调用pthread_join可以获取线程的退出状态*/
	pthread_join(tid, (void **)&retval);      //wait(&status);
	printf("a = %d, b = %d \n", retval->a, retval->b);

	return 0;
}
使用phread_join函数将循环创建的多个子线程回收
退出和回收之间的区别,join()函数和exit()区别
杀死线程
int pthread_cancel(pthread_t thread);		杀死一个线程。  需要到达取消点(保存点)

		thread: 待杀死的线程id

		返回值:成功:0

			失败:errno

		如果,子线程没有到达取消点, 那么 pthread_cancel 无效。

		我们可以在程序中,手动添加一个取消点。使用 pthread_testcancel();

		成功被 pthread_cancel() 杀死的线程,返回 -1.使用pthead_join 回收


/*该线程会打印从0到9的数字,每个数字之间间隔1秒。在主线程中,我们等待3秒,然后调用
pthread_cancel() 尝试取消这个线程。由于我们设置了线程为可取消状态,并且为异步取消,
所以线程可能在任何时刻被取消。然而,由于 sleep() 函数是一个可取消点(在大多数实现中),因此在这个例子中,线程很有可能在休眠期间被取消。

注意,即使调用了 pthread_cancel(),线程也可能不会立即终止。它会在下一个可取消点处
检查取消请求,并决定是否终止。此外,线程也可以选择忽略取消请求,或者设置自己的取消
状态和取消类型。*/


#include <stdio.h>
#include <stdlib.h>
#include <pthread.h>
#include <unistd.h>

// 线程函数,用于演示线程取消
void *thread_func(void *arg) {
    int i;
    // 设置线程为可取消状态
    pthread_setcancelstate(PTHREAD_CANCEL_ENABLE, NULL);
    // 设置线程的取消类型为异步取消
    pthread_setcanceltype(PTHREAD_CANCEL_ASYNCHRONOUS, NULL);

    // 模拟线程工作
    for (i = 0; i < 10; ++i) {
        printf("Thread working: %d\n", i);
        sleep(1); // 休眠一秒,模拟工作
    }

    pthread_exit(NULL);
}

int main() {
    pthread_t tid;
    int s;

    // 创建线程
    s = pthread_create(&tid, NULL, thread_func, NULL);
    if (s != 0) {
        printf("Error: pthread_create() failed\n");
        exit(EXIT_FAILURE);
    }

    // 等待一段时间,然后尝试取消线程
    sleep(3); // 等待3秒
    printf("Cancelling thread...\n");
    s = pthread_cancel(tid);
    if (s != 0) {
        printf("Error: pthread_cancel() failed\n");
        exit(EXIT_FAILURE);
    }

    // 等待线程退出
    s = pthread_join(tid, NULL);
    if (s != 0) {
        printf("Error: pthread_join() failed\n");
        exit(EXIT_FAILURE);
    }

    printf("Thread cancelled.\n");

    return 0;
}
线程分离

线程分离后,系统把资源回收了,这个tid也没了

线程中调试错误的方法


线程控制原语				     进程控制原语


pthread_create()			 fork();

pthread_self()				 getpid();

pthread_exit()				 exit(); 		/ return

pthread_join()				 wait()/waitpid()

pthread_cancel()			 kill()

pthread_detach()
线程使用注意事项


pthread_join() 和pthread_detach()的区别
阻塞与非阻塞:pthread_join() 是阻塞的,它会等待线程结束;
而 pthread_detach() 是非阻塞的,它设置线程为分离状态后,线程结束时会自动回收资源。
退出状态:pthread_join() 可以获取线程的退出状态;而 pthread_detach() 无法获取线程的退出状态。

使用场景:如果需要等待线程结束并获取其退出状态,应使用 pthread_join();如果不需要等待线程结束,
只希望线程自动结束并回收其资源,应使用 pthread_detach()。
线程同步
在多个线程访问共享数据的时候会有先后次序


互斥锁

这里搞清楚,栈区,堆区,全局变量区哪些是共享数据的,为什么说这里栈区不共享,堆区共享

使用互斥锁的一般步骤

restrict关键字:

	用来限定指针变量。被该关键字限定的指针变量所指向的内存操作,必须由本指针完成。
#include <stdio.h>
#include <string.h>
#include <pthread.h>
#include <stdlib.h>
#include <unistd.h>

pthread_mutex_t mutex;//创建锁

void *tfn(void *arg)
{
    srand(time(NULL));

    while (1) {
        pthread_mutex_lock(&mutex);//加锁
        printf("hello ");
        sleep(rand() % 3);	/*模拟长时间操作共享资源,导致cpu易主,产生与时间有关的错误*/
        printf("world\n");
        sleep(rand() % 3);
        pthread_mutex_unlock(&mutex);//释放锁
    }

    return NULL;
}

int main(void)
{
	//主线程
    pthread_t tid;
    srand(time(NULL));

    pthread_mutex_init(&mutex, NULL);//初始化锁

    pthread_create(&tid, NULL, tfn, NULL);
    while (1) {

        pthread_mutex_lock(&mutex);//加锁
        printf("HELLO ");
        sleep(rand() % 3);
        printf("WORLD\n");
        sleep(rand() % 3);
        pthread_mutex_unlock(&mutex);//释放锁

    }
    pthread_join(tid, NULL);
    pthread_mutex_destroy(&mutex);

    return 0;
}


/*线程之间共享资源stdout*/
互斥锁使用技巧

try锁


死锁
一种使用锁不恰当现象,不是锁的类型,
产生原因:
1.线程试图对同一个互斥量加锁两次
2…线程1拥有A锁,请求B锁,线程2拥有B锁,请求A锁,

这里阻塞产生的原因是,当一个A线程给共享操作加锁以后,mutex由1减少到0,当另外一个B线程想拿到锁的时候,就会发生阻塞,直到A线程释放锁后,B线程才会拥有锁
需要自己写出来死锁的两种情况代码
#include <stdio.h>
#include <stdlib.h>
#include <pthread.h>

pthread_mutex_t mutex = PTHREAD_MUTEX_INITIALIZER;

void* thread_func(void* arg) {
    pthread_mutex_lock(&mutex);
    printf("Thread %ld acquired mutex\n", (long)arg);

    // 尝试对同一个互斥量加锁两次
    if (pthread_mutex_lock(&mutex) != 0) {
        fprintf(stderr, "Failed to lock mutex again!\n");
        exit(EXIT_FAILURE); // 在这个例子中,我们直接退出以避免死锁
    }

    // 如果互斥量是非递归的,那么上面的第二次加锁会失败
    // 但如果我们忽略错误并继续执行,将会导致死锁

    // 解锁操作... 但由于上面的第二次加锁,这里将不会被执行
    pthread_mutex_unlock(&mutex);
    pthread_mutex_unlock(&mutex); // 如果执行到这里,也是错误的,因为只应该解锁一次

    return NULL;
}

int main() {
    pthread_t thread1, thread2;

    // 创建线程...
    pthread_create(&thread1, NULL, thread_func, (void*)1);
    pthread_create(&thread2, NULL, thread_func, (void*)2);

    // 等待线程结束...
    pthread_join(thread1, NULL);
    pthread_join(thread2, NULL);

    return 0;
}
#include <stdio.h>

#include <stdlib.h>
#include <pthread.h>

pthread_mutex_t lockA = PTHREAD_MUTEX_INITIALIZER;
pthread_mutex_t lockB = PTHREAD_MUTEX_INITIALIZER;

void* thread1(void* arg) {
    pthread_mutex_lock(&lockA);
    printf("Thread 1: Acquired lock A\n");

    // 模拟一些工作
    sleep(1);

    pthread_mutex_lock(&lockB); // 试图获取lockB,但线程2可能已经持有了它
    printf("Thread 1: Acquired lock B\n");

    // ... 线程1继续执行 ...

    pthread_mutex_unlock(&lockB);
    pthread_mutex_unlock(&lockA);

    return NULL;
}

void* thread2(void* arg) {
    pthread_mutex_lock(&lockB);
    printf("Thread 2: Acquired lock B\n");

    // 模拟一些工作
    sleep(1);

    pthread_mutex_lock(&lockA); // 试图获取lockA,但线程1可能已经持有了它
    printf("Thread 2: Acquired lock A\n");

    // ... 线程2继续执行 ...

    pthread_mutex_unlock(&lockA);
    pthread_mutex_unlock(&lockB);

    return NULL;
}

int main() {
    pthread_t t1, t2;

    // 创建线程...
    pthread_create(&t1, NULL, thread1, NULL);
    pthread_create(&t2, NULL, thread2, NULL);

    // 等待线程结束...
    pthread_join(t1, NULL);
    pthread_join(t2, NULL);

    return 0;
}
这里想起管道的读时什么,写实共享,不清楚,要搞懂
读写锁
特点:读共享,写独占,写锁优先级高,适合对数据结构读数据比写数据多的情况
锁只有一把,以读的方式给数据加锁----读锁 .以写的方式给数据加锁-----写锁


/* 3个线程不定时 "写" 全局资源,5个线程不定时 "读" 同一全局资源 */

#include <stdio.h>
#include <unistd.h>
#include <pthread.h>

int counter;                          //全局资源
pthread_rwlock_t rwlock;

void *th_write(void *arg)
{
    int t;
    int i = (int)arg;

    while (1) {
        t = counter;                    // 保存写之前的值
        usleep(1000);

        pthread_rwlock_wrlock(&rwlock);
        printf("=======write %d: %lu: counter=%d ++counter=%d\n", i, pthread_self(), t, ++counter);
        pthread_rwlock_unlock(&rwlock);

        usleep(9000);  //函数的参数以微秒
		// 给 r 锁提供机会
    }
    return NULL;
}

void *th_read(void *arg)
{
    int i = (int)arg;

    while (1) {
        pthread_rwlock_rdlock(&rwlock);
        printf("----------------------------read %d: %lu: %d\n", i, pthread_self(), counter);
        pthread_rwlock_unlock(&rwlock);

        usleep(2000);                // 给写锁提供机会
    }
    return NULL;
}

int main(void)
{
    int i;
    pthread_t tid[8]; //需要创建8个线程

    pthread_rwlock_init(&rwlock, NULL);

    for (i = 0; i < 3; i++)
        pthread_create(&tid[i], NULL, th_write, (void *)i);

    for (i = 0; i < 5; i++)
        pthread_create(&tid[i+3], NULL, th_read, (void *)i);

    for (i = 0; i < 8; i++)
        pthread_join(tid[i], NULL);//回收子线程

    pthread_rwlock_destroy(&rwlock);            //释放读写琐

    return 0;
}
条件变量
本身不是锁,条件变量通常与互斥锁(mutex)一起使用,用于在多线程环境中同步线程的执行。

#include <stdio.h>
#include <stdlib.h>
#include <pthread.h>
#include <unistd.h>

//声明一个链表
struct msg {
    int num;
    struct msg *next;
};

struct msg *head = NULL;
struct msg *mp = NULL;

//静态初始化条件变量(condition variable)的一个宏
pthread_cond_t has_product = PTHREAD_COND_INITIALIZER;
pthread_mutex_t mutex = PTHREAD_MUTEX_INITIALIZER;

void *producter(void *p)
{
    while (1) {
        mp = malloc(sizeof(struct msg));
        mp->num = rand() % 1000 + 1;
        printf("---product----%d\n", mp->num);

        pthread_mutex_lock(&mutex);
		//头插法添加数据
        mp->next = head;
        head = mp;
        pthread_mutex_unlock(&mutex);

        pthread_cond_signal(&has_product);
        sleep(rand() % 2);
    }

    return NULL;
}

void *consumer(void *p)
{
    while (1) {
        pthread_mutex_lock(&mutex);
        while (head == NULL)
            pthread_cond_wait(&has_product, &mutex);
        mp = head;
        head = mp->next;
        pthread_mutex_unlock(&mutex);

        printf("-----------------consumer---%d\n", mp->num);
        free(mp);
        mp = NULL;
        sleep(rand() % 3);
    }

    return NULL;
}

int main(void)
{
    pthread_t pid, cid;
    srand(time(NULL));

    pthread_create(&pid, NULL, producter, NULL);
    pthread_create(&cid, NULL, consumer, NULL);

    pthread_join(pid, NULL);
    pthread_join(cid, NULL);

    return 0;
}

int pthread_cond_wait(pthread_cond_t *cond, pthread_mutex_t *mutex);
pthread_cond_wait() 的行为大致如下:

1.当前线程首先等待cond条件变量满足,接着会释放互斥锁 mutex(这是原子操作)。

2.当前线程进入等待状态,直到其他线程调用 pthread_cond_signal() 或
pthread_cond_broadcast() 来唤醒它。

3.当线程被唤醒后,它会尝试重新获取互斥锁 mutex(如果此时该锁已被其他线程锁定,
则该线程会阻塞,直到获得锁)。

4.只有在成功获取了互斥锁之后,pthread_cond_wait() 才会返回。

条件变量的生产者消费者模型

/*借助条件变量模拟 生产者-消费者 问题*/
#include <stdlib.h>
#include <unistd.h>
#include <pthread.h>
#include <stdio.h>

/*链表作为公享数据,需被互斥量保护*/
struct msg {
    struct msg *next;
    int num;
};

struct msg *head;

/* 静态初始化 一个条件变量 和 一个互斥量*/
pthread_cond_t has_product = PTHREAD_COND_INITIALIZER;
pthread_mutex_t lock = PTHREAD_MUTEX_INITIALIZER;

void *consumer(void *p)
{
    struct msg *mp;

    for (;;) {
        pthread_mutex_lock(&lock);
        while (head == NULL) {           //头指针为空,说明没有节点    可以为if吗
            pthread_cond_wait(&has_product, &lock);
        }
        mp = head;
        head = mp->next;                 //模拟消费掉一个产品
        pthread_mutex_unlock(&lock);

        printf("-Consume %lu---%d\n", pthread_self(), mp->num);
        free(mp);
        sleep(rand() % 5);
    }
}

void *producer(void *p)
{
    struct msg *mp;

    for (;;) {
        mp = malloc(sizeof(struct msg));
        mp->num = rand() % 1000 + 1;        //模拟生产一个产品
        printf("-Produce ---------------------%d\n", mp->num);

        pthread_mutex_lock(&lock);
        mp->next = head;
        head = mp;
        pthread_mutex_unlock(&lock);

        pthread_cond_signal(&has_product);  //将等待在该条件变量上的一个线程唤醒
        sleep(rand() % 5);
    }
}

int main(int argc, char *argv[])
{
    pthread_t pid, cid;
    srand(time(NULL));

    pthread_create(&pid, NULL, producer, NULL);
    pthread_create(&cid, NULL, consumer, NULL);

    pthread_join(pid, NULL);
    pthread_join(cid, NULL);

    return 0;
}
#include <stdio.h>
#include <stdlib.h>
#include <string.h>
#include <unistd.h>
#include <errno.h>
#include <pthread.h>

void err_thread(int ret, char *str)
{
    if (ret != 0) {
        fprintf(stderr, "%s:%s\n", str, strerror(ret));
        pthread_exit(NULL);
    }
}

struct msg {
    int num;
    struct msg *next;
};

struct msg *head;

pthread_mutex_t mutex = PTHREAD_MUTEX_INITIALIZER;      // 定义/初始化一个互斥量
pthread_cond_t has_data = PTHREAD_COND_INITIALIZER;      // 定义/初始化一个条件变量

void *produser(void *arg)
{
    while (1) {
        struct msg *mp = malloc(sizeof(struct msg));

        mp->num = rand() % 1000 + 1;                        // 模拟生产一个数据`
        printf("--produce %d\n", mp->num);

        pthread_mutex_lock(&mutex);                         // 加锁 互斥量
        mp->next = head;                                    // 写公共区域
        head = mp;
        pthread_mutex_unlock(&mutex);                       // 解锁 互斥量

        pthread_cond_signal(&has_data);       // 唤醒阻塞在条件变量 has_data上的线程.

        sleep(rand() % 3);
    }

    return NULL;
}

void *consumer(void *arg)
{
    while (1) {
        struct msg *mp;

        pthread_mutex_lock(&mutex);                         // 加锁 互斥量
        while (head == NULL) {
            pthread_cond_wait(&has_data, &mutex);           // 阻塞等待条件变量, 解锁
        }                                                   // pthread_cond_wait 返回时, 重新加锁 mutex

        mp = head;
        head = mp->next;

        pthread_mutex_unlock(&mutex);                       // 解锁 互斥量
        printf("---------consumer id: %lu :%d\n", pthread_self(), mp->num);

        free(mp);
        sleep(rand()%3);
    }

    return NULL;
}

int main(int argc, char *argv[])
{
    int ret;
    pthread_t pid, cid;

    srand(time(NULL));

    ret = pthread_create(&pid, NULL, produser, NULL);           // 生产者
    if (ret != 0)
        err_thread(ret, "pthread_create produser error");

    ret = pthread_create(&cid, NULL, consumer, NULL);           // 消费者
    if (ret != 0)
        err_thread(ret, "pthread_create consuer error");
    ret = pthread_create(&cid, NULL, consumer, NULL);           // 消费者
    if (ret != 0)
        err_thread(ret, "pthread_create consuer error");
    ret = pthread_create(&cid, NULL, consumer, NULL);           // 消费者
    if (ret != 0)
        err_thread(ret, "pthread_create consuer error");

    pthread_join(pid, NULL);
    pthread_join(cid, NULL);

    return 0;
}


多个消费者,一个创建者
信号量
相当于初始值为N的互斥量,和信号没有关系,张三和张三丰的关系哈哈哈哈哈

wait()函数时加锁,post()函数是解锁

信号量:

	应用于线程、进程间同步。
	相当于 初始化值为 N 的互斥量。  N值,表示可以同时访问共享数据区的线程数。

	函数:
		sem_t sem;	定义类型。

		int sem_init(sem_t *sem, int pshared, unsigned int value);

		参数:
			sem: 信号量

			pshared:	0: 用于线程间同步

					1: 用于进程间同步

			value:N值。(指定同时访问的线程数)

		sem_destroy();

		sem_wait();		一次调用,做一次-- 操作, 当信号量的值为 0 时,再次 -- 就会阻塞。 (对比 pthread_mutex_lock)

		sem_post();		一次调用,做一次++ 操作. 当信号量的值为 N 时, 再次 ++ 就会阻塞。(对比 pthread_mutex_unlock)

信号量实现生产者消费者模型


/*信号量实现 生产者 消费者问题*/

#include <stdlib.h>
#include <unistd.h>
#include <pthread.h>
#include <stdio.h>
#include <semaphore.h>

#define NUM 5

int queue[NUM];                                     //全局数组实现环形队列
sem_t blank_number, product_number;                 //空格子信号量, 产品信号量

void *producer(void *arg)
{
    int i = 0;

    while (1) {
        sem_wait(&blank_number);                    //生产者将空格子数--,为0则阻塞等待
        queue[i] = rand() % 1000 + 1;               //生产一个产品
        printf("----Produce---%d\n", queue[i]);
        sem_post(&product_number);                  //将产品数++

        i = (i+1) % NUM;                            //借助下标实现环形
        sleep(rand()%1);
    }
}

void *consumer(void *arg)
{
    int i = 0;

    while (1) {
        sem_wait(&product_number);                  //消费者将产品数--,为0则阻塞等待
        printf("-Consume---%d\n", queue[i]);
        queue[i] = 0;                               //消费一个产品
        sem_post(&blank_number);                    //消费掉以后,将空格子数++

        i = (i+1) % NUM;
        sleep(rand()%3);
    }
}

int main(int argc, char *argv[])
{
    pthread_t pid, cid;

    sem_init(&blank_number, 0, NUM);                //初始化空格子信号量为5, 线程间共享 -- 0
    sem_init(&product_number, 0, 0);                //产品数为0

    pthread_create(&pid, NULL, producer, NULL);
    pthread_create(&cid, NULL, consumer, NULL);

    pthread_join(pid, NULL);
    pthread_join(cid, NULL);

    sem_destroy(&blank_number);
    sem_destroy(&product_number);

    return 0;
}


 1万+
1万+


 被折叠的 条评论
为什么被折叠?
被折叠的 条评论
为什么被折叠?
 到【灌水乐园】发言


