


http://t.csdn.cn/hMR7o本文章仅供学习参考,超级小白记录一下学习的相关知识,如有任何错误欢迎指正。谢谢啦!!!!!!!!!!!!!!!!!!!!!!!!!!!!!!!!!!!!!!
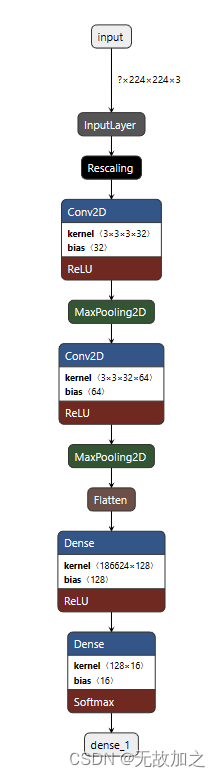
cnn模型的构建:
def model_load(IMG_SHAPE=(224, 224, 3), class_num=12):
    # 搭建模型
    model = tf.keras.models.Sequential([
        # 对模型做归一化的处理,将0-255之间的数字统一处理到0到1之间
        tf.keras.layers.experimental.preprocessing.Rescaling(1. / 255, input_shape=IMG_SHAPE),
        # 卷积层,该卷积层的输出为32个通道,卷积核的大小是3*3,激活函数为relu
        tf.keras.layers.Conv2D(32, (3, 3), activation='relu'),
        # 添加池化层,池化的kernel大小是2*2
        tf.keras.layers.MaxPooling2D(2, 2),
        # Add another convolution
        # 卷积层,输出为64个通道,卷积核大小为3*3,激活函数为relu
        tf.keras.layers.Conv2D(64, (3, 3), activation='relu'),
        # 池化层,最大池化,对2*2的区域进行池化操作
        tf.keras.layers.MaxPooling2D(2, 2),
        # 将二维的输出转化为一维
        tf.keras.layers.Flatten(),
        # The same 128 dense layers, and 10 output layers as in the pre-convolution example:
        tf.keras.layers.Dense(128, activation='relu'),
        # 通过softmax函数将模型输出为类名长度的神经元上,激活函数采用softmax对应概率值
        tf.keras.layers.Dense(class_num, activation='softmax')
    ])
    # 输出模型信息
    model.summary()
    # 指明模型的训练参数,优化器为sgd优化器,损失函数为交叉熵损失函数
    model.compile(optimizer='sgd', loss='categorical_crossentropy', metrics=['accuracy'])
    # 返回模型
    return model
CNN可视化卷积层:
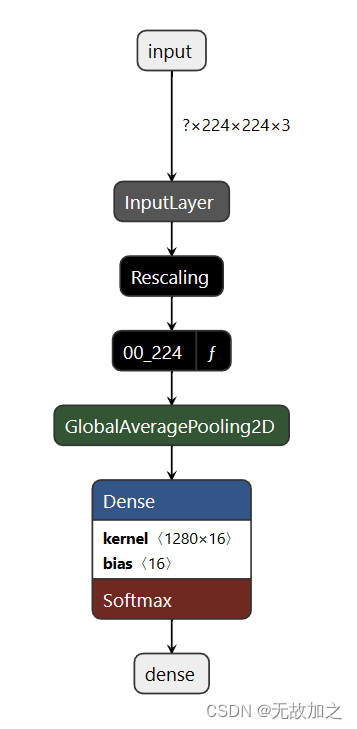
构建mobilenet模型,模型加载,指定图片处理的大小和是否进行迁移学习:
def model_load(IMG_SHAPE=(224, 224, 3), class_num=12):
    # 微调的过程中不需要进行归一化的处理
    # 加载预训练的mobilenet模型
    base_model = tf.keras.applications.MobileNetV2(input_shape=IMG_SHAPE,
                                                   include_top=False,
                                                   weights='imagenet')
    # 将模型的主干参数进行冻结
    base_model.trainable = False
    model = tf.keras.models.Sequential([
        # 进行归一化的处理
        tf.keras.layers.experimental.preprocessing.Rescaling(1. / 127.5, offset=-1, input_shape=IMG_SHAPE),
        # 设置主干模型
        base_model,
        # 对主干模型的输出进行全局平均池化
        tf.keras.layers.GlobalAveragePooling2D(),
        # 通过全连接层映射到最后的分类数目上
        tf.keras.layers.Dense(class_num, activation='softmax')
    ])
    model.summary()
    # 模型训练的优化器为adam优化器,模型的损失函数为交叉熵损失函数
    model.compile(optimizer='adam', loss='categorical_crossentropy', metrics=['accuracy'])
    return model
mobilenet可视化卷积层:
数据加载,分别从训练的数据集的文件夹和测试的文件夹中加载训练集和验证集 :
def data_load(data_dir, test_data_dir, img_height, img_width, batch_size):
    # 加载训练集
    train_ds = tf.keras.preprocessing.image_dataset_from_directory(
        data_dir,
        label_mode='categorical',
        seed=123,
        image_size=(img_height, img_width),
        batch_size=batch_size)
    # 加载测试集
    val_ds = tf.keras.preprocessing.image_dataset_from_directory(
        test_data_dir,
        label_mode='categorical',
        seed=123,
        image_size=(img_height, img_width),
        batch_size=batch_size)
    class_names = train_ds.class_names
    # 返回处理之后的训练集、验证集和类名
    return train_ds, val_ds, class_names
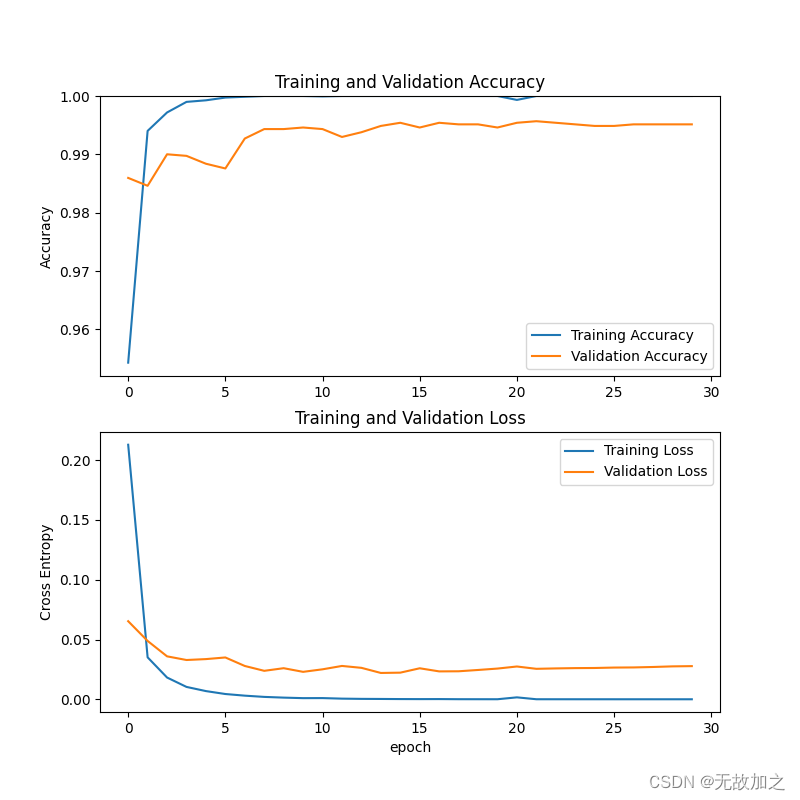
测试mobilenet准确率:
def test_mobilenet():
    # todo 加载数据, 修改为你自己的数据集的路径
    train_ds, test_ds, class_names = data_load("D:/pycharm/ku/模型训练/new_data/Plant Disease and Pest Dataset/train",
                                              "D:/pycharm/ku/模型训练/new_data/Plant Disease and Pest Dataset/val", 224, 224, 16)
    # todo 加载模型,修改为你的模型名称
    model = tf.keras.models.load_model("models/mobilenet_zwbh30.h5")
    # model.summary()
    # 测试
    loss, accuracy = model.evaluate(test_ds)
    # 输出结果
    print('Mobilenet test accuracy :', accuracy)

    test_real_labels = []
    test_pre_labels = []
    for test_batch_images, test_batch_labels in test_ds:
        test_batch_labels = test_batch_labels.numpy()
        test_batch_pres = model.predict(test_batch_images)
        # print(test_batch_pres)

        test_batch_labels_max = np.argmax(test_batch_labels, axis=1)
        test_batch_pres_max = np.argmax(test_batch_pres, axis=1)
        # print(test_batch_labels_max)
        # print(test_batch_pres_max)
        # 将推理对应的标签取出
        for i in test_batch_labels_max:
            test_real_labels.append(i)

        for i in test_batch_pres_max:
            test_pre_labels.append(i)
        # break

    # print(test_real_labels)
    # print(test_pre_labels)
    class_names_length = len(class_names)
    heat_maps = np.zeros((class_names_length, class_names_length))
    for test_real_label, test_pre_label in zip(test_real_labels, test_pre_labels):
        heat_maps[test_real_label][test_pre_label] = heat_maps[test_real_label][test_pre_label] + 1

    print(heat_maps)
    heat_maps_sum = np.sum(heat_maps, axis=1).reshape(-1, 1)
    # print(heat_maps_sum)
    print()
    heat_maps_float = heat_maps / heat_maps_sum
    print(heat_maps_float)
    # title, x_labels, y_labels, harvest
    show_heatmaps(title="heatmap", x_labels=class_names, y_labels=class_names, harvest=heat_maps_float,
                  save_name="results/heatmap_mobilenet30.png")
模型训练效果呈现:
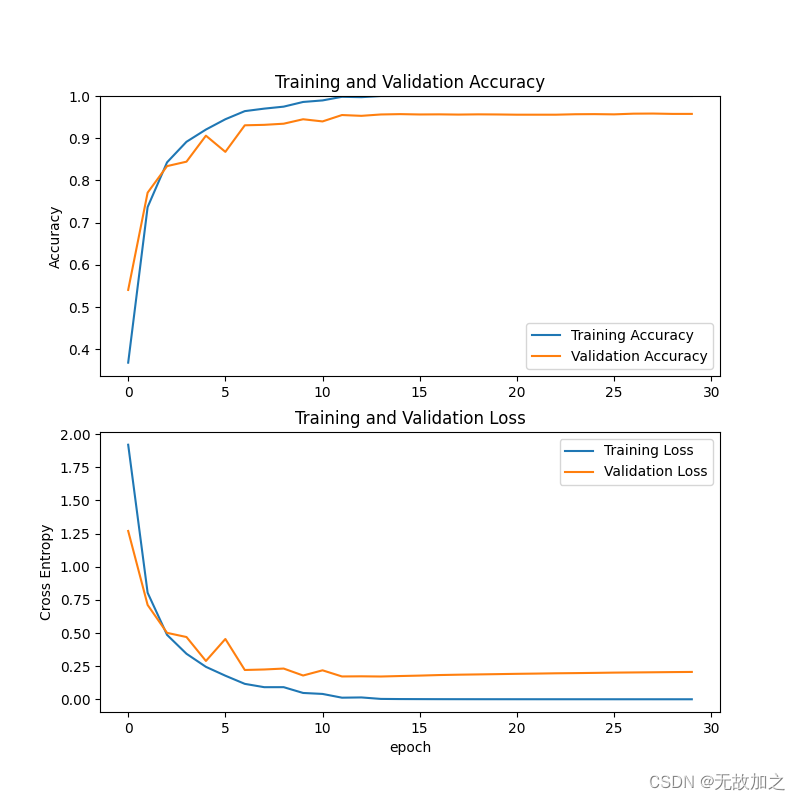
测试cnn模型准确率:
def test_cnn():
    # todo 加载数据, 修改为你自己的数据集的路径
    train_ds, test_ds, class_names = data_load("D:/pycharm/ku/模型训练/new_data/Plant Disease and Pest Dataset/train",
                                              "D:/pycharm/ku/模型训练/new_data/Plant Disease and Pest Dataset/val", 224, 224, 16)
    model = tf.keras.models.load_model("models/cnn_zwbch30.h5")
    # model.summary()
    loss, accuracy = model.evaluate(test_ds)
    # 输出结果
    print('CNN test accuracy :', accuracy)
    # 对模型分开进行推理
    test_real_labels = []
    test_pre_labels = []
    for test_batch_images, test_batch_labels in test_ds:
        test_batch_labels = test_batch_labels.numpy()
        test_batch_pres = model.predict(test_batch_images)
        # print(test_batch_pres)

        test_batch_labels_max = np.argmax(test_batch_labels, axis=1)
        test_batch_pres_max = np.argmax(test_batch_pres, axis=1)
        # print(test_batch_labels_max)
        # print(test_batch_pres_max)
        # 将推理对应的标签取出
        for i in test_batch_labels_max:
            test_real_labels.append(i)

        for i in test_batch_pres_max:
            test_pre_labels.append(i)
        # break

    class_names_length = len(class_names)
    heat_maps = np.zeros((class_names_length, class_names_length))
    for test_real_label, test_pre_label in zip(test_real_labels, test_pre_labels):
        heat_maps[test_real_label][test_pre_label] = heat_maps[test_real_label][test_pre_label] + 1

    print(heat_maps)
    heat_maps_sum = np.sum(heat_maps, axis=1).reshape(-1, 1)

    print()
    heat_maps_float = heat_maps / heat_maps_sum
    print(heat_maps_float)
    show_heatmaps(title="heatmap", x_labels=class_names, y_labels=class_names, harvest=heat_maps_float,
                  save_name="results/heatmap_cnn30.png")
cnn模型训练效果:


 897
897


 被折叠的 条评论
为什么被折叠?
被折叠的 条评论
为什么被折叠?
 到【灌水乐园】发言


