


1. thread
1.1 线程创建
| 创建方式 | 函数原型 |
|---|---|
| Default | thread() noexcept; |
| Initialization | template <class Fn, class... Args> explicit thread(Fn&& fn, Args&&... args); |
| Move | thread(thread&& x) noexcept; |
| copy(禁止拷贝构造) | thread(const thread&) = delete; |
Default:就是创建一个空的线程对象,由于该对象没有传启动函数,因此该线程不会被执行,并且也不可join。
Initalization:这里的函数原型是一个模板函数,函数的第一个参数是"启动函数",第二个参数是一个可变参数,可变参数就意味着可以传多个参数,也可以不传参数。(类似于printf)
Move:
线程函数使用的三种方式:
- 通过函数指针
- lambda表达式
- 函数对象
void func1(int a, int b)
{
	cout << "函数指针: " << a << " " << b << endl;
}

struct ThreadFunc
{
    void operator()()
    {
        cout << "函数对象" << endl;
    }
};

int main()
{
	int a = 1, b = 2;
	thread t1;	//创建空的线程对象,由于没有关联任何线程函数,所以不会启动该线程
	//1. 函数指针
    thread t2(func1, a, b);
	//2. lambda表达式
	thread t3([] {
		cout << "lambda" << endl;
	});
    //3. 函数对象
    ThreadFunc tf;
    thread t4(tf);

	//t1.join();	//t1线程没有启动,因此无法join
	t2.join();
	t3.join();
	t4.join();
	return 0;
}
1.2 join与detach
join():线程等待,主线程再执行join()时会进入阻塞状态,直到等待的线程终止,主线程去回收该线程的资源。
detach():线程分离,让子线程脱离主线程的控制,也就不需要主线程再等待该线程了,该线程就会被C++库进行管理了,C++库能保证该线程的资源可以正确的被回收。
joinable():判断线程是否是可以被等待的 (返回值类型bool),如果某个线程在执行了detach()后,它就变成了不可join的线程了,此时就是joinable()的返回值就是false。可以被join的线程,joinable的返回值是true。
· 线程joinable == false的情况
- 线程已经分离detach
- 线程已经join过了
- 线程未启动 (创建了一个空的线程对象,没有给它启动函数)
- 线程对象的状态已经转移给了其它线程对象
int main()
{
	thread t1([] {
		cout << "This is t1 thread\n";
		this_thread::sleep_for(std::chrono::seconds(3));  //让当前线程被阻塞至少3s
	});
	thread t2([] {
		cout << "This is t2 thread\n";
		this_thread::sleep_for(std::chrono::seconds(5));  //让当前线程被阻塞至少5s
	});

    //让t2线程分离
	t2.detach();

	if (t1.joinable())
	{
		cout << "t1 is joinable!" << endl;
		t1.join();
	}
	else
	{
		cout << "t1 is not joinable!" << endl;
	}

	if (t2.joinable())
	{
		cout << "t2 is joinable" << endl;
		t2.join();
	}
	else
	{
		cout << "t2 is not joinable!" << endl;
	}
	return 0;
}

1.3 std::this_thread命名空间
1.3.1 get_id
作用:获取当前线程ID
线程ID的获取分为2种方式,一种是通过对象.get_id(),另一种就是通过std::this_thread::get_id(),对象.get_id,是获取该线程对象的ID;而this_thread的get_id,是获取当前线程的ID。
void Start_t1()
{
	cout << "std::this_thread::get_id()" << std::this_thread::get_id() << endl;
}

int main()
{
	thread t1(Start_t1);
	cout << "对象.get_id(): " << t1.get_id() << endl;
	t1.join();
	return 0;
}
1.3.2 yield
作用:当前线程“放弃”执行,让操作系统调度另一线程继续执行
适用场景:
在多线程编程当中,我们可能会遇到"让一个线程等待某个条件满足后,再让它继续执行"的场景。而此时往往需要用到while循环,去让它循环判断条件是否成立。
while(isReady());
然而这种写法,会大量占用CPU的时间从而造成资源的浪费。为了解决这个问题,我们可以让该线程在每次判断结束后,让它放弃继续占用CPU的使用权,让操作系统调用其他线程继续执行,然后过一会再来判断条件是否满足。这样的操作就会大大的节省CPU的时间了。yield函数的功能就是这样的。
while(isReady())
    std::this_thread::yield();
1.3.3 sleep_for
作用:让当前线程休眠一段时间(rel_time),不过真实的休眠时间往往会超出这个数值。
void Start_Routine()
{
	using namespace std::chrono;	//chrono是std的一个子命名空间(同时也是个头文件)
	int cnt = 10;	//为了方便观察,我们这里看10次的sleep_for耗时
	while (cnt--)
	{
		high_resolution_clock::time_point t1 = high_resolution_clock::now();
		this_thread::sleep_for(milliseconds(500));
		high_resolution_clock::time_point t2 = high_resolution_clock::now();
		//计算sleep_for的耗时
		duration<double> time_span = duration_cast<duration<double>>(t2 - t1);
		cout << "The time for sleep_for is: " << time_span.count() << endl;
	}
}

int main()
{
	thread t(Start_Routine);
	t.join();
	return 0;
}

我们可以很直接的观察出,sleep_for的耗时都是在0.5秒以上的,但是不会超出太多。
1.3.4 sleep_until
作用:使当前线程休眠到某个时间点*(abs_time)*
1.3.5 yield vs sleep_for
C++11标准库中提供的yield和sleep_for方法都可以让当前线程放弃继续占用CPU。
yield方法让出CPU的时间是不确定的,它是以CPU的调度时间片为单位的。
yield方法一般适用于CPU非常忙碌的时候,需要反复去查看某个条件是否满足的时候。除此之外,不太推荐使用yield方法。
2. mutex
C++11中mutex一共包含了4种互斥量:mutex、recursive_mutex、timed_mutex、recursive_timed_mutex。
2.1 mutex
C++11提供的最基本的互斥量,mutex类对象之间不能进行拷贝构造和移动构造,mutex类只能调用默认构造函数。下面是mutex最常用的3个成员函数。
| 函数接口 | 功能 |
|---|---|
| lock | 加锁;(加锁不成功就阻塞当前进程) |
| try_lock | 如果当前互斥量没有其它线程占有,则加锁成功; 如果当前互斥量已经被其它线程占有,当前线程也不会被阻塞。 |
| unlock | 解锁 |
//mutex对象刚创建时是unlock状态
注意:
(1): lock的3种情况
- 当前互斥量未被上锁,则调用线程会将该互斥量锁住,直到调用unlock,此期间该线程一直持有该锁。
- 当前互斥量已经被其它线程上锁,则调用线程会被阻塞住
- 当前互斥量被当前调用线程锁住,则会产生死锁(deadlock)
(2): try_lock的3种情况
- 当前互斥量未被上锁,则调用线程会将该互斥量锁住,直到调用unlock,此期间该线程一直持有该锁。
- 当前互斥量已经被其它线程上锁,则调用线程返回false,继续往下执行。(不会被阻塞)
- 当前互斥量被当前调用线程锁住,则会产生死锁(deadlock)
演示
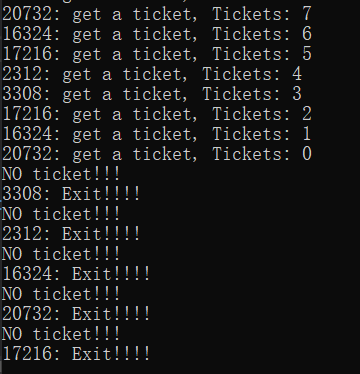
//5个进程抢1000张票
#include <iostream>
#include <thread>
#include <mutex>	//互斥量头文件
#include <vector>
using namespace std;

mutex mtx;
int tickets = 1000;

void Get_Tickets()
{
	while (1)
	{
		this_thread::sleep_for(chrono::milliseconds(1));//每次抢完休眠1毫秒
		mtx.lock();
		if (tickets > 0)
		{
			--tickets;
			cout << this_thread::get_id() << ": get a ticket, Tickets: " << tickets << endl;
			mtx.unlock();
		}
		else
		{
			cout << "NO ticket!!!" << endl;
			mtx.unlock();
			break;
		}
	}
	cout << this_thread::get_id() << ": Exit!!!!" << endl;
}

int main()
{
	//vector<thread> vt(5, thread(Get_Tickets)); //不能这么写!!! 这里是先构造了thread对象,然后再把对象拷贝构造到vt数组中(thread不支持拷贝)

	vector<thread> vt;
	for (int i = 0; i < 5; ++i)
		vt.push_back(thread(Get_Tickets));

	for (thread& i : vt)	//必须加&,因为线程不可以被拷贝
		i.join();

	//for (size_t i = 0; i < vt.size(); ++i)
	//	vt[i].join();
	//for_each(vt.begin(), vt.end(), mem_fn(&std::thread::join));
	return 0;
}
2.2 recursive_mutex
递归互斥锁,它允许通过一个线程对互斥量进行多次上锁*(指递归上锁)*,释放互斥量的时候需要调用与该锁层次深度相同次数的unlock去解锁。除此以外,它和mutex大致相同。
2.3 timed_mutex
它比mutex多了2个成员函数,try_lock_for()和try_lock_until()。
· try_lock_for
template <class Rep, class Period>
  bool try_lock_for (const chrono::duration<Rep,Period>& rel_time);
接受一个时间范围rel_time作为参数,在rel_time时间内,调用线程会被阻塞住。如果在调用时间内获得了锁,那么立刻上锁并返回true(解除了阻塞状态);如果超出调用时间仍未获得锁,那么返回false。
try_lock_for和try_lock的区别就在于"在rel_time时间内,try_lock_for会一直阻塞等待其它线程释放锁",而try_lock不存在时间的说法。
· try_lock_until
template <class Clock, class Duration>
  bool try_lock_until (const chrono::time_point<Clock,Duration>& abs_time);
接收一个时间点abs_time作为参数,在abs_time时刻来之前,调用线程会被阻塞住。如果在调用时刻来之前获得了锁,那么立刻上锁并返回true;如果超出了调用时刻也未获得锁,那么返回false.
//try_lock_until就是把try_lock_for的时间范围换成了某个时间点。
2.4 recursive_timed_mutex
recursive_timed_mutex就是timed_mutex的递归版本。
3. lock
下面两种锁是在互斥量的基础上扩展产生的,它们相比互斥量能够对临界资源进行保护外,还拥有一些其它的特性。
3.1 lock_guard
lock_guard是C++11中定义的模板类,它相比互斥量,还拥有RAII的机制 (RAII详解看这里)。lock_guard会在其对象被创建的时候,就进行加锁,然后在对象析构的时候,进行解锁!
void Print(int i)
{
	lock_guard<mutex> lg(mtx);
	cout << "thread# " << i << endl;
}

int main()
{
	vector<thread> vt;
	for (int i = 0; i < 20; ++i)
		vt.push_back(thread(Print, i));
	for (auto& i : vt)
		i.join();
	return 0;
}
同时创建20个线程,让它们一起向显示器上打印。此时此刻,显示器就是临界资源,如果不加锁进行保护的话,可能会出现打印错乱的情况。在这里我们使用lock_guard去保护显示器这个临界资源。这样就不会出现打印错乱的情况了。
3.2 unique_lock
在进行加锁和解锁操作的时候,有一个名词叫做"粒度",锁的粒度越粗,意味着加锁的区域越大;锁的粒度越细,意味着加锁的区域越小。我们知道在加锁的区域中,线程都是串行操作的,串行就意味着效率大幅度的降低。因此为了保证效率,我们要尽可能的使用粒度细的锁。
lock_guard实际上在控制锁的粒度上,效果不是很好。因为它的RAII机制,以及lock_guard并不提供手动加锁和解锁的接口,因此lock_guard很难去控制锁的粒度。而面对这种情况,我们就可以使用unique_lock了,unique_lock基于RAII机制的基础上,还提供了lock()与unlock接口,并且它还能判断当前是否拥有锁。在unique_lock的析构函数中,会根据当前状态来判断是否要进行解锁。
unique_lock支持移动构造,但是不支持拷贝构造。而lock_guard不支持移动也不支持拷贝构造。
mutex mtx;
int main()
{
	lock_guard<mutex> lg1(mtx);			//✔
	//lock_guard<mutex> lg2(lg1);		//error
	//lock_guard<mutex> lg3(move(lg2));	//error

	unique_lock<mutex> ulock1(mtx);				//✔
	//unique_lock<mutex> ulock2(ulock1);		//error
	unique_lock<mutex> ulock3(move(ulock1));	//✔
	return 0;
}
unique_lock在构造的时候,可以选择不加锁,只需要传入一个标识符defer_lock。
mutex mtx;

void Print(int i)
{
	unique_lock<mutex> ulock(mtx, defer_lock);	//创建时不加锁

	if (i % 2 == 0)
	{
		ulock.lock();
		cout << "Even thread# " << i << endl;
		ulock.unlock();
    }
}

int main()
{
	vector<thread> vt;
	for (int i = 0; i < 20; ++i)
		vt.push_back(thread(Print, i));
	for (auto& i : vt)
		i.join();
	return 0;
}
unique_lock还有很多其它的操作,[详细可以看这里](unique_lock - C++ Reference (cplusplus.com))。其它详细资料
注意:
虽然unique_lock的操作更加灵活,但是它在效率上的开销比lock_guard会更大一些。在能用lock_guard解决的地方,就尽可能的用lock_guard!
4. 条件变量
default (1):		condition_variable();	//默认构造函数
copy [deleted] (2):	 condition_variable (const condition_variable&) = delete;//禁止拷贝构造
| 成员函数 | 功能描述 |
|---|---|
| wait | 阻塞式等待,直到条变量被通知、虚假唤醒或循环的等待条件满足 |
| wait_for | 阻塞式等待,直至条件变量被通知、或虚假唤醒发生、或超时返回 |
| wait_until | 阻塞式等待,直到条件变量被通知、或到某个时间点 |
| notify_one | 通知一个在当前条件变量下等待的线程 |
| notify_all | 通知所有在当前条件变量下等待的现场 |
4.1 wait
//unconditional (1)
void wait (unique_lock<mutex>& lck);
//predicate (2)	pred可以是个函数指针、仿函数、lambda表达式,被当做条件
template <class Predicate>
  void wait (unique_lock<mutex>& lck, Predicate pred);
作用:阻塞式等待,直到得到通知。
注意:wait调用的锁的类型是unique_lock!
在第二种predicat下:pred函数被用来当做wait条件的判断,wait(lck, pred)类似于下面的代码。
while(!pred())		//当条件"不满足"时,会持续的进行阻塞等待s
    wait(lck);
使用pred可以有效防止虚假唤醒!
4.2 wait_for
//unconditional (1)
template <class Rep, class Period>
  cv_status wait_for (unique_lock<mutex>& lck,
                      const chrono::duration<Rep,Period>& rel_time);
//predicate (2)
template <class Rep, class Period, class Predicate>
       bool wait_for (unique_lock<mutex>& lck,
                      const chrono::duration<Rep,Period>& rel_time, Predicate pred);
作用:等待超时或者被通知才会返回,否则阻塞线程。
4.3 虚假唤醒
虚假唤醒就是指在调用wait函数时,可能会存在调用失败的情况,此时就不会阻塞线程了,这就导致了被应该被阻塞的线程被唤醒了。为了防止虚假唤醒的发生,我们一般在调用wait函数时,都会使用带有条件函数的版本的wait函数。即wait(lck, pred)。
if(!条件)	//条件不满足时会进入if中调用wait函数
{
    wait();	//wait函数正常调用,线程被阻塞住
}		   //当wait调用失败时,线程就会继续往下执行
//为了解决wait函数调用失败使得即使条件不满足,线程也继续往下执行的问题
//我们可以将if判断改为while判断!
while(!条件)
{
    wait();	//只有条件满足时,才会跳出while循环,不然是无法跳出的!
}
5. 原子操作
原子操作就意味着这个操作不可以再被分割!也就是意味着这个操作在被编译成汇编语言后,对应的汇编指令就是1条!一条汇编指令就是具有原子性的,(关于原子性可以看这篇文章中的互斥量的原理部分)。
在<atomic>头文件中有2个原子类,一个是atomic,另一个是atomic_flag。其中atomic_flag一定是lock_free的*(无锁实现)*,而atomic<T>类型的不一定是lock_free的,我们可以通过调用**is_lock_free()**成员函数去判断atomic<T>类型的变量是否是lock_free的。
5.1 atomic
| 原子类型名称 | 内置类型 |
|---|---|
| std::atomic_bool | std::atomic<bool> |
| std::atomic_char | std::atomic<char> |
| std::atomic_schar | std::atomic<signed char> |
| std::atomic_uchar | std::atomic<unsigned char> |
| std::atomic_short | std::atomic<short> |
| std::atomic_ushort | std::atomic<unsigned short> |
| std::atomic_int | std::atomic<int> |
| std::atomic_uint | std::atomic<unsigned int> |
| std::atomic_long | std::atomic<long> |
| std::atomic_ulong | std::atomic<unsigned long> |
| std::atomic_llong | std::atomic<long long> |
| std::atomic_ullong | std::atomic<unsigned long long> |
| std::atomic_char16_t | std::atomic<char16_t> |
| std::atomic_char32_t | std::atomic<char32_t> |
| std::atomic_wchar_t | std:atomic<wchar_t> |
| 更多原子类型可以参考 |
#include <iostream>
#include <thread>
#include <atomic>	//原子操作的头文件
using namespace std;

atomic_long ato_cnt = 0;
long cnt = 0;

void func()
{
	for (int i = 0; i < 100000; ++i)
	{
		++cnt;
		++ato_cnt;
	}
}

int main()
{
	thread t1(func);
	thread t2(func);

	t1.join();
	t2.join();
	cout << "普通操作" << cnt << endl;
	cout << "原子操作" << ato_cnt << endl;
	return 0;
}

atomic类是模板类,因此也会支持自定义类型。但是需要注意的是:atomic类的拷贝构造函数、移动构造函数、operator=都被删除了。
| 函数接口 | 功能描述 |
|---|---|
| store | 写入数据 |
| load | 读取数据 |
| exchange | 交换数据 (原子操作) |
| compare_exchange_weak | CAS操作 (数据符合条件被修改也可能返回false, strong就没有这个问题) |
| compare_exchange_strong | CAS操作 |
5.2 atomic_flag
· 构造函数
atomic_flag() noexcept = default;
atomic_flag (const atomic_flag&T) = delete;
· ATOMIC_FLAG_INIT
这是一个初始化参数,一般在定义atomic_flag变量时赋予这个参数,用于初始化一个确定的状态。
| 函数接口 | 功能描述 |
|---|---|
| test_and_set | 检测是否被设置成true,如果没有被设置成true,就设置为true,并返回之前的值(false);如果已经被设置为true,则直接返回true |
| clear | 将atomic_flag的bool成员变量设置为false (无返回值) |
演示
//创建10个线程竞速,看谁先加到1000000,一共测试5轮
#include <iostream>
#include <thread>
#include <atomic>
#include <vector>
using namespace std;

atomic_bool ready = false;
atomic_flag winner = ATOMIC_FLAG_INIT;	//初始化

void CountToNumber(int id)
{
	while (!ready)
		this_thread::yield();

	for (int i = 0; i < 1000000; ++i);
	while (!winner.test_and_set())
	{
		cout << "thread#" << id << " is the winner!" << endl;
	}
}

int main()
{
	for (int cnt = 0; cnt < 5; ++cnt)
	{
		//重置状态
		ready = false;
		winner.clear();
		vector<thread> vt;
		for (int i = 0; i < 10; ++i)
			vt.push_back(thread(CountToNumber, i + 1));
		//开始竞速!
		ready = true;

		for (auto& e : vt)
			e.join();
	}
	return 0;
}

5.3 自旋锁
自旋锁的简单模拟实现
class My_Spinlock
{
public:
	My_Spinlock()
	{
		_spinlock.clear();
	}
	My_Spinlock(const My_Spinlock&) = delete;
	My_Spinlock& operator=(const My_Spinlock&) = delete;

	void lock()
	{
		while (_spinlock.test_and_set()); //spinlock的初值是false,在一个线程设置为false后,其它线程会一直在这个while循环中等待
	}

	void unlock()
	{
		_spinlock.clear();
	}
private:
	std::atomic_flag _spinlock;
};
测试代码
#include <iostream>
#include <thread>
#include <atomic>
using namespace std;

class My_Spinlock
{
public:
	My_Spinlock()
	{
		_spinlock.clear();
	}

	My_Spinlock(const My_Spinlock&) = delete;
	My_Spinlock& operator=(const My_Spinlock&) = delete;

	void lock()
	{
		while (_spinlock.test_and_set());
	}

	void unlock()
	{
		_spinlock.clear();
	}
private:
	std::atomic_flag _spinlock;
};


My_Spinlock spl;
long cnt = 0;

void func()
{
	for (int i = 0; i < 100000; ++i)
	{
		spl.lock();
		++cnt;
		spl.unlock();
	}
}

int main()
{
	thread t1(func);
	thread t2(func);
	t1.join();
	t2.join();
	cout << cnt << endl;
	return 0;
}
运行后的结果没问题,是200000


 848
848

 被折叠的 条评论
为什么被折叠?
被折叠的 条评论
为什么被折叠?
 到【灌水乐园】发言


