


说明
按下K1时计数+1;
按下K2时计数-1;
按下K3时清零;
Proteus仿真
注意:
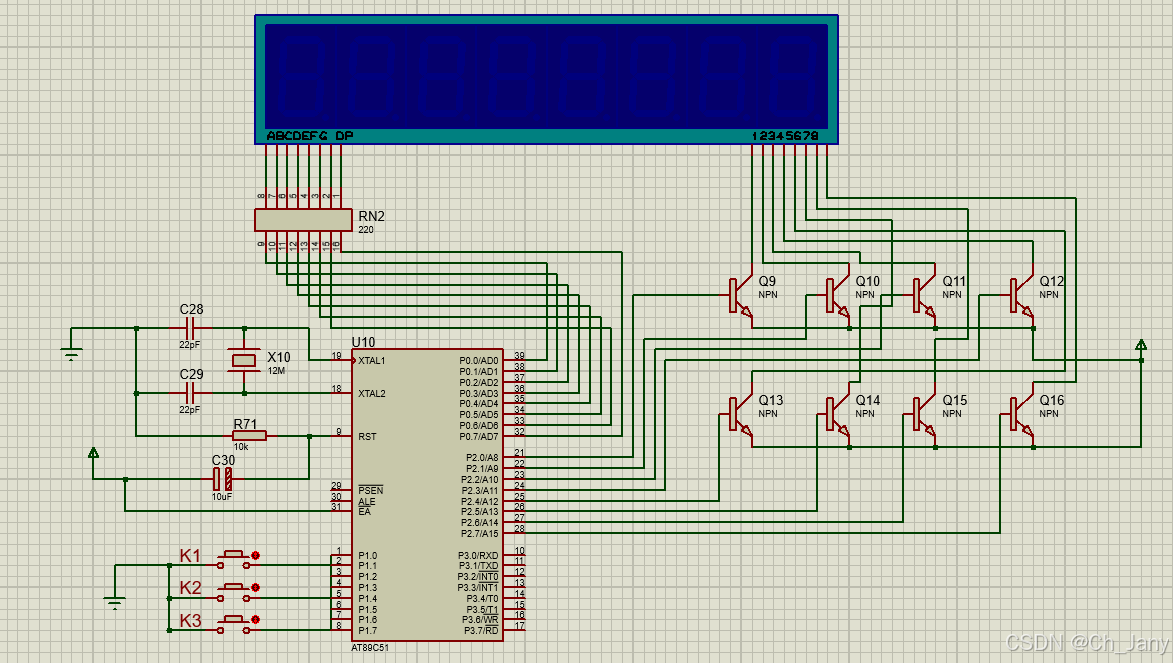
RX8的1-8引脚脚依次连接数码管的A-G和DP
RX8的9-16引脚依次连接P0.0-P0.7
Q9-Q16的基极(B)依次连接P2.0-P2.7
Q9-Q16的集电极(C)依次连接数码管的1-8
Q9-Q16的发射极(E)连接电源
K1-K3依次连接引脚P1.0-P1.2
使用到的元器件:
单片机:AT89C51
电容:CAP
极性电容:CAP-ELEC
电阻:RES
晶振:CRYSTAL
数码管:7SEG-MPX8-CA-BLUE
排阻:RX8
三极管:NPN
按键:BUTTON
C51代码
#include<reg51.h>
#include<intrins.h>
#define uchar unsigned char
#define uint unsigned int

//段码			0-9、关闭
uchar code DSY_CODE[]={0xc0,0xf9,0xa4,0xb0,0x99,0x92,0x82,0xf8,0x80,0x90,0xff};
//待显示的3位缓冲
uchar Num_Buffer[]={0,0,0};
//按键代码,按键计数
uchar Key_Code,Key_Counts=0;

//延时
void DelayMs(uint ms)
{
	uchar i;
	while(ms--)
	{
		for(i=0;i<120;i++);
	}
}

//显示实现
void Show_Count_On_Dsy()
{
	uchar i,Pos = 0x01;
	Num_Buffer[2] = Key_Counts/100;//百位
	Num_Buffer[1] = Key_Counts/10%10;//十位
	Num_Buffer[0] = Key_Counts%10;//个位
	//循环实现,展示百十个位数字到数码管
	for(i=0;i<3;i++)
	{
		 Pos = _cror_(Pos,1);//位选
		 P2 = Pos;
		 P0 = DSY_CODE[Num_Buffer[i]];//段选
		 DelayMs(2);
	}
}

void main()
{
	uchar i;
	P0 = 0xff;
	P1 = 0xff;
	P2 = 0x00;
	while(1)
	{
		Show_Count_On_Dsy();//刷新数码管显示
		P1 = 0xff;
		Key_Code = P1;//读取按键状态
		switch(Key_Code)
		{
			case 0xfe://K1
						if(Key_Counts < 255)//因为Key_Counts是一个uchar类型的,所以不应该大于255,可以定义uint类型,这样就可以解除255的限制
							Key_Counts++;
						break;
			case 0xfd://K2
						if(Key_Counts > 0)
							Key_Counts--;
						break;
			case 0xfb://K3
						Key_Counts = 0;
		}
		while(P1 != 0xff)//消抖,保证按键按下松开之后,数字才能进行改变
		{
			for(i=0;i<30;i++)
				Show_Count_On_Dsy();
		}
	}
}


 8196
8196

 被折叠的 条评论
为什么被折叠?
被折叠的 条评论
为什么被折叠?
 到【灌水乐园】发言


