


基本思想
画布元素(canvas element)的基本思想是使⽤⼀个2D对象来渲染路径。这个2D对象包括了必要的绘图函数,画布元素(canvas element)充当绘制画布。2D对象⽀持画笔,填充,渐变,⽂本和绘制路径创建命令。
给一个例子
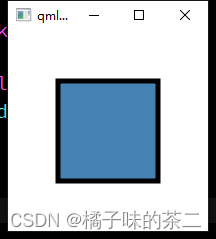
import QtQuick 2.0

Canvas {
    id: root
    // canvas size
    width: 200
    height: 200
    // handler to override for drawing
    onPaint: {
        // get context to draw with
        var ctx = getContext("2d") //获取绘制内容 目前只支持2d
        // setup the stroke
        ctx.lineWidth = 5 //线宽
        ctx.strokeStyle = "black" //线的颜色
        // setup the fill
        ctx.fillStyle = "steelblue" //填充的颜色
        // begin a new path to draw
        ctx.beginPath()
        // top-left start point
        ctx.moveTo(50, 50)
        // upper line
        ctx.lineTo(150, 50)
        // right line
        ctx.lineTo(150, 150)
        // bottom line
        ctx.lineTo(50, 150)
        ctx.lineTo(50, 50)
        // left line through path closing
        ctx.closePath()
        // fill using fill style
        ctx.fill()
        // stroke using line width and stroke style
        ctx.stroke()
    }
}
画笔的宽度被设置为5个像素,并且定义strokeStyle(画笔样式)为黑⾊。最后的形状由设置填充样式(fillStyle)为steelblue颜⾊,然后填充完成的。只有调⽤stroke或者fill函数,创建的路径才会绘制,它们与其它的函数使⽤是相互独⽴的。调⽤stroke或者fill将会绘制当前的路径,创建的路径是不可重⽤的,只有绘制状态能够被存储和恢复。
在QML中,画布元素(canvas element)充当了绘制的容器。2D绘制对象提
供了实际绘制的⽅法。绘制需要在onPaint事件中完成。
Canvas {
width: 200; height: 200
onPaint: {
var ctx = getContext("2d")
}
}
笛卡尔坐标系统 这个名词
画布⾃⾝提供了典型的⼆维笛卡尔坐标系统,左上⾓是(0,0)坐标。Y轴坐
标轴向下,X轴坐标轴向右。
绘制命令流程如下:
- 装载画笔或者填充模式
- 创建绘制路径
- 使⽤画笔或者填充绘制路径
onPaint: {
var ctx = getContext("2d")
// setup the stroke
ctx.strokeStyle = "red"
// create a path
ctx.beginPath()
ctx.moveTo(50,50)
ctx.lineTo(150,50)
// stroke path
ctx.stroke()
}
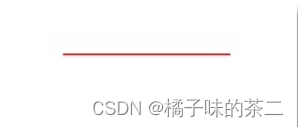
注意
通常在你重置了路径后你将会设置⼀个开始点,所以,在beginPath()这个操
作后,你需要使⽤moveTo来设置开始点。
便捷的接口(Convenient API)
在绘制矩形时,我们提供了⼀个便捷的接⼝,⽽不需要调⽤stroke或者fill来
完成。
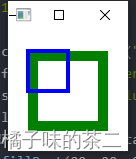
// convenient.qml
import QtQuick 2.0

Canvas {
    id: root
    width: 120
    height: 120
    onPaint: {
        var ctx = getContext("2d")
        ctx.fillStyle = 'green'
        ctx.strokeStyle = "blue"
        ctx.lineWidth = 4
        // draw a filles rectangle
        ctx.fillRect(20, 20, 80, 80)
        // cut our an inner rectangle
        ctx.clearRect(30, 30, 60, 60)
        // stroke a border from top-left to
        // inner center of the larger rectangle
        ctx.strokeRect(20, 20, 40, 40)
    }
}
// convenient.qml
import QtQuick 2.0

Canvas {
    id: root
    width: 120
    height: 120
    onPaint: {
        var ctx = getContext("2d")
        ctx.fillStyle = 'green'
        ctx.strokeStyle = "blue"
        ctx.lineWidth = 4
        // draw a filles rectangle
        ctx.fillRect(20, 20, 80, 80)
        // cut our an inner rectangle
        // ctx.clearRect(30, 30, 60, 60)
        // stroke a border from top-left to
        // inner center of the larger rectangle
        ctx.strokeRect(20, 20, 40, 40)
        ctx.fillStyle = "blue"
        ctx.fillRect(20, 20, 40, 40)
    }
}
这部分代码说明 后面改变的颜色 不会影响前面已经画好了元素
注意
画笔的绘制区域由中间向两边延展。⼀个宽度为4像素的画笔将会在绘制路径
的⾥⾯绘制2个像素,外⾯绘制2个像素。
渐变(Gradients)
画布中可以使⽤颜⾊填充也可以使⽤渐变或者图像来填充。
// convenient.qml
import QtQuick 2.0

Canvas {
    id: root
    width: 120
    height: 120
    onPaint: {
        var ctx = getContext("2d")
        var gradient = ctx.createLinearGradient(100, 0, 100, 200)
        gradient.addColorStop(0, "blue")
        gradient.addColorStop(0.5, "lightsteelblue")
        ctx.fillStyle = gradient
        ctx.fillRect(50, 50, 100, 100)
    }
}
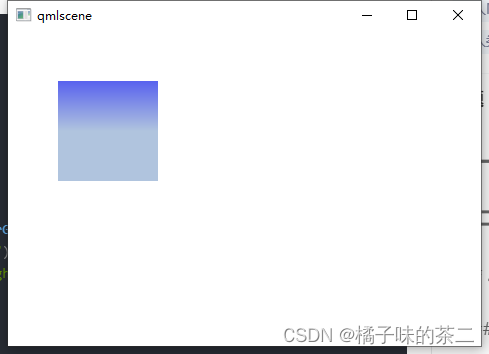
createLinearGradient
该函数返回一个CanvasGradient对象,该对象表示一个线性渐变,该渐变沿着从起点(x0, y0)到终点(x1, y1)的线条进行颜色过渡。
渐变是颜色之间的平滑过渡。有两种类型的渐变:线性和径向。渐变必须有两个或更多的颜色停止点,这些停止点代表在渐变起始点和终点或圆形之间从0到1的位置上的颜色变化
在这个例⼦中,渐变⾊定义在开始点(100,0)到结束点(100,200)。在我们画布中是⼀个中间垂直的线。渐变⾊在停⽌点定义⼀个颜⾊,范围从0.0到1.0。这⾥我们使⽤⼀个蓝⾊作为0.0(100,0),⼀个⾼亮刚蓝⾊作为0.5(100,200)。渐变⾊的定义⽐我们想要绘制的矩形更⼤,所以矩形在它
定义的范围内对渐变进⾏了裁剪。
// convenient.qml
import QtQuick 2.0

Canvas {
    id: root
    width: 120
    height: 120
    onPaint: {
        var ctx = getContext("2d")
        var gradient = ctx.createLinearGradient(100, 0, 100, 200)
        gradient.addColorStop(0, "blue")
        gradient.addColorStop(0.5, "lightsteelblue")
        ctx.fillStyle = gradient
        ctx.fillRect(50, 0, 100, 200)
    }
}
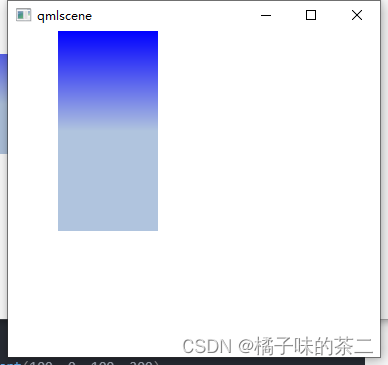
当我们把返回放大的时候 可以看到颜色变化的地方更明显了
渐变⾊是在画布坐标下定义的,⽽不是在绘制路径相对坐标下定义的。画布
中没有相对坐标的概念。 都是绝对坐标


 821
821

 被折叠的 条评论
为什么被折叠?
被折叠的 条评论
为什么被折叠?
 到【灌水乐园】发言


