


实验目的
In this lab you will add some new system calls to xv6, which will help you understand how they work and will expose you to some of the internals of the xv6 kernel. You will add more system calls in later labs.
System call tracing[moderate]
提示
- 在Makefile中加入$U_trace
- 此时执行make qemu后,无法编译user/trace.c,因为系统调用的用户空间stubs还不存在,要在user/user.h添加原型,user/usys.pl中添加一个stub,在kernel/syscall.h中添加系统调用号;Makefile就可以通过user/usys.pl,生成user/usys.S,这里是真实的系统调用stub,它使用RSIC-V 的ecall指令进入内核,以上就解决了编译问题,但系统调用还没有在内核实现
- 在 kernel/sysproc.c 中添加 *sys _ trace ()*函数,该函数通过在 proc 结构中的新变量中记住参数来实现新的系统调用(参见 kernel/proc.h)
- 由于在proc结构体中添加了个新变量来保存参数,所以也要在fork()(参见kernel/proc.c)中相应把这个变量复制给子进程
- 最后在syscall(参见kerne/syscall.c)中打印trace所要求的格式,主要包括pid,追踪的系统调用名,该系统调用的返回值等
背景知识
-
RISC-V上的C调用通常将返回值放在a0中。
比如对于系统调用而言,syscall将其返回值记录在p->trapframe->a0中。 -
内核的系统调用实现需要找到用户代码传递的参数,因为用户代码调用系统调用,实际上是调用它的包装函数,参数首先会存放在寄存器中,这是C语言存放参数的惯例位置。对xv6内核而言,内核trap代码将用户寄存器保存到当前进程的trapframe中,内核可以在那里找到它们。这里有三个函数,分别为argint、argaddr和argfd,它们从trapframe中以整数、指针、文件描述符的形式检索第n个系统调用参数。它们都调用argraw来获取保存的用户寄存器数据。
-
通过用户调用exec系统调用的例子,理解系统调用的过程很重要!
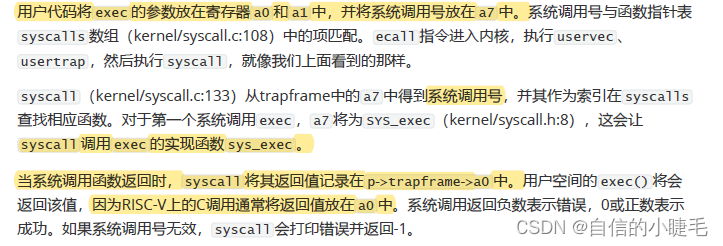
exec syscall函数的实现过程:
void
syscall(void)
{
  int num;
  struct proc *p = myproc();

  num = p->trapframe->a7;   //syscall number
  if(num > 0 && num < NELEM(syscalls) && syscalls[num]) {
    p->trapframe->a0 = syscalls[num]();  //call a func in syscalls and save the return val to a0
  } else {
    printf("%d %s: unknown sys call %d\n",
            p->pid, p->name, num);
    p->trapframe->a0 = -1;
  }
}
实验过程
1.trace函数已经写好,trace.c,但声明还没加入到user.h
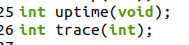
2.user/usys.pl中添加入口

3.在kernel/syscall.h中添加系统调用号

4.在proc结构体(kernel/proc.h)中添加新变量用于保存参数,并在fork(kernel/proc.c)中增加这一项的复制语句
struct proc {
/*
...
*/
int trace_mask;               //Trace mask
};
int fork(void) {
/*
...
*/
  //copy trace_mask to child process
  np->trace_mask = p->trace_mask;
/*
...
*/
};
5.sys_trace(kernel/sysproc.c)内核实现,主要内容获取调用参数
uint64
sys_trace(void)
{
	//get arg of syscall
	argint(0, &myproc()->trace_mask); //save arg to myproc()->trace_mask
	return 0;
}
6.在syscall(kernel/syscall.c)中打印最终格式,调用进程pid,调用名称,调用返回值
/*...
extern uint64 sys_trace(void);
...*/
/*...
[SYS_trace]  sys_trace
...*/

void
syscall(void)
{
  int num;
  struct proc *p = myproc();


  num = p->trapframe->a7;   //syscall number
  if(num > 0 && num < NELEM(syscalls) && syscalls[num]) {
    p->trapframe->a0 = syscalls[num]();  //call a func in syscalls and save the return val to a0
    //whether current syscall number is the syscall number we trace or not
    if((1 << num) & p->trace_mask) {
    	printf("%d: syscall %s -> %d\n", p->pid, syscall_name[num], p->trapframe->a0);
    }
  } else {
    printf("%d %s: unknown sys call %d\n",
            p->pid, p->name, num);
    p->trapframe->a0 = -1;
  }
}
这里终结一下xv shell中系统调用流程(trace 为例)
1.从shell中输入trace命令后,shell找到trace.c程序(前提是Makefile中UPROGS添加了$U/_trace\,这样才有trace对应的可执行程序);
2.将命令行参数传递给trace.c中main函数的参数argc,argv,执行用户函数,调用exec替换子进程;
usys.pl(包含所有系统调用的stubs,entry(“trace”))会生成usys.S, usys.S(汇编,源码可以看到)将系统调用号SYS_trace()保存在a7寄存器,调用ecall指令进行系统调用;
3.有了系统调用号后,就可以根据系统调用函数指针数组uint64 (*syscall[])(void) (kernel/syscall.c中),查找到系统调用的实现函数sys_trace() (kernel/sysproc.c) ,到这里系统调用一般完成。在这里每次系统调用都会通过syscall() (kernel syscall.c)调用系统调用的具体实现函数,并将sys_trace()的返回值保存在a0中。如果想进一步输出到shell,可以在syscall()函数中完成。
Sysinfo [moderate]
提示
- 将$U/_sysinfotest 添加到Makefile UPROGS中,这个主要用于测试
- 运行make qemu,user/sysinfotest将会编译失败,和上次提交一样,添加系统调用的必要东西,系统调用号;在user/user.h中添加函数原型,函数原型前要提前声明所用到的结构体
struct sysinfo;
int sysinfo(struct sysinfo*);
解决了编译问题后,还没有有添加系统调用实现 - sysinfo的实现函数freebytes、procnum都是在kernel文件夹中,是内核资源,需要借助copyout()函数,将内核数据拷贝到用户空间,这个函数要好好理解,涉及到页表的理解
- 在kernel/kalloc.c中添加函数freebytes,获取空闲空间
- 在kernel/proc.c中添加函数procnum,获取未使用的进程数
背景知识
- 关于copyout函数的理解,源码如下
// Copy from kernel to user.
// Copy len bytes from src to virtual address dstva in a given page table.
// Return 0 on success, -1 on error.
int
copyout(pagetable_t pagetable, uint64 dstva, char *src, uint64 len)
{
  uint64 n, va0, pa0;

  while(len > 0){
    va0 = PGROUNDDOWN(dstva);          //往低地址的方向对其4k的地址,相当后12位清零
    pa0 = walkaddr(pagetable, va0);    //get pa from pagetable and va0;  user space pa
    if(pa0 == 0)
      return -1;
    n = PGSIZE - (dstva - va0);    //PGSIZE 4096; dstva - va0 : Offset
    if(n > len)
      n = len;
    memmove((void *)(pa0 + (dstva - va0)), src, n);//copy n bytes to virtual addr ,pa : currrent user space addr

    len -= n;
    src += n;
    dstva = va0 + PGSIZE;
  }
  return 0;
}
实验过程
原来的实验并不需要像上一个trace调用那样很完整,也可以通过sysinfotest,但这里把它写完整,使得可以从shell调用并显示结果
- 在Makefile中,添加如下
UPROGS=\
/* ...*/
$U/_sysinfotest\
$U/_sysinfo\    #否则不会生成对应的可执行文件,exec sysinfo failed
- usys.pl脚本中添加该系统调用stub;在syscall.h中添加系统调用号
// user/usys.pl
/*...*/
entry("sysinfo");

// kernel/syscall.h
#define SYS_sysinfo 23
- 添加freebytes函数,用于获取空闲字节
//kernel/kalloc.c
/*
struct run {
  struct run *next;
};
struct {
  struct spinlock lock;
  struct run *freelist;
} kmem;
*/
//count number of bytes of free memory
void
freebytes(uint64 *dst)
{
	*dst = 0;
	struct run *p = kmem.freelist;

	acquire(&kmem.lock);
	while(p) {
		*dst += PGSIZE;//一个节点对应一个4096的空间
		p = p->next;
	}
	release(&kmem.lock);
}
- 添加procnum函数,用于获取进程数(未被使用的)
//count number of active processes
void
procnum(uint64 *dst)
{
	*dst = 0;
	struct proc *p;
	for(p = proc; p < &proc[NPROC]; p++) {  //遍历每个进程
		if(p->state != UNUSED) {
			(*dst)++;
		}
	}
}
- 将上述两个函数的声明添加到头文件defs.h中,里面包含了所有函数的声明,以及结构体声明
//kernel/defs.h
//kalloc.c
void            freebytes(uint64 *dst);
//proc.c
void            procnum(uint64 *dst);
- 编写sysinfo的具体实现函数,并要包含头文件sysinfo.h
//kernel/sysproc.c
#include "kernel/sysinfo.h"
//copy system information to user space
uint64
sys_sysinfo(void)
{
	struct sysinfo info;   //struct pointer must be initialized

	freebytes(&info.freemem);
	procnum(&info.nproc);

	//get virtual addr
	uint64 dstaddr;
	argaddr(0, &dstaddr); //get user space dstaddr

	//copy kernel data(info) to user space dstaddr
	if(copyout(myproc()->pagetable, dstaddr, (char *)&info, sizeof info) < 0)
	{
		return -1;
	}
	return 0;
}
- 最后,为了实现shell调用,创建sysinfo.c文件,并编写用户函数
#include "kernel/param.h"
#include "kernel/types.h"
#include "user/user.h"
#include "kernel/sysinfo.h"

int
main(int argc, char *argv[])
{
	if(argc != 1) {
		fprintf(2, "%s need not param\n", argv[0]);
		exit(1);
	}
	struct sysinfo info;
	sysinfo(&info);
	printf("free space(bytes) : %d, number of used proc : %d\n", info.freemem, info.nproc);

	exit(0);

}
实验结果


 970
970


 被折叠的 条评论
为什么被折叠?
被折叠的 条评论
为什么被折叠?
 到【灌水乐园】发言


