


1.房价预测
California House Prices | Kaggle
借鉴:【沐神课程 - 动手学深度学习】实战一详解之 Kaggle比赛:预测房价
1.1思路
定义MLP层
class MLP(nn.Module):
def __init__(self,in_featrues):
super().__init__()
self.layer1 = nn.Linear(in_featrues,256)
self.layer2 = nn.Linear(256,64)
self.out = nn.Linear(64,1)
def forward(self,X):
X = F.relu(self.layer1(X))
X = F.relu(self.layer2(X))
return self.out(X)
# 使用GPU
device = torch.device("cuda:0" if torch.cuda.is_available()else "cpu")
deviceLOSS选取
criterion = nn.MSELoss()
def load_array(data_arrays,batch_size , is_train=True):
dataset = data.TensorDataset(*data_arrays)
return data.DataLoader(dataset,batch_size ,shuffle=is_train)
def log_rmse(net,featrues,labels):
# 为了在取对数时进一步稳定该值,将小于1的值设置为1
net = net.to(device)
labels = labels.to(device)
clipped_preds = torch.clamp(net(featrues),1,float('inf'))
rmse = torch.sqrt(criterion(torch.log(clipped_preds),torch.log(labels)))
return rmse.item()数据处理
import torch
import pandas as pd
import torch.nn as nn
from torch.nn import functional as F
from tqdm import tqdm
import numpy as np
from torch.utils import data
train_data = pd.read_csv("../Dataset/train.csv")
test_data = pd.read_csv("../Dataset/test.csv")
train_data.shape,test_data.shape
# 去掉冗余数据
redundant_cols = ['Address','Summary','City','State']
for c in redundant_cols:
if c in train_data.columns:
del train_data[c]
if c in test_data.columns:
del test_data[c]
# 数据预处理
# 预处理是因为有些数字比较大 所以需要取一下log进行数据处理
large_vel_cols = ['Lot', 'Total interior livable area', 'Tax assessed value', 'Annual tax amount', 'Listed Price', 'Last Sold Price']
for c in large_vel_cols:
train_data[c] = np.log(train_data[c] + 1)
test_data[c] = np.log(test_data[c] + 1)
# 查询数字列 -> 归一化 -> 缺失数据赋0
# 查询数字列
all_features = pd.concat((train_data.iloc[:,1:],test_data.iloc[:,1:]),ignore_index=True)
numeric_features = all_features.dtypes[all_features.dtypes!='object'].index
# 归一化
all_features[numeric_features] = all_features[numeric_features].apply(
lambda x: (x - x.mean()) / (x.std()))
# 缺失数据赋0
all_features[numeric_features] = all_features[numeric_features].fillna(0)

features = list(numeric_features)
features.extend(['Type','Bedrooms'])
all_features = all_features[features]
all_features.shape
print("before one hot code",all_features.shape)
all_features = pd.get_dummies(all_features,dummy_na=True)
print("after one hot code",all_features.shape)
n_train = train_data.shape[0]
all_features = all_features.astype(float)
train_features = torch.tensor(all_features[:n_train].values,dtype=torch.float32)
print('train features shape : ',train_features.shape)
test_features = torch.tensor(all_features[n_train:].values,dtype=torch.float32)
print('test features shape : ',test_features.shape)
train_labels = torch.tensor(train_data['Sold Price'].values.reshape(-1,1),dtype=torch.float32)
print('train labels shape : ',train_labels.shape)
训练
in_features = train_features.shape[1]
net = MLP(in_features).to(device)
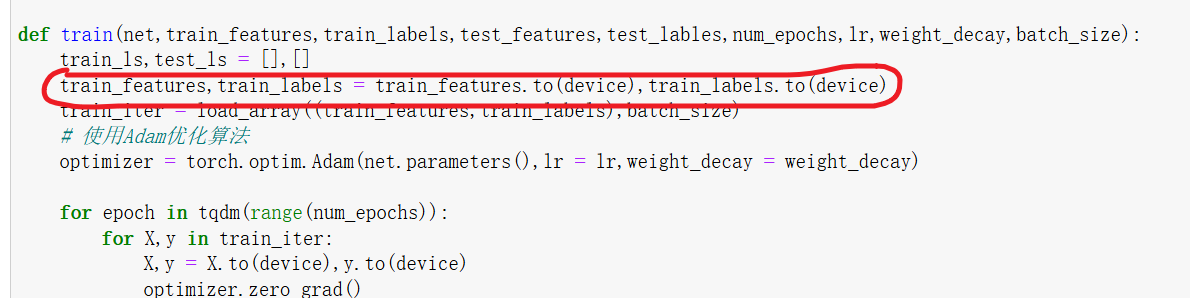
def train(net,train_features,train_labels,test_features,test_lables,num_epochs,lr,weight_decay,batch_size):
train_ls,test_ls = [],[]
train_features,train_labels = train_features.to(device),train_labels.to(device)
train_iter = load_array((train_features,train_labels),batch_size)
# 使用Adam优化算法
optimizer = torch.optim.Adam(net.parameters(),lr = lr,weight_decay = weight_decay)
for epoch in tqdm(range(num_epochs)):
for X,y in train_iter:
X,y = X.to(device),y.to(device)
optimizer.zero_grad()
outputs = net(X)
loss = criterion(outputs,y)
loss.backward()
optimizer.step()
record_loss = log_rmse(net.to(device), train_features, train_labels)
train_ls.append(record_loss)
if (epoch%5==0 and epoch!=0) or (epoch==num_epochs-1):
torch.save(net.state_dict(),'checkpoint_'+str(epoch))
print('save checkpoints on:', epoch, 'rmse loss value is:', record_loss)
del X, y
net.to(device)
return train_ls, test_ls
num_epochs, lr, weight_decay, batch_size = 500, 0.005, 0.05, 256
train_ls, valid_ls = train(net, train_features,train_labels,None,None, num_epochs, lr, weight_decay, batch_size)
将预测结果输出为csv文件
test_features = test_features.to('cpu')
net = net.to('cpu')
preds = net(test_features).detach().numpy()
# 将其重新格式化以导出到Kaggle
test_data['Sold Price'] = pd.Series(preds.reshape(1, -1)[0])
submission = pd.concat([test_data['Id'], test_data['Sold Price']], axis=1)
submission.to_csv('submission.csv', index=False)
提交结果
1.2 遇到的问题
1.3.1 pd.get_dummies内存爆炸
之前尝试要将所有的object对象进行pd.get_dummies(all_features,dummy_na=True)操作,但是内存炸了
解决方法
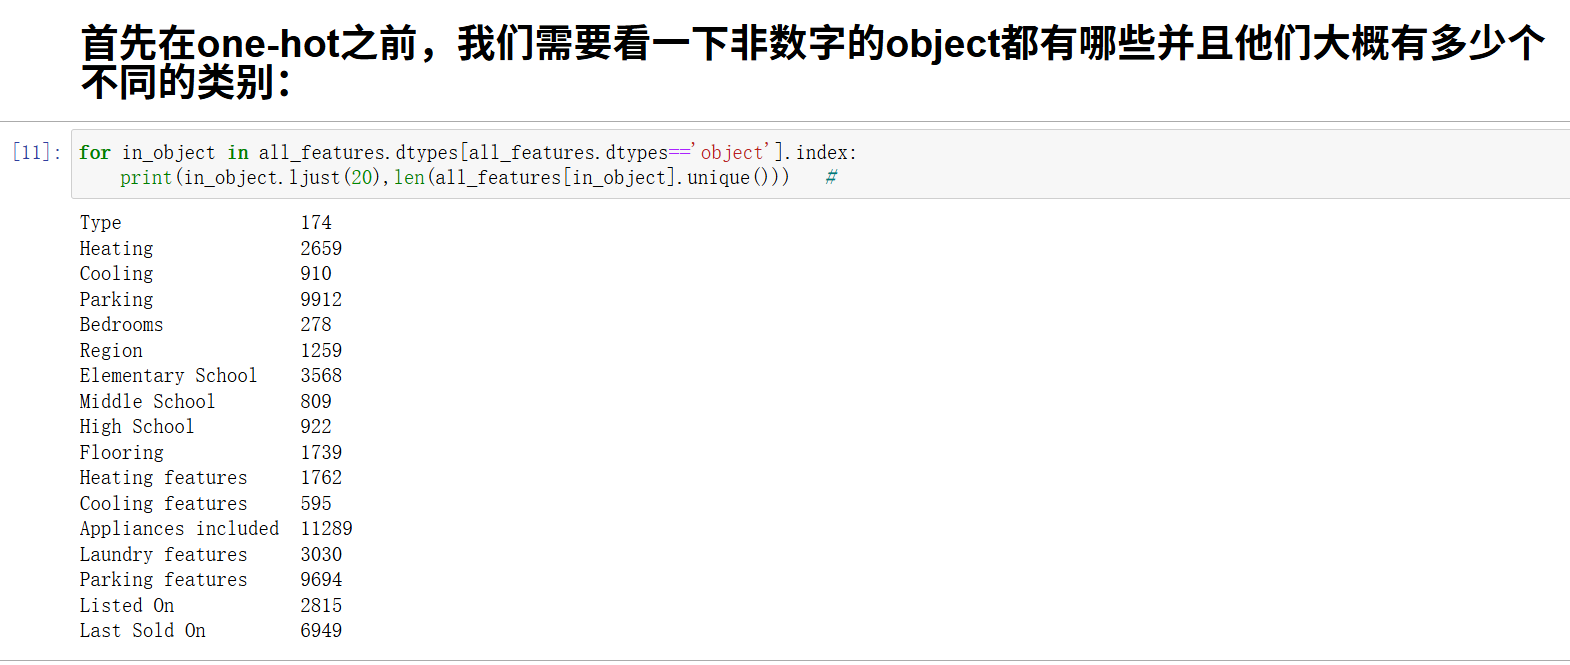
首先在one-hot之前,我们需要看一下非数字的object都有哪些并且他们大概有多少个不同的类别:
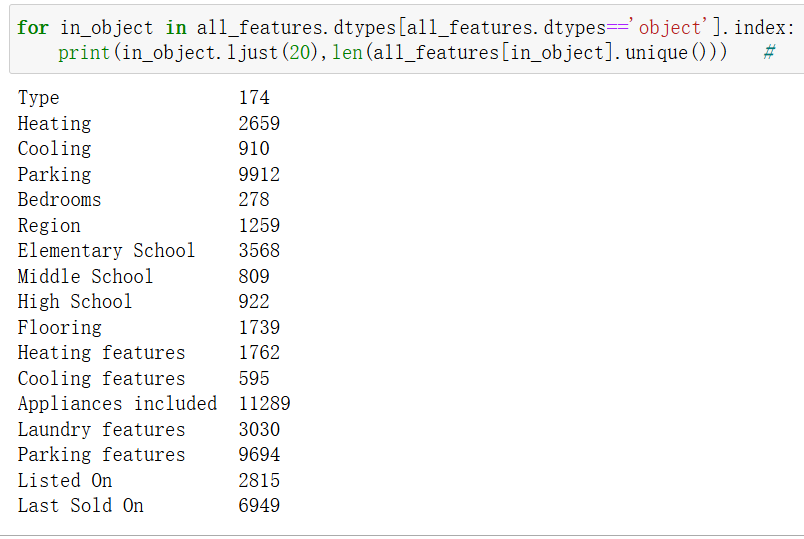
选择几个重要的放入数据中,其他的object数据移除
最后进行pd.get_dummies(features,dummy_na=True) 很快,可以成功
1.3.2 不在一个设备上

翻译:RuntimeError: 期望所有张量都在同一个设备上,但发现至少有两个设备,cuda:0 和 cpu! (在检查 wrapper_addmm 方法的参数 mat1 的参数时)
错误原理详解
1. PyTorch 的设备管理机制
PyTorch 允许张量和模型在不同的设备上:
-
CPU:
torch.device('cpu') -
GPU:
torch.device('cuda')或torch.device('cuda:0')
python
# 示例:不同设备上的张量
tensor_cpu = torch.tensor([1, 2, 3])                    # 默认在CPU
tensor_gpu = torch.tensor([1, 2, 3]).cuda()            # 在GPU
2. 计算时的设备一致性要求
当进行任何张量运算时,所有参与运算的张量必须在同一设备上:
python
# 这会报错:一个在CPU,一个在GPU
result = tensor_cpu + tensor_gpu  # RuntimeError!
3. 模型与数据的设备匹配
神经网络模型和张量数据也必须设备一致:
python
# 模型在GPU,数据在CPU - 会报错
model = model.cuda()
data = torch.tensor([...])  # 在CPU
output = model(data)  # RuntimeError!
底层机制
1. 张量设备属性
每个PyTorch张量都有.device属性:
python
print(tensor.device) # 输出: cpu 或 cuda:0
2. 运算时的设备检查
当执行运算时,PyTorch会检查所有操作数的设备:
python
# 伪代码:PyTorch内部的设备检查
def add_tensors(tensor1, tensor2):
    if tensor1.device != tensor2.device:
        raise RuntimeError("Tensors on different devices!")
    # ... 执行加法
3. 神经网络前向传播
在模型前向传播时,每一层都会检查输入数据的设备:
python
# 线性层的伪代码实现
def linear_forward(input, weight, bias):
    if input.device != weight.device:
        raise RuntimeError("Input and weight on different devices!")
    return input @ weight.t() + bias
常见的设备不匹配场景
1. 手动移动部分组件
python
model = model.cuda() # 模型移到GPU optimizer = torch.optim.Adam(model.parameters()) # 优化器参数在GPU # 但忘记移动数据 for data, target in dataloader: output = model(data) # 错误!data在CPU
2. 数据加载器返回的数据
python
# 数据加载器可能返回CPU张量
for batch in dataloader:
    data, target = batch
    # data和target可能在CPU,即使模型在GPU
3. 多GPU训练
python
# 使用DataParallel时 model = nn.DataParallel(model.cuda()) # 但输入数据可能不在主GPU上 output = model(input_data) # 可能出错
为什么需要设备一致性?
1. 内存管理
-
CPU和GPU有独立的内存空间
-
不能直接在两个内存空间之间进行计算
2. 硬件架构
-
CPU和GPU有不同的指令集和计算方式
-
混合计算需要复杂的数据传输和同步
3. 性能考虑
-
设备间数据传输很慢
-
保持数据在同一设备可以最大化计算效率
解决方案的本质
解决这个问题的核心是确保模型和所有输入数据在同一设备上:
1.3.3 改成cpu可以,改成cuda为什么不行
问题代码:
test_features = test_features.to(device)
net = net.to(device)
preds = net(test_features).detach().numpy()
# 将其重新格式化以导出到Kaggle
test_data['Sold Price'] = pd.Series(preds.reshape(1, -1)[0])
submission = pd.concat([test_data['Id'], test_data['Sold Price']], axis=1)
submission.to_csv('submission.csv', index=False)
报错:

根本原因
1. 数据最终需要回到 CPU
python
preds = net(test_features).detach().numpy() # 这里需要 CPU 数据!
关键点:numpy() 只能在 CPU 张量上调用,因为 NumPy 数组只能存在于 CPU 内存中。
2. GPU 到 CPU 的显式转换
当你使用 cuda 时:
python
test_features = test_features.to('cuda')
net = net.to('cuda')
preds = net(test_features)  # preds 在 GPU 上
preds.numpy()  # 错误!GPU 张量不能直接转 numpy
正确做法:
python
test_features = test_features.to('cuda')
net = net.to('cuda')
preds = net(test_features).cpu().detach().numpy()  # 先移到 CPU
详细分析
情况1:使用 CPU(可以工作)
python
test_features = test_features.to('cpu')    # 数据在 CPU
net = net.to('cpu')                        # 模型在 CPU
preds = net(test_features)                 # 输出在 CPU
preds = preds.detach().numpy()             # 可以直接转换 ✅
情况2:使用 CUDA(需要额外步骤)
python
test_features = test_features.to('cuda')   # 数据在 GPU
net = net.to('cuda')                       # 模型在 GPU
preds = net(test_features)                 # 输出在 GPU
preds = preds.detach().numpy()             # 错误!❌
修复方法:
python
test_features = test_features.to('cuda')
net = net.to('cuda')
preds = net(test_features).cpu().detach().numpy()  # 先移到 CPU ✅
内存管理角度
CPU 和 GPU 的内存隔离
text
CPU 内存    <-->    NumPy 数组
    ↑
    | (通过 .numpy())
    ↓
CPU 张量    <-->    GPU 张量
    ↑               (通过 .cuda()/.cpu())
    |
PyTorch 计算
关键限制:NumPy ↔ CPU 张量 可以直接转换,但 NumPy ↔ GPU 张量 不能直接转换。
完整的正确解决方案
方案1:全部使用 CPU(简单可靠)
python
# 确保所有东西都在 CPU 上
test_features = test_features.to('cpu')
net = net.to('cpu')
preds = net(test_features).detach().numpy()
test_data['Sold Price'] = pd.Series(preds.reshape(1, -1)[0])
submission = pd.concat([test_data['Id'], test_data['Sold Price']], axis=1)
submission.to_csv('submission.csv', index=False)
方案2:使用 GPU 但正确转换
python
# 使用 GPU 加速计算,但最后移回 CPU
device = torch.device('cuda' if torch.cuda.is_available() else 'cpu')
test_features = test_features.to(device)
net = net.to(device)
preds = net(test_features).cpu().detach().numpy() # 关键:.cpu()
test_data['Sold Price'] = pd.Series(preds.reshape(1, -1)[0])
submission = pd.concat([test_data['Id'], test_data['Sold Price']], axis=1)
submission.to_csv('submission.csv', index=False)方案3:设备感知的通用函数
python
def predict_and_save(net, test_features, test_data, use_gpu=False):
device = torch.device('cuda' if use_gpu and torch.cuda.is_available() else 'cpu')
net = net.to(device)
test_features = test_features.to(device)
with torch.no_grad():
preds = net(test_features)
# 无论用什么设备,都移回 CPU 进行后续处理
preds = preds.cpu().numpy()
test_data['Sold Price'] = pd.Series(preds.reshape(1, -1)[0])
submission = pd.concat([test_data['Id'], test_data['Sold Price']], axis=1)
submission.to_csv('submission.csv', index=False)
return submission
# 使用示例
submission = predict_and_save(net, test_features, test_data, use_gpu=True)总结
为什么 cpu 可以而 cuda 不行:
-
numpy()只能在 CPU 张量上调用 -
GPU 张量需要显式移动到 CPU 才能转换为 NumPy 数组
-
你的原始代码缺少
.cpu()步骤
这就是深度学习开发中常见的"设备边界"问题:计算可以在 GPU 上进行以获得加速,但与其他库(如 NumPy、pandas)交互时,数据必须回到 CPU。
1.3.4 为什么数据需要是data.DataLoader格式的
实际上,训练数据不一定要是 data.DataLoader 类型,但使用 DataLoader 有几个重要优势。让我详细解释:
1. 不使用 DataLoader 的替代方案
你可以直接使用张量进行训练:
python
# 直接使用张量训练(不使用 DataLoader)
def train_without_dataloader(net, train_features, train_labels, num_epochs, lr):
    optimizer = torch.optim.Adam(net.parameters(), lr=lr)
    criterion = nn.MSELoss()

    for epoch in range(num_epochs):
        # 一次性处理所有数据(批量梯度下降)
        predictions = net(train_features)
        loss = criterion(predictions, train_labels)

        optimizer.zero_grad()
        loss.backward()
        optimizer.step()

        print(f'Epoch {epoch}, Loss: {loss.item()}')
2. 为什么推荐使用 DataLoader
优势 1:批处理 (Batching)
python
# 使用 DataLoader 进行批处理
train_loader = DataLoader(dataset, batch_size=32, shuffle=True)
for batch_features, batch_labels in train_loader:
# 每次处理一个批次,而不是全部数据
predictions = net(batch_features)
loss = criterion(predictions, batch_labels)
# ...好处:
-
内存效率:不需要一次性加载所有数据到内存
-
适合大数据集:可以处理比内存大的数据集
-
随机梯度下降:每个批次提供不同的梯度信号
优势 2:数据打乱 (Shuffling)
python
# 自动打乱数据顺序
train_loader = DataLoader(dataset, batch_size=32, shuffle=True)好处:
-
防止模型记住数据顺序
-
提高泛化能力
-
每个epoch看到不同顺序的数据
优势 3:并行数据加载
python
# 使用多进程加速数据加载
train_loader = DataLoader(dataset, batch_size=32, shuffle=True, num_workers=4)好处:
-
数据预处理与模型训练并行
-
减少训练等待时间
-
充分利用多核CPU
优势 4:自动设备管理
python
# 结合设备管理的完整示例
def train_with_dataloader(net, train_loader, device, num_epochs, lr):
    net = net.to(device)
    optimizer = torch.optim.Adam(net.parameters(), lr=lr)
    criterion = nn.MSELoss()

    for epoch in range(num_epochs):
        net.train()
        total_loss = 0

        for batch_features, batch_labels in train_loader:
            # 自动将批次数据移动到设备
            batch_features = batch_features.to(device)
            batch_labels = batch_labels.to(device)

            predictions = net(batch_features)
            loss = criterion(predictions, batch_labels)

            optimizer.zero_grad()
            loss.backward()
            optimizer.step()

            total_loss += loss.item()

        print(f'Epoch {epoch}, Average Loss: {total_loss/len(train_loader)}')
3. 不同场景的选择
小数据集(内存充足)
python
# 可以直接使用完整数据集训练
features = torch.tensor(...) # 全部特征
labels = torch.tensor(...) # 全部标签
# 一次性训练
output = net(features)
loss = criterion(output, labels)大数据集或需要批处理
python
# 使用 DataLoader
dataset = TensorDataset(features, labels)
dataloader = DataLoader(dataset, batch_size=32, shuffle=True)
for batch_features, batch_labels in dataloader:
# 批次训练
output = net(batch_features)
loss = criterion(output, batch_labels)4. 完整的训练流程对比
不使用 DataLoader
python
# 简单但功能有限
def simple_train(net, features, labels, epochs, lr):
    optimizer = torch.optim.Adam(net.parameters(), lr=lr)

    for epoch in range(epochs):
        preds = net(features)
        loss = criterion(preds, labels)

        optimizer.zero_grad()
        loss.backward()
        optimizer.step()
使用 DataLoader
python
# 功能完整,适合生产环境
def robust_train(net, train_loader, val_loader, epochs, lr, device):
    net.to(device)
    optimizer = torch.optim.Adam(net.parameters(), lr=lr)

    for epoch in range(epochs):
        # 训练阶段
        net.train()
        train_loss = 0
        for batch in train_loader:
            x, y = batch
            x, y = x.to(device), y.to(device)

            preds = net(x)
            loss = criterion(preds, y)

            optimizer.zero_grad()
            loss.backward()
            optimizer.step()
            train_loss += loss.item()

        # 验证阶段
        net.eval()
        val_loss = 0
        with torch.no_grad():
            for batch in val_loader:
                x, y = batch
                x, y = x.to(device), y.to(device)
                preds = net(x)
                val_loss += criterion(preds, y).item()

        print(f'Epoch {epoch}: Train Loss: {train_loss/len(train_loader):.4f}, '
              f'Val Loss: {val_loss/len(val_loader):.4f}')
总结
DataLoader 不是必须的,但强烈推荐使用,因为:
-
内存效率:支持批处理和流式处理
-
训练质量:支持数据打乱,提高泛化能力
-
性能优化:支持并行数据加载
-
代码可维护性:提供标准化的数据接口
-
功能丰富:支持各种数据集和变换
对于简单的实验或小数据集,你可以不用 DataLoader。但对于真实的机器学习项目,使用 DataLoader 是行业最佳实践。
1.3.5 不会的函数
建议查看pandas文档(微信收藏)
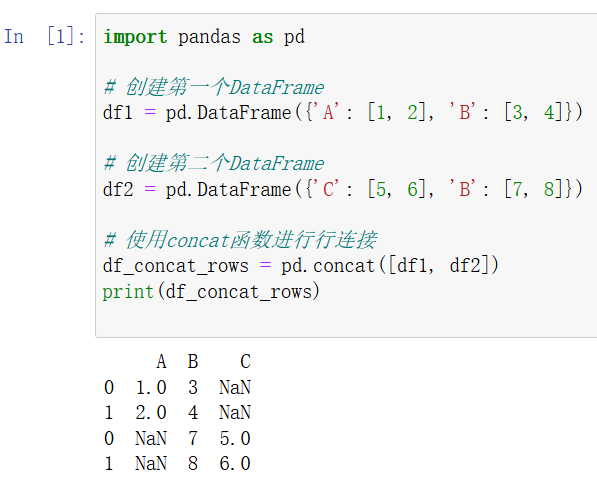
pd.concat (可以有多个参数)
独有的列合并后独占一列
pandas.apply()
【pandas】(七)df.apply(lambda表达式)-CSDN博客![]() https://blog.csdn.net/u010916338/article/details/105493393
https://blog.csdn.net/u010916338/article/details/105493393


 1万+
1万+

 被折叠的 条评论
为什么被折叠?
被折叠的 条评论
为什么被折叠?
 到【灌水乐园】发言


