


一、U-Net模型结构详细介绍
U-Net是一种非常经典且广泛应用于图像分割任务的卷积神经网络(CNN)。最早由Olaf Ronneberger等人在2015年提出,U-Net专为生物医学图像的语义分割设计,尤其擅长处理具有少量标注数据的分割任务。它的名称来源于其具有U形对称结构的网络架构。U-Net结构的独特之处在于采用了编码器(Contracting Path)和解码器(Expansive Path)相结合的方式,通过跳跃连接(skip connection)有效保留了高分辨率的特征。
下面详细介绍U-Net的模型结构。
1. U-Net的整体结构
U-Net的架构可分为两个主要部分:
-
编码器(Contracting Path):该部分用于提取图像的高层次特征,通常由多个卷积层和池化层构成。每个卷积操作后都伴随有激活函数(通常是ReLU)和批归一化(Batch Normalization)。在每个卷积层之后,通过池化层(通常是最大池化)逐步减小图像的空间尺寸。
-
解码器(Expansive Path):解码器部分用于将编码器提取的高层特征映射回原始图像大小,以便生成每个像素的类别标签。在解码过程中,解码器采用转置卷积(反卷积)进行上采样,并将对应的编码器层的特征通过跳跃连接与解码器层连接,保持高分辨率特征,确保分割的精细度。
-
跳跃连接(Skip Connection):跳跃连接是U-Net架构中最具特色的部分,它将编码器中的每一层的特征图与解码器中相应的上采样层进行连接。这种方式帮助网络在解码时更好地恢复图像的空间信息,避免了仅依赖深层特征所带来的细节丢失。
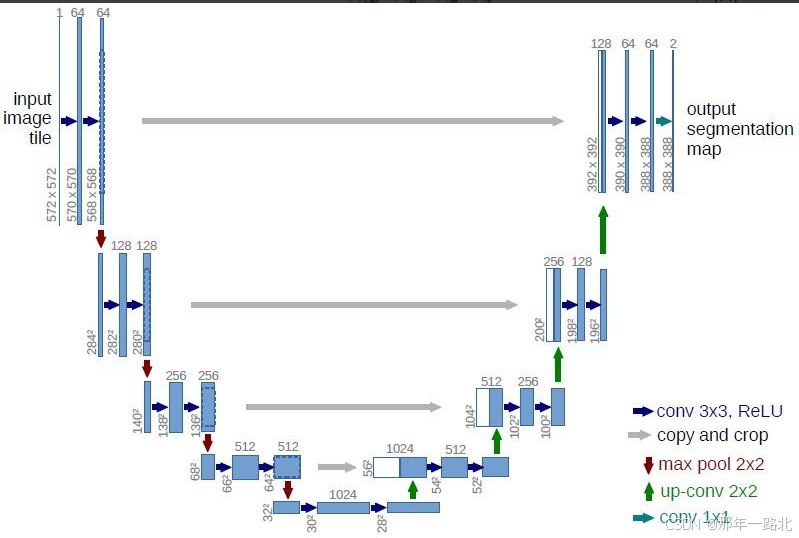
2. 具体结构详解
2.1 编码器(Contracting Path)
编码器的目的是通过逐步减少图像的空间分辨率,提取图像的高级特征。这个过程通常由以下几个步骤构成:
-
卷积层:每个卷积层使用3x3的卷积核,通过卷积操作提取特征。每个卷积操作后跟随一个ReLU激活函数,以增加网络的非线性能力。
-
最大池化(Max Pooling):池化操作通过下采样减少特征图的空间尺寸,从而减少计算量并增加感受野。常用的池化操作是2x2的最大池化。
-
逐层增加深度:每经过一次池化,特征图的分辨率降低,但深度(通道数)增加。通过增加深度,网络能够捕捉更为复杂的语义信息。
简化后,编码器可以描述为:
- 输入 → 卷积 → ReLU → 最大池化
- 输入尺寸从较大的尺寸(如256x256)逐步减小(例如池化后的尺寸变为128x128、64x64、32x32等)。
2.2 解码器(Expansive Path)
解码器的目的是通过逐步增加图像的空间分辨率,恢复图像的空间细节,最终输出一个与输入图像相同尺寸的分割图。解码器的每个步骤通常包括:
-
转置卷积(反卷积):反卷积用于将特征图的空间分辨率恢复至较高的尺寸,即实现上采样。通过学习反卷积核,网络能够精确地进行上采样并恢复空间细节。
-
跳跃连接(Skip Connections):编码器和解码器之间的跳跃连接将编码器中低层特征图与解码器的高层特征图拼接在一起。这样,解码器能够结合编码器的低层特征,以恢复更多细节信息。
-
卷积层:每个反卷积操作后,通常会通过一个卷积层进一步精细化特征图。
简化后,解码器的结构可以描述为:
- 转置卷积 → 拼接(跳跃连接) → 卷积 → ReLU
- 每个步骤逐渐恢复图像分辨率,最终达到输入图像的尺寸。
2.3 输出层
U-Net的输出层通常是一个1x1卷积,用于将解码后的特征图映射到最终的标签空间。该卷积操作的作用是将每个像素的特征映射到相应类别的预测标签。
- 1x1卷积:用于将解码器输出的高维特征图映射到与类别数量相同的通道数上。
- Softmax或Sigmoid激活函数:对于多类别任务,通常使用Softmax激活函数将网络输出转化为概率分布;对于二分类任务,通常使用Sigmoid激活函数。
3. U-Net的优势
-
高效的特征复用:通过跳跃连接,U-Net能够充分利用编码器的低层特征,保持空间细节,避免了单纯依赖高层特征导致的空间信息丢失。
-
适用于小样本学习:U-Net在医学图像分割等任务中表现出色,特别是在训练数据有限的情况下。跳跃连接的使用帮助网络更好地恢复细节,增强了模型的泛化能力。
-
端到端训练:U-Net是一个端到端可训练的网络,可以直接从原始图像训练出分割结果,而无需依赖中间的复杂手工特征。
-
优秀的分割精度:U-Net在医学图像、卫星图像等领域的应用中取得了非常好的效果,尤其适合处理结构复杂或细节要求较高的图像。
4. U-Net变体
U-Net已经衍生出了许多变体,常见的变体包括:
- 3D U-Net:扩展到三维图像分割,常用于医学图像(如CT或MRI图像)的处理。
- Attention U-Net:结合了注意力机制,能够自适应地聚焦于图像中的重要区域,提升分割效果。
- ResUNet:结合了ResNet架构,引入残差连接,以帮助更深的网络进行训练。
二、利用U-Net模型完成语义分割道路裂纹项目
1. 数据集制作
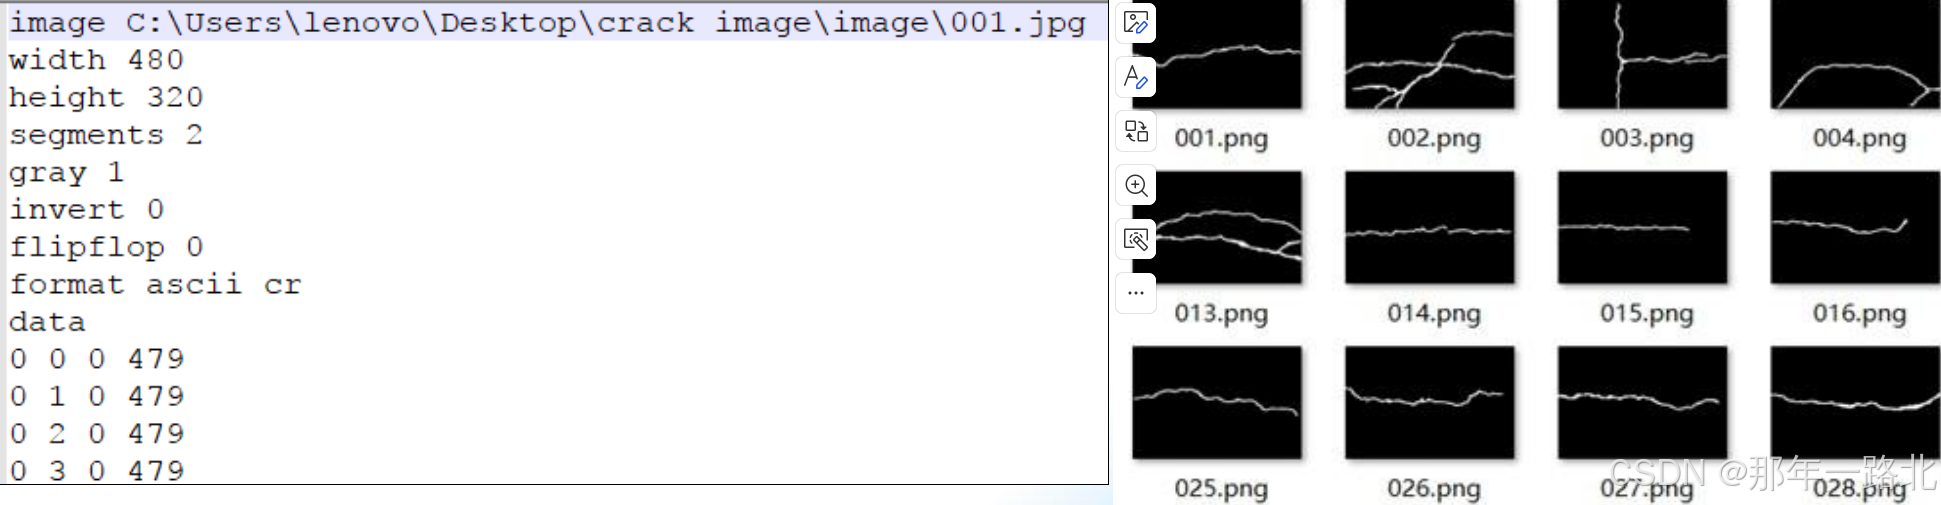
数据集名称:CrackForest Dataset
数据集分为groundTruth/image/seg
分别对应:标注数据/图像数据/序列文本
其中Seg文件是标注文件,其格式是按行组织。
数据集制作代码:
import torch
import numpy as np
from torch.utils.data import Dataset, DataLoader
import os
import cv2 as cv

class SegmentationDataset(Dataset):
    def __init__(self, image_dir, mask_dir):
        self.images = []
        self.masks = []
        files = list(sorted(os.listdir(image_dir)))
        sfiles = list(sorted(os.listdir(mask_dir)))
        for i in range(len(sfiles)):
            img_file = os.path.join(image_dir, files[i])
            mask_file = os.path.join(mask_dir, sfiles[i])
            # print(img_file, mask_file)
            self.images.append(img_file)
            self.masks.append(mask_file)

    def __len__(self):
        return len(self.images)

    # ... [其他代码] ...

    def __getitem__(self, idx):
        if torch.is_tensor(idx):
            idx = idx.tolist()
        image_path = self.images[idx]
        mask_path = self.masks[idx]

        img = cv.imread(image_path, cv.IMREAD_GRAYSCALE)  # 以灰度模式读取图像
        mask = cv.imread(mask_path, cv.IMREAD_GRAYSCALE)

        # 输入图像
        img = np.float32(img) / 255.0
        img = np.expand_dims(img, 0)

        # 目标标签0~1,对于
        mask[mask <= 128] = 0
        mask[mask > 128] = 1
        mask = np.expand_dims(mask, 0)
        mask = np.float32(mask)
        sample = {'image': torch.from_numpy(img), 'mask': torch.from_numpy(mask)}
        return sample

if __name__ == "__main__":
    image_dir = "xxx"
    mask_dir = "xxx"
    ds = SegmentationDataset(image_dir, mask_dir)
    dataloader = DataLoader(ds, batch_size=4, shuffle=True, num_workers=4)
    for i_batch,sample_batched in enumerate(dataloader):
        print(i_batch,sample_batched['image'].size(),sample_batched['mask'])
        break
2. 模型构建
利用Unet网络搭建模型,由于Relu激活函数实验证明没有PRelu实验效果好,使用了Pelu。
import torch
from torch.utils.data import DataLoader
from defect_unet.unet_dataset import SegmentationDataset

class UNetModel(torch.nn.Module):
    def __init__(self, in_features=1, out_features=2, init_features=32):
        super(UNetModel, self).__init__()
        features = init_features
        self.encode_layer1 = torch.nn.Sequential(
            torch.nn.Conv2d(in_channels=in_features, out_channels=features, kernel_size=3, padding=1, stride=1),
            torch.nn.BatchNorm2d(num_features=features),
            torch.nn.PReLU(),
            torch.nn.Conv2d(in_channels=features, out_channels=features, kernel_size=3, padding=1, stride=1),
            torch.nn.BatchNorm2d(num_features=features),
            torch.nn.PReLU()
        )
        self.pool1 = torch.nn.MaxPool2d(kernel_size=2, stride=2)
        self.encode_layer2 = torch.nn.Sequential(
            torch.nn.Conv2d(in_channels=features, out_channels=features*2, kernel_size=3, padding=1, stride=1),
            torch.nn.BatchNorm2d(num_features=features*2),
            torch.nn.PReLU(),
            torch.nn.Conv2d(in_channels=features*2, out_channels=features*2, kernel_size=3, padding=1, stride=1),
            torch.nn.BatchNorm2d(num_features=features * 2),
            torch.nn.PReLU()
        )
        self.pool2 = torch.nn.MaxPool2d(kernel_size=2, stride=2)
        self.encode_layer3 = torch.nn.Sequential(
            torch.nn.Conv2d(in_channels=features*2, out_channels=features*4, kernel_size=3, padding=1, stride=1),
            torch.nn.BatchNorm2d(num_features=features*4),
            torch.nn.PReLU(),
            torch.nn.Conv2d(in_channels=features*4, out_channels=features*4, kernel_size=3, padding=1, stride=1),
            torch.nn.BatchNorm2d(num_features=features * 4),
            torch.nn.PReLU()
        )
        self.pool3 = torch.nn.MaxPool2d(kernel_size=2, stride=2)
        self.encode_layer4 = torch.nn.Sequential(
            torch.nn.Conv2d(in_channels=features*4, out_channels=features*8, kernel_size=3, padding=1, stride=1),
            torch.nn.BatchNorm2d(num_features=features * 8),
            torch.nn.PReLU(),
            torch.nn.Conv2d(in_channels=features*8, out_channels=features*8, kernel_size=3, padding=1, stride=1),
            torch.nn.BatchNorm2d(num_features=features * 8),
            torch.nn.PReLU()
        )
        self.pool4 = torch.nn.MaxPool2d(kernel_size=2, stride=2)
        self.encode_decode_layer = torch.nn.Sequential(
            torch.nn.Conv2d(in_channels=features * 8, out_channels=features * 16, kernel_size=3, padding=1, stride=1),
            torch.nn.BatchNorm2d(num_features=features * 16),
            torch.nn.PReLU(),
            torch.nn.Conv2d(in_channels=features * 16, out_channels=features * 16, kernel_size=3, padding=1, stride=1),
            torch.nn.BatchNorm2d(num_features=features * 16),
            torch.nn.PReLU()
        )

        self.upconv4 = torch.nn.ConvTranspose2d(features * 16, features * 8, kernel_size=2, stride=2)
        self.decode_layer4 = torch.nn.Sequential(
            torch.nn.Conv2d(in_channels=features * 16, out_channels=features * 8, kernel_size=3, padding=1, stride=1),
            torch.nn.BatchNorm2d(num_features=features * 8),
            torch.nn.PReLU(),
            torch.nn.Conv2d(in_channels=features * 8, out_channels=features * 8, kernel_size=3, padding=1, stride=1),
            torch.nn.BatchNorm2d(num_features=features * 8),
            torch.nn.PReLU()
        )
        self.upconv3 = torch.nn.ConvTranspose2d(features * 8, features * 4, kernel_size=2, stride=2)
        self.decode_layer3 = torch.nn.Sequential(
            torch.nn.Conv2d(in_channels=features * 8, out_channels=features * 4, kernel_size=3, padding=1, stride=1),
            torch.nn.BatchNorm2d(num_features=features * 4),
            torch.nn.PReLU(),
            torch.nn.Conv2d(in_channels=features * 4, out_channels=features * 4, kernel_size=3, padding=1, stride=1),
            torch.nn.BatchNorm2d(num_features=features * 4),
            torch.nn.PReLU()
        )
        self.upconv2 = torch.nn.ConvTranspose2d(features * 4, features * 2, kernel_size=2, stride=2)
        self.decode_layer2 = torch.nn.Sequential(
            torch.nn.Conv2d(in_channels=features * 4, out_channels=features * 2, kernel_size=3, padding=1, stride=1),
            torch.nn.BatchNorm2d(num_features=features * 2),
            torch.nn.PReLU(),
            torch.nn.Conv2d(in_channels=features * 2, out_channels=features * 2, kernel_size=3, padding=1, stride=1),
            torch.nn.BatchNorm2d(num_features=features * 2),
            torch.nn.PReLU()
        )
        self.upconv1 = torch.nn.ConvTranspose2d(features * 2, features * 1, kernel_size=2, stride=2)
        self.decode_layer1 = torch.nn.Sequential(
            torch.nn.Conv2d(in_channels=features * 2, out_channels=features * 1, kernel_size=3, padding=1, stride=1),
            torch.nn.BatchNorm2d(num_features=features),
            torch.nn.PReLU(),
            torch.nn.Conv2d(in_channels=features * 1, out_channels=features * 1, kernel_size=3, padding=1, stride=1),
            torch.nn.BatchNorm2d(num_features=features),
            torch.nn.PReLU()
        )
        self.out_layer = torch.nn.Sequential(
            torch.nn.Conv2d(in_channels=features * 1, out_channels=out_features, kernel_size=1, padding=0, stride=1),
        )

    def forward(self, x):
        enc1 = self.encode_layer1(x)
        enc2 = self.encode_layer2(self.pool1(enc1))
        enc3 = self.encode_layer3(self.pool2(enc2))
        enc4 = self.encode_layer4(self.pool3(enc3))

        bottleneck = self.encode_decode_layer(self.pool4(enc4))

        dec4 = self.upconv4(bottleneck)
        dec4 = torch.cat((dec4, enc4), dim=1)
        dec4 = self.decode_layer4(dec4)

        dec3 = self.upconv3(dec4)
        dec3 = torch.cat((dec3, enc3), dim=1)
        dec3 = self.decode_layer3(dec3)

        dec2 = self.upconv2(dec3)
        dec2 = torch.cat((dec2, enc2), dim=1)
        dec2 = self.decode_layer2(dec2)

        dec1 = self.upconv1(dec2)
        dec1 = torch.cat((dec1, enc1), dim=1)
        dec1 = self.decode_layer1(dec1)

        out = self.out_layer(dec1)
        return out


if __name__ == "__main__":
    # 检查设备
    train_on_gpu = torch.cuda.is_available()
    device = "cuda:0" if train_on_gpu else "cpu"

    unet = UNetModel(in_features=1, out_features=2, init_features=32).to(device)
    optimizer = torch.optim.Adam(unet.parameters(), lr=0.001)
    cross_loss = torch.nn.CrossEntropyLoss()

    # 数据加载
    bs = 2
    num_epochs = 15
    image_dir = "xxx"
    mask_dir = "xxx"
    ds = SegmentationDataset(image_dir, mask_dir)
    dataloader = DataLoader(ds, batch_size=bs, shuffle=True)

    for epoch in range(num_epochs):
        train_loss = 0.0
        for i_batch, sample_batched in enumerate(dataloader):
            images_batch = sample_batched['image'].to(device)
            target_labels = sample_batched['mask'].to(device)

            optimizer.zero_grad()
            m_label_out = unet(images_batch)

            target_labels = target_labels.view(-1)
            m_label_out = m_label_out.permute(0, 2, 3, 1).contiguous().view(-1, 2)
            loss = cross_loss(m_label_out, target_labels.long())

            loss.backward()
            optimizer.step()
            train_loss += loss.item()

        train_loss /= len(dataloader)
        print(f'Epoch {epoch + 1}/{num_epochs}, Training Loss: {train_loss:.6f}')

    torch.save(unet.state_dict(), 'unet_road_model.pth')
    print("Model saved successfully.")
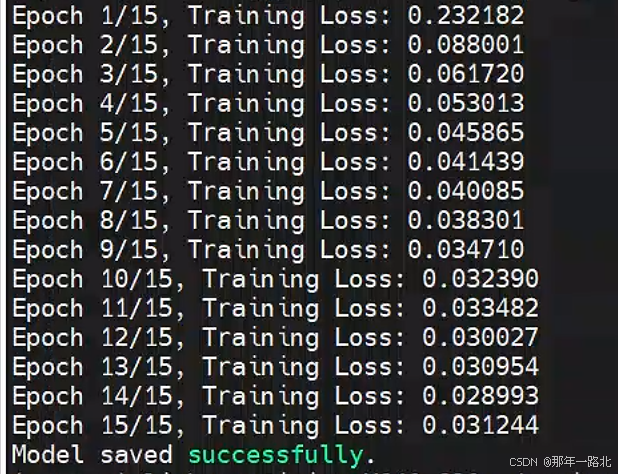
模型在118张小型数据集上训练15次epoch,最终Training Loss实验结果:
3. 模型部署
加载权重调整图片大小
import cv2 as cv
import numpy as np
import torch
from defect_unet.unet_model import UNetModel


def unet_defect_demo():
    # 初始化模型并加载参数权重
    cnn_model = UNetModel(in_features=1, out_features=2, init_features=32)
    cnn_model.load_state_dict(torch.load("xxx"))
    cnn_model.eval()  # 设置为评估模式

    if torch.cuda.is_available():
        cnn_model = cnn_model.cuda()

    # 测试机数据路径
    root_dir = "xxx"
    fileNames = os.listdir(root_dir)

    for f in fileNames:
        image_path = os.path.join(root_dir, f)
        image = cv.imread(image_path, cv.IMREAD_GRAYSCALE)
        if image is None:
            print(f"Error reading image: {image_path}")
            continue

        h, w = image.shape
        img = np.float32(image) / 255.0
        img = np.expand_dims(img, axis=0)  # 增加通道维度
        img = np.expand_dims(img, axis=0)  # 增加批量维度
        x_input = torch.from_numpy(img).to(dtype=torch.float32)  # 转为浮点张量

        if torch.cuda.is_available():
            x_input = x_input.cuda()

        # 预测
        with torch.no_grad():  # 禁用梯度计算以加速推理
            probs = cnn_model(x_input)

        # 获取预测结果
        pred_probs = torch.softmax(probs, dim=1)  # 通过 softmax 转为概率
        pred_labels = torch.argmax(pred_probs, dim=1).squeeze(0).cpu().numpy()

        # 将预测结果二值化并转为图像
        predic_ = (pred_labels * 255).astype(np.uint8)

        print(f"Processed {f}, output shape: {predic_.shape}")

        # 显示原图
        cv.namedWindow("Input Image", cv.WINDOW_NORMAL)  # 设置窗口可以调整大小
        cv.resizeWindow("Input Image", 800, 800)  # 设置窗口大小为 800x800
        cv.imshow("Input Image", image)

        # 处理分割结果
        result = cv.resize(predic_, (w, h))
        contours, _ = cv.findContours(result, cv.RETR_EXTERNAL, cv.CHAIN_APPROX_SIMPLE)
        bgr_img = cv.cvtColor(image, cv.COLOR_GRAY2BGR)
        cv.drawContours(bgr_img, contours, -1, (0, 0, 255), thickness=-1)

        # 显示分割结果
        cv.namedWindow("UNet Segmentation Demo", cv.WINDOW_NORMAL)
        cv.resizeWindow("UNet Segmentation Demo", 800, 800)
        cv.imshow("UNet Segmentation Demo", bgr_img)

        # 等待用户按键(按 'q' 键跳过当前图像)
        key = cv.waitKey(0)
        if key == ord('q'):  # 按 'q' 键退出整个程序
            break

    # 确保关闭所有窗口
    cv.destroyAllWindows()


if __name__ == '__main__':
    unet_defect_demo()
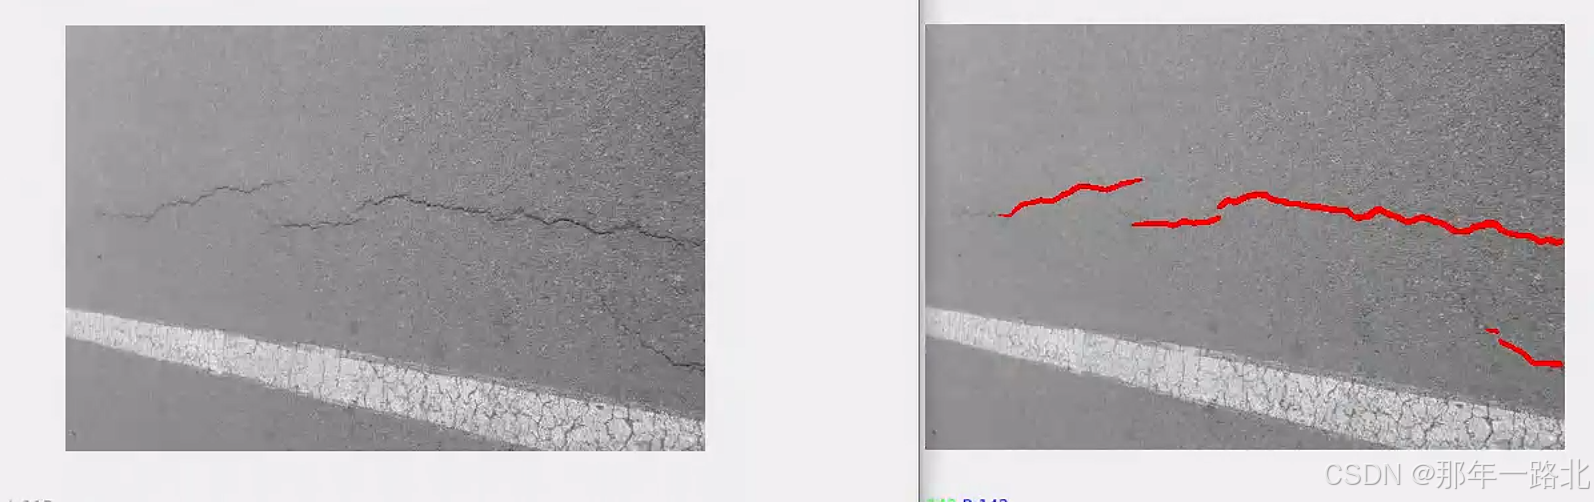
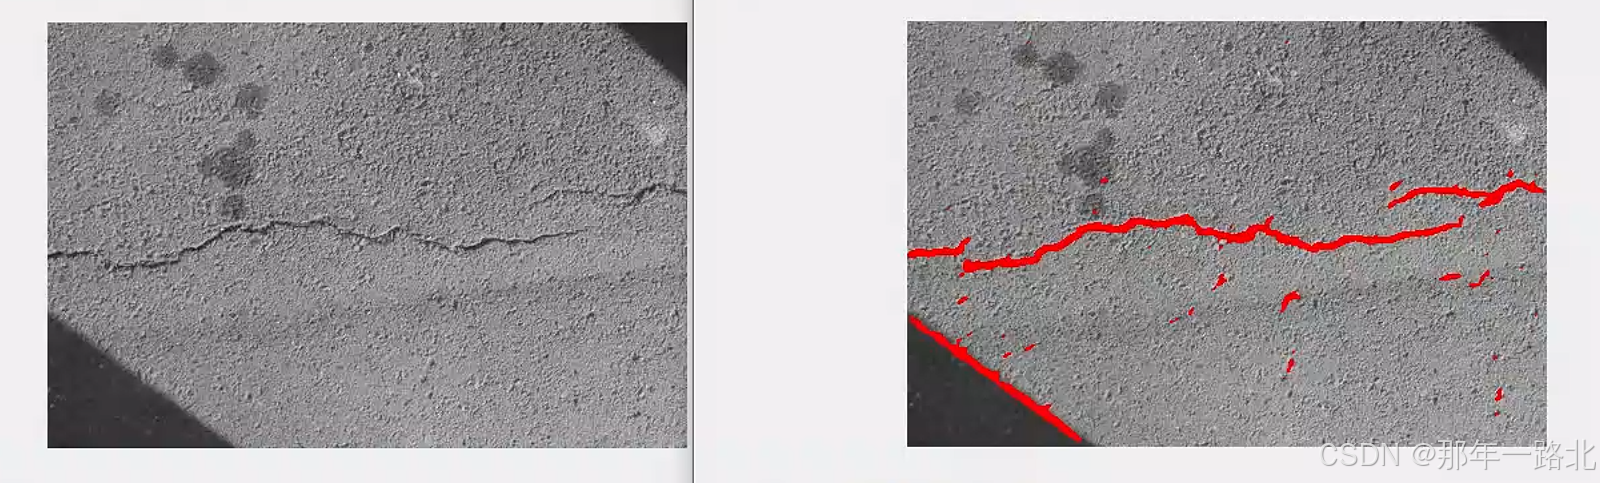
实验结果可视化:
三、总结
本文首先介绍了U-Net模型结构,后应用U-Net网络来构建模型,旨在处理部分道路缺陷问题。U-Net因其对称的结构和有效的跳跃连接,使其成为图像分割领域中的经典模型,尤其是在医学图像分割任务中取得了卓越的成果。通过编码器提取特征,解码器恢复细节,再通过跳跃连接传递高分辨率信息,U-Net能够有效地提高分割精度,并能适应数据量较少的情况。其优越的性能和简单的结构使其成为图像分割任务中的基础模型之一。我利用U-Net网络模型构建模型识别道路裂纹,通过训练该模型,达到好的效果。可以减少繁琐的人工识别路口裂纹,节省了人力物力,能提高了维修路况的效率。


 422
422

 被折叠的 条评论
为什么被折叠?
被折叠的 条评论
为什么被折叠?
 到【灌水乐园】发言


