


目录
p10-11 torchvision中的transforms
p20非线性激活-Non-Linear Activations
目录
p10-11 torchvision中的transforms
p20非线性激活-Non-Linear Activations
p1-5环境配置
用anaconda配置环境(python3.6为例)
 进入pytorch环境:
记得先找官网下载命令
conda activate pytorch
 两个很有用的函数
dir()//打开
dir(pytorch)->1,2,3,4; dir(pytorch.3)->a,b,c;(pytorch包下有,1,2,3,4四个包,3中有a,b,c三个包)
help()//说明书
help(pytorch.3.b)//查看b如何使用
打开jupyter

cd /d D: 终端中切换目录命令(打开jupyter前使用)
Python熟悉
python console里按shift+回车可以多行编辑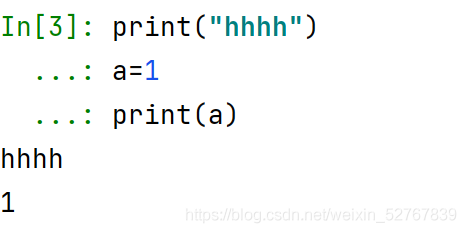
使用alt+enter可以看推荐解决方案
使用ctr+p查看函数所需变量
p6-7加载数据
如何读取数据:
from PIL import Image
image_path=r"D:\python\learn_pytorch\hymenoptera_data\train\ants\0013035.jpg"
image=Image.open(image_path)
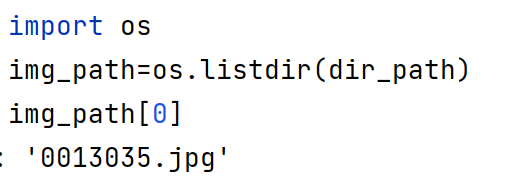
image.show()利用os集抓取数据集名称集(img_path是个列表,dirpath是所有图片所在的文件夹路径)
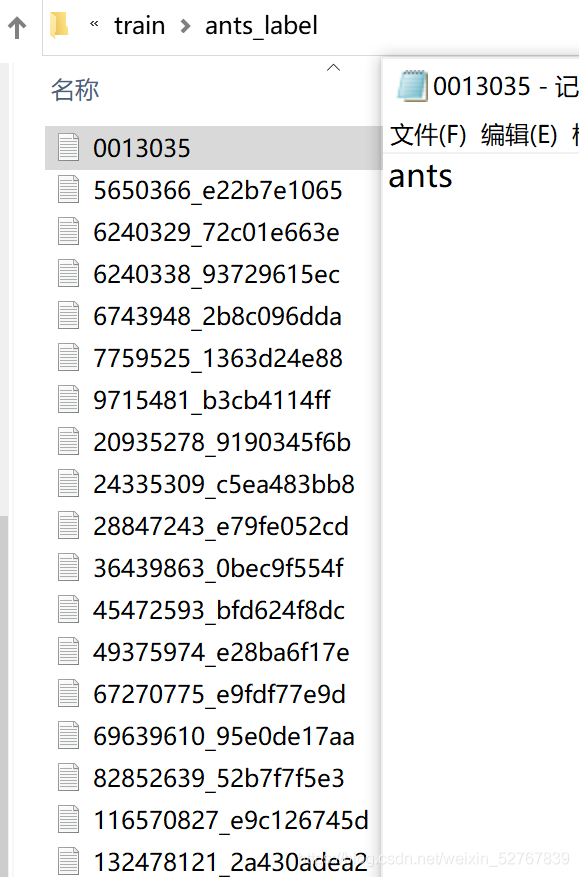
如何将每个图片的label作为txt文件写入另外一个文件夹(txt文件名与图片文件名相同)
import os
root_dir=r"D:\python\learn_pytorch\hymenoptera_data\train"
target_dir="ants_img"
img_path_list=os.listdir(os.path.join(root_dir,target_dir))
label=target_dir.split('_')[0]
out_dir="ants_label"
for i in img_path_list:
    file_name=i.split('.jpg')[0]
    f=open((os.path.join(root_dir,out_dir,format(file_name))+".txt"),'w')
    f.write(label)
    f.close()
注意:open函数在文件夹中没有该文件时会自动创建一个。(下图为运行结果)
如何安装包:

或直接在terminal内
![]()
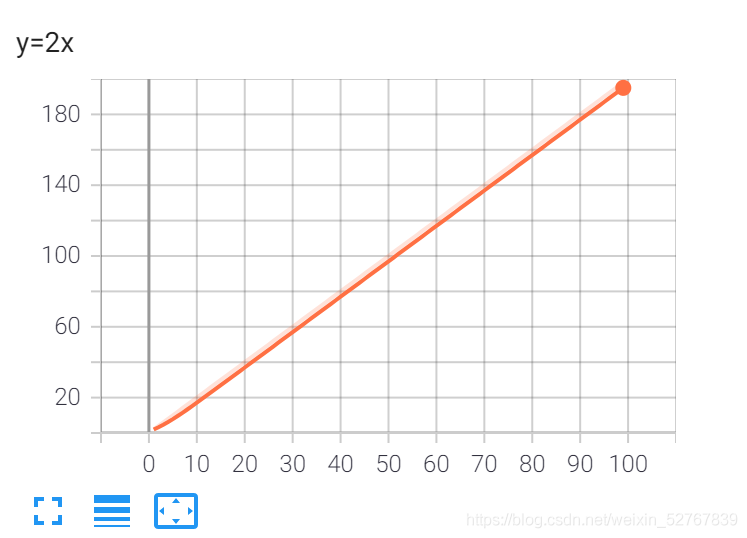
p8-9 tensorboard
tensorboard的summary writer
from torch.utils.tensorboard import SummaryWriterfrom torch.utils.tensorboard import SummaryWriter
writer=SummaryWriter("logs")#创建实例文件夹“logs”
#writer.add_image()
for i in range(1,100):
writer.add_scalar("y=2x",2*i,i)
writer.close()如何打开tensorboard的事件文件(logs)

为了不重复端口,我们可以用以下指令指定:
(pytorch) D:\python\learn_pytorch>tensorboard --logdir=logs --port=6007处理图片:
from PIL import Image
img=Image.open(path)
def add_image(self, tag, img_tensor, global_step=None, walltime=None, dataformats='CHW'):
#img_tensor (torch.Tensor, numpy.array, or string/blobname): Image data注意,add_img只能读tensor型或numpy.array型的图片,.img要先转换(先看numpy.array格式)
print(type(img))用PIL中的Image 打开的img type是“<class 'PIL.JpegImagePlugin.JpegImageFile'>”
利用numpy将img改为numpy形式
import numpy as np
img_array=np.array(img)
print(type(img_array))
#<class 'numpy.ndarray'>
注意add_image的dataformats格式,默认是CHW
def add_image(self, tag, img_tensor, global_step=None, walltime=None, dataformats='CHW')通过print(img_array.shape)以查看img是否为C(通道)H(高度)W(宽度)的形式
print(img_array.shape)
#(512, 768, 3)
(由此可见img的format是HWC(通道在后),因此要把add_img语句改成
writer.add_image("test",img_array,1,dataformats='HWC')最终代码:
from torch.utils.tensorboard import SummaryWriter
import numpy as np
from PIL import Image
writer=SummaryWriter("logs")#创建实例文件夹“logs”
img_path=r"hymenoptera_data/train/ants_img/5650366_e22b7e1065.jpg"#图片路径
img_PIL=Image.open(img_path)#打开PIL格式的图片
img_np=np.array(img_PIL)#将该图片转换为numpy.array格式
writer.add_image("test",img_np,3,dataformats='HWC')
writer.close()
p10-11 torchvision中的transforms
关注官方文档,关注输入、输出(利用type()/debug查看)和需要什么参数
pytorch中打开structure(alt+7)可以快捷地浏览transform源文件
class ToTensor:
    """Convert a ``PIL Image`` or ``numpy.ndarray`` to tensor. This transform does not support torchscript.
↑ToTensor用处:将PIL(PIL.Image)或numpy.ndarray(cv2)图片转换为tensor格式,可以用于tensorboard中的add_image(见lec7-8)
另:使用opencv:pip install opencv-python
import cv2
cv_img=cv2.imread(img_path)#cv_img为numpy.ndarray格式
最终代码:
from torch.utils.tensorboard import SummaryWriter
from PIL import Image
from torchvision import transforms
#transforms是个工具箱
writer1=SummaryWriter("log1")#实例化
path=r"hymenoptera_data/train/ants_img/Ant_1.jpg"#图片路径
img=Image.open(path)#以PIL格式打开
tensor_trans=transforms.ToTensor()#创建具体的工具"tensor_trans"
#用法:result=tool(input)
img_tensor=tensor_trans(img)
writer1.add_image("test1",img_tensor,1)
writer1.close()
tensor格式的图片包含信息较全面,因此之后较常用。
p12-13:常见的transform
小记def __call__与普通def的区别
class person:
    def __call__(self, other):
        print(other)
    def hello(self,name):
        print("Hello"+name)
person1=person()#实例化
person1.hello("li4")
person1("zhang3")#将zhang3赋给__call__
#output:
#Helloli4
#zhang3
Normalize:
img_tensor.size()
# torch.Size([3, 272, 199])
这说明img_tensor是一个有三个通道、高272、宽199的图片(rgb通道原本是[0,255],但tensor将其压缩到了[0,1])
tensor格式图片的内容:[C[H[W]]]
 该函数需求均值、标准差,且图片为rgb格式需求三通道。因此由以下格式:
#Normalize
trans_norm=transforms.Normalize([0.5,0.5,0.5],[0.5,0.5,0.5])
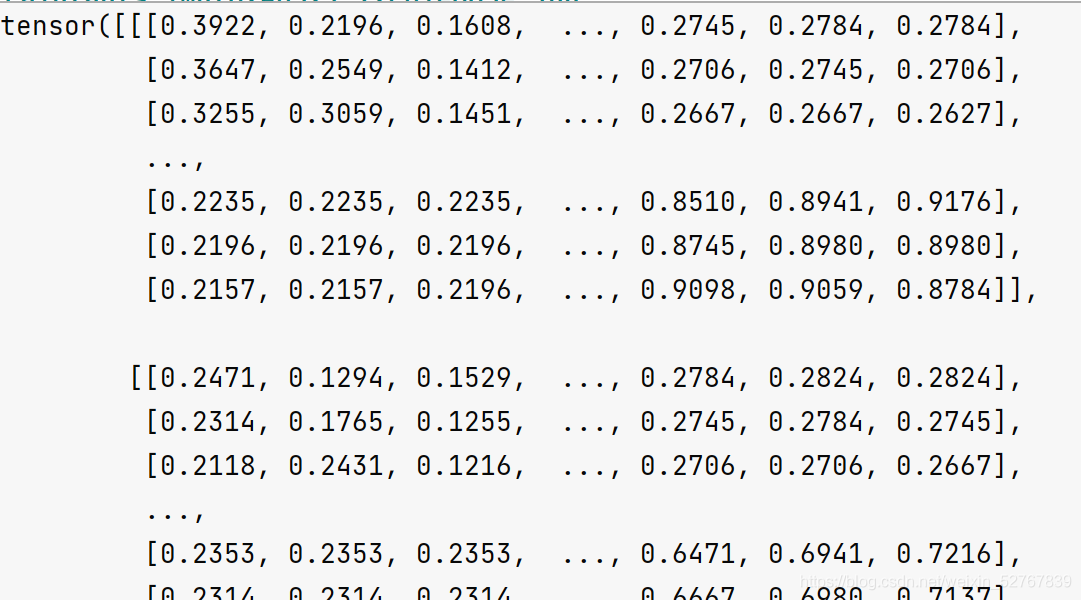
print(img_tensor[0][0][0])
img_norm=trans_norm(img_tensor)
print(img_norm[0][0][0])
writer.add_image("test1",img_norm,1)
writer.close()
#output:
#tensor(0.3725)
#tensor(-0.2549)Resize
改变图片大小(H,W)
#Resize
trans_resize=transforms.Resize((512,512))
img_resize=trans_resize(img_tensor)
print(type(img_resize))
writer.add_image("test1",img_resize,2)
Compose(合并)
注意,由于norm与resize需要tensor数据类型,所以trans_tensor需要放在最前面
#compose的变量是transforms工具的列表,实现多个功能顺序执行
trans_compose=transforms.Compose([trans_totensor,trans_resize,trans_norm])
img_compose=trans_compose(img)
writer.add_image("test1",img_compose,3)
writer.close()
RandomCrop随机裁剪
#RandomCrop
trans_rc=transforms.RandomCrop((122,100))#裁剪大小
img_rc=trans_rc(img_tensor)
img_rc=trans_rc(img_tensor)
writer.add_image("test1",img_rc,4)
writer.close()
p14torchvision数据集
pytorch官网-docs-torchvision-packa reference下载数据集(以CIFAR为例)
torchvision.datasets.CIFAR10(root: str, train: bool = True, transform: Optional[Callable] = None, target_transform: Optional[Callable] = None, download: bool = False)
-
root (string) – Root directory of dataset where directory
cifar-10-batches-pyexists or will be saved to if download is set to True. -
train (bool, optional) – If True, creates dataset from training set, otherwise creates from test set.
-
transform (callable, optional) – A function/transform that takes in an PIL image and returns a transformed version. E.g,
transforms.RandomCrop -
target_transform (callable, optional) – A function/transform that takes in the target and transforms it.
-
download (bool, optional) – If true, downloads the dataset from the internet and puts it in root directory. If dataset is already downloaded, it is not downloaded again.
import torchvision
train_set=torchvision.datasets.CIFAR10(root="./dataset",train=True,download=True)
test_set=torchvision.datasets.CIFAR10(root="./dataset",train=False,download=True)
print(test_set[0])
img,labl=test_set[0]
print(test_set.classes)
print(img)
print(labl)

output:
#(<PIL.Image.Image image mode=RGB size=32x32 at 0x2C0C7D92648>, 3)
#['airplane', 'automobile', 'bird', 'cat', 'deer', 'dog', 'frog', 'horse', 'ship', 'truck']
#<PIL.Image.Image image mode=RGB size=32x32 at 0x2C0C7D92588>
#3
#test的第一张图片是PIL格式,RGB形式,大小32x32,其分类为第三类
将10个trainset数据写入tensorboard:
writer=SummaryWriter("p14")
for i in range (10):
    img,l=test_set[i]
    writer.add_image("set1",img,i)
writer.close()
P15DataLoader
点进dataset源文件查找getitem()可以查看该数据集返回数据类型(如CIFAR,返回img和target)
torch.utils.data.DataLoader(dataset, batch_size=1, shuffle=False, sampler=None, batch_sampler=None, num_workers=0, collate_fn=None, pin_memory=False, drop_last=False, timeout=0, worker_init_fn=None, multiprocessing_context=None, generator=None, *, prefetch_factor=2, persistent_workers=False)
-
dataset (Dataset) – dataset from which to load the data.
-
batch_size (int, optional) – how many samples per batch to load (default:
1).一次取几个 -
shuffle (bool, optional) – set to
Trueto have the data reshuffled at every epoch (default:False).是否打乱顺序 -
drop_last (bool, optional) – set to
Trueto drop the last incomplete batch, if the dataset size is not divisible by the batch size. IfFalseand the size of dataset is not divisible by the batch size, then the last batch will be smaller. (default:False)是否丢弃剩余
import torchvision
from torch.utils.data import DataLoader
train_set=torchvision.datasets.CIFAR10(root="./dataset",transform=torchvision.transforms.ToTensor(),train=True,download=True)
train_loader=DataLoader(dataset=train_set,batch_size=4,shuffle=True,num_workers=0,drop_last=False)
for data in train_loader:
    imgs,targets=data
    print(imgs.shape)
    print(targets)

#output:
#torch.Size([4, 3, 32, 32])#四张图片,每张三通道,32x32
#tensor([4, 9, 3, 9]).....#标签
多张图片写入tensorboard:
step=0
writer=SummaryWriter("dataloader")
for data in train_loader:
    imgs,targets=data
    writer.add_images("test1",imgs,step)
    step=step+1
writer.close()
p16神经网络的基本骨架-nn.Module
pytorch官网-doc-torch.nn-Module
from torch import nn
import torch
class haha(nn.Module):
    def __init__(self):
        super(haha,self).__init__()#调用父类初始化函数
        #自定义

    def forward(self,input):#forward一定不能拼错!否则会报错
        output=input+1#自定义
        return output#自定义

c=haha()#实例化
x=torch.tensor(1.0)
output=c(x)
print(output)

output
#tensor(2.)
torch.tensor/torch.Tensor
Tensor是class,tensor是func,将数据类型转换为Tensor
p17conv2d卷积
卷积核与input矩阵的各个元素乘积和生成一个output矩阵
torch.nn.functional.conv2d(input, weight, bias=None, stride=1, padding=0, dilation=1, groups=1) → Tensor
-
input – input tensor of shape (\text{minibatch} , \text{in\_channels} , iH , iW)(minibatch,in_channels,iH,iW) #输入内容
-
weight – filters of shape (\text{out\_channels} , \frac{\text{in\_channels}}{\text{groups}} , kH , kW)(out_channels,groupsin_channels,kH,kW) #卷积核
-
bias – optional bias tensor of shape (\text{out\_channels})(out_channels). Default:
None -
stride – the stride of the convolving kernel. Can be a single number or a tuple (sH, sW). Default: 1 #每次移动几步(tuple可以规定不同方向步数不同)
-
padding –
implicit paddings on both sides of the input. Can be a string {‘valid’, ‘same’}, single number or a tuple (padH, padW). Default: 0
padding='valid'is the same as no padding.padding='same'pads the input so the output has the shape as the input. However, this mode doesn’t support any stride values other than 1.#填充输入 -
 经过padding=1填充后的input(padding的部分默认0)
 -
import torch
import torch.nn.functional as F
#输入:5x5矩阵
input=torch.tensor([[1,2,0,3,1],
                    [0,1,2,3,1],
                    [1,2,1,0,0],
                    [5,2,3,1,1],
                    [2,1,0,1,1]])
#卷积核3x3矩阵
kernel=torch.tensor([[1,2,1],
                     [0,1,0],
                     [2,1,0]])
#尺寸变换,要对应conv2d input的要求(minibatch=1,channel=1,h,w)
input=torch.reshape(input,(1,1,5,5))
kernel=torch.reshape(kernel,(1,1,3,3))
#stride:每次(在哪个方向)移动几步
output=F.conv2d(input,kernel,stride=1)
print(output)
output1=F.conv2d(input,kernel,stride=2)
print(output1)
output2=F.conv2d(input,kernel,stride=1,padding=1)
print(output2)

#output
# tensor([[[[10, 12, 12],
#           [18, 16, 16],
#           [13,  9,  3]]]])
# tensor([[[[10, 12],
#           [13,  3]]]])
# tensor([[[[ 1,  3,  4, 10,  8],
#           [ 5, 10, 12, 12,  6],
#           [ 7, 18, 16, 16,  8],
#           [11, 13,  9,  3,  4],
#           [14, 13,  9,  7,  4]]]])
p18神经网络-卷积层Conv2d
conv_arithmetic/README.md at master · vdumoulin/conv_arithmetic · GitHub
卷积层动图理解(蓝色input,绿色output,深色kernel)
torch.nn.Conv2d(in_channels, out_channels, kernel_size, stride=1, padding=0, dilation=1, groups=1, bias=True, padding_mode='zeros', device=None, dtype=None)
import torch
import torchvision
from torch import nn
from torch.utils.data import DataLoader
from torch.utils.tensorboard import SummaryWriter

dataset=torchvision.datasets.CIFAR10("./dataset",train=False,transform=torchvision.transforms.ToTensor(),download=True)
dataloader=DataLoader(dataset=dataset,batch_size=64,shuffle=True,drop_last=False)
class test(nn.Module):
    def __init__(self):
        super(test, self).__init__()
        self.conv1=nn.Conv2d(3,6,3,stride=1,padding=0)

    def forward(self,x):
        x=self.conv1(x)
        return x
writer=SummaryWriter("log1")
test1=test()
step=0
for data in dataloader:
    imgs,t=data
    output=test1(imgs)
    #torch.size([64,3,32,32])
    writer.add_images("input",imgs,step)
    #由于图片只能以三个通道显示,因此要把6个channel改成3个
    #torch.size([64,6,30,30])->[???,3,30,30]
    #batch_size不知道写多少的时候就写-1,它会自动计算
    output=torch.reshape(output,(-1,3,30,30))
    writer.add_images("output",output,step)
    step=step+1
writer.close()
P18 Pooling layer MaxPool2
与卷积不用,池化是选取核中最大数作为output
torch.nn.MaxPool2d(kernel_size, stride=None, padding=0, dilation=1, return_indices=False, ceil_mode=False)
-
kernel_size – the size of the window to take a max over
-
stride – the stride of the window. Default value is
kernel_size -
padding – implicit zero padding to be added on both sides
-
dilation – a parameter that controls the stride of elements in the window
-
return_indices – if
True, will return the max indices along with the outputs. Useful for torch.nn.MaxUnpool2d later -
ceil_mode – when True, will use ceil instead of floor to compute the output shape(True则保留多出来的input,False丢弃。)
池化:在保留数据特征的情况下减小数据量
import torch

import torchvision
from torch import nn
from torch.nn import MaxPool2d
from torch.utils.data import DataLoader
from torch.utils.tensorboard import SummaryWriter

dataset=torchvision.datasets.CIFAR10("./dataset",train=False,transform=torchvision.transforms.ToTensor(),download=True)
dataloader=DataLoader(dataset=dataset,batch_size=64,shuffle=True,drop_last=False)
#dtype:将数据类型更改为浮点数
#输入:5x5矩阵
input=torch.tensor([[1,2,0,3,1],
                    [0,1,2,3,1],
                    [1,2,1,0,0],
                    [5,2,3,1,1],
                    [2,1,0,1,1]],dtype=torch.float32)
input=torch.reshape(input,(-1,1,5,5))
class test(nn.Module):
    def __init__(self):
        super(test, self).__init__()
        self.maxpool1=MaxPool2d(kernel_size=3,ceil_mode=True)
    def forward(self,input):
        output=self.maxpool1(input)
        return output
test1=test()
#矩阵输出
print(test1(input))
#图像输出
writer=SummaryWriter("log2")
step=0
for data in dataloader:
    imgs,t=data
    writer.add_images("input", imgs, step)
    output=test1(imgs)
    #注意,最大池化不会改变channel(input是3通道,output也是三通道)
    writer.add_images("output", output, step)
    step=step+1
writer.close()

output:
# tensor([[[[2., 3.],
#           [5., 1.]]]])
图像输出结果:
-

p20非线性激活-Non-Linear Activations
ReLU:ReLU — PyTorch 1.11.0 documentation
将小于0的数据变换成0
input=torch.tensor([[1,-0.5],
                    [-1,3]])
output=torch.reshape(input,(-1,1,2,2))
print(ReLU(output))

output:
#([[1,0],
#  [0,3]])
还有很多公式,不一一列举,torch.nn — PyTorch 1.11.0 documentation去官网查
import torchvision
from torch import nn
from torch.nn import ReLU, Sigmoid
from torch.utils.data import DataLoader
from torch.utils.tensorboard import SummaryWriter

dataset=torchvision.datasets.CIFAR10("./dataset",train=False,transform=torchvision.transforms.ToTensor(),download=True)
dataloader=DataLoader(dataset=dataset,batch_size=64,shuffle=True,drop_last=False)

class test(nn.Module):
    def __init__(self):
        super(test, self).__init__()
        #inplace:是否将input替换成output
        self.relu1=ReLU(inplace=False)
        self.sigmoid1=Sigmoid()
    def forward(self,input):
        output=self.sigmoid1(input)
        output=self.sigmoid1(output)
        return output
test1=test()

writer=SummaryWriter("log2")
step=0
for data in dataloader:
    imgs,t=data
    writer.add_images("input", imgs, step)
    output=test1(imgs)
    writer.add_images("output", output, step)
    step=step+1
writer.close()
output:
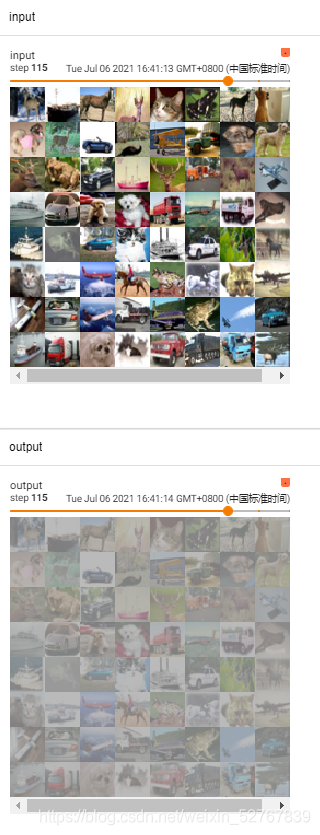 (仅Sigmoid)
 (ReLU与Sigmoid叠加)
P21 线性层
torch.nn.Linear(in_features, out_features, bias=True, device=None, dtype=None)
-
in_features – size of each input sample
-
out_features – size of each output sample
-
bias – If set to
False, the layer will not learn an additive bias. Default:True
 将图片内容转化为一维:
for data in dataloader:
    imgs,t=data
    print(imgs.shape)
    output=torch.reshape(imgs,(64,1,1,-1))
    print(output.shape)

output:
#torch.Size([64, 3, 32, 32])
#torch.Size([64, 1, 1, 3072])
由此可见,将图片展开后,也就是inputsize为3072
import torch
import torchvision
from torch import nn
from torch.nn import Linear
from torch.utils.data import DataLoader

dataset=torchvision.datasets.CIFAR10("dataset",train=False,transform=torchvision.transforms.ToTensor(),
                                    download=True)
#这里不droplast后面会报错,因为linear1的定义是196608,而最后一组图片不够64张,最后的大小也不足196608
dataloader=DataLoader(dataset,batch_size=64,drop_last=True)

class test(nn.Module):
    def __init__(self):
        super(test, self).__init__()
        self.linear1=Linear(3072,10)
    def forward(self,input):
        output=self.linear1(input)
        return output
test1=test()
for data in dataloader:
    imgs,t=data
    print(imgs.shape)
    #将图片线性化
    output=torch.reshape(imgs,(64,1,1,-1))
    #flatten也可以用
    # output=torch.flatten(imgs)
    print(output.shape)
    output=test1(output)
    print(output.shape)

output:
#torch.Size([64, 3, 32, 32])
#torch.Size([64, 1, 1, 3072])
#torch.Size([64, 1, 1, 10])
P22
CIFAR10模型结构
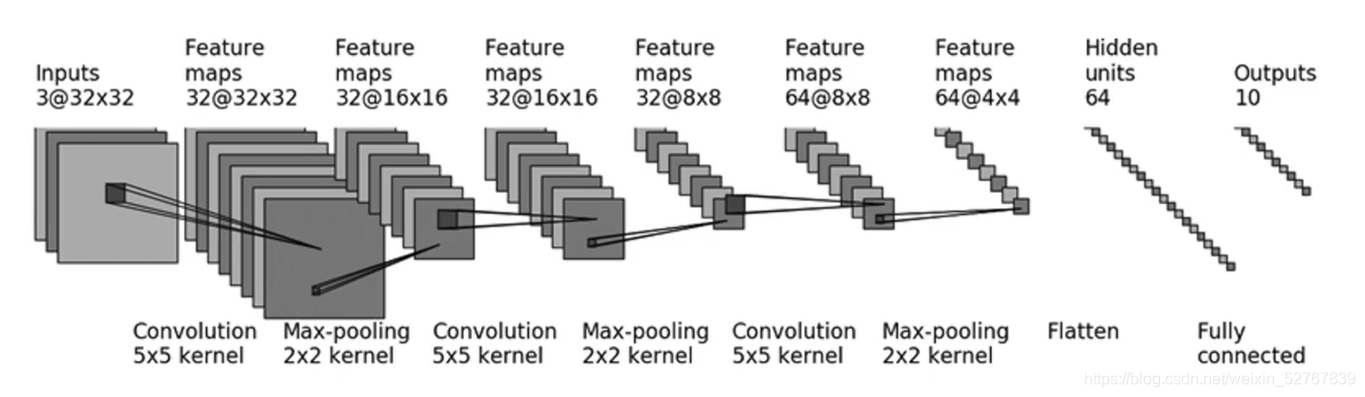
import torch
from torch import nn

class test(nn.Module):
    def __init__(self):
        super(test, self).__init__()
        #因为size_in和size_out都是32,经过计算得出padding=2,stride=1
        self.conv1=nn.Conv2d(3,32,5,padding=2,stride=1)
        self.pool1=nn.MaxPool2d(2)
        #尺寸不变,和上面一样
        self.conv2=nn.Conv2d(32,32,5,stride=1,padding=2)
        self.pool2=nn.MaxPool2d(2)
        # 尺寸不变,和上面一样
        self.conv3=nn.Conv2d(32,64,5,stride=1,padding=2)
        self.pool3 = nn.MaxPool2d(2)
        self.flatten=nn.Flatten()
        #in_feature:64*4*4,out_feature:64
        self.linear1=nn.Linear(1024,64)
        self.linear2=nn.Linear(64,10)
    def forward(self,x):
        x=self.conv1(x)
        x = self.pool1(x)
        x = self.conv2(x)
        x = self.pool2(x)
        x = self.conv3(x)
        x = self.pool3(x)
        x=self.flatten(x)
        x=self.linear1(x)
        x=self.linear2(x)
        return x
test1=test()
#对网络结构进行检验
input=torch.ones((64,3,32,32))
output=test1(input)
print(output.shape)

output:
#torch.Size([64, 10])
可以用nn.Sequential将代码变得更简洁:
class test(nn.Module):
def __init__(self):
super(test, self).__init__()
self.model1=nn.Sequential(
nn.Conv2d(3, 32, 5, padding=2, stride=1),
nn.MaxPool2d(2),
nn.Conv2d(32, 32, 5, stride=1, padding=2),
nn.MaxPool2d(2),
nn.Conv2d(32, 64, 5, stride=1, padding=2),
nn.MaxPool2d(2),
nn.Flatten(),
nn.Linear(1024, 64),
nn.Linear(64, 10)
)
def forward(self,x):
x=self.model1(x)
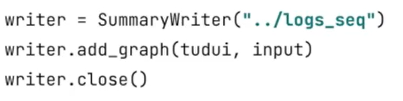
return x另:用SummaryWriter 的 add graph也可以可视化*比print高级一些
P23损失函数与反向传播
torch.nn-loss functions
注意输入和输出的形式
torch.nn.CrossEntropyLoss(weight=None, size_average=None, ignore_index=-100, reduce=None, reduction='mean')
input has to be a Tensor of size either (minibatch, C)(minibatch,C) or (minibatch, C, d_1, d_2, ..., d_K)(minibatch,C,d1,d2,...,dK)
输入为神经网络最后对该图片的每种类型预测的概率(minibatch),与该图片的类型标签
test1=test()
loss=nn.CrossEntropyLoss()
for data in dataloader:
    imgs,t=data
    #output代表该图像是每种类别的概率
    output=test1(imgs)
    print(output)
    print(t)
    #实际输出和目标之间的差距
    result_loss=loss(output,t)

output:
# tensor([[-0.0928, -0.0330,  0.0529,  0.1399, -0.1088,  0.0506, -0.0798,  0.0198,
#           0.1653, -0.0215]], grad_fn=<AddmmBackward>)
# tensor([7])
# tensor(2.2961, grad_fn=<NllLossBackward>)
p24优化器
pytorch-optim
在degug内查看gard:
test1-conv1(或其他网络)-weight-grad
test1=test()
#lossFunction模型
loss=nn.CrossEntropyLoss()
#优化器模型
optim=torch.optim.SGD(test1.parameters(),0.01)
#只对每张图片进行一轮学习
for data in dataloader:
    imgs,t=data
    output=test1(imgs)
    result_loss=loss(output,t)
    #将每个梯度清为0(初始化)
    optim.zero_grad()
    #反向传播,得到每个可调节参数对应的梯度(grad不再是none)
    result_loss.backward()
    #对每个参数进行改变,weight-data被改变
    optim.step()
    print(result_loss)
43行之前的weight,grad不为none(非首次循环)
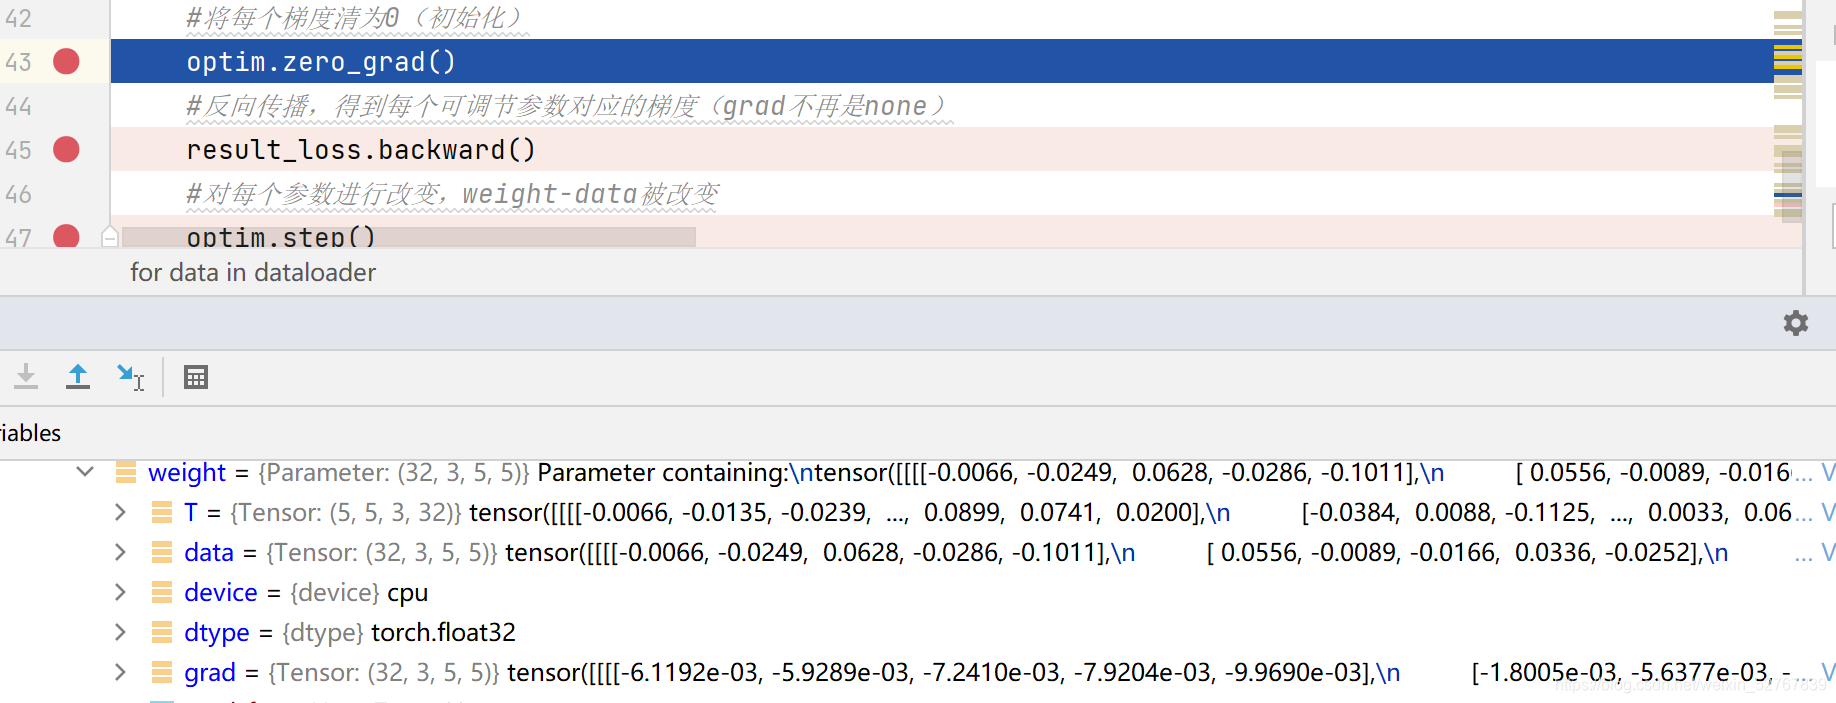 43行运行完毕,gard清零,data不变
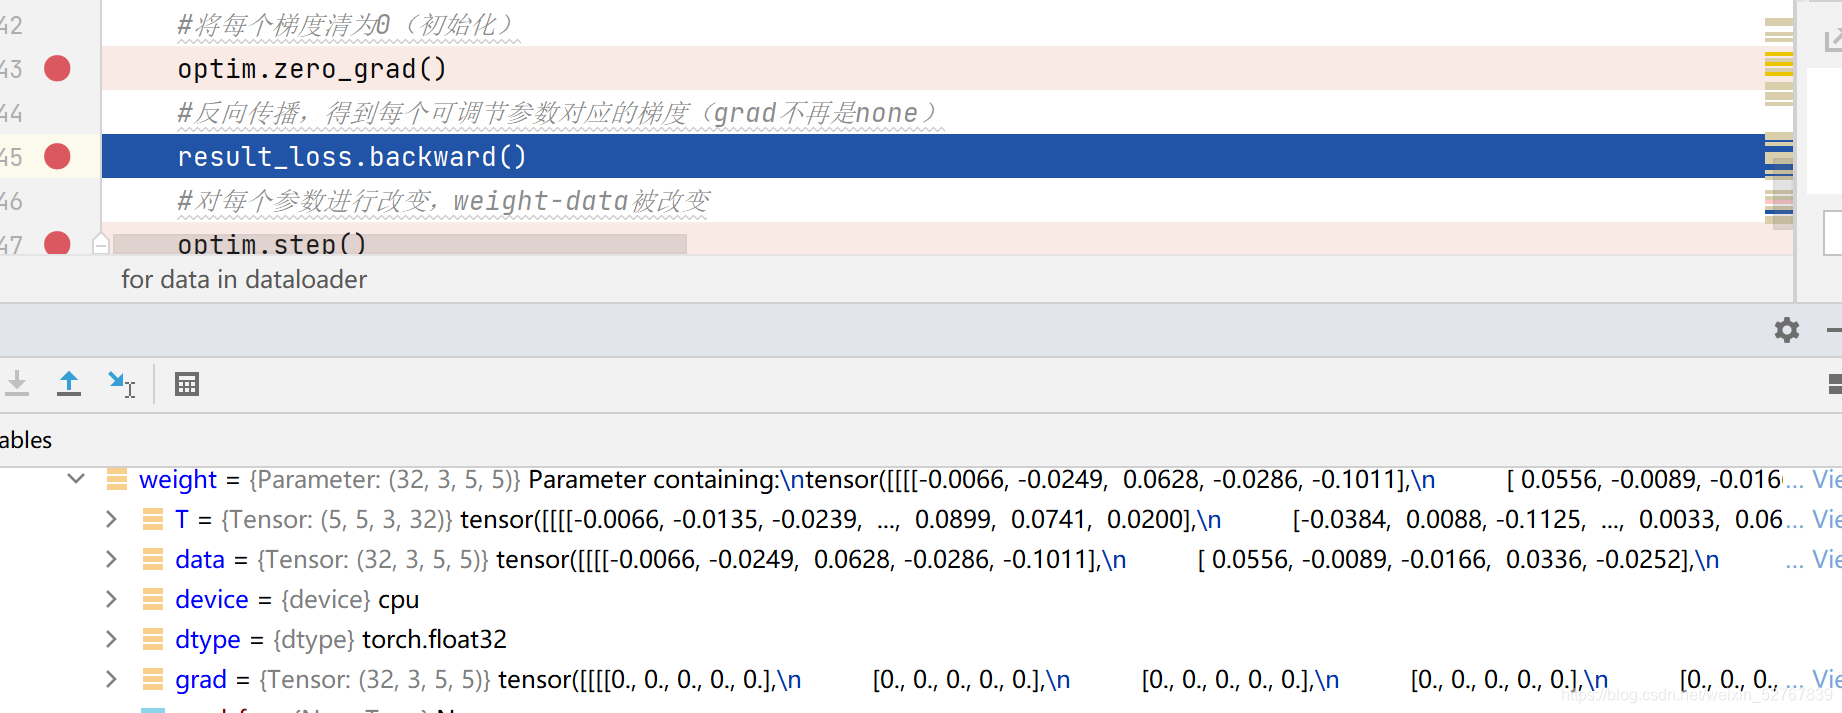 45行运行完毕,grad被重新计算,data不变
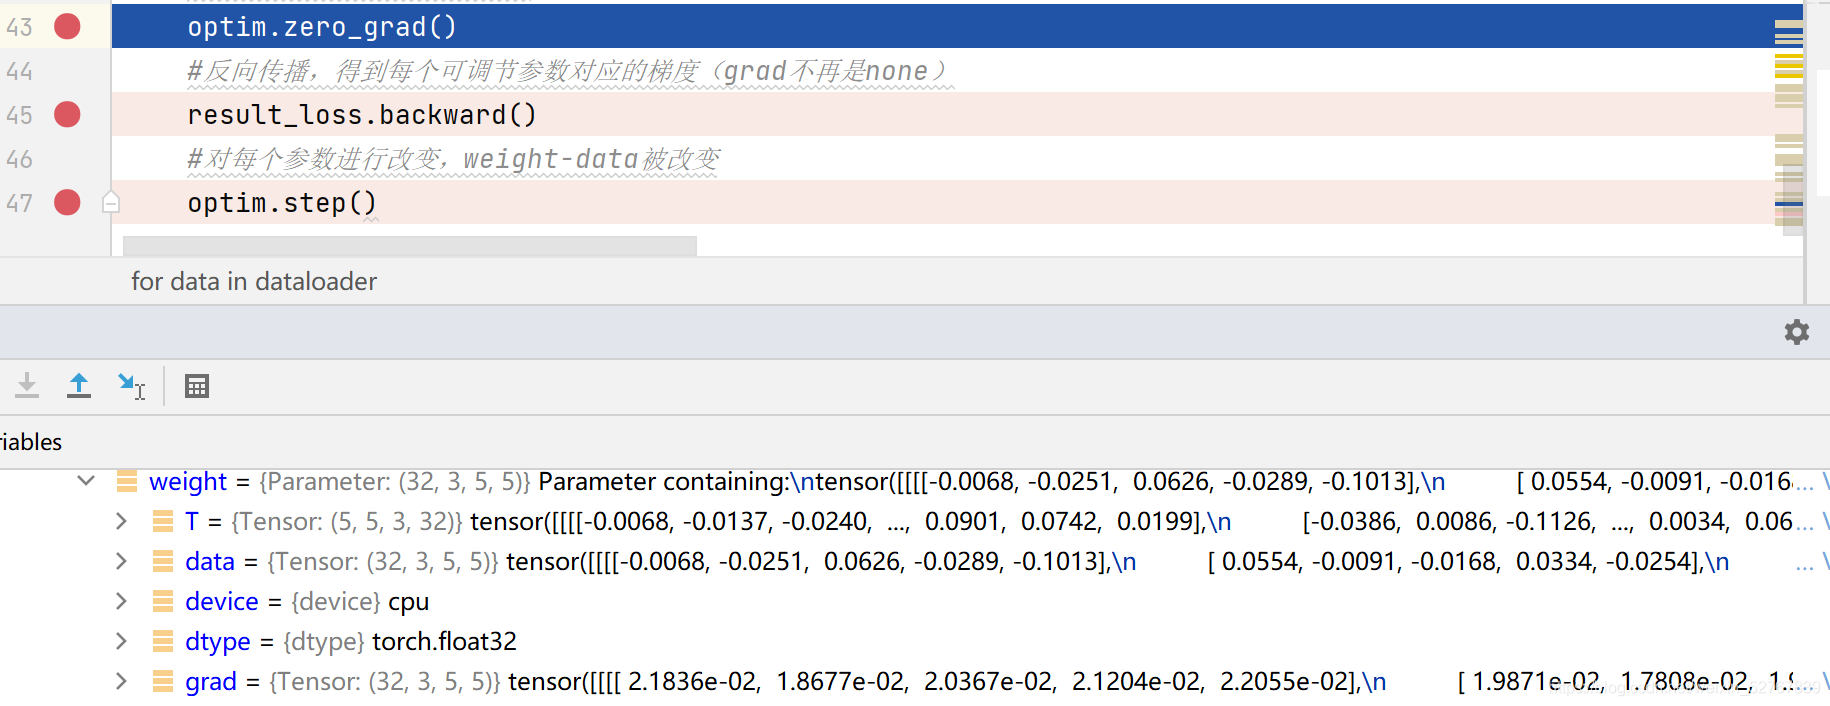
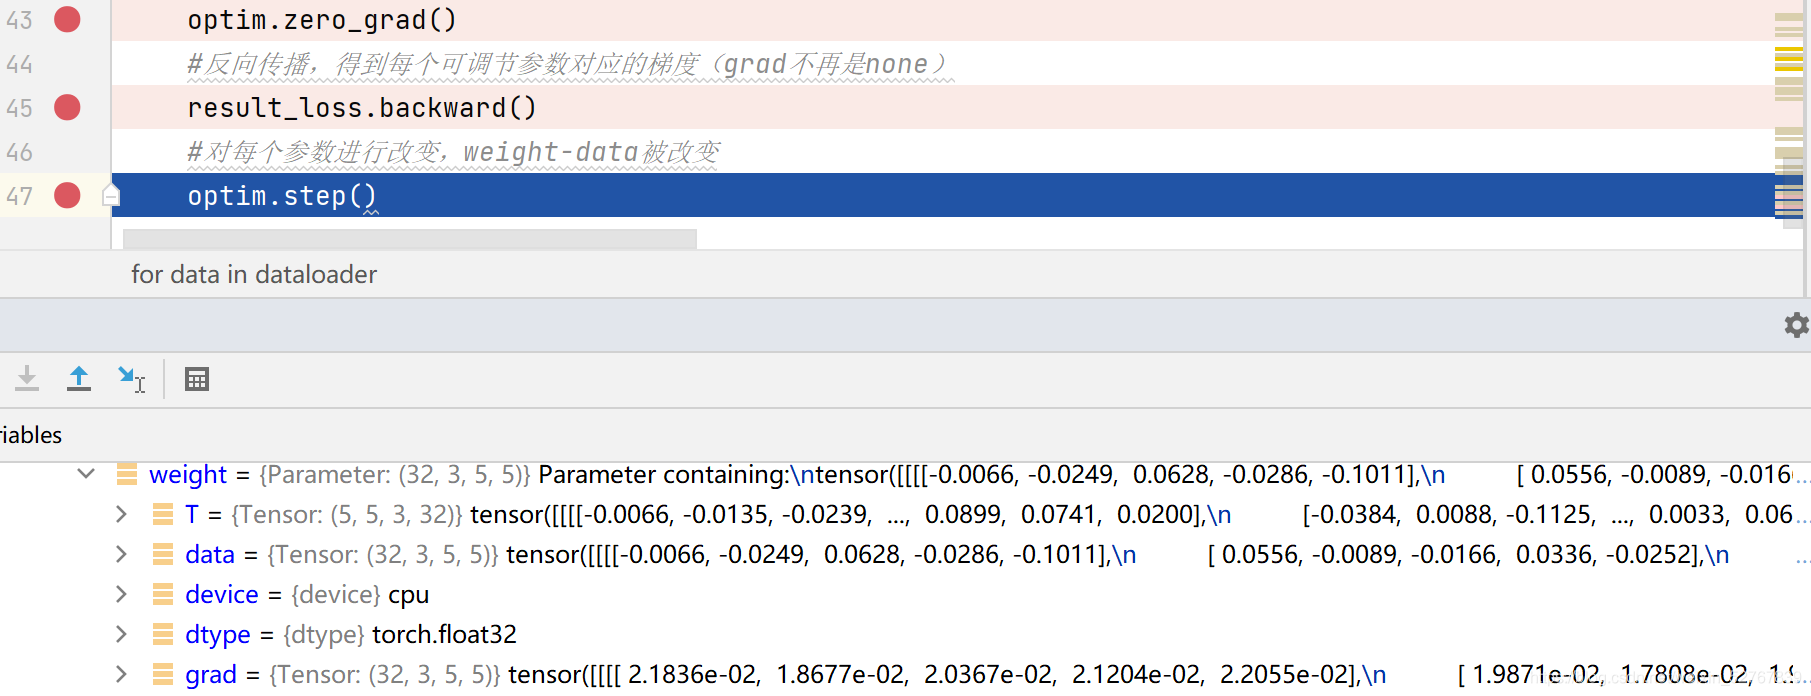 47行运行完毕,grad不变,data更新(data就是模型中的参数)
尝试进行多次优化:
test1=test()
#lossFunction模型
loss=nn.CrossEntropyLoss()
#优化器模型
optim=torch.optim.SGD(test1.parameters(),0.01)
#进行20次优化
for epcho in range (20):
    running_loss=0.0
    for data in dataloader:
        imgs,t=data
        output=test1(imgs)
        result_loss=loss(output,t)
        #将每个梯度清为0(初始化)
        optim.zero_grad()
        #反向传播,得到每个可调节参数对应的梯度(grad不再是none)
        result_loss.backward()
        #对每个参数进行改变,weight-data被改变
        optim.step()
        #计算每轮优化中每个变量的loss和
        running_loss=running_loss+result_loss
    print(running_loss)

output:
#总loss在逐渐变小
# tensor(18712.0938, grad_fn= < AddBackward0 >)
# tensor(16126.7949, grad_fn= < AddBackward0 >)
# tensor(15382.0703, grad_fn= < AddBackward0 >)
p25现有网络模型使用及修改
torchvision-models
vgg16:
vgg16_f=torchvision.models.vgg16(pretrained=False)
vgg16_t=torchvision.models.vgg16(pretrained=True)
vgg16_t的weight:

vgg16_f的weight:
![]()
vgg16_t的部分内容:
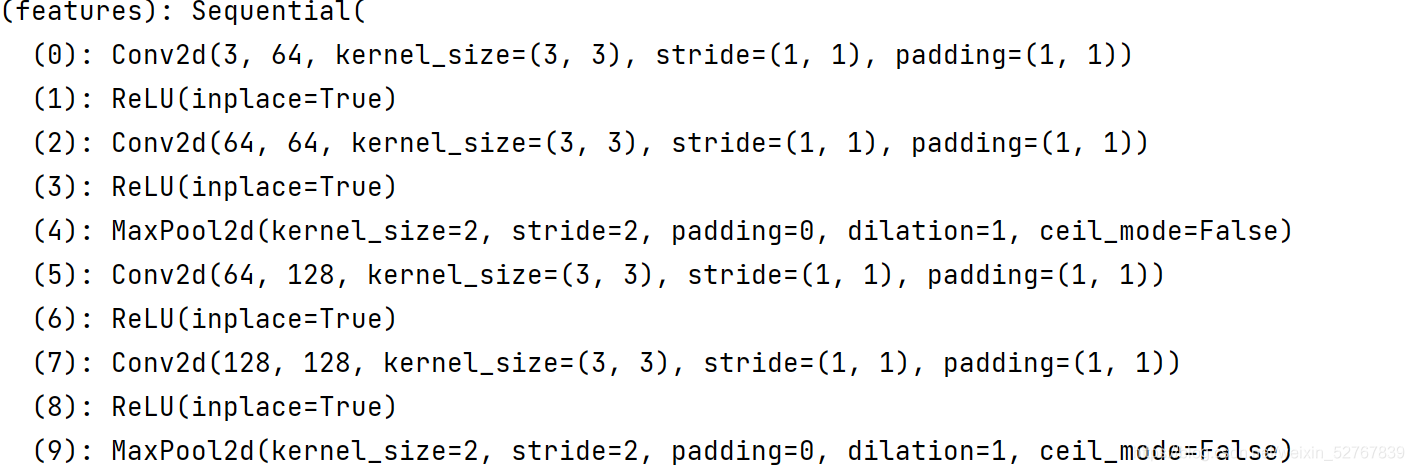
.
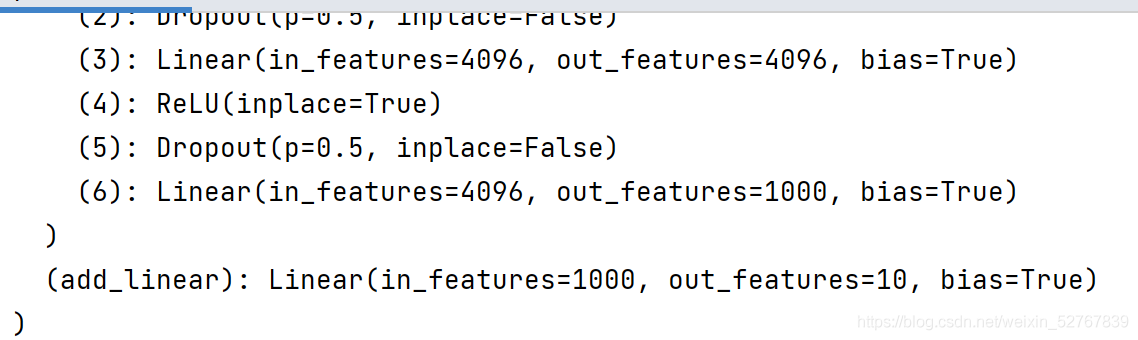
可以看到vgg16最后输出1000个类,想要将这1000个类改成10个类:
from torch import nn

vgg16_f=torchvision.models.vgg16(pretrained=False)
vgg16_t=torchvision.models.vgg16(pretrained=True)
#改动网络
#添加
vgg16_t.add_module("add_linear",nn.Linear(1000,10))
#或改动
vgg16_f.classifier[6]=nn.Linear(4096,10)
print(vgg16_t)
print(vgg16_f)
vgg_t:
vgg_f:

p26网络模型的保存与读取
保存:(以vgg16为例)
import torch
import torchvision
vgg16=torchvision.models.vgg16(pretrained=False)
#方式1(.pth不是必须的)
torch.save(vgg16,"vgg16.pth")
#方式2:将参数保存为字典格式(官方推荐)
torch.save(vgg16.state_dict(),"vgg16_2.pth")
读取:
import torch
import torchvision
vgg16=torchvision.models.vgg16(pretrained=False)
#方式一=》保存方式一(路径)
model=torch.load("vgg16.pth")
print(model)
#方式2=》字典格式
#注意方式2要printvgg16这个模型,不能model=xxx,print(model)
vgg16.load_state_dict(torch.load("vgg16_2.pth"))
print(vgg16)
注意,以方式一形式读取自定义模型时要先将该模型复制或引用到读取文件中,否则会报错
p27-29完整模型训练
步骤:
载入模型、数据
加载数据
创建网络模型
初始化损失函数、优化器
设置训练网络的参数(训练、测试次数、轮数)
添加tensorboard(可视化)
for epoch:
for data in trainset:
分割数据,loss,清零,优化
for data in testset:
分割数据,计算准确度
展现每轮总loss,特定步数loss,保存模型
准确度计算思路:找出最大预测结果与target相同的图片数量,用其除以图片总数
import torch
import torchvision
from torch import nn
from torch.utils.data import DataLoader
from torch.utils.tensorboard import SummaryWriter
#import自己写的models
from p27_1model import *

train_data=torchvision.datasets.CIFAR10("../datasets",train=True,transform=torchvision.transforms.ToTensor(),
                                        download=True)
test_data=torchvision.datasets.CIFAR10("../datasets",train=False,transform=torchvision.transforms.ToTensor(),
                                        download=True)
#查看数据集长度
train_size=len(train_data)
test_size=len(test_data)
print("size of train,test is:{},{}".format(train_size,test_size))
#利用dataloader加载
train_dataloader=DataLoader(train_data,64)
test_dataloader=DataLoader(test_data,64)
#创建网络模型
test1=test()
#损失函数
loss_f=nn.CrossEntropyLoss()
#优化器
#1e-2=0.01
learning_rate=1e-2
opt=torch.optim.SGD(test1.parameters(),lr=learning_rate,)
#设置训练网络的参数
#记录训练次数
train_step=0
#测试次数
test_step=0
#训练轮数
epoch=10
#添加tensoeboard
writer=SummaryWriter("train_log")


for i in range(epoch):
    print("第{}轮训练开始".format(i+1))
    #训练步骤开始
    #有时不必要:test1.train()
    for data in train_dataloader:
        imgs,t=data
        output=test1(imgs)
        loss=loss_f(output,t)
        #优化器优化模型
        opt.zero_grad()
        loss.backward()
        opt.step()
        train_step=train_step+1
        #loss.item更加规范(.item不会打印数据类型,例如tensor(5))
        if train_step%100==0:
            print("训练次数{},loss值为{}".format(train_step,loss.item()))
            writer.add_scalar("train_loss",loss.item(),train_step)
    loss_total=0
    #测试步骤开始
    #有时不必要:test1.eval()
    total_correct=0
    with torch.no_grad():
        for data in test_dataloader:
            imgs,t=data
            output=test1(imgs)
            loss=loss_f(output,t)
            loss_total=loss_total+loss.item()
            test_step=test_step+1
            #argmax参数:1为横向比较,2为纵向比较,output为64,10的矩阵
            #output.argmax(1)==t是为了得到[Ture,False,True....]这种形式
            #.sum:T为1,F为0
            corect=(output.argmax(1)==t).sum()
            total_correct=total_correct+corect
            accuracy=total_correct/test_size
    print("测试集总loss{}".format(loss_total))
    writer.add_scalar("test_loss",loss_total,test_step)
    writer.add_scalar("accuracy",accuracy,test_step)

    torch.save(test1,"test1{}.pth".format(i))
    print("模型已保存")
p30-31利用gpu训练
改动:
网络模型创建实例、损失函数、分割数据集(输入和标注)时加.cuda()
test1=test()
if torch.cuda.is_available()==True:
    test1.cuda()
loss_f=nn.CrossEntropyLoss()
if torch.cuda.is_available()==True:
loss_f=loss_f.cuda() for data in train_dataloader:
imgs,t=data
if torch.cuda.is_available() == True:
imgs=imgs.cuda()
t=t.cuda()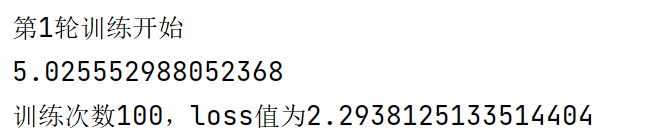
cpu运行100步需5秒

gpu运行100步只需1秒左右


 141
141


 被折叠的 条评论
为什么被折叠?
被折叠的 条评论
为什么被折叠?
 到【灌水乐园】发言


