


实现步骤:
1.向Unity导入EPPlus相关文件,助力Unity操作Excel文件
2.应用Unity自带UGUI制作基础表格
3.基于前两步制作可存可改Excel信息的表格
一、向Unity中导入EPPlus相关文件
请参考我的另一篇博客:导入EPPlus步骤
二、应用Unity制作基础表格
在学习CSDN的各种博客后,笔者结合自身需求与现有Unity(2021.1.19f1c1)版本给出以下步骤:
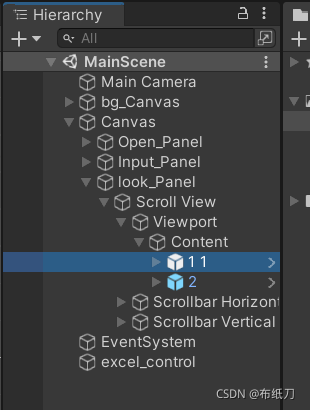
首先在场景内新建Canvas,在Canvas内新建一个Panel,在Panel内新建一个Scroll View,在Scroll View->Viewport->Content内新建一个空物体,命名随便(下文以row代替),如下图
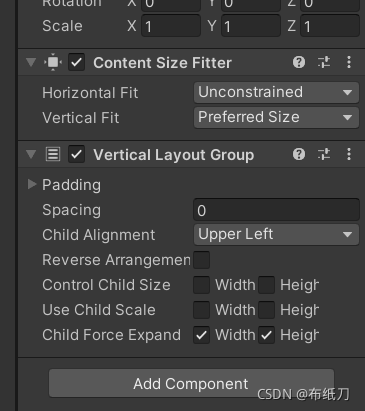
然后在Content物体上添加如下组件,设置如图(其中的Spacing可以在最后根据自身情况调整)
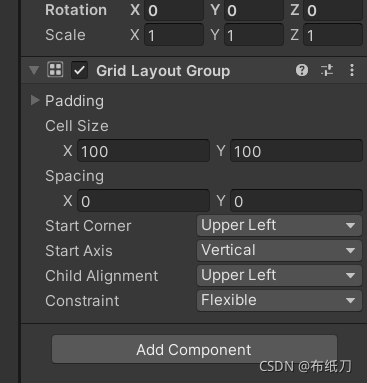
然后在上文建立的row(上文中约定的别名,就是那个随便命名的东西)添加组件如下,设置如图(其中的Cell Size与Spacing可以在最后根据自身情况调整)
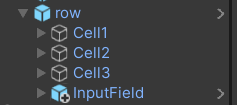
在row物体下新建至少两个InputField(方便修改Excel内容),方便纠错:),如图(如果你新建的物体没有变成蓝色,请不要担心,灰色才是应有的颜色,下图仅代表结构)
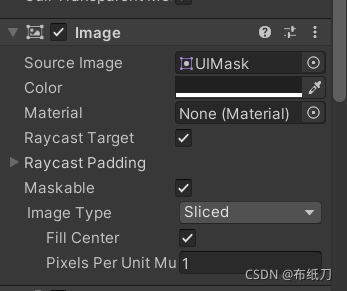
接下来建议将建立的InputField的背景改为透明,可以换上自己的背景,看起来更舒服(调整下图中的Source Image,UIMask为透明背景)
下面用鼠标左键按住row物体拖动到Project视图的存放资源的文件夹中,生成预制体(变蓝),再将row下任一InputField生成预制体
三、新建2个C#脚本:TableCreate.cs myexcel.cs
代码如下:
using System.Collections;
using System.Collections.Generic;
using UnityEngine;
using UnityEngine.UI;
using OfficeOpenXml;
using System.IO;

public class TableCreate : MonoBehaviour
{
    public GameObject Row_Prefab;
    public GameObject Cell_Prefab;
    private string address;
    public  int Row;
    public  int Col;
    private myexcel myexcel;
    private FileInfo fileInfo;
    private ExcelPackage excelPackage;
    private void Start()
    {
        Row = 1;
        Col = 1;
        myexcel = this.GetComponent<myexcel>();
    }
    private void Update()
    {
        if(myexcel.isok==true)
        {
            fileInfo = myexcel.fileInfo;
            excelPackage = new ExcelPackage(fileInfo);
            ExcelWorksheet worksheet = excelPackage.Workbook.Worksheets[1];

            IEnumerator a = worksheet.Cells.GetEnumerator();
            while (true)
            {
                address = (a.Current as ExcelRangeBase).Address;
                if (address[0] - 'A' + 1 > Col)
                    Col = address[0] - 'A' + 1;
                int r=0;
                for(int i = 1;i<address.Length;i++)
                {
                    r = r * 10 + address[i] - '0';
                }
                if (r > Row)
                    Row = r;
                if (a.MoveNext()==false)
                {
                    break;
                }
            }
            Debug.Log(address);

            Debug.Log(Row);
            Debug.Log(Col);

            for (int i = 1; i <= Row; i++)
            {
                GameObject table = GameObject.Find("Canvas/look_Panel/Scroll View/Viewport/Content");
                GameObject row = GameObject.Instantiate(Row_Prefab, table.transform.position, table.transform.rotation) as GameObject;
                row.name = "row" + i;
                row.transform.SetParent(table.transform);
                row.transform.localScale = Vector3.one;
                if (worksheet.Cells[i , 1].Value != null)
                    row.transform.Find("Cell1").GetComponent<InputField>().text = worksheet.Cells[i , 1].Value.ToString();
                if (worksheet.Cells[i , 2].Value != null)
                    row.transform.Find("Cell2").GetComponent<InputField>().text = worksheet.Cells[i , 2].Value.ToString();
                if (worksheet.Cells[i , 3].Value != null)
                    row.transform.Find("Cell3").GetComponent<InputField>().text = worksheet.Cells[i , 3].Value.ToString();
                for (int j = 4; j <= Col; j++)
                {
                    GameObject cell = GameObject.Instantiate(Cell_Prefab, row.transform.position, row.transform.rotation) as GameObject;
                    cell.name = "Cell" + j;
                    cell.transform.SetParent(row.transform);
                    cell.transform.localScale = Vector3.one;
                    if (worksheet.Cells[i , j ].Value != null)
                        cell.GetComponent<InputField>().text = worksheet.Cells[i , j ].Value.ToString();
                }
            }
            myexcel.isok = false;
        }
    }
}
using System.Collections;
using System.Collections.Generic;
using UnityEngine;
using OfficeOpenXml;
using System.IO;
using UnityEngine.UI;

public class myexcel : MonoBehaviour
{
    private  InputField Input_field;
    public Button Input_button;
    public Button Open_button;
    public InputField Filepath_field;
    public Text filename_text;

    public bool isok;

    public FileInfo fileInfo;
    private TableCreate tc;
    private ExcelPackage excelPackage;
    private string m_Path;
    private void Awake()
    {
        isok = false;
        tc = this.GetComponent<TableCreate>();
        Input_button.interactable = false;
        Input_button.GetComponent<Button>().onClick.AddListener(Input_button_OnClickDown);
        Open_button.GetComponent<Button>().onClick.AddListener(Open_button_OnClickDown);
    }
    void Input_button_OnClickDown()
    {
        using (excelPackage = new ExcelPackage(fileInfo))
        {
            ExcelWorksheet worksheet = excelPackage.Workbook.Worksheets[1];
            for(int i=1;i<=tc.Row;i++)
            {
                for(int j=1;j<=tc.Col;j++)
                {
                    Debug.Log("Canvas/look_Panel/Scroll View/Viewport/Content/row" + i.ToString() + "/Cell" + j.ToString());
                    Input_field = GameObject.Find("Canvas/look_Panel/Scroll View/Viewport/Content/row" + i.ToString()+"/Cell"+j.ToString()).GetComponent<InputField>();
                    if (Input_field.text.ToString() != null)
                        worksheet.Cells[i, j].Value = Input_field.text.ToString();
                }
            }
            excelPackage.Save();
        }
    }
    void Open_button_OnClickDown()
    {
        m_Path = Filepath_field.text;//"D:/JK/try.xlsx";
        fileInfo = new FileInfo(m_Path);
        filename_text.text = Filepath_field.text;
        Input_button.interactable = true;
        Open_button.interactable = false;
        isok = true;
    }
}
在Hierarchy视图中最外层新建空物体,将上面两个脚本添加到此物体上,将此物体作为中控器
关于脚本所需外部录入值参考下图:

效果图:
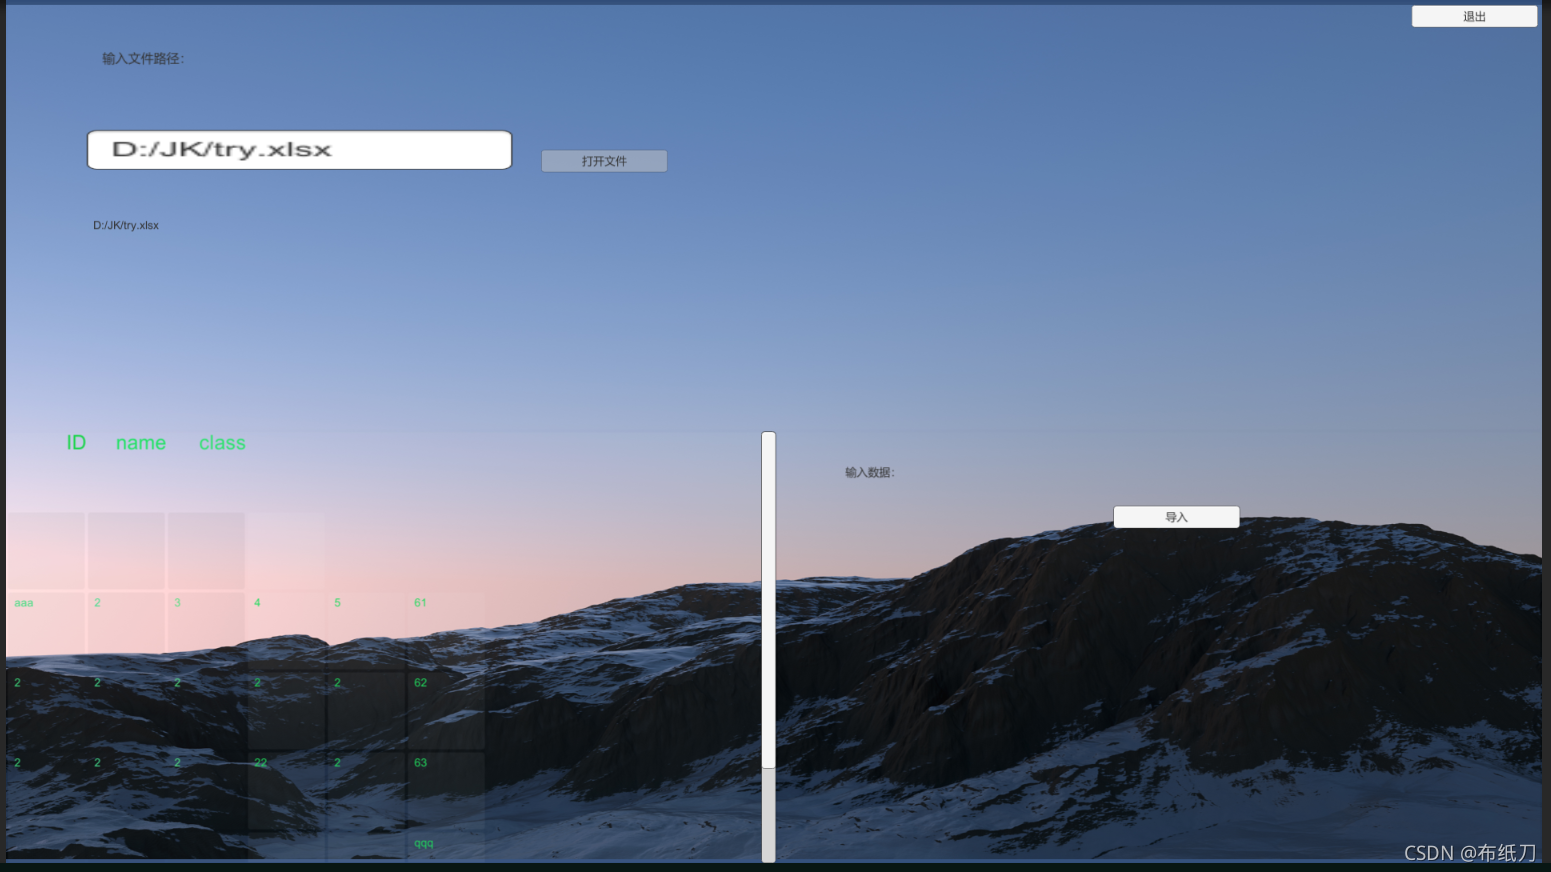
操作先后:首先在输入框填入excel文件绝对路径,点击打开文件按钮,左下图表格出现文件内容,在格子里编辑文本后,点击按钮导入即可保存,最后退出
有可能出现的问题:
1.为啥自己的表没有表头?
答:我在新建row之上建立了另一个row‘,里面放Text物体,按照row设置即可,并不用设置预制体,但这种表头无法修改,推荐在excel文件表格里输入表头
2.为啥读不到第二张表?
答:设置的读第一张表,本文只为提供实现参考(技术参考),可以自己控制自己的软件读表,控制 ExcelWorksheet worksheet = excelPackage.Workbook.Worksheets[1]; 里的1为其他数字即可(也可采用名称检索方式)
3.为啥自己的表格颜色不对,字不好看?
答:设置所有Canvas里的所有物体Source Image即可设置背景,在Text组件设置字体
4.为啥自己添加背景Canvas效果不好?
答:将背景Canvas设置改为下图,主Canvas不变

5.为啥自己按上面的结构设置时,有的按钮无法被点击到?
答:一个Canvas里添加多个Panel时,注意不要让Panel互相遮挡,点击Panel设置大小即可
最后,如若项目有任何问题,欢迎批评指正或讨论。


 被折叠的 条评论
为什么被折叠?
被折叠的 条评论
为什么被折叠?
 到【灌水乐园】发言


