


【Kafka-3.x-教程】专栏:
【Kafka-3.x-教程】-【一】Kafka 概述、Kafka 快速入门
【Kafka-3.x-教程】-【二】Kafka-生产者-Producer
【Kafka-3.x-教程】-【三】Kafka-Broker、Kafka-Kraft
【Kafka-3.x-教程】-【四】Kafka-消费者-Consumer
【Kafka-3.x-教程】-【五】Kafka-监控-Eagle
【Kafka-3.x-教程】-【六】Kafka 外部系统集成 【Flume、Flink、SpringBoot、Spark】
【Kafka-3.x-教程】-【七】Kafka 生产调优、Kafka 压力测试
【Kafka-3.x-教程】-【三】Kafka-Broker、Kafka-Kraft
1)Kafka Broker 工作流程
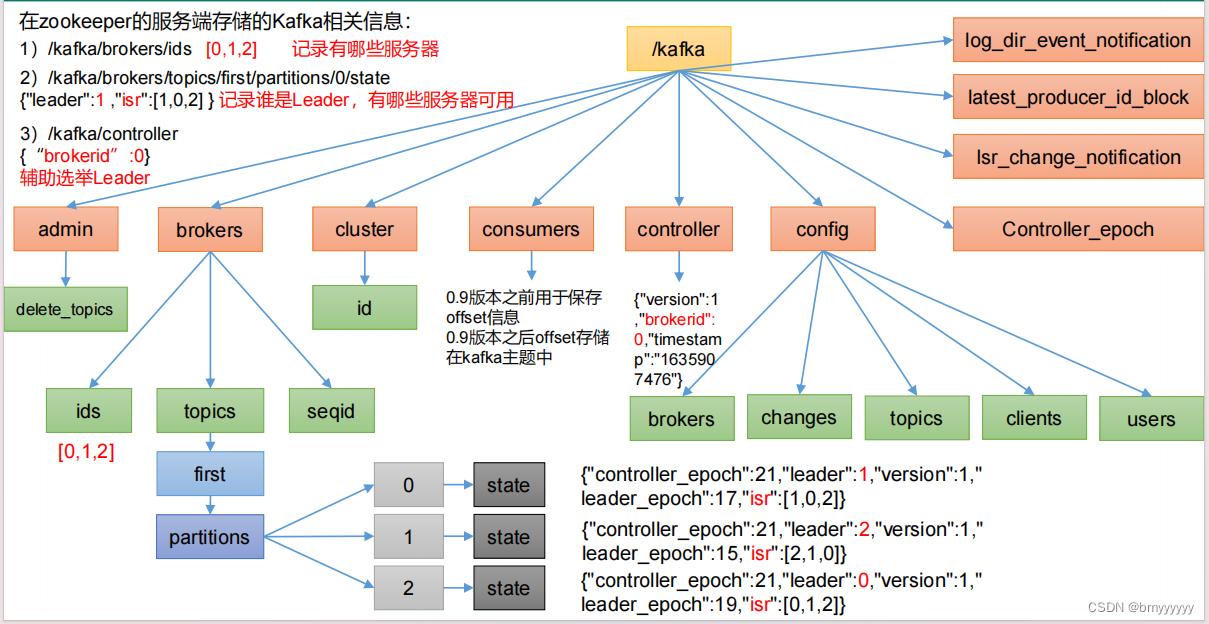
1.1.Zookeeper 存储的 Kafka 信息
Kafka 2.8 版本以后,Kafka-Kraft 模式出现,不再依赖 ZK,由 controller 节点代替 zookeeper,元数据保存在 controller 中,由 controller 直接进行 Kafka 集群管理。点击此处查看 Kafka-Kraft 模式。
1.2.Kafka Broker 总体工作流程
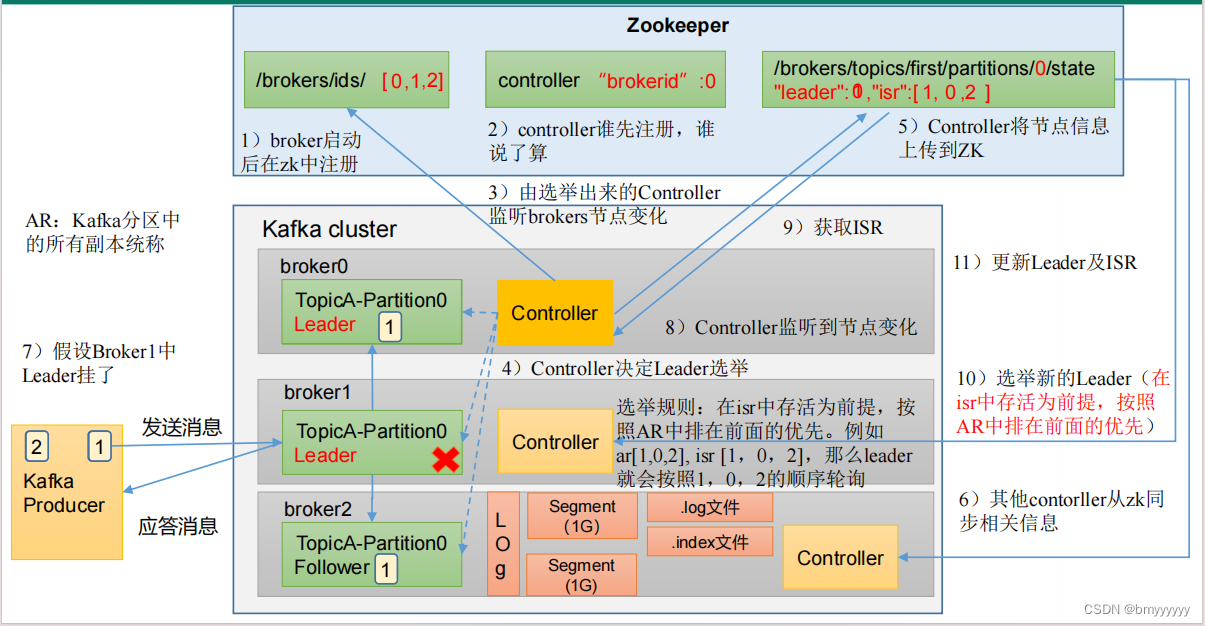
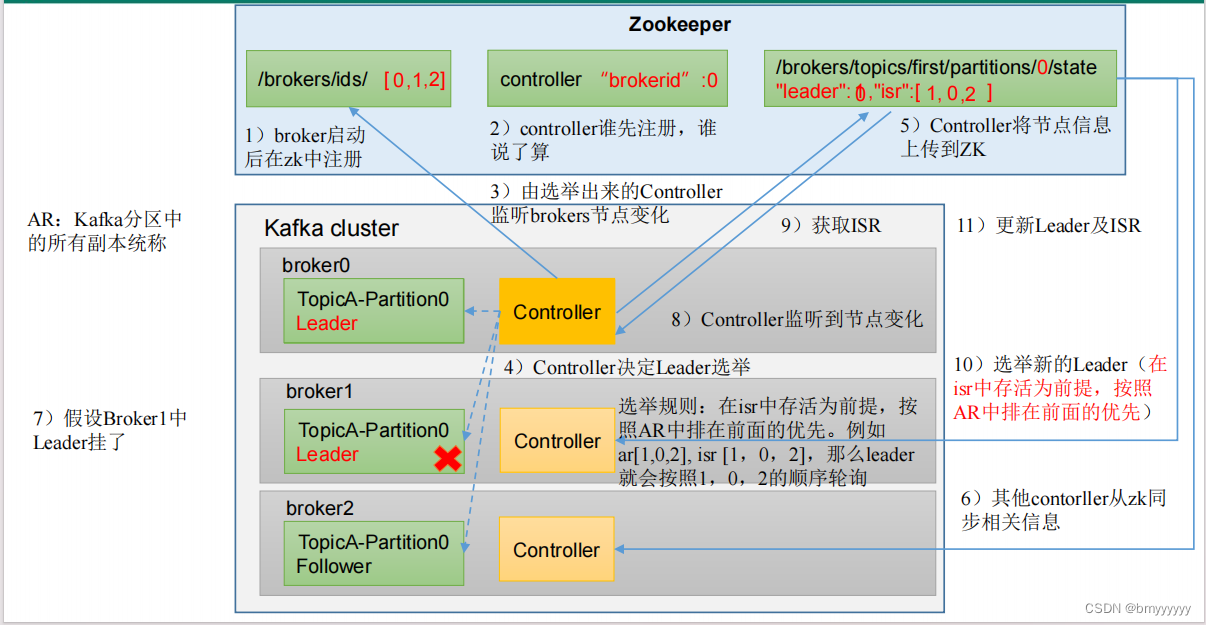
1、Broker 启动后向 ZK 进行注册,ZK 记录好存活的 Broker。
2、每个 Broker 中都有 Controller,谁的 Controller 先注册谁就是 Controller Leader。
3、Controller Leader 上线后监听已经注册的 Broker 节点的变化。
4、Controller 开始选举 Leader
(1)选举规则:在 ISR 中存活着的节点,按照 AR 中排在前面的优先,Leader 也会按照 AR 中的排列顺序进行轮询。
(2)AR:Kafka 分区中所有副本的统称。
5、Controller 将节点信息(Leader、ISR)记录在 ZK 中。
6、其他 Controller 节点从 ZK 中拉取记录好的数据(防止 Leader 挂了后其他节点上位获取相关数据)。
7、Producer 发送消息后 Follower 主动从 Leader 同步数据。
(1)底层以 log 的方式进行存储,但是 log 实际上是抽象的称呼,实际上是以 segment (1G)进行存储。
(2)segment 中包含 .log 和 .index 文件,.log 就是数据,.index 负责加快检索速度。
8、如果 Leader 挂了,Controller 会监听到这个变化,从而在 ZK 中重新拉取到 Leader 信息和 ISR 信息。
9、重新选举,原则还是按照 AR 中排在前面的优先。
10、将新的 Leader 和 ISR 信息更新回 ZK 中。
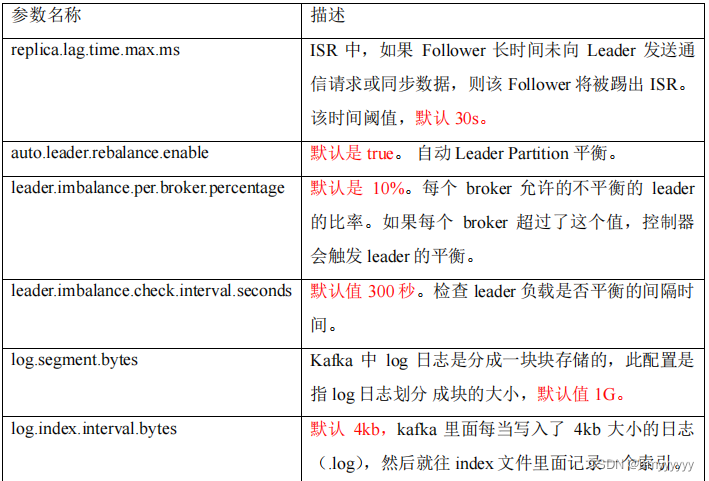
1.3.Broker 重要参数
2)节点服役和退役
实际生产中,会出现 kafka 节点的服役和退役,那么我们该如何进行负载均衡操作呢?
2.1.服役新节点
1、创建一个要均衡的主题。
vim topics-to-move.json

#添加下面内容
{
 "topics": [
 {"topic": "first"}
 ],
 "version": 1
}
2、生成一个负载均衡的计划。
bin/kafka-reassign-partitions.sh --bootstrap-server hadoop102:9092 --topics-to-move-json-file topics-to-move.json --broker-list "0,1,2,3" --generate

#Current partition replica assignment
#{"version":1,"partitions":[{"topic":"first","partition":0,"replicas":[0,2,1],"log_dirs":["any","any","any"]},{"topic":"first","partition":1,"replicas":[2,1,0],"log_dirs":["any","any","any"]},{"topic":"first","partition":2,"replicas":[1,0,2],"log_dirs":["any","any","any"]}]}

#Proposed partition reassignment configuration
#{"version":1,"partitions":[{"topic":"first","partition":0,"replicas":[2,3,0],"log_dirs":["any","any","any"]},{"topic":"first","partition":1,"replicas":[3,0,1],"log_dirs":["any","any","any"]},{"topic":"first","partition":2,"replicas":[0,1,2],"log_dirs":["any","any","any"]}]}
3、创建副本存储计划(所有副本存储在 broker0、broker1、broker2、broker3 中)。
vim increase-replication-factor.json

#输入如下内容:
{"version":1,"partitions":[{"topic":"first","partition":0,"replicas":[2,3,0],"log_dirs":["any","any","any"]},{"topic":"first","partition":1,"replicas":[3,0,1],"log_dirs":["any","any","any"]},{"topic":"first","partition":2,"replicas":[0,1,2],"log_dirs":["any","any","any"]}]}
4、执行副本存储计划。
bin/kafka-reassign-partitions.sh --bootstrap-server hadoop102:9092 --reassignment-json-file increase-replication-factor.json --execute
5、验证副本存储计划。
bin/kafka-reassign-partitions.sh --bootstrap-server hadoop102:9092 --reassignment-json-file increase-replication-factor.json --verify

#Status of partition reassignment:
#Reassignment of partition first-0 is complete.
#Reassignment of partition first-1 is complete.
#Reassignment of partition first-2 is complete.
#Clearing broker-level throttles on brokers 0,1,2,3
#Clearing topic-level throttles on topic first
2.2.退役旧节点
1、执行负载均衡操作
先按照退役一台节点,生成执行计划,然后按照服役时操作流程执行负载均衡。
(1)创建一个要均衡的主题。
vim topics-to-move.json
{
 "topics": [
 {"topic": "first"}
 ],
 "version": 1
}
2、创建执行计划。
bin/kafka-reassign-partitions.sh --bootstrap-server hadoop102:9092 --topics-to-move-json-file topics-to-move.json --broker-list "0,1,2" --generate

#Current partition replica assignment
#{"version":1,"partitions":[{"topic":"first","partition":0,"replicas":[2,0,1],"log_dirs":["any","any","any"]},{"topic":"first","partition":1,"replicas":[3,1,2],"log_dirs":["any","any","any"]},{"topic":"first","partition":2,"replicas":[0,2,3],"log_dirs":["any","any","any"]}]}

#Proposed partition reassignment configuration
#{"version":1,"partitions":[{"topic":"first","partition":0,"replicas":[2,0,1],"log_dirs":["any","any","any"]},{"topic":"first","partition":1,"replicas":[0,1,2],"log_dirs":["any","any","any"]},{"topic":"first","partition":2,"replicas":[1,2,0],"log_dirs":["any","any","any"]}]}
3、创建副本存储计划(所有副本存储在 broker0、broker1、broker2 中)。
vim increase-replication-factor.json

#添加如下内容
{"version":1,"partitions":[{"topic":"first","partition":0,"replicas":[2,0,1],"log_dirs":["any","any","any"]},{"topic":"first","partition":1,"replicas":[0,1,2],"log_dirs":["any","any","any"]},{"topic":"first","partition":2,"replicas":[1,2,0],"log_dirs":["any","any","any"]}]}
4、执行副本存储计划。
bin/kafka-reassign-partitions.sh --bootstrap-server hadoop102:9092 --reassignment-json-file increase-replication-factor.json --execute
5、验证副本存储计划。
bin/kafka-reassign-partitions.sh --bootstrap-server hadoop102:9092 --reassignment-json-file increase-replication-factor.json --verify

#Status of partition reassignment:
#Reassignment of partition first-0 is complete.
#Reassignment of partition first-1 is complete.
#Reassignment of partition first-2 is complete.
#Clearing broker-level throttles on brokers 0,1,2,3
#Clearing topic-level throttles on topic first
6、执行停止命令
bin/kafka-server-stop.sh
3) Kafka 副本
3.1.副本基本信息
1、Kafka 副本作用:提高数据可靠性。
2、Kafka 默认副本 1 个,生产环境一般配置为 2 个,保证数据可靠性;太多副本会增加磁盘存储空间,增加网络上数据传输,降低效率。
3、Kafka 中副本分为:Leader 和 Follower。Kafka 生产者只会把数据发往 Leader,然后 Follower 找 Leader 进行同步数据。
4、Kafka 分区中的所有副本统称为 AR(Assigned Repllicas)。
AR = ISR + OSR
ISR,表示和 Leader 保持同步的 Follower 集合。如果 Follower 长时间未向 Leader 发送通信请求或同步数据,则该 Follower 将被踢出 ISR。该时间阈值由 replica.lag.time.max.ms 参数设定,默认 30s。Leader 发生故障之后,就会从 ISR 中选举新的 Leader。
OSR,表示 Follower 与 Leader 副本同步时,延迟过多的副本。
3.2.Leader 选举流程
Kafka 集群中有一个 broker 的 Controller 会被选举为 Controller Leader,负责管理集群
broker 的上下线,所有 topic 的分区副本分配和 Leader 选举等工作。
Controller 的信息同步工作是依赖于 Zookeeper 的。
1、创建一个新的 topic,4 个分区,4 个副本。
bin/kafka-topics.sh --bootstrap-server hadoop102:9092 --create --topic atguigu1 --partitions 4 --replication-factor 4
#Created topic atguigu1.
2、查看 Leader 分布情况。
bin/kafka-topics.sh --bootstrap-server hadoop102:9092 --describe --topic atguigu1

#Topic: atguigu1 TopicId: awpgX_7WR-OX3Vl6HE8sVg PartitionCount: 4 ReplicationFactor: 4
#Configs: segment.bytes=1073741824
#Topic: atguigu1 Partition: 0 Leader: 3 Replicas: 3,0,2,1 Isr: 3,0,2,1
#Topic: atguigu1 Partition: 1 Leader: 1 Replicas: 1,2,3,0 Isr: 1,2,3,0
#Topic: atguigu1 Partition: 2 Leader: 0 Replicas: 0,3,1,2 Isr: 0,3,1,2
#Topic: atguigu1 Partition: 3 Leader: 2 Replicas: 2,1,0,3 Isr: 2,1,0,3
3、停止掉 hadoop105 的 kafka 进程,并查看 Leader 分区情况。
bin/kafka-server-stop.sh
bin/kafka-topics.sh --bootstrap-server hadoop102:9092 --describe --topic atguigu1

#Topic: atguigu1 TopicId: awpgX_7WR-OX3Vl6HE8sVg PartitionCount: 4 ReplicationFactor: 4
#Configs: segment.bytes=1073741824
#Topic: atguigu1 Partition: 0 Leader: 0 Replicas: 3,0,2,1 Isr: 0,2,1
#Topic: atguigu1 Partition: 1 Leader: 1 Replicas: 1,2,3,0 Isr: 1,2,0
#Topic: atguigu1 Partition: 2 Leader: 0 Replicas: 0,3,1,2 Isr: 0,1,2
#Topic: atguigu1 Partition: 3 Leader: 2 Replicas: 2,1,0,3 Isr: 2,1,0
4、停止掉 hadoop104 的 kafka 进程,并查看 Leader 分区情况。
bin/kafka-server-stop.sh
bin/kafka-topics.sh --bootstrap-server hadoop102:9092 --describe --topic atguigu1

#Topic: atguigu1 TopicId: awpgX_7WR-OX3Vl6HE8sVg PartitionCount: 4 ReplicationFactor: 4
#Configs: segment.bytes=1073741824
#Topic: atguigu1 Partition: 0 Leader: 0 Replicas: 3,0,2,1 Isr: 0,1
#Topic: atguigu1 Partition: 1 Leader: 1 Replicas: 1,2,3,0 Isr: 1,0
#Topic: atguigu1 Partition: 2 Leader: 0 Replicas: 0,3,1,2 Isr: 0,1
#Topic: atguigu1 Partition: 3 Leader: 1 Replicas: 2,1,0,3 Isr: 1,0
5、启动 hadoop105 的 kafka 进程,并查看 Leader 分区情况。
bin/kafka-server-start.sh -daemon config/server.properties
bin/kafka-topics.sh --bootstrap-server hadoop102:9092 --describe --topic atguigu1

#Topic: atguigu1 TopicId: awpgX_7WR-OX3Vl6HE8sVg PartitionCount: 4 ReplicationFactor: 4
#Configs: segment.bytes=1073741824
#Topic: atguigu1 Partition: 0 Leader: 0 Replicas: 3,0,2,1 Isr: 0,1,3
#Topic: atguigu1 Partition: 1 Leader: 1 Replicas: 1,2,3,0 Isr: 1,0,3
Topic: atguigu1 Partition: 2 Leader: 0 Replicas: 0,3,1,2 Isr: 0,1,3
#Topic: atguigu1 Partition: 3 Leader: 1 Replicas: 2,1,0,3 Isr: 1,0,3
6、启动 hadoop104 的 kafka 进程,并查看 Leader 分区情况。
bin/kafka-server-start.sh -daemon config/server.properties
bin/kafka-topics.sh --bootstrap-server hadoop102:9092 --describe --topic atguigu1

#Topic: atguigu1 TopicId: awpgX_7WR-OX3Vl6HE8sVg PartitionCount: 4 ReplicationFactor: 4
#Configs: segment.bytes=1073741824
#Topic: atguigu1 Partition: 0 Leader: 0 Replicas: 3,0,2,1 Isr: 0,1,3,2
#Topic: atguigu1 Partition: 1 Leader: 1 Replicas: 1,2,3,0 Isr: 1,0,3,2
#Topic: atguigu1 Partition: 2 Leader: 0 Replicas: 0,3,1,2 Isr: 0,1,3,2
#Topic: atguigu1 Partition: 3 Leader: 1 Replicas: 2,1,0,3 Isr: 1,0,3,2
7、停止掉 hadoop103 的 kafka 进程,并查看 Leader 分区情况。
bin/kafka-server-stop.sh
bin/kafka-topics.sh --bootstrap-server hadoop102:9092 --describe --topic atguigu1

#Topic: atguigu1 TopicId: awpgX_7WR-OX3Vl6HE8sVg PartitionCount: 4 ReplicationFactor: 4
#Configs: segment.bytes=1073741824
#Topic: atguigu1 Partition: 0 Leader: 0 Replicas: 3,0,2,1 Isr: 0,3,2
#Topic: atguigu1 Partition: 1 Leader: 2 Replicas: 1,2,3,0 Isr: 0,3,2
#Topic: atguigu1 Partition: 2 Leader: 0 Replicas: 0,3,1,2 Isr: 0,3,2
#Topic: atguigu1 Partition: 3 Leader: 2 Replicas: 2,1,0,3 Isr: 0,3,2
3.3.Leader 和 Follower 故障处理细节
首先了解两个概念
LEO(Log End Offset):每个副本的最后一个offset,LEO其实就是最新的offset + 1
HW(High Watermark):所有副本中最小的LEO
1、Follower 故障
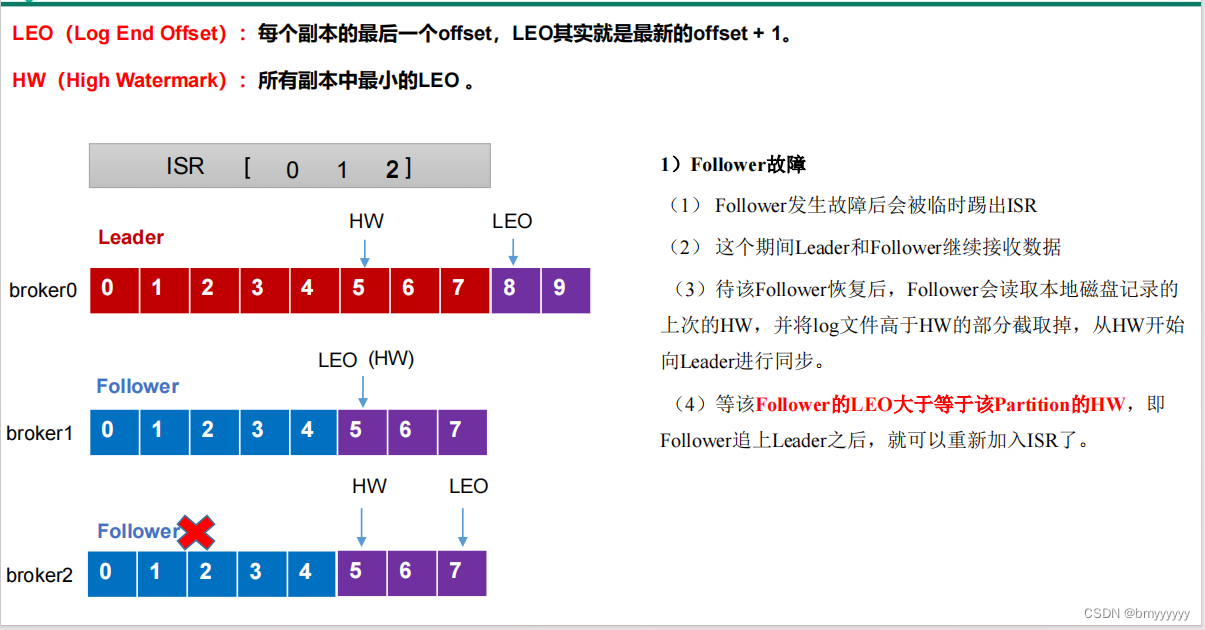
(1)发生故障的 Follower 被踢出 ISR。
(2)这期间 Leader 和剩下正常工作的 Follower 会继续接收数据。
(3)发生故障的 Follower 恢复正常后,会读取本地磁盘记录的上次的 HW,并将 log 文件高于 HW 的部分截取掉,从 HW 开始向 Leader 进行同步。
(4)等到该 Follower 的 LEO 大于等于该 Partition 的 HW(即 Follower 追上 Leader 后),就可以重新假如 ISR 了。
2、Leader 故障
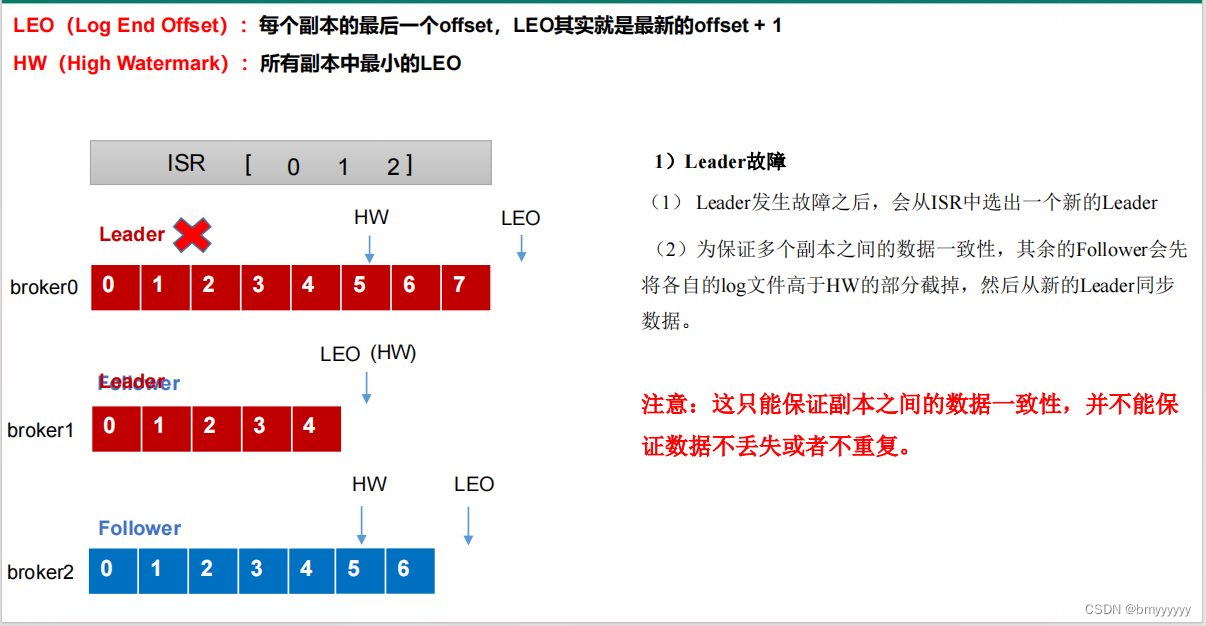
(1)发生故障的 Leader 被踢出 ISR。
(2)从 ISR 中选出一个新的 Leader。
(3)为了保证副本之间数据的一致性,其余 Follower 会先将各自的 log 文件高于 HW 的部分截取掉(保持和新选举的 Leader 一致),然后从新的 Leader 同步数据。
注意:只能保证副本之间数据的一致性,并不能保证数据不丢失或者不重复。
3.4.分区副本分配
如果 kafka 服务器只有 4 个节点,那么设置 kafka 的分区数大于服务器台数,在 kafka 底层如何分配存储副本呢?
1、创建 16 分区,3 个副本的 topic,名称为 second。
bin/kafka-topics.sh --bootstrap-server hadoop102:9092 --create --partitions 16 --replication-factor 3 --topic second
2、查看分区和副本情况。
bin/kafka-topics.sh --bootstrap-server hadoop102:9092 --describe --topic second

#Topic: second4 Partition: 0 Leader: 0 Replicas: 0,1,2 Isr: 0,1,2
#Topic: second4 Partition: 1 Leader: 1 Replicas: 1,2,3 Isr: 1,2,3
#Topic: second4 Partition: 2 Leader: 2 Replicas: 2,3,0 Isr: 2,3,0
#Topic: second4 Partition: 3 Leader: 3 Replicas: 3,0,1 Isr: 3,0,1
#Topic: second4 Partition: 4 Leader: 0 Replicas: 0,2,3 Isr: 0,2,3
#Topic: second4 Partition: 5 Leader: 1 Replicas: 1,3,0 Isr: 1,3,0
#Topic: second4 Partition: 6 Leader: 2 Replicas: 2,0,1 Isr: 2,0,1
#Topic: second4 Partition: 7 Leader: 3 Replicas: 3,1,2 Isr: 3,1,2
#Topic: second4 Partition: 8 Leader: 0 Replicas: 0,3,1 Isr: 0,3,1
#Topic: second4 Partition: 9 Leader: 1 Replicas: 1,0,2 Isr: 1,0,2
#Topic: second4 Partition: 10 Leader: 2 Replicas: 2,1,3 Isr: 2,1,3
#Topic: second4 Partition: 11 Leader: 3 Replicas: 3,2,0 Isr: 3,2,0
#Topic: second4 Partition: 12 Leader: 0 Replicas: 0,1,2 Isr: 0,1,2
#Topic: second4 Partition: 13 Leader: 1 Replicas: 1,2,3 Isr: 1,2,3
#Topic: second4 Partition: 14 Leader: 2 Replicas: 2,3,0 Isr: 2,3,0
#Topic: second4 Partition: 15 Leader: 3 Replicas: 3,0,1 Isr: 3,0,1
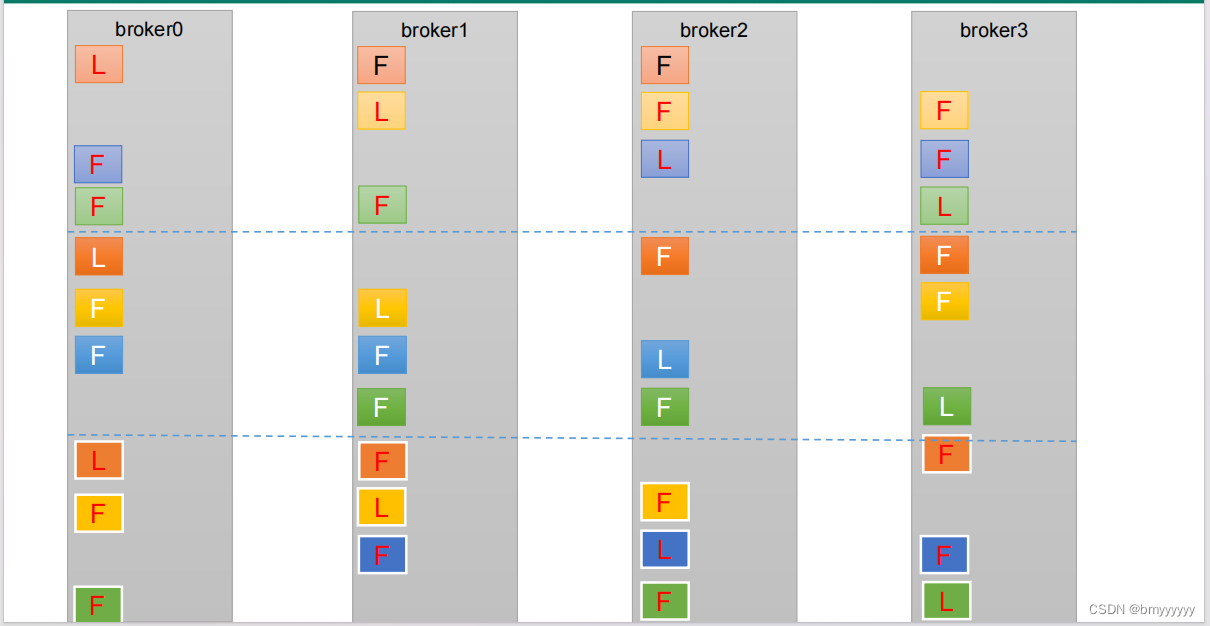
总结:
① 尽可能让副本均匀分布 - 负载均衡。
② 防止数据丢失。
3.5.手动调整分区副本存储
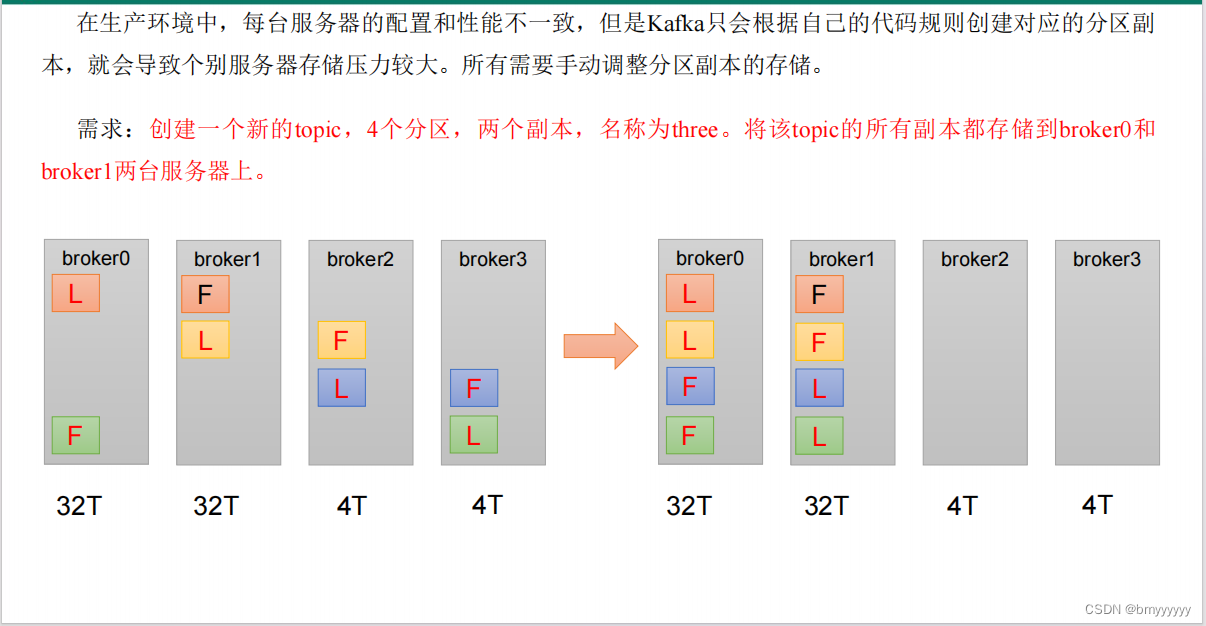
手动调整分区副本存储的步骤如下:
1、创建一个新的 topic,名称为 three。
bin/kafka-topics.sh --bootstrap-server hadoop102:9092 --create --partitions 4 --replication-factor 2 --topic three
2、查看分区副本存储情况。
bin/kafka-topics.sh --bootstrap-server hadoop102:9092 --describe --topic three
3、创建副本存储计划(所有副本都指定存储在 broker0、broker1 中)。
vim increase-replication-factor.json

#输入如下内容:
{
"version":1,
"partitions":[{"topic":"three","partition":0,"replicas":[0,1]},
{"topic":"three","partition":1,"replicas":[0,1]},
{"topic":"three","partition":2,"replicas":[1,0]},
{"topic":"three","partition":3,"replicas":[1,0]}]
}
4、执行副本存储计划。
bin/kafka-reassign-partitions.sh --bootstrap-server hadoop102:9092 --reassignment-json-file increase-replication-factor.json --execute
5、验证副本存储计划。
bin/kafka-reassign-partitions.sh --bootstrap-server hadoop102:9092 --reassignment-json-file increase-replication-factor.json --verify
6、查看分区副本存储情况。
bin/kafka-topics.sh --bootstrap-server hadoop102:9092 --describe --topic three
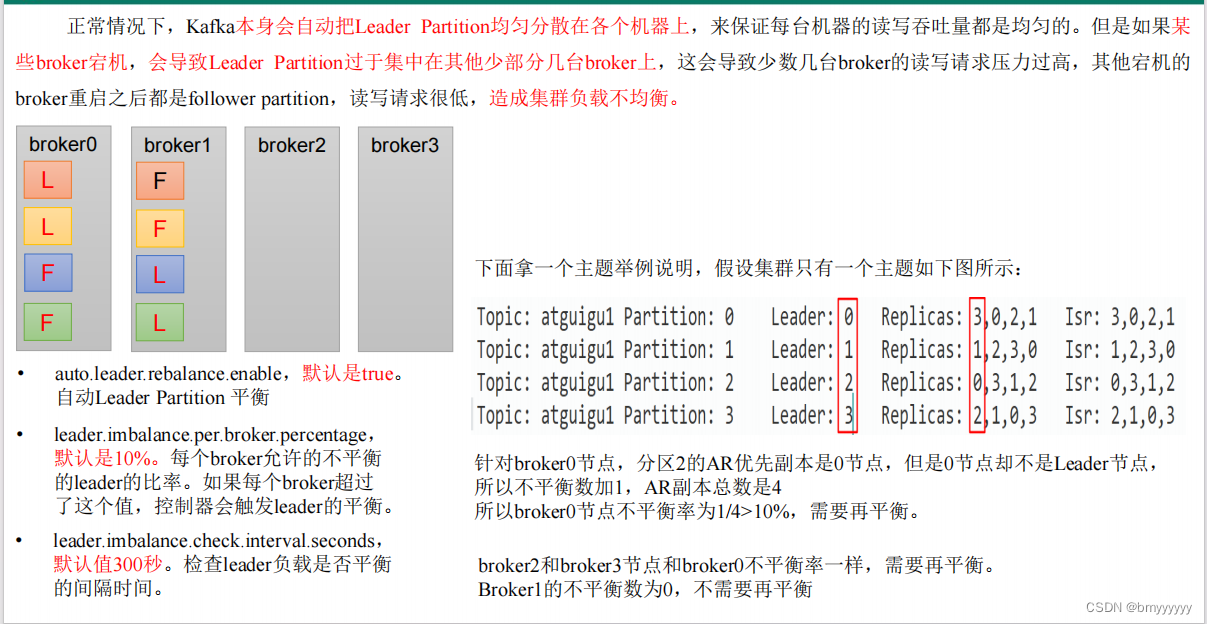
3.6.Leader Partition 负载平衡

3.7.增加副本因子
在生产环境当中,由于某个主题的重要等级需要提升,我们考虑增加副本。副本数的增加需要先制定计划,然后根据计划执行。
1、创建 topic
bin/kafka-topics.sh --bootstrap-server hadoop102:9092 --create --partitions 3 --replication-factor 1 --topic four
2、手动增加副本存储
(1)创建副本存储计划(所有副本都指定存储在 broker0、broker1、broker2 中)。
vim increase-replication-factor.json

#输入如下内容:
{"version":1,"partitions":[{"topic":"four","partition":0,"replicas":[0,1,2]},{"topic":"four","partition":1,"replicas":[0,1,2]},{"topic":"four","partition":2,"replicas":[0,1,2]}]}
(2)执行副本存储计划。
bin/kafka-reassign-partitions.sh --bootstrap-server hadoop102:9092 --reassignment-json-file increase-replication-factor.json --execute
4)文件存储
4.1.Topic 数据存储机制

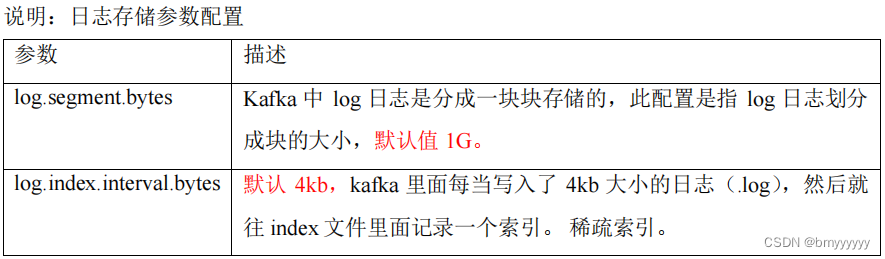
1、一个 topic 分为多个 partition,一个 partition 分为多个 segment,数据以 segment 形式进行存储(分文件存储,大小为 1G)。
2、一个 segment 分为:.log(数据)、.index(为了快速定位数据位置的索引)、.timeindex(自动删除策略时的时间基准)、其他文件。
3、index 和 log 文件以当前 segment 的第一条消息的 offset 命名(命名规则:topic 名称 + 分区序号)。
4、Producer 的数据会不断追加到 segment 后(写入速度较快)。
4.2.Topic 数据存储位置
1、启动生产者,并发送消息。
bin/kafka-console-producer.sh --bootstrap-server hadoop102:9092 --topic first
>hello world
2、查看 hadoop102(或者 hadoop103、hadoop104)的/opt/module/kafka/datas/first-1(first-0、first-2)路径上的文件。
ls

#00000000000000000092.index
#00000000000000000092.log
#00000000000000000092.snapshot
#00000000000000000092.timeindex
#leader-epoch-checkpoint
#partition.metadata
3、直接查看 log 日志,发现是乱码。
cat 00000000000000000092.log

#\CYnF|©|©ÿÿÿÿÿÿÿÿÿÿÿÿÿÿ"hello world
4、通过工具查看 index 和 log 信息。
kafka-run-class.sh kafka.tools.DumpLogSegments --files ./00000000000000000000.index

#Dumping ./00000000000000000000.index
#offset: 3 position: 152
kafka-run-class.sh kafka.tools.DumpLogSegments --files ./00000000000000000000.log

#输出如下内容:
Dumping datas/first-0/00000000000000000000.log
Starting offset: 0
baseOffset: 0 lastOffset: 1 count: 2 baseSequence: -1 lastSequence: -1 producerId: -1
producerEpoch: -1 partitionLeaderEpoch: 0 isTransactional: false isControl: false position:
0 CreateTime: 1636338440962 size: 75 magic: 2 compresscodec: none crc: 2745337109 isvalid:
true
baseOffset: 2 lastOffset: 2 count: 1 baseSequence: -1 lastSequence: -1 producerId: -1
producerEpoch: -1 partitionLeaderEpoch: 0 isTransactional: false isControl: false position:
75 CreateTime: 1636351749089 size: 77 magic: 2 compresscodec: none crc: 273943004 isvalid:
true
baseOffset: 3 lastOffset: 3 count: 1 baseSequence: -1 lastSequence: -1 producerId: -1
producerEpoch: -1 partitionLeaderEpoch: 0 isTransactional: false isControl: false position:
152 CreateTime: 1636351749119 size: 77 magic: 2 compresscodec: none crc: 106207379 isvalid:
true
baseOffset: 4 lastOffset: 8 count: 5 baseSequence: -1 lastSequence: -1 producerId: -1
producerEpoch: -1 partitionLeaderEpoch: 0 isTransactional: false isControl: false position:
229 CreateTime: 1636353061435 size: 141 magic: 2 compresscodec: none crc: 157376877 isvalid:
true
baseOffset: 9 lastOffset: 13 count: 5 baseSequence: -1 lastSequence: -1 producerId: -1
producerEpoch: -1 partitionLeaderEpoch: 0 isTransactional: false isControl: false position:
370 CreateTime: 1636353204051 size: 146 magic: 2 compresscodec: none crc: 4058582827 isvalid:
true
4.3.index 文件和 log 文件详解

1、Kafka 并不会将每条数据都创建索引,Kafka 的 index 为稀疏索引,大约每往 segment 中写入 4kb 数据,会往 index 文件写入一条索引(写入的索引为此 segment 上的相对 offset),参数:log.index.interval.bytes。
2、如果此时想在文件中找到 offset = 600 的数据,那么会按照 index 区间进行查找(类似于二分查找法)。
3、找到相对 offset 对应的 position(起始位置)后继续向下检索,直到定位到这条数据的具体位置。
注意:每个 segment 中的 offset 为相对 offset,这样能确保 offset 值所占用的空间不会过大。
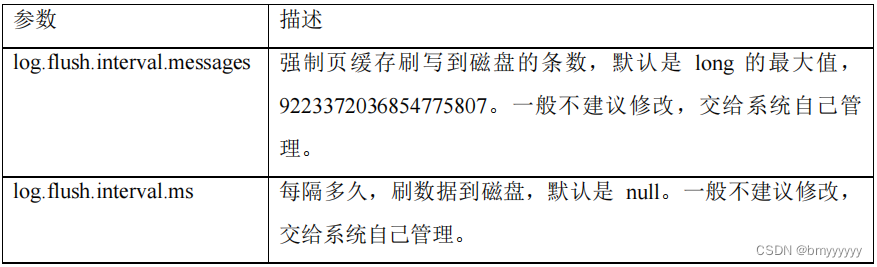
5)文件清理策略
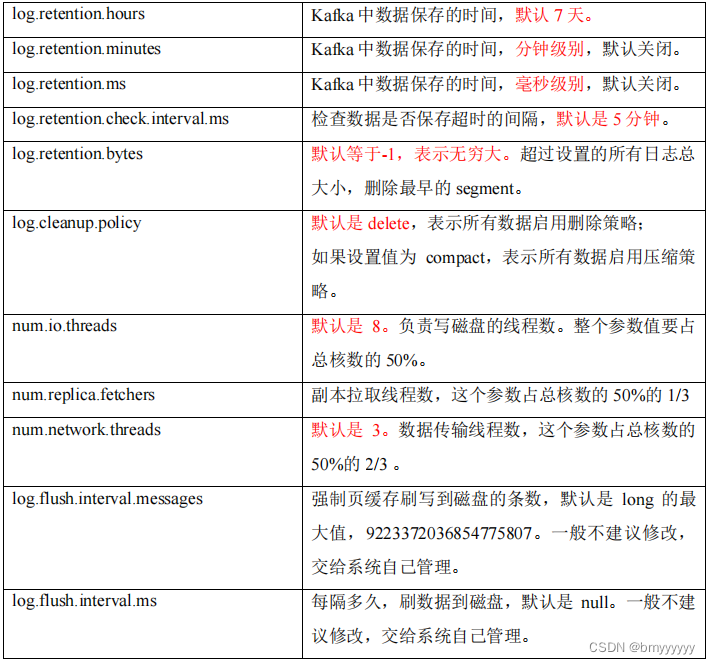
Kafka 中默认的日志保存时间为 7 天,可以通过调整如下参数修改保存时间。
-
log.retention.hours,最低优先级小时,默认 7 天。
-
log.retention.minutes,分钟。
-
log.retention.ms,最高优先级毫秒。
-
log.retention.check.interval.ms,负责设置检查周期,默认 5 分钟。
那么日志一旦超过了设置的时间,怎么处理呢?
Kafka 中提供的日志清理策略有 delete 和 compact 两种。
1、delete 日志删除:将过期数据删除
- log.cleanup.policy = delete 所有数据启用删除策略
(1)基于时间:默认打开。以 segment 中所有记录中的最大时间戳作为该文件时间戳。
(2)基于大小:默认关闭。超过设置的所有日志总大小,删除最早的 segment(最好不要开启)。
- log.retention.bytes,默认等于-1,表示无穷大。
【思考】:如果一个 segment 中有一部分数据过期,一部分没有过期,怎么处理?
【答】:以 segment 中所有记录中的最大时间戳作为该文件时间戳进行删除。
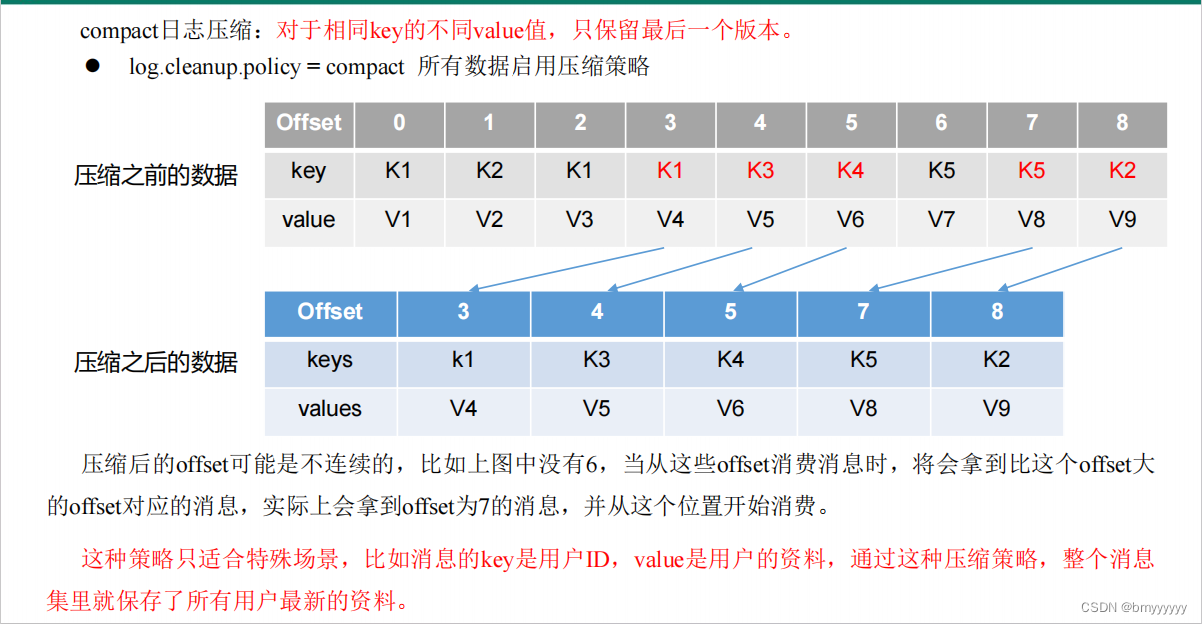
2、compact 日志压缩
(1)compact日志压缩:对于相同key的不同value值,只保留最后一个版本。
- log.cleanup.policy = compact 所有数据启用压缩策略
(2)压缩后的 offset 可能是不连续的,比如上图中没有 6,当从这些 offset 消费消息时,将会拿到比这个 offset 大的 offset 对应的消息,实际上会拿到 offset 为 7 的消息,并从这个位置开始消费。
注意:这种策略只适合特殊场景,比如消息的 key 是用户 ID,value 是用户的资料,通过这种压缩策略,整个消息集里就保存了所有用户最新的资料(数据更新或覆盖,一般用的比较少)。
6)高效读写数据
1、Kafka 本身是分布式集群,可以采用分区技术,并行度高。
2、读数据采用稀疏索引,可以快速定位要消费的数据。
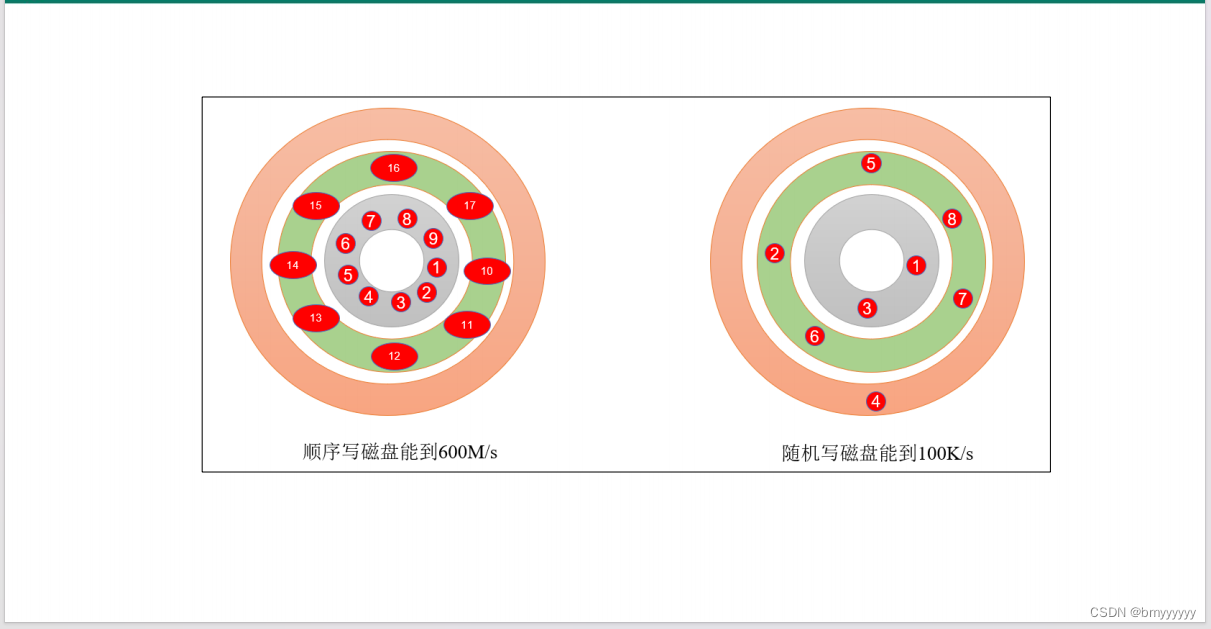
3、顺序写磁盘。
Kafka 的 producer 生产数据,要写入到 log 文件中,写的过程是一直追加到文件末端,为顺序写。官网有数据表明,同样的磁盘,顺序写能到 600M/s,而随机写只有 100K/s。这与磁盘的机械机构有关,顺序写之所以快,是因为其省去了大量磁头寻址的时间。
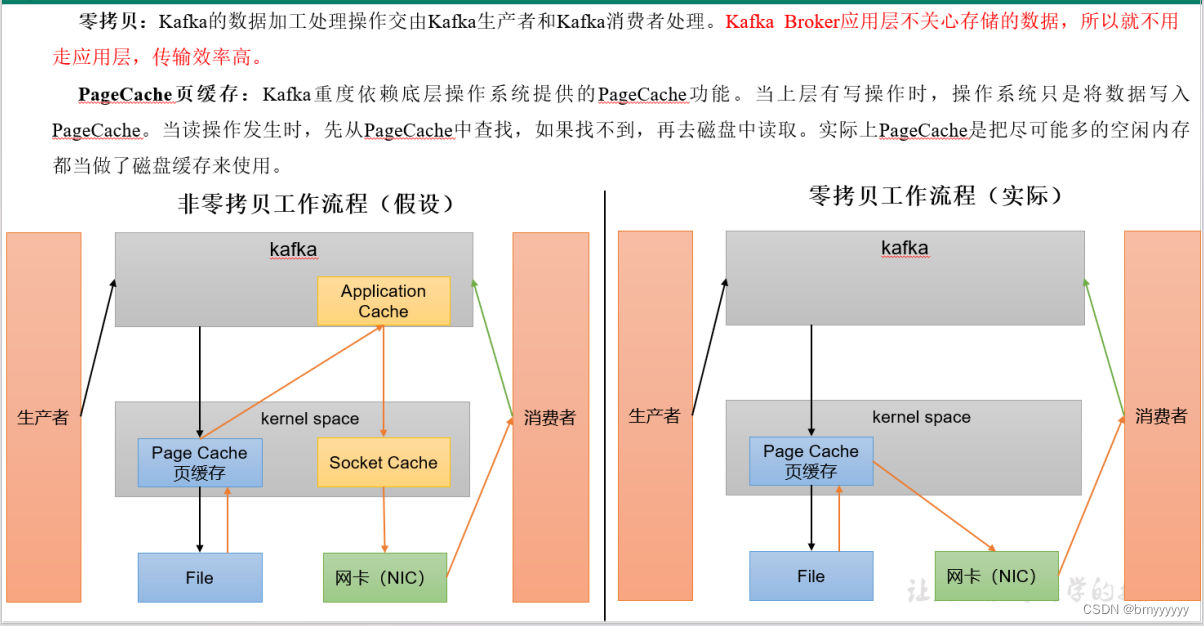
4、页缓存 + 零拷贝技术
(1)非零拷贝工作流程:
① Producer 发送数据到 Kafka 集群,直接将数据发送给 Linux 系统内核。
② 内核是用来操作系统硬件的,数据过来后不会直接进行落盘,数据会存放于内核中的页缓存中,至于什么时候落盘,取决于 Linux 内核做决定。
③ 消费者消费数据先访问 Kafka 应用层,然后访问页缓存,接着访问网卡,最后传输到 Consumer。
总结:Kafka 重度依赖 Linux 系统内核,当写数据时直接写入页缓存中,当读数据时先到页缓存中读取,如果找不到再从磁盘中获取。
(2)零拷贝工作流程(Kafka 所用):
① Producer 发送数据到 Kafka 集群,直接将数据发送给 Linux 系统内核。
② 内核是用来操作系统硬件的,数据过来后不会直接进行落盘,数据会存放于内核中的页缓存中,至于什么时候落盘,取决于 Linux 内核做决定。
③ 消费者直接访问网卡将数据传输到 Consumer,并不会走 Kafka 应用层。
总结:Kafka Broker 应用层不关心对存储的数据的修改,只需要把数据获取到,下放到页缓存中即可,所有对数据操作的地方都放在了 Producer 和 Consumer 的拦截器中。
7)Kafka-Kraft 模式
7.1.Kafka-Kraft 架构
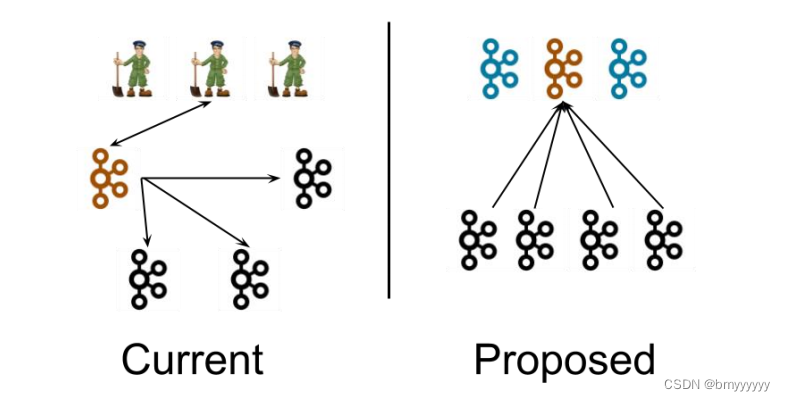
左图为 Kafka 现有架构,元数据在 zookeeper 中,运行时动态选举 controller,由controller 进行 Kafka 集群管理。右图为 kraft 模式架构(实验性),不再依赖 zookeeper 集群,而是用三台 controller 节点代替 zookeeper,元数据保存在 controller 中,由 controller 直接进行 Kafka 集群管理。
这样做的好处有以下几个:
- Kafka 不再依赖外部框架,而是能够独立运行;
- controller 管理集群时,不再需要从 zookeeper 中先读取数据,集群性能上升;
- 由于不依赖 zookeeper,集群扩展时不再受到 zookeeper 读写能力限制;
- controller 不再动态选举,而是由配置文件规定。这样我们可以有针对性的加强 controller 节点的配置,而不是像以前一样对随机 controller 节点的高负载束手无策。
7.2.Kafka-Kraft 集群部署
1、再次解压一份 kafka 安装包
tar -zxvf kafka_2.12-3.0.0.tgz -C /opt/module/
2、重命名为 kafka2
mv kafka_2.12-3.0.0/ kafka2
3、在 hadoop102 上修改 /opt/module/kafka2/config/kraft/server.properties 配置文件
vim server.properties
#kafka 的角色(controller 相当于主机、broker 节点相当于从机,主机类似 zk 功
能)
process.roles=broker, controller
#节点 ID
node.id=2
#controller 服务协议别名
controller.listener.names=CONTROLLER
#全 Controller 列表
controller.quorum.voters=2@hadoop102:9093,3@hadoop103:9093,4@hado
op104:9093
#不同服务器绑定的端口
listeners=PLAINTEXT://:9092,CONTROLLER://:9093
#broker 服务协议别名
inter.broker.listener.name=PLAINTEXT
#broker 对外暴露的地址
advertised.Listeners=PLAINTEXT://hadoop102:9092
#协议别名到安全协议的映射
listener.security.protocol.map=CONTROLLER:PLAINTEXT,PLAINTEXT:PLA
INTEXT,SSL:SSL,SASL_PLAINTEXT:SASL_PLAINTEXT,SASL_SSL:SASL_SSL
#kafka 数据存储目录
log.dirs=/opt/module/kafka2/data
4、分发 kafka2
xsync kafka2/
- 在 hadoop103 和 hadoop104 上 需 要 对 node.id 相应改变,值需要和 controller.quorum.voters 对应。
- 在 hadoop103 和 hadoop104 上需要根据各自的主机名称,修改相应的 advertised.Listeners 地址。
5、初始化集群数据目录
(1)首先生成存储目录唯一 ID。
bin/kafka-storage.sh random-uuidJ7s9e8PPTKOO47PxzI39VA
(2)用该 ID 格式化 kafka 存储目录(三台节点)。
bin/kafka-storage.sh format -t J7s9e8PPTKOO47PxzI39VA -c /opt/module/kafka2/config/kraft/server.properties
6、启动 kafka 集群
bin/kafka-server-start.sh -daemon config/kraft/server.properties
7、停止 kafka 集群
bin/kafka-server-stop.sh
7.3.Kafka-Kraft 集群启动停止脚本
1、在 /home/atguigu/bin 目录下创建文件 kf2.sh 脚本文件
vim kf2.sh
脚本如下:
#! /bin/bash
case $1 in
"start"){
 for i in hadoop102 hadoop103 hadoop104
 do
 echo " --------启动 $i Kafka2-------"
 ssh $i "/opt/module/kafka2/bin/kafka-server-start.sh -
daemon /opt/module/kafka2/config/kraft/server.properties"
 done
};;
"stop"){
 for i in hadoop102 hadoop103 hadoop104
 do
 echo " --------停止 $i Kafka2-------"
 ssh $i "/opt/module/kafka2/bin/kafka-server-stop.sh "
 done
};;
esac
2、添加执行权限
chmod +x kf2.sh
3、启动集群命令
kf2.sh start
4、停止集群命令
kf2.sh stop


 1194
1194


 被折叠的 条评论
为什么被折叠?
被折叠的 条评论
为什么被折叠?
 到【灌水乐园】发言


