


前言
关于网络中注意力机制的改进有很多种,本篇内容从EMA注意力机制开始!
往期回顾
YOLOv5-7.0改进(一)MobileNetv3替换主干网络
YOLOv5-7.0改进(三)添加损失函数EIoU、AlphaIoU、SIoU、WIoU、MPDIoU、NWD
目录
一、EMA简介
论文题目:Efficient Multi-Scale Attention Module with Cross-Spatial Learning
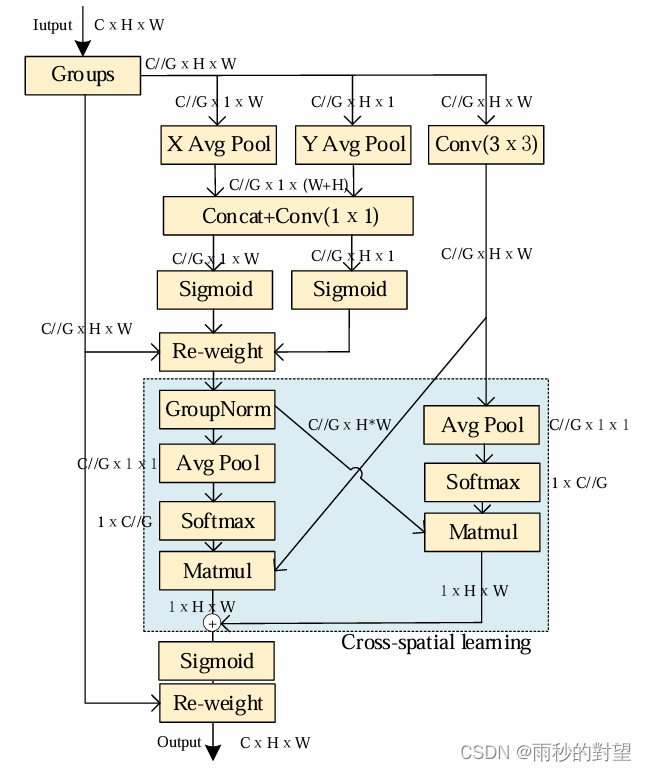
EMA注意力机制:基于跨空间学习的高效多尺度注意力机制,该模块首先将部分通道维度重塑为批量维度,以避免通用卷积进行某种形式的降维,接着在每个并行子网络中构建局部的跨通道交互,利用一种新的跨空间学习方法融合两个并行子网络的输出特征图,设计了一个多尺度并行子网络来建立长短依赖关系。
网络结构:
二、Neck端添加EMA
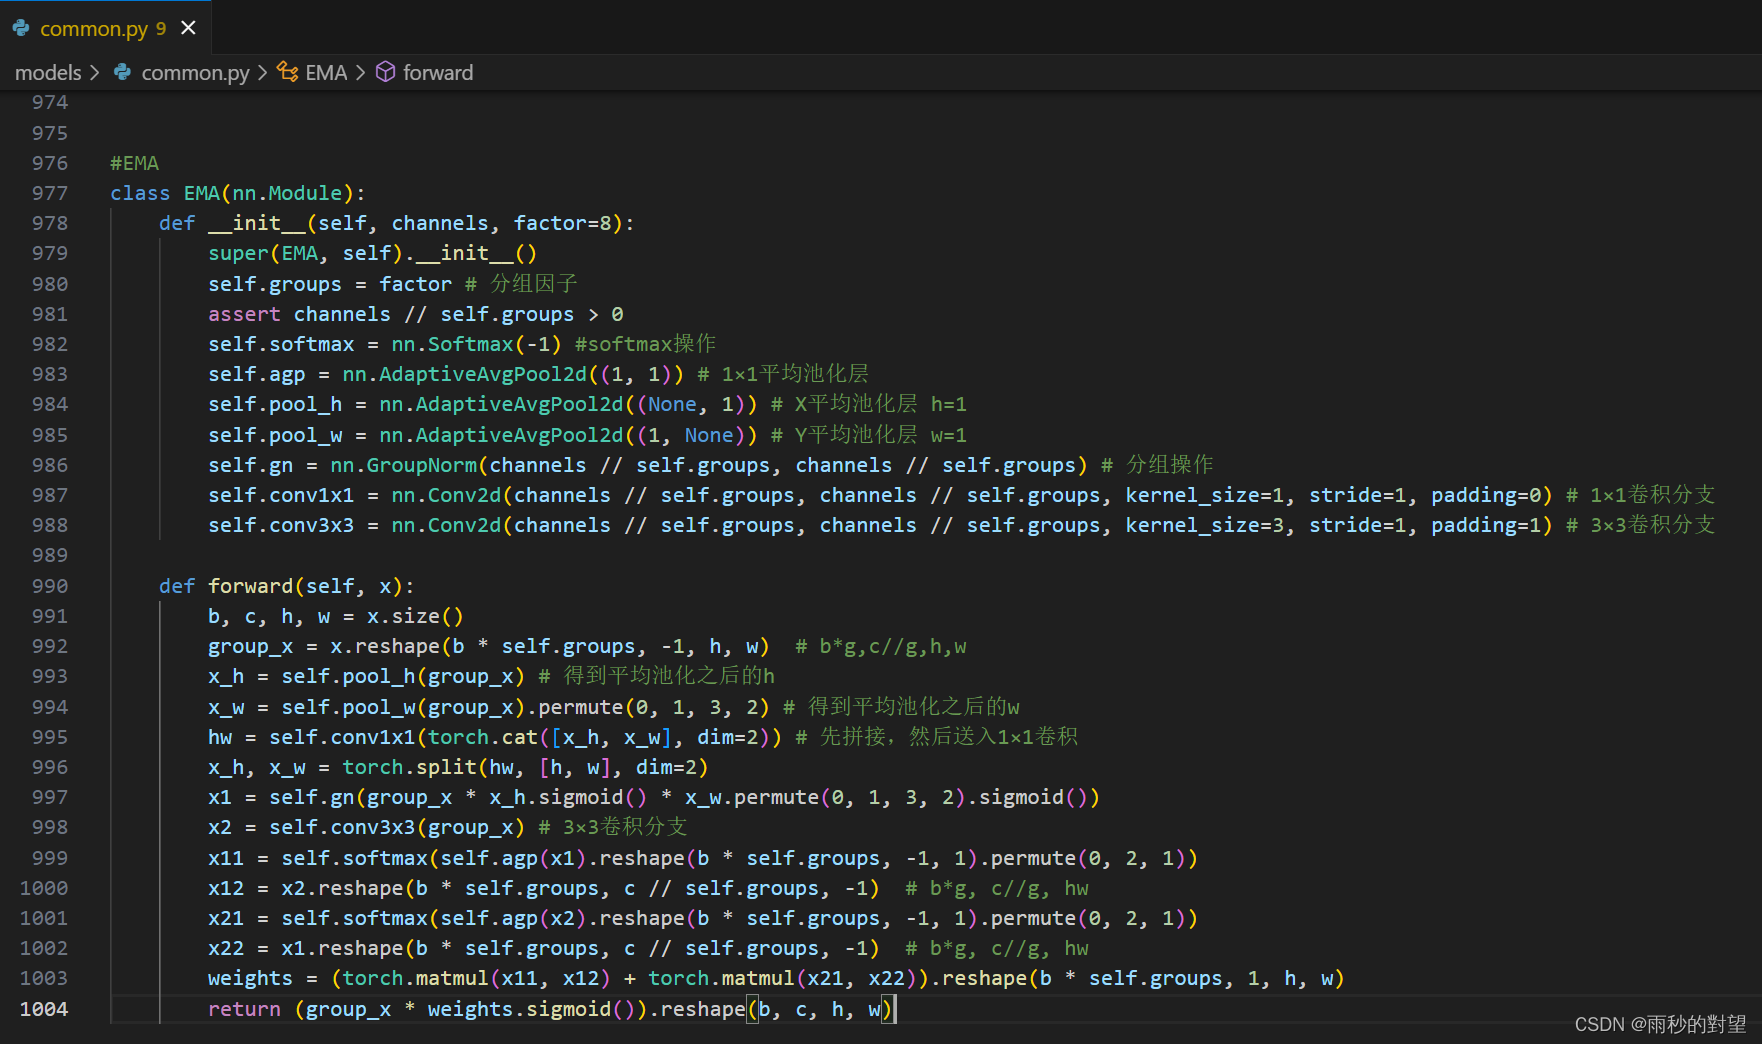
第一步:在common.py中添加EMA模块
代码如下:
#EMA
class EMA(nn.Module):
    def __init__(self, channels, factor=8):
        super(EMA, self).__init__()
        self.groups = factor # 分组因子
        assert channels // self.groups > 0
        self.softmax = nn.Softmax(-1) #softmax操作
        self.agp = nn.AdaptiveAvgPool2d((1, 1)) # 1×1平均池化层
        self.pool_h = nn.AdaptiveAvgPool2d((None, 1)) # X平均池化层 h=1
        self.pool_w = nn.AdaptiveAvgPool2d((1, None)) # Y平均池化层 w=1
        self.gn = nn.GroupNorm(channels // self.groups, channels // self.groups) # 分组操作
        self.conv1x1 = nn.Conv2d(channels // self.groups, channels // self.groups, kernel_size=1, stride=1, padding=0) # 1×1卷积分支
        self.conv3x3 = nn.Conv2d(channels // self.groups, channels // self.groups, kernel_size=3, stride=1, padding=1) # 3×3卷积分支

    def forward(self, x):
        b, c, h, w = x.size()
        group_x = x.reshape(b * self.groups, -1, h, w)  # b*g,c//g,h,w
        x_h = self.pool_h(group_x) # 得到平均池化之后的h
        x_w = self.pool_w(group_x).permute(0, 1, 3, 2) # 得到平均池化之后的w
        hw = self.conv1x1(torch.cat([x_h, x_w], dim=2)) # 先拼接,然后送入1×1卷积
        x_h, x_w = torch.split(hw, [h, w], dim=2)
        x1 = self.gn(group_x * x_h.sigmoid() * x_w.permute(0, 1, 3, 2).sigmoid())
        x2 = self.conv3x3(group_x) # 3×3卷积分支
        x11 = self.softmax(self.agp(x1).reshape(b * self.groups, -1, 1).permute(0, 2, 1))
        x12 = x2.reshape(b * self.groups, c // self.groups, -1)  # b*g, c//g, hw
        x21 = self.softmax(self.agp(x2).reshape(b * self.groups, -1, 1).permute(0, 2, 1))
        x22 = x1.reshape(b * self.groups, c // self.groups, -1)  # b*g, c//g, hw
        weights = (torch.matmul(x11, x12) + torch.matmul(x21, x22)).reshape(b * self.groups, 1, h, w)
        return (group_x * weights.sigmoid()).reshape(b, c, h, w)
插入效果:
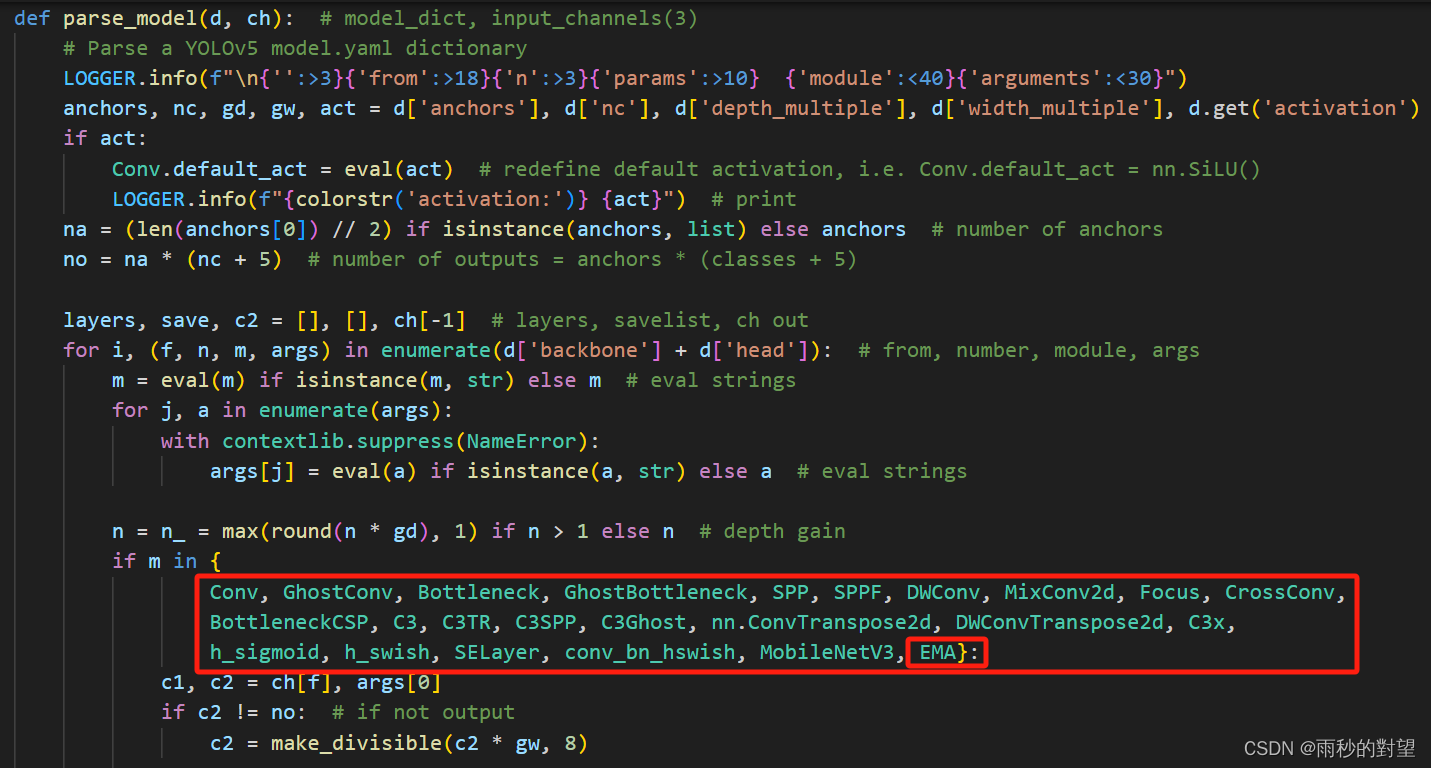
第二步:在yolo.py中的parse_model函数加入类名
将EMA类名添加到注册表中,效果如下:
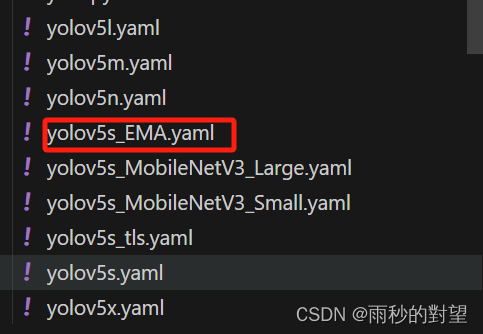
第三步:制作模型配置文件
1、复制models/yolov5s.yaml文件,并重命名
2、将以下代码复制到新创建的yaml文件
# YOLOv5 🚀 by Ultralytics, GPL-3.0 license

# Parameters
nc: 12  # number of classes
depth_multiple: 0.33  # model depth multiple
width_multiple: 0.50  # layer channel multiple
anchors:
  - [10,13, 16,30, 33,23]  # P3/8
  - [30,61, 62,45, 59,119]  # P4/16
  - [116,90, 156,198, 373,326]  # P5/32

# YOLOv5 v6.0 backbone
backbone:
  # [from, number, module, args]
  [[-1, 1, Conv, [64, 6, 2, 2]],  # 0-P1/2
   [-1, 1, Conv, [128, 3, 2]],  # 1-P2/4
   [-1, 3, C3, [128]],
   [-1, 1, Conv, [256, 3, 2]],  # 3-P3/8
   [-1, 6, C3, [256]],
   [-1, 1, Conv, [512, 3, 2]],  # 5-P4/16
   [-1, 9, C3, [512]],
   [-1, 1, Conv, [1024, 3, 2]],  # 7-P5/32
   [-1, 3, C3, [1024]],
   [-1, 1, SPPF, [1024, 5]],  # 9
  ]

# YOLOv5 v6.0 head
head:
  [[-1, 1, Conv, [512, 1, 1]],
   [-1, 1, nn.Upsample, [None, 2, 'nearest']],
   [[-1, 6], 1, Concat, [1]],  # cat backbone P4
   [-1, 3, C3, [512, False]],  # 13

   [-1, 1, Conv, [256, 1, 1]],
   [-1, 1, nn.Upsample, [None, 2, 'nearest']],
   [[-1, 4], 1, Concat, [1]],  # cat backbone P3
   [-1, 3, C3, [256, False]],  # 17 (P3/8-small)
   [-1, 1, EMA, [256]],  # 加入到小目标层后

   [-1, 1, Conv, [256, 3, 2]],
   [[-1, 14], 1, Concat, [1]],  # cat head P4
   [-1, 3, C3, [512, False]],  # 20 (P4/16-medium)
   [-1, 1, EMA, [512]],  # 加入到中目标层后

   [-1, 1, Conv, [512, 3, 2]],
   [[-1, 10], 1, Concat, [1]],  # cat head P5
   [-1, 3, C3, [1024, False]],  # 23 (P5/32-large)
   [-1, 1, EMA, [1024]],  # 加入到大目标层后

   [[18, 22, 26], 1, Detect, [nc, anchors]],  # Detect(P3, P4, P5)
  ]
第四步:验证新加入的Neck网络
1、修改yolo.py中以下两个地方
(1)DetectionModel函数下的cfg
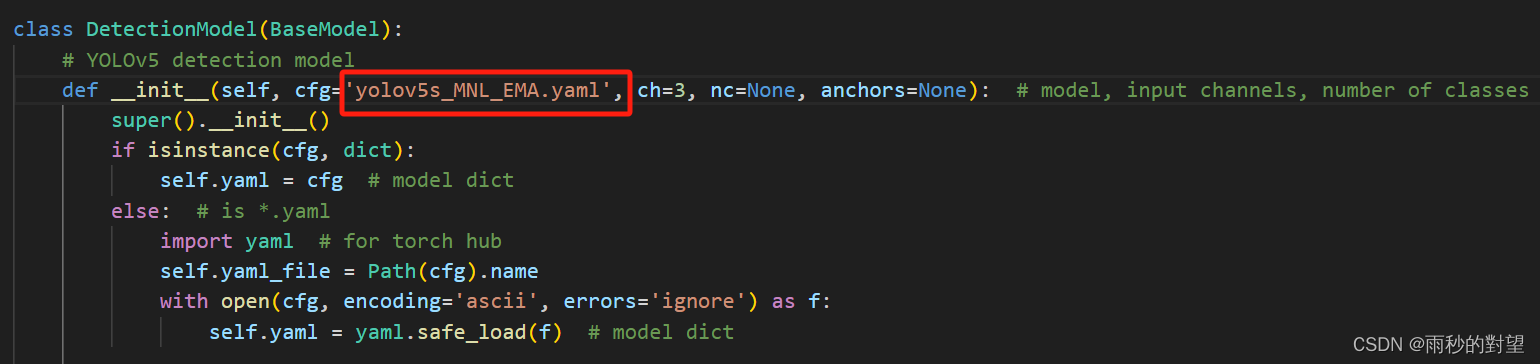
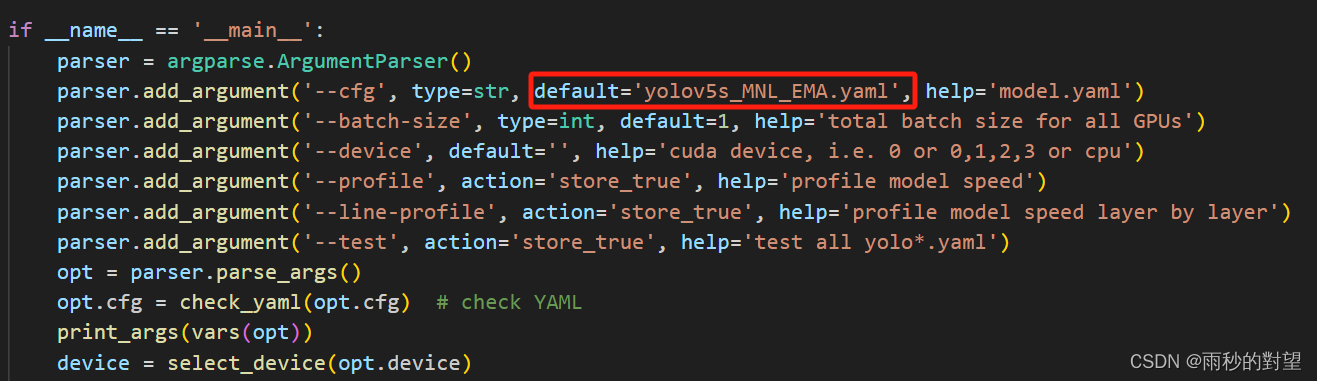
(2)parser = argparse.ArgumentParser()下的cfg
2、运行yolo.py
(1)yolov5s_EMA.yaml
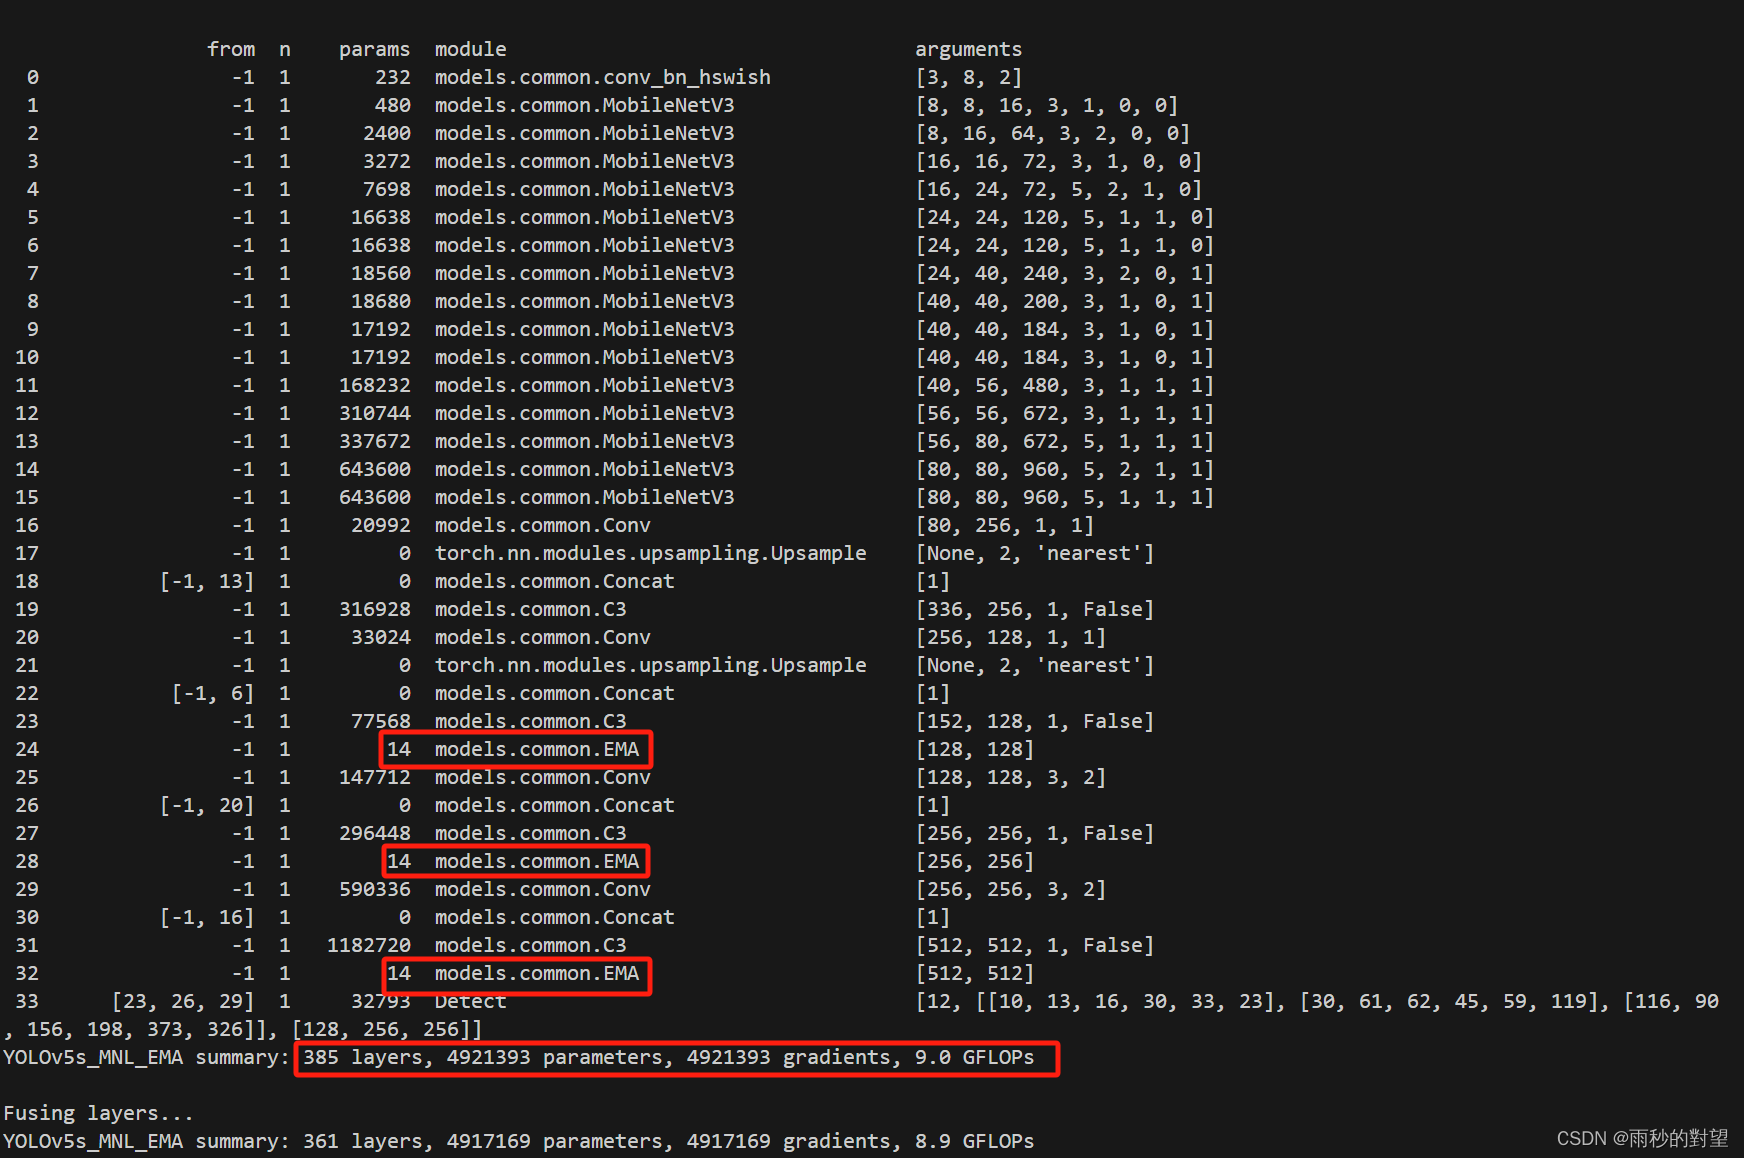
好了,到这一步在Neck端添加EMA基本完成,接下就可以开始训练~
三、C3中添加EMA
第一步:在common.py中添加EMA模块
代码如下:
#EMA
class EMA(nn.Module):
    def __init__(self, channels, factor=8):
        super(EMA, self).__init__()
        self.groups = factor # 分组率
        assert channels // self.groups > 0
        self.softmax = nn.Softmax(-1) # Softmax
        self.agp = nn.AdaptiveAvgPool2d((1, 1)) # 平均池化层
        self.pool_h = nn.AdaptiveAvgPool2d((None, 1)) # x平均池化层 h=1
        self.pool_w = nn.AdaptiveAvgPool2d((1, None)) # y平均池化层 w=1
        self.gn = nn.GroupNorm(channels // self.groups, channels // self.groups) # 分组操作
        self.conv1x1 = nn.Conv2d(channels // self.groups, channels // self.groups, kernel_size=1, stride=1, padding=0) # 1×1卷积分支
        self.conv3x3 = nn.Conv2d(channels // self.groups, channels // self.groups, kernel_size=3, stride=1, padding=1) # 3×3卷积分支

    def forward(self, x):
        b, c, h, w = x.size()
        group_x = x.reshape(b * self.groups, -1, h, w)  # b*g,c//g,h,w
        x_h = self.pool_h(group_x)
        x_w = self.pool_w(group_x).permute(0, 1, 3, 2)
        hw = self.conv1x1(torch.cat([x_h, x_w], dim=2))
        x_h, x_w = torch.split(hw, [h, w], dim=2)
        x1 = self.gn(group_x * x_h.sigmoid() * x_w.permute(0, 1, 3, 2).sigmoid())
        x2 = self.conv3x3(group_x)
        x11 = self.softmax(self.agp(x1).reshape(b * self.groups, -1, 1).permute(0, 2, 1))
        x12 = x2.reshape(b * self.groups, c // self.groups, -1)  # b*g, c//g, hw
        x21 = self.softmax(self.agp(x2).reshape(b * self.groups, -1, 1).permute(0, 2, 1))
        x22 = x1.reshape(b * self.groups, c // self.groups, -1)  # b*g, c//g, hw
        weights = (torch.matmul(x11, x12) + torch.matmul(x21, x22)).reshape(b * self.groups, 1, h, w)
        return (group_x * weights.sigmoid()).reshape(b, c, h, w)

class C3_EMA3(nn.Module):
    # CSP Bottleneck with 3 convolutions
    def __init__(self, c1, c2, n=1, shortcut=True, g=1, e=0.5):  # ch_in, ch_out, number, shortcut, groups, expansion
        super().__init__()
        c_ = int(c2 * e)  # hidden channels
        self.cv1 = Conv(c1, c_, 1, 1)
        self.cv2 = Conv(c1, c_, 1, 1)
        self.cv3 = Conv(2 * c_, c2, 1)  # optional act=FReLU(c2)
        self.m = nn.Sequential(*(Bottleneck(c_, c_, shortcut, g, e=1.0) for _ in range(n)))
        self.m1 = nn.ModuleList([EMA(2 * c_)])  # 添加在最后一个卷积之前

    def forward(self, x):
        return self.cv3(self.m1[0](torch.cat((self.m(self.cv1(x)), self.cv2(x)), 1)))


class C3_EMA2(nn.Module):
    # CSP Bottleneck with 3 convolutions
    def __init__(self, c1, c2, n=1, shortcut=True, g=1, e=0.5):  # ch_in, ch_out, number, shortcut, groups, expansion
        super().__init__()
        c_ = int(c2 * e)  # hidden channels
        self.cv1 = Conv(c1, c_, 1, 1)
        self.cv2 = Conv(c1, c_, 1, 1)
        self.cv3 = Conv(2 * c_, c2, 1)  # optional act=FReLU(c2)
        self.m = nn.Sequential(*(Bottleneck(c_, c_, shortcut, g, e=1.0) for _ in range(n)))
        self.m1 = nn.ModuleList([EMA(c1)])  # 添加在最后一个卷积之前

    def forward(self, x):
        return self.cv3(torch.cat((self.m(self.cv1(x)), self.cv2(self.m1[0](x))), 1))


class C3_EMA1(nn.Module):
    # CSP Bottleneck with 3 convolutions
    def __init__(self, c1, c2, n=1, shortcut=True, g=1, e=0.5):  # ch_in, ch_out, number, shortcut, groups, expansion
        super().__init__()
        c_ = int(c2 * e)  # hidden channels
        self.cv1 = Conv(c1, c_, 1, 1)
        self.cv2 = Conv(c1, c_, 1, 1)
        self.cv3 = Conv(2 * c_, c2, 1)  # optional act=FReLU(c2)
        self.m = nn.Sequential(*(Bottleneck(c_, c_, shortcut, g, e=1.0) for _ in range(n)))
        self.m1 = nn.ModuleList([EMA(c_)])  # 添加在最后一个卷积之前

    def forward(self, x):
        return self.cv3(torch.cat((self.m(self.m1[0](self.cv1(x))), self.cv2(x)), 1))
效果如下:

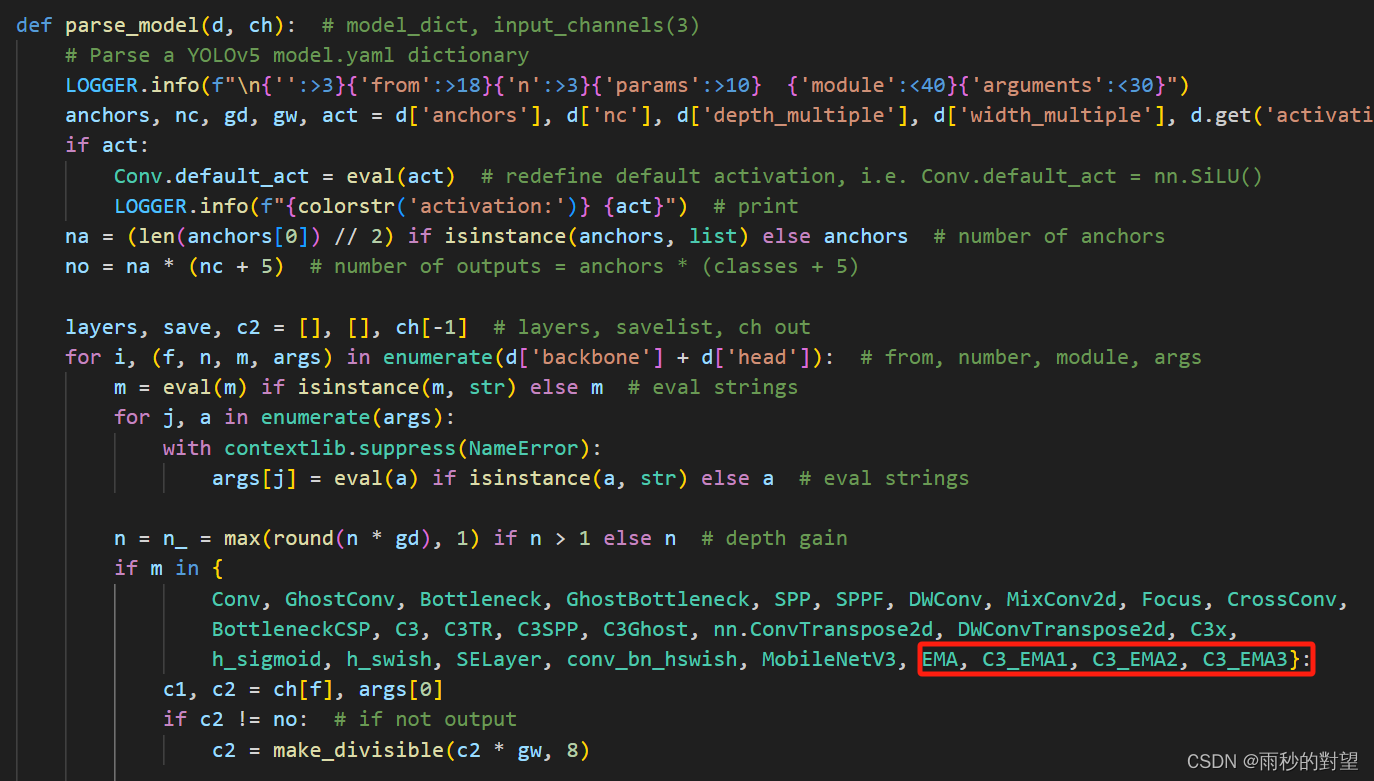
第二步:在yolo.py中的parse_model函数加入类名
将以下类名添加到注册表中
EMA, C3_EMA1, C3_EMA2, C3_EMA3
效果如下:
第三步:制作模型配置文件
将以下代码复制到yaml文件中
# YOLOv5 🚀 by Ultralytics, GPL-3.0 license

# Parameters
nc: 12  # number of classes
depth_multiple: 0.33  # model depth multiple
width_multiple: 0.50  # layer channel multiple
anchors:
  - [10,13, 16,30, 33,23]  # P3/8
  - [30,61, 62,45, 59,119]  # P4/16
  - [116,90, 156,198, 373,326]  # P5/32

# YOLOv5 v6.0 backbone
backbone:
  # [from, number, module, args]
  [[-1, 1, Conv, [64, 6, 2, 2]],  # 0-P1/2
   [-1, 1, Conv, [128, 3, 2]],  # 1-P2/4
   [-1, 3, C3_EMA1, [128]],
   [-1, 1, Conv, [256, 3, 2]],  # 3-P3/8
   [-1, 6, C3, [256]],
   [-1, 1, Conv, [512, 3, 2]],  # 5-P4/16
   [-1, 9, C3, [512]],
   [-1, 1, Conv, [1024, 3, 2]],  # 7-P5/32
   [-1, 3, C3, [1024]],
   [-1, 1, SPPF, [1024, 5]],  # 9
  ]

# YOLOv5 v6.0 head
head:
  [[-1, 1, Conv, [512, 1, 1]],
   [-1, 1, nn.Upsample, [None, 2, 'nearest']],
   [[-1, 6], 1, Concat, [1]],  # cat backbone P4
   [-1, 3, C3, [512, False]],  # 13

   [-1, 1, Conv, [256, 1, 1]],
   [-1, 1, nn.Upsample, [None, 2, 'nearest']],
   [[-1, 4], 1, Concat, [1]],  # cat backbone P3
   [-1, 3, C3, [256, False]],  # 17 (P3/8-small)

   [-1, 1, Conv, [256, 3, 2]],
   [[-1, 14], 1, Concat, [1]],  # cat head P4
   [-1, 3, C3, [512, False]],  # 20 (P4/16-medium)

   [-1, 1, Conv, [512, 3, 2]],
   [[-1, 10], 1, Concat, [1]],  # cat head P5
   [-1, 3, C3, [1024, False]],  # 23 (P5/32-large)

   [[17, 20, 23], 1, Detect, [nc, anchors]],  # Detect(P3, P4, P5)
  ]
第四步:验证新加入的Neck网络
1、运行yolo.py
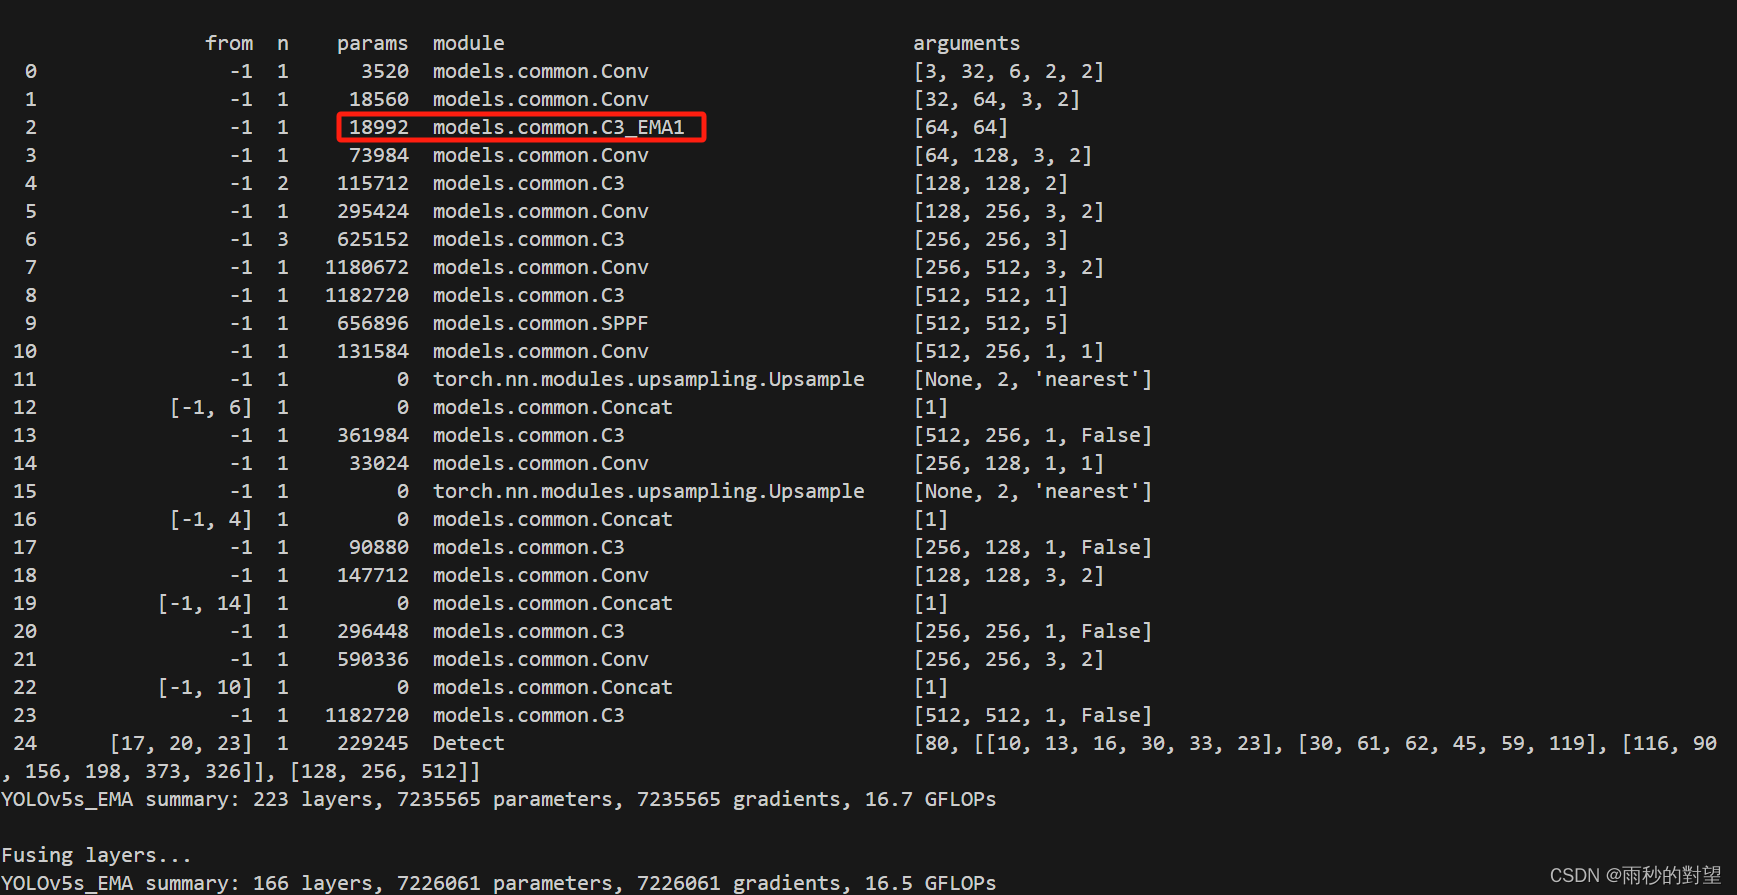
接下来也是对这个模型进行训练,需要注意的是这是在主干网络部分改进~


 5542
5542


 被折叠的 条评论
为什么被折叠?
被折叠的 条评论
为什么被折叠?
 到【灌水乐园】发言


