


 本文介绍了如何在代码中运用SAM(Segment Anything Model)进行点提示(point prompt)的图像分割任务。SAM基于视觉Transformer架构,旨在建立高性能图像分割模型。通过hugging face库,可以更方便地使用预训练的SAM模型。文章展示了使用预训练模型进行预测并可视化结果的过程,为后续的框提示使用奠定了基础。
概述
本系列将做一个专题,主要关于介绍如何在代码上运行并使用SAM模型以及如何用自己的数据集微调SAM模型,也是本人的毕设内容,这是一个持续更新系列,欢迎大家关注~
SAM(Segment Anything Model)
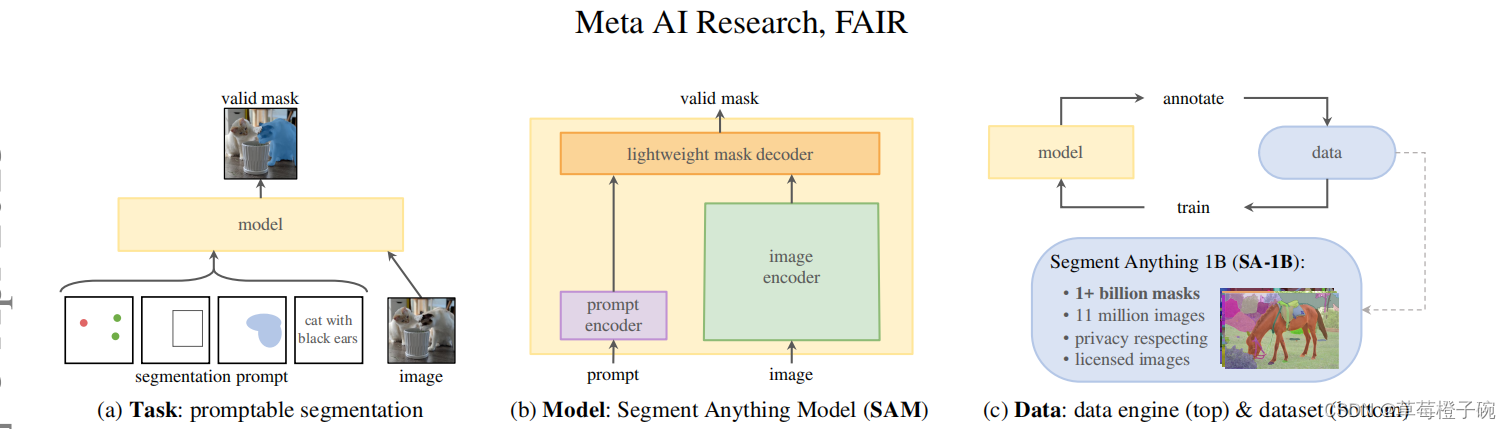
SAM基于visual transformer架构,希望通过这个大一统的框架建立起在图像分割领域的高性能模型,由于在图像分割领域可用的训练数据较为缺乏,团队在数据的获取训练这一块任务也专门设计的对应的流程。在SAM的论文中,主要把SAM模型的构建分成了三个部分,分别是任务、模型和数据。
模型使用
有一个Meta发布了一个网站demo,感兴趣的朋友可以根据网站的指导进行使用,对SAM的效果有一个直观的感受Segment Anything | Meta AI (segment-anything.com)
本篇博客主要介绍使用hugging face中封装好的函数对SAM进行point prompt的分割任务,对比github上SAM的源码使用,hugging face的函数更加方便使用
依赖的环境库
import torch
import numpy as np
from PIL import Image
import matplotlib.pyplot as plt
from transformers import SamModel, SamProcessor
从transfomers库上下载预训练好的SAM模型,一般保存在C盘下用户的.cache文件下
device = torch.device("cuda" if torch.cuda.is_available() else "cpu")
model = SamModel.from_pretrained("facebook/sam-vit-base").to(device)
processor = SamProcessor.from_pretrained("facebook/sam-vit-base")
这里的sam-vit-base是比较小的权重,有300多M,还有facebook/sam-vit-huge有1G多,这里使用前者进行使用的演示
定义可视化的函数
def show_mask(mask, ax, random_color=False):
    if random_color:
        color = np.concatenate([np.random.random(3), np.array([0.6])], axis=0)
    else:
        color = np.array([30/255, 144/255, 255/255, 0.6])
    h, w = mask.shape[-2:]
    mask_image = mask.reshape(h, w, 1) * color.reshape(1, 1, -1)
    ax.imshow(mask_image)

def show_points_on_image(raw_image, input_points, input_labels=None):
    plt.figure(figsize=(10,10))
    plt.imshow(raw_image)
    input_points = np.array(input_points)
    if input_labels is None:
      labels = np.ones_like(input_points[:, 0])
    else:
      labels = np.array(input_labels)
    show_points(input_points, labels, plt.gca())
    plt.axis('on')
    plt.show()

def show_points(coords, labels, ax, marker_size=375):
    pos_points = coords[labels==1]
    neg_points = coords[labels==0]
    ax.scatter(pos_points[:, 0], pos_points[:, 1], color='green', marker='*', s=marker_size, edgecolor='white', linewidth=1.25)
    ax.scatter(neg_points[:, 0], neg_points[:, 1], color='red', marker='*', s=marker_size, edgecolor='white', linewidth=1.25)

def show_masks_on_image(raw_image, masks, scores):
    if len(masks.shape) == 4:
      masks = masks.squeeze()
    if scores.shape[0] == 1:
      scores = scores.squeeze()

    nb_predictions = scores.shape[-1]
    fig, axes = plt.subplots(1, nb_predictions, figsize=(15, 15))

    for i, (mask, score) in enumerate(zip(masks, scores)):
      mask = mask.cpu().detach()
      axes[i].imshow(np.array(raw_image))
      show_mask(mask, axes[i])
      axes[i].title.set_text(f"Mask {i+1}, Score: {score.item():.3f}")
      axes[i].axis("off")
我们使用下面这张图像来进行演示

可视化一个我们的图像和point prompt的位置
raw_image = Image.open(r'D:\CSDN_point\3_11_model\yunnan.jpg')

input_points = [[[900, 1050]]]
show_points_on_image(raw_image, input_points[0])
进行mask的预测,没有进行参数限制的话输出的图片为3张,并且对应有iou的预测得分
inputs = processor(raw_image, input_points=input_points, return_tensors="pt").to(device)


with torch.no_grad():
    outputs = model(**inputs)

masks = processor.image_processor.post_process_masks(outputs.pred_masks.cpu(), inputs["original_sizes"].cpu(), inputs["reshaped_input_sizes"].cpu())
scores = outputs.iou_scores

show_masks_on_image(raw_image, masks[0], scores)
总结
下面就是简单地使用点提示在代码上进行SAM模型的使用,在微调的任务中,普遍认为框提示的效果会比点提示好,所以下一节我们来介绍一下使用框提示的内容
欢迎大家讨论交流~


 3016
3016

 被折叠的 条评论
为什么被折叠?
被折叠的 条评论
为什么被折叠?
 到【灌水乐园】发言


