


一、强制类型转换
C:
    float f1 = 3.14;
    int a = (int)f1;

C++:
    float f1 = 3.14;
    int a = static_cast<int>(f1);
    //const_cast
    //reinterpret_cast
    //dynamic_cast
二、引用
概念:对于一个已经存在的变量取别名
取别名相当于把值和本身内存的地址传给别名,相当于拷贝了一份 ,本质是指针
例如:
int a = 100;
int& a_ref = a;
#include <iostream>
using namespace std;

void exchange(int a, int b)
{
    int tmp = a;
    a = b;
    b = tmp;
}

void exchange2(int *a, int *b)
{
    int tmp = *a;
    *a = *b;
    *b = tmp;
}

//引用作为函数的输入参数
void exchange3(int& a, int& b)
{
    int tmp = a;
    a = b;
    b = tmp;
}

//引用作为函数的返回值
//要确保被引用的变量在函数结束后,生命周期依然存在
int& func1()
{
    //int aa = 100;
    static int aa = 100;

    return aa;
}

int main()
{
    int aa = 100;

    //引用的定义,引用必须在定义的时候初始化
    int& ref_aa = aa;
    cout << "aa=" << aa << "ref_aa=" << ref_aa << endl;

    aa++;
    cout << "aa=" << aa << "ref_aa=" << ref_aa << endl;

    ref_aa++;
    cout << "aa=" << aa << "ref_aa=" << ref_aa << endl;

    int a1=100, b1=200;
    cout << "a1=" << a1 << ",b1=" << b1 << endl;
    exchange(a1, b1);
    cout << "a1=" << a1 << ",b1=" << b1 << endl;

    cout << "exchange by pointer" << endl;
    a1=100, b1=200;
    cout << "a1=" << a1 << ",b1=" << b1 << endl;
    exchange2(&a1, &b1);
    cout << "a1=" << a1 << ",b1=" << b1 << endl;


    cout << "exchange by reference" << endl;
    a1=100, b1=200;
    cout << "a1=" << a1 << ",b1=" << b1 << endl;
    exchange3(a1, b1);
    cout << "a1=" << a1 << ",b1=" << b1 << endl;

    cout << "reference as return value" << endl;
    cout << func1() << endl;


    return 0;
}
总结:
1、引用一定要初始化
2、一个变量可有有多个引用
3、一个引用只能指向一个特定的变量
4、引用可以作为函数的参数
5、引用可以作为函数的返回值(确保被引用的变量在函数调用结束后,它的生命周期依然存在;如果返回一个局部变量,会导致段错误)
6、C语言函数的传值有2种方式:
复制传递方式
地址传递方式
C++函数的传值增加了
引用传递的方式
三、内联函数
概念:内联函数是一种特殊类型的函数。内联函数的主要目的是提高函数调用的效率。
例如:
inline int multiply(int a, int b)
{
return a*b;
}
#include <iostream>
using namespace std;

#define MULTIPLY(a, b) (a*b)

inline int multiply(int a, int b)
{
    return a*b;
}


int main()
{
    cout << MULTIPLY(10, 20) << endl;
    cout << multiply(10, 20) << endl;
    //内联函数在编译的时候用函数体的内容去替换函数的调用,来提升程序的效率
    //cout << {return a*b} << endl;
    cout << MULTIPLY(2+3, 3+4) << endl;// 2+3*3+4
    cout << multiply(2+3, 3+4) << endl;


    return 0;
}
总结:
1、当调用内联函数的时候,不会走函数调用的流程,而是在编译期间用函数体的内容去取代这个内联函数的调用,省去了函数调用需要的系统的CPU,内存的资源,达到提高效率目的
2、如果这个被频繁调用的话,会导致的代码的膨胀,对于对硬件比较苛求的系统而言,需要慎重使用内联函数
3、内联函数的逻辑要足够的简单,代码行数要小,不能有复杂的控制逻辑while,switch,不能用递 归
4、某种程度上取代简单的宏定义的字符替代,有数据类型的检查,遵循运算符的优先级5、宏替换实在预处理时期,且没有数据类型的检查;内联函数在编译时期,且有数据类型检查
6、内联函数尽量用在代码逻辑不复杂,代码少的地方
四、函数重载
概念:函数重载是一种特殊情况,C++允许在同一作用域中声明几个类似的同名函数,这些同名函数的形参列表(参数个数,类型,顺序)必须不同,常用来处理实现功能类似数据类型不同的问题。
例如:
int add(int a);
int add(int a, int b);
int add(int b, int a);
总结:
1、函数重载,这些函数的作用域是相同
2、函数名一定相同
3、参数的类型,参数的个数,参数的顺序一定有某一项不同,返回值不影响函数重载
4、仅仅想通过返回值的不同,是不能构成重载
五、默认参数
概念:函数默认参数是指在函数声明中为一个或多个参数提供默认值。如果函数调用时没有为这些参数提供值,则将使用默认值作为参数的值。
例如:
void func1(int a, float b = 3.14);
void func2(int a=100, float b = 3.14);
#include <iostream>
using namespace std;

void print(string s ="------------------------------------")
{
    cout << s << endl;
}

void print2(int a=100, float b=3.14, string c ="Small world")
{
    cout << a << endl;
    cout << b << endl;
    cout << c << endl;
}

int main()
{
    print();
    print2();
    print();
    print2(200);
    print();
    print2(300,3.33);
    print();
    print2(400, 4.444, "big world");

    return 0;
}
默认参数的使用的规则:
1、默认参数必须出现在非默认参数之后
2、一旦出现了一个默认参数,它后面的参数必须是默认参数
3、一个函数可以全是默认参数
六、作用域
分类:
1、局部域
2、名字空间域
3、类域
4、变量的作用域
局部变量的作用域是局部
普通全局变量的作用域是整个项目(别的文件可以访问)
静态全局变量的作用域是本文件,在别的文件是不可见的
5、全局函数的作用域
普通全局函数的作用域是整个项目(别的文件可以访问)
静态全局函数的作用域是本文件,在别的文件是不可见的
#include <iostream>
//using namespace std;

//aa存在于一个叫做全局的名字空间
int aa = 100;

int main()
{
    int aa = 1000;

    std::cout << "aa=" << aa << std::endl;

    //:: 作用域访问符
    //std::cout 名字空间std + 作用域访问符 + 变量名
    std::cout << "::aa=" << ::aa << std::endl;

    return 0;
}
七、动态内存(new/delete )
//C风格的动态分配内存
int *p = malloc(sizeof(int)*100);
//释放内存
free(p);
p = NULL;//防止它成为野指针
//C++风格的动态内存分配
new/delete
int *p = new int; //分配1个int大小的内存delete p;
p = nullptr;
p = new int[100] //分配100个int大小的内存
//delete p 错误,只会释放1个int大小的内存,造成内存泄露
delete [] p;
p= nullptr;
八、名字空间(namespace)
1、名字空间语法
namesapce mySpace
    {
        int aa = 100;
        void func1()
        {
	    }

	    struct student
	    {

	    }

	    class Demo
	    {
	    }
	}
#include <iostream>
//使用std整个的名字空间,不提倡使用
//using namespace std;
//只使用名字空间里的特定的变量或者函数
using std::cout;
using std::endl;
using std::string;
namespace MySpace
{
int aa = 100;
struct Student
{
string name;
int age;
};
class Demo
{
int aa;
float bb;
};
void func1()
{
cout << "MySpace::func1()" << endl;
}
}
int aa = 200;
void func1()
{
//使用名字空间的全路径来使用特定的变量或者函数
std::cout << "::func1()" << std::endl;
}
using namespace MySpace;
int main()
{
//使用名字空间,最好使用它的全路径
//名字空间 + :: + 变量或者函数
cout << "::aa=" << ::aa << endl;
::func1();
cout << "Myspace::aa=" << MySpace::aa << endl;
//cout << "Myspace::aa=" << aa << endl;
MySpace::func1();
return 0;
}
1、名字空间的引入是为了解决在大项目下的名字冲突的问题。
2、理解名字空间、可以把全局名字空间看成是文件相同的根目录,而用户自己定义的名字空间看成是新建的子目录,这样的的话,在根目录和子目录就就能够相同文件名的文件。
2、如何使用名字空间?
1、using namesapce std //直接使用整个名字空间,在实际的开发是不提倡的
2、using std::cout //使用名字空间里某个变量或者函数
3、std::cout //用得最多,最安全且不会发生名字的冲突
3、名字空间可以嵌套
namespace mySpace
{
    int aa = 100;

    namesapce mySpace
	{
	    int aa = 200;
	}
}
mySpace::mySpace::aa;
九、输入输出流 (iostream)
1、cout
根据数据类型自适应的去做打印输出
2、cin
int aa;
string s1;
cin >> aa >> s1;3、格式控制符
使用cout的成员函数设置:
cout.setf(ios::hex, ios::basefield); //设置为16进制,
ios::basefield = iso::hex | ios::dec | ios::oct 111
ios::floatfield = ios::fixed | ios::scientific
ios::adjustfield = ios::left | ios::right | ios::internal
cout.setf(ios::showpos)
cout.unsetf(ios::showpos)
cout.width(10);
cout.fill('*');
cout.precision(20);
使用预定义的操作符:
cout << setw(10) << setfill('$') << hex << showbase << left << a << endl;
十、类与对象
1、类是对象的抽象,对象是类的实例
class Demo
{
public:  //公有的接口函数和数据,能够通过对象访问
	int a1;
	void func1();

protected: //保护的成员数据和函数,不能通过对象访问
	int a2;
	void func2();

private: //私有的成员数据和函数,不能通过对象访问
	int a3;
	void func3();
};

2、对象的定义
Demo d1(10, 20);
Demo *p = new Demo(10, 20);
d1.func1()
p->func1()
十一、初始化列表
概念:初始化列表用于在构造函数中对类成员变量进行初始化。它位于构造函数的函数体之前,使用冒号 ":" 标记,并以逗号分隔多个成员初始化。
例如:
Demo(int a,int b)
{
aa = a;
bb = b;
}
相当于:
Demo(int a, int b):aa(a), bb(b){}
#include <iostream>
using namespace std;

class Point
{
public:
    //构造函数,和类名同名,没有返回值,可以有参数,也可无参,能够重载
    //系统会在生在类对象的时候自动调用,作用是初始化
    Point();
    Point(float a, float b);
    //析构函数,也类名同名,没有返回值,没有参数,不能重载
    //系统会在类对象消亡的时候自动调用,作用是作清除工作,释放系统资源
    ~Point();
    void show();
private:
    float x;
    float y;
};

Point::Point():x(1.0),y(2.0)//初始化列表
{
    cout << "不带参数的构造函数" << endl;
    //x = 1.0;
    //y = 2.0;
}

Point::Point(float a, float b):x(a),y(b) //初始化列表
{
    cout << "带参数的构造函数" << endl;
    //x = a;
    //y = b;
}

Point::~Point()
{
    cout << "析构函数" << endl;
}

void Point::show()
{
    cout << "x=" << x << ",y=" << y << endl;
}

int main()
{
    Point p1;
    p1.show();

    Point p2(1.1, 2.2);
    p2.show();

    Point *p11 = new Point;
    p11->show();

    Point *p12 = new Point(3.3, 4.4);
    p12->show();

    delete p11;
    p11 = nullptr;
    delete p12;
    p12 = nullptr;


    return 0;
}
十二、this指针
隐藏的this指针
总结:
1、this指针是一个特殊指针,它指向类对象的首地址
2、每一个类的对象都有一个自己的this指针
3、this指针只能在类的内部使用
4、各个类的对象的this指针指向各自的对象的起始地址,这些this指针是不一样的
5、this指针不需要显式的使用
this指针背后实现的原理
Demo::show() 编译过后,编译器自动的增加了this指针,this指针它指向调用对象的首地址 ==》 Demo::show(Demo *this)
当Demo类的对象d1去调用show函数的时候 d1.show() 相当于调用 d1.show(&d1);
当Demo类的指针去调用show函数的时候 p1->show() 相当于调用 p->show(p);
#include <iostream>
using namespace std;

class Demo
{
public:
    Demo(int a, float b);
    ~Demo();
    void show();
    Demo* getThis();
    void show2()
    {
        cout << "Demo::show2()" << endl;
    }

private:
    int aa;
    float bb;
};

Demo::Demo(int a, float b):aa(a),bb(b)
{
    cout << "Demo::Demo" << endl;
}

Demo::~Demo()
{
    cout << "Demo::~Demo" << endl;
}

void Demo::show()
//void Demo::show(Demo *this);编译器对每个成员函数增加了this指针
{
    cout << "aa=" << this->aa << ",bb=" << this->bb << endl;
}

Demo* Demo::getThis()
{
    return this;
}

int main()
{
    Demo d1(10, 3.14);
    d1.show();
    //调用成员函数
    //d1.show(&d1);

    cout << "this pointer=" << d1.getThis() << endl;
    cout << "&d1=" << &d1 << endl;

    Demo *p1=nullptr;
    p1->show2();
    //p1->show2(p1);
    cout << p1->getThis() << endl;
    //p1->getThis(p1);
    p1->show();
    //p1->show(p1);

    return 0;
}
十三、static
#include <iostream>
using namespace std;

class Demo
{
public:
    Demo():aa(10),bb(1.11)
    {

    }

    void show()
    {
        cout << "aa=" << aa << ",bb=" << bb << endl;
    }

    //静态成员函数
    static void show_static()
    {
        cout << "cc=" << cc << endl;
        //静态的成员函数没有this指针,不能访问非静态的成员函数
        //show();
    }

    //static修改的成员变量 为静态的成员变量
    //看成是类的全局变量,不管我们生成多少个对象,只有1份拷贝
    static int cc;

private:
    int aa;
    float bb;
};

//静态变量必须在类定义外面去定义
int Demo::cc = 100;

int main()
{
    //可以通过类名直接访问静态成员变量和静态的成员函数
    Demo::cc = 1000;
    Demo::show_static();

    //也能够通过对象去访问静态的成员变量和函数
    Demo d1;
    d1.cc = 100;
    d1.show_static();

    Demo d2;
    d2.cc = 200;
    d2.show_static();


    return 0;
}
总结:
1、可以将类的成员变量和成员函数申明为static,叫类的静态成员变量和静态的成员函数
2、使用类名和作用域访问符来访问它
Demo::total_num //静态的成员变量
Demo::show_howmany() //静态的成员函数
也可以通过对象名访问静态的成员:
Demo d1;
d.total_num;
d.show_howmany();
3、静态的成员它属于类,所以它不带this指针,不能访问类对象里的成员
静态的成员变量只有1份,来有所有的类对象去共享;而普通的成员变量在各个类对象中都有对象自己的。4、如果我们将静态成员变量的定义放在类定义内部,那么编译器只会知道该静态成员变量的类型和名称,但并不知道应该为其分配多少存储空间。因此,在类定义中只能进行静态成员变量的声明,而不能进行实际的定义。因此,静态成员变量需要在类定义外部进行定义和初始化,以便为其分配存储空间和初始化。
十四、const
const可以修饰:const成员函数,const成员变量,const对象
1、const变量必须初始化,并且不能被更改
2、const int *p1 = &bb; //p1是指向常量的指针,指向的值不能被修改,指针本身可以修改
3、int * const p2 = &bb; //p2是一个常指针,指针本身不能修改,指向的值可以修改
4、const int *p3 const = &bb;//p3是一个指向常量的常指针,指针本身不能改变,指向的值也不能
const成员函数
如果需要保证成员函数不会修改对象的成员变量,可以将该函数设置为const成员函数
它不能调用非const的成员函数,但是能够调用const的成员函数
void Demo::show() const;
#include <iostream>
using namespace std;

class Demo
{
public:
    Demo(int a = 100):aa(a){}
    void setValue(int a);
    int getValue() const;
    void show() const;
private:
    int aa;
};

void Demo::setValue(int a)
{
    aa = a;
}

//const 成员函数
int Demo::getValue() const
{
    //aa = 0;const 成员函数不能修改成员变量
    //setValue(1000); 也不能调用非const的成员函数
    return this->aa;
}

void Demo::show() const
{
    cout << "aa=" << aa << endl;
    //const 成员函数可以调用 另一个const 成员函数
    cout << "getvalue=" << getValue() << endl;
}

int main()
{
    Demo d1;
    d1.show();
    cout << d1.getValue() << endl;


    return 0;
}
const成员变量
class Demo
{
const int aa;
}
不能够在对象的生命周期内被更改,只能通过构造函数的初始化列表对const成员变量进行初始化
const对象
const 类名 对象名
const对象可以调用const的成员函数,但是不能够调用非const的成员函数
#include <iostream>
using namespace std;

class Demo
{
    //类的缺省成员访问限定符为private
public:
    Demo(int aa=100):aa(aa)
    {

    }
    void setValue(int aa)
    {
        this->aa = aa;
    }
    int getValue() const
    {
        return aa;
    }
private:
    int aa;
};

int main()
{
    //d1是一个常量的对象,不能改变他的值
    const Demo d1;
    cout << d1.getValue() << endl;
    //d1.setValue(2000);
    cout << d1.getValue() << endl;


    return 0;
}
十五、友元
概念:当一个函数或者类想访问另外一个类的私有成员的时候,要先成为它的友元
三类友元:友元函数、友元类、友员成员函数
友元函数:
将一个全局函数声明为类的友元函数,这样的话,这个友元函数就能够访问类对象的私有的成员
形式:
class Student
{
friend void checkId(Student&);
};
#include <iostream>
using namespace std;

class Student
{
public:
    Student(string name, int age, float score):
        name(name),age(age),score(score)
    {}

    void show()
    {
        cout << name << "今年" << age << "岁,考试分数为" << score << endl;;
    }

    //将全局函数show_student_info声明为class Student的友元函数
    friend void show_student_info(Student& s);

private:
    string name;
    int age;
    float score;
};

//但是友元函数没有类的this指针,必须把类的数据作为参数传进来
void show_student_info(Student& stu)
{
    cout << stu.name << "今年" << stu.age << "岁,考试成绩是" << stu.score << endl;
}

int main()
{
    Student xiaoming("小明", 13, 97);
    //xiaoming.show();

    show_student_info(xiaoming);

    return 0;
}
总结:
1、友元函数没有类对象的this指针,必须将类对象的指针或者引用传给友元函数
2、友元函数可以放在共有区域,也能够放到私有区域
3、一个函数可以是多个类的友元函数,只需要在各个类中分别声明
4、友元函数的调用和普通函数一样
友元类
friend class Demo;(class可以省略)
可以声明一个类为另一类的友元类
#include <iostream>
using namespace std;

//前向声明Address类
class Address;

class Student
{
public:
    Student(string name, int age, float score)
        :name(name), age(age), score(score)
    {
    }
    void show_info(Address& addr);

private:
    string name;
    int age;
    float score;
};

class Address
{
public:
    Address(string p, string c, string d, string s)
        :province(p), city(c),district(d),street(s)
    {}

    //让Student类成为Address类的友元类
    friend class Student;

private:
    string province;
    string city;
    string district;
    string street;
};

void Student::show_info(Address& addr)
{
    cout << name << "今年" << age << "岁,考试分数是" << score << endl;
    cout << "家庭地址是" << addr.province << addr.city << addr.district
         << addr.street << endl;
}

int main()
{
    Address addr("四川省", "成都市", "金牛区", "金牛大道1024号");

    Student xiaoming("小明", 17, 98);
    xiaoming.show_info(addr);


    return 0;
}
友员成员函数
可以将A的成员函数设置为B的友元,这个函数就成为了B的友元成员函数
#include <iostream>
using namespace std;

//前向声明Address类
class Address;

class Student
{
public:
    Student(string name, int age, float score)
        :name(name), age(age), score(score)
    {
    }
    void show_info(Address& addr);

private:
    string name;
    int age;
    float score;
};

class Address
{
public:
    Address(string p, string c, string d, string s)
        :province(p), city(c),district(d),street(s)
    {}

    //让Student show_info函数成为Address类的友元成员函数
    friend void Student::show_info(Address& s);

private:
    string province;
    string city;
    string district;
    string street;
};

void Student::show_info(Address& addr)
{
    cout << name << "今年" << age << "岁,考试分数是" << score << endl;
    cout << "家庭地址是" << addr.province << addr.city << addr.district
         << addr.street << endl;
}

int main()
{
    Address addr("四川省", "成都市", "金牛区", "金牛大道1024号");

    Student xiaoming("小明", 17, 98);
    xiaoming.show_info(addr);


    return 0;
}
注意的地方
1、友元关系不能继承
2、友元关系是单向的,如果A是B的友元,但B不一定是A的友元,要看有没有友元的申明
3、友元关系不具有传递性,如果B是A的友元,而C是B的友元,那C不一定是A的友元,要看C是否被定义为A的友元它,破坏了类的封装和隐藏,所以我们要慎用
处理友元函数或者友元类相互嵌套的问题,处理的方法是:先定义类,对于涉及到友元的成员函数只做声明,不做实现,当所有的类
声明完了,最好再对涉及到友元的函数进行实现。
十六、拷贝构造函数
1、拷贝函数的定义和语法: 用一个已经存在的类的对象去初始化一个新的类的对象
当用户自己没有定义自己的拷贝构造函数的时候,系统会给我们生成一个缺省的拷贝构造函数(字节拷贝,把存在对象的数据拷贝到新的对象里头去,称之为浅拷贝)
形式:
Demo(int a, int b)
Demo(const Demo& d)
{
aa = d.aa;
bb = d.bb;
}
#include <iostream>
using namespace std;

class Demo
{
public:
    Demo(int a=100, float b = 0):aa(a), bb(b)
    {
        cout << "Demo 普通构造函数" << endl;
    }

    //copy constructor 拷贝构造
    Demo(const Demo& d):aa(d.aa), bb(d.bb)
    {
        cout << "Demo 拷贝构造函数" << endl;
    }

    void show()
    {
        cout << "aa=" << aa << ",bb=" << bb << endl;
    }

    void set(int a, float b)
    {
        aa = a;
        bb = b;
    }

private:
    int aa;
    float bb;
};

void print(int i, string s="-------------------------")
{
    cout << i << s << endl;
}

//拷贝构造被使用的第二种情况
//类对象作为参数传给一个函数,拷贝构造会被调用
void func1(Demo d)
{
    d.show();
}

//拷贝构造被使用的第三种情况
//从函数里返回一个类的对象
Demo func2()
{
    Demo tmp(4000, 4.44);

    return tmp;
}


int main()
{
    Demo d1(1000, 3.14);
    d1.show();

    print(1);
    //拷贝构造的使用方法1
    Demo d2(d1);
    d2.show();

    print(2);
    d2.set(2000, 2.22);
    d2.show();
    //拷贝构造的使用方法2
    Demo d3 = d2;//d3是一个新实例化的一个对象
    //int a = 3;
    d3.show();

    print(3);
    d2.set(3000, 3.333);//d2是已经存在的对象,不会调用拷贝构造
    d2.show();
    d3 = d2;//d2,d3都是已经存在的对象,d2赋值给d3,不会调用拷贝构造
    d3.show();

    print(4);
    func1(d3);

    print(5);
    Demo d4 = func2();
    d4.show();

    return 0;
}
结果:
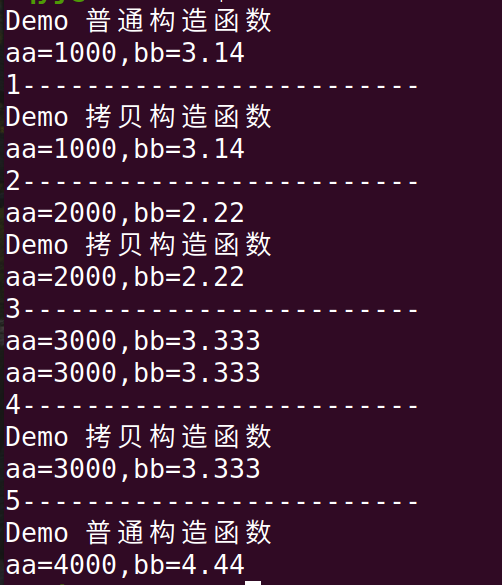
注意:拷贝构造调用条件必须要是一个新的对象
2、什么情况下调用拷贝构造
1、使用一个存在的对象去初始化一个新的对象
Demo d0(1, 2);
Demo d1(d0); //方式1
Demo d2 = d0; //方式2 构造
d2 = d0; //赋值
2、类对象作为一个函数的输入参数
Demo d1(100, 2.2)
func1(d1);
3、从函数里面返回一个类对象 -fno-elide-constructors
Demo returnDemo()
{
Demo tmp(100, 2.2);
return tmp;
}
3、缺省拷贝构造(浅拷贝)
当用户自己没有定义自己的拷贝构造函数的时候,系统会提供缺省的拷贝构造函数,它会一个字节一个字节的进行拷贝,这种行为我们称之为“浅拷贝”
4、自定义拷贝构造(深拷贝)
针对类需要从堆空间动态申请内存的情况,用户要定义自己的拷贝构造函数,申请相同的内存,然后复制相应的数据,避免内存二次释放导致系统崩溃
#include <iostream>
using namespace std;

class Array
{
public:
    Array(int len = 50):len(len),p(nullptr)
    {
        cout << "Array::Array()" << endl;
        p = new int[len];
        for (int i = 0; i < len; i++)
        {
            p[i] = i + 1;
        }
    }

    //深拷贝的拷贝构造函数,能开辟新的内存空间,避免内存的二次释放
    Array(const Array& a):len(a.len),p(nullptr)
    {
        cout << "Array copy constructor" << endl;
        p = new int[len];
        for(int i = 0; i < len; i++)
        {
            p[i] = a.p[i];
        }
    }

    ~Array()
    {
        delete [] p;
        p = nullptr;
    }

    void show()
    {
        for (int i = 0; i < len; i++)
        {
            cout << p[i] << ",";
        }
        cout << endl;
    }

    void setAll(int a)
    {
        for (int i = 0; i < len; i++)
        {
            p[i] = a;
        }
    }

private:
    int len;
    int *p;
};

void print(int i, string s="--------------------------")
{
    cout << i << s << endl;
}


int main()
{
    Array a1(200);
    a1.show();

    print(1);
    Array a2(a1);
    a2.show();

    print(2);
    Array a3 = a2;
    a3.show();

    //print(3);
    a2.setAll(3);
    a2.show();
    //使用a2去给a3赋值,用的系统缺省的赋值运算符,同样的是浅拷贝,也会导致二次释放
    //需要进行运算符重载 =
    //a3 = a2;
    a3.show();

    return 0;
}
十七、运算符的重载
1、为什么要运算符重载
现有的运算符只能够对基础的数据类型起作用,对于用户自定义的类不起作用,需要重新定义这些运算符,赋予其新的功能,让这些运算符能够对类的对象工作
运算符重载的本质是函数重载
2、运算符重载的概念和语法
形式:
<返回值的数据类型> operator<运算符符号> (<参数列表>)
{
//函数体
}
3、友员运算符重载
形式:
class Point
{
friend <返回值的数据类型> operator<运算符符号> (<参数列表>);
};
<返回值的数据类型> operator<运算符符号> (<参数列表>)
{
//函数体
}
#include <iostream>
using namespace std;

class Point
{
    double x;
    double y;

public:
    Point(double a=0, double b=0):x(a),y(b){}

    void show()
    {
        cout << "x=" << x << ",y=" << y << endl;
    }

    void set(double a, double b)
    {
        x = a;
        y = b;
    }

    friend Point operator--(Point& p1)
    {
        p1.x--;
        p1.y--;

        return p1; //调用拷贝构造函数
    }
    friend Point operator--(Point& p1, int a)
    {
        Point tmp(p1.x--, p1.y--);

        return tmp;
    }

    friend Point operator+=(Point& p1, const Point& p2)
    {
        p1.x += p2.x;
        p1.y += p2.y;

        return p1;
    }

    friend bool operator==(Point& p1, Point& p2)
    {
        return ((p1.x == p2.x) && (p1.y == p2.y));
    }

    friend Point& operator!(Point& p1)
    {
        p1.x = (-p1.x);
        p1.y = (-p1.y);
        return p1;
    }
};

void print(int i, string s = "-----------------------------------")
{
    cout << i << s << endl;
}


int main()
{
    Point p1(10, 10);
    Point p2(100, 100);
    (--p1).show();
    p1.show();

    print(1);
    (p1--).show();
    p1.show();

    print(2);
    p1.set(10,10);
    p1.show();
    p2.show();
    p1 += p2;
    p1.show();

    print(3);
    p1.show();
    (!p1).show();
    p1.show();


    return 0;
}
注意:
实现可以是类的内部或者外部,作为全局函数来实现,既然是友元运算符重载,不能使用类的this指针,所以对单目运算符,它需要1个参数;对于二目运算符,它需要2个参数。但是对于a++和aa--,虽然是单目运算符,但是为了和++a,--a区分,需要一个额外的参数,并且这个参数必须是int的
4、成员运算符重载 (成员函数)
形式:
class Point
{
<返回值的数据类型> operator<运算符符号> (<参数列表>)
{
//函数体
}
}
#include <iostream>
using namespace std;

class Point
{
    double x;
    double y;

public:
    Point(double a = 0, double b = 0):
        x(a),y(b) {}

    void set(double a, double b)
    {
        x = a;
        y = b;
    }

    Point operator+(const Point& p);
    //前向++
    Point& operator++();
    //后向++
    Point operator++(int a);
    Point& operator-=(const Point& p);
    bool operator==(const Point& p);
    void operator()()
    {
        cout << "这个点的位置是:" << x << "<->" << y << endl;
    }

    int operator()(int a, int b)
    {
        return a + b;
    }

    friend ostream& operator<<(ostream& out, const Point& p)
    {
        out << p.x << "<->" << p.y;
        return out;
    }
};

Point Point::operator+(const Point& p)
{
    Point tmp(x+p.x, y+p.y);

    return tmp;
}

Point& Point::operator++()
{
    x++;
    y++;

    return *this;
}

Point Point::operator++(int a)
{
    Point tmp(x++, y++);

    return tmp; //调用拷贝构造
}

Point& Point::operator-=(const Point& p)
{
    x -= p.x;
    y -= p.y;

    return *this;
}

bool Point::operator==(const Point& p)
{
    return ((x == p.x) && (y == p.y));
}

void print(int i, string s="----------------------------------")
{
    cout << i << s << endl;
}


int main()
{
    Point p1(1.1,1.1), p2(2.2,2.2), p3;
    cout << p1 << "," << p2 << "," << p3 << endl;

    print(1);
    p3 = p1 + p2;//p1.operator+(p2)
    cout << p3 << endl;

    print(2);
    cout << (p3++) << endl; //p3.operator++(a)
    cout << p3 << endl;

    print(3);
    cout << ++p3 << endl; //p3.operator++()
    cout << p3 << endl;

    print(4);
    cout << (p3 -= p1) << endl;  //p3.operator-=(p1)
    cout << p3 << endl;

    print(5);
    if (p3 == p1)
    {
        cout << p3 << endl;
    }
    else
    {
        cout << p1 << endl;
    }

    print(6);
    p3(); //p3.operator()()

    print(7);
    cout << p1(10, 20) << endl; //p1.operator()(10, 20)


    return 0;
}
注意:
定义在类里面,实现可以在类里面,也可以在类的外面;既然是成员运算符重载,能够使用this指针,那对于单目运算符,不需要参数;对于二目运算符,它需要1个参数;对于二目运算符,它需要2个参数 但是对于a++和aa--,虽然是单目运算符,但是为了和++a,--a区分,需要一个额外的参数,并且这个参数必须是int的
总结 :
1、除去极个别的运算符(“?:”、“.”、“::”、“sizeof”和”.*”),大多数运算符能够重载
2、重载运算符()、[]、->、=时,只能将它们重载为成员函数,不能重载为全局函数
3、只能够使用现有的运算符进行重载,不能创建新的运算符
4、操作符重载的实质是函数重载,必须遵循函数重载的原则(不能仅仅通过返回值类型来重载)
5、操作符重载只能使用在用户自定义的数据类型(class, struct)
十八、模板
概念:模板是泛型编程的基础,将数据类型参数化,用同一套代码去处理不同数据类型和应用场景
注意事项:模板的声明或定义只能在全局,命名空间或类范围内进行。即不能在局部范围,函数内进行
(一)函数模板
函数模板语法
template<class T>     //老的模板的语法,能够后向兼容
template<typename T>  //新的模板的语法,建议使用这种语法
    T add(T a, T b)
    {
        T tmp;
        return a+b;
    }

    函数模板的实例化:
    //T被实例化为int
    int a = 100, b=200, c;
    c = add(a, b);
    //T被示例化为float
    float f1=23.22, f2 =11.22, f3;
    f3 = add(f1, f2);
add_function_template模板:
#include <iostream>
using namespace std;

//template<class T>
template<typename T>
T add(T a, T b)
{
    return a + b;
}

class Integer
{
public:
    Integer(int a=0):aa(a) {};

    friend ostream& operator<<(ostream& out, const Integer& in)
    {
        out << in.aa;

        return out;
    }

    Integer operator+(const Integer& in)
    {
        Integer tmp(aa + in.aa);

        return tmp;//会调用拷贝构造
    }

private:
    int aa;
};

int main()
{
    int a1=100, b1 = 200, c1;
    c1 = add(a1, b1);  //int add(int a, int b)
    cout << c1 << endl;

    int a2 = 1000, b2 = 2000;
    cout << add(a2, b2) << endl;

    float f1 = 1.111, f2 = 2.222;
    cout << add(f1, f2) << endl; //float add(float f1, float f2)

    string s1= "big world ";
    string s2 = "small world";
    cout << add(s1, s2) << endl; //string add(string s1, string s2)

    Integer i1(10),i2(20);
    cout << add(i1, i2) << endl; //Integer add(Integer i1, Integer i2)


    return 0;
}
exchage_function_template模板:
#include <iostream>
using namespace std;

template<typename T>
void exchange(T& a, T& b)
{
    T tmp = a;
    a = b;
    b = tmp;
}

class Point
{
public:
    Point(double a, double b):x(a), y(b){}

    friend ostream& operator<<(ostream& out, Point& p)
    {
        out << p.x << "<->" << p.y;
        return out;
    }

private:
    double x;
    double y;
};

template<typename T1, typename T2>
void print(T1 a, T2 b)
{
    cout << a << "--" << b << endl;
}

int main()
{
    int a1=100, b1=200;
    cout << "a1=" << a1 << ",b1=" << b1 << endl;
    exchange(a1, b1); //void exchange(int& a, int& b);
    cout << "a1=" << a1 << ",b1=" << b1 << endl;

    string s1="no man is an island";
    string s2="give up the ghost";
    cout << s1 << endl;
    cout << s2 << endl;
    exchange(s1, s2); //void exchange(string& s1, string& s2);
    cout << s1 << endl;
    cout << s2 << endl;

    Point p1(1.1,1.1), p2(2.2,2.2);
    print(p1, p2);
    exchange(p1, p2); //void exchange(Point& p1, Point& p2)
    print(p1, p2);

    return 0;
}
(二)类模板
类模板语法
template<typename T>
    class Demo
    {
        T data;
    public:
        Demo(T a):data(a){}
        T getData();
    }
array_class_template模板:
#include <iostream>
using namespace std;

template<typename T>
class Array
{
public:
    Array(int len=100):len(len),p(nullptr)
    {
        if (len > 0)
        {
            p = new T[len];
        }
    }
    ~Array()
    {
        if (p != nullptr)
        {
            delete [] p;
            p = nullptr;
        }
    }

    int getLen()
    {
        return len;
    }

    void set(T& a)
    {
        for (int i = 0; i < len; i++)
        {
            p[i] = a;
        }
    }

    T& operator[](int index)
    {
        if (index >= 0 && index < len)
        {
            return p[index];
        }
        else
        {
            cout << "Index " << index << " is out of range" << endl;
            static T tmp;
            return tmp;
        }
    }

    friend ostream& operator<<(ostream& out, const Array& a)
    {
        for (int i = 0; i < a.len; i++)
        {
            out << a.p[i] << ",";
        }

        return out;
    }

private:
    int len;
    T *p;
};

class Point
{
public:
    Point(double a=0, double b=0):x(a),y(b){}

    friend ostream& operator<<(ostream& out, const Point& p)
    {
        out << p.x << "<->" << p.y;
        return out;
    }

private:
    double x;
    double y;
};


int main()
{
    Array<int> intArray; //指定了数据类型是int,将模板类实例化,成为装载int的数组
    int a = 100;
    intArray.set(a);
    cout << intArray << endl;
    for (int i = 0; i <= intArray.getLen(); i++)
    {
        intArray[i] = i + 100;
    }
    cout << intArray << endl;

    Array<string> strArray(50); //指定数据类型为string,模板类实例化,成为装载string的数组类
    string s1 = "hello";
    strArray.set(s1);
    cout << strArray << endl;
    for (int i = 0; i < strArray.getLen(); i++)
    {
        string s = "world-" + std::to_string(i+1);
        strArray[i] = s;
    }
    cout << strArray << endl;

    Array<Point> pointArray; //指定数据类型为Point
    Point p(1.1, 2.2);
    pointArray.set(p);
    cout << pointArray << endl;
    for (int i = 0; i < pointArray.getLen(); i++)
    {
        Point p(i+0.5, i+0.3);
        pointArray[i] = p;
    }
    cout << pointArray << endl;


    return 0;
}
container_class_template模板:
#include <iostream>
using namespace std;

template<typename T>
class Container
{
public:
    Container(T a):data(a){}

    void show();
    T& getData();

private:
    T data;
};

template<typename T>
void Container<T>::show()
{
    cout << "data=" << data << endl;
}

template<typename T>
T& Container<T>::getData()
{
    return data;
}

class Point
{
public:
    Point(double a = 0, double b =0):x(a), y(b) {}
    friend ostream& operator<<(ostream& out, const Point& p)
    {
        out << p.x << "<->" << p.y;
        return out;
    }

private:
    double x;
    double y;
};

int main()
{
    Container<int> intC(100);//实例化模板类,指定数据类型为int,生产一个容纳整数的容器类
    intC.show();
    intC.getData() = 200;
    intC.show();

    Container<string> strC("This is a big world"); //指定数据类型为string
    strC.show();
    strC.getData() = "This is a small world";
    strC.show();

    Point p1(1.1,2.2);
    Container<Point> pointC(p1);//指定数据类型为Point
    pointC.show();
    Point p2(10.10, 20.20);
    pointC.getData() = p2;
    pointC.show();

    return 0;
}
成员函数的实现
template<typename T>
T Demo<T>::getData()
{
    return data;
}
类模板的实例化
Demo<float> floatContainer(1.1);默认类型模板参数
template<typename T=int>
    class Stack
    {
        ...
    }
#include <iostream>
// 带有默认类型参数的模板类
template <typename T = int>
class MyClass {
public:
void print() {
std::cout << "Type: " << typeid(T).name() << std::endl;
}
};
int main() {
// 使用默认类型参数实例化模板类
MyClass<> obj1;
obj1.print(); // 输出:Type: i (表示 int 类型)
// 显式指定类型参数实例化模板类
MyClass<double> obj2;
obj2.print(); // 输出:Type: d (表示 double 类型)
return 0;
}非类型模板参数
template<typename T, int value> template <typename T, int size>
class Array {
private:
T m_array[size];
public:
void print() {
for (int i = 0; i < size; ++i) {
std::cout << m_array[i] << " ";
}
std::cout << std::endl;
}
void setValue(int index, T value) {
if (index >= 0 && index < size) {
m_array[index] = value;
}
}
};
int main() {
Array<int, 5> arr;
arr.setValue(0, 10);
arr.setValue(1, 20);
arr.setValue(2, 30);
arr.setValue(3, 40);
arr.setValue(4, 50);
arr.print(); // 输出:10 20 30 40 50
return 0;
}十九、类的继承和派生
(一)继承的基本语法
形式:
class 派生类的类名: [继承方式 public/protected/private] 基类的类名
{
//派生类新的成员变量和成员函数
int d1;
void func1();
};
(二)三种继承方式 public/protected/private
public、protected、private 修饰类的成员(成员访问限定符):
public成员,是能够通过对象直接访问
protected的成员,是不能通过对象直接访问,只能通过共有或者保护的接口去访问
private的成员,在派生类中不可见;protected成员是派生类是可见
public、protected、private 指定继承方式:
注:不同的继承方式会影响基类成员在派生类中的访问权限
1、public继承方式 //在实际的开发中,使用public的继承
基类的public成员在派生类是public属性
基类的protected成员在派生类是protected属性
基类的private成员在派生类是不可见
2、protected继承方式
基类的public成员在派生类是protected属性
基类的protected成员在派生类是protected属性
基类的private成员在派生类是不可见
3、private继承方式
基类的public成员在派生类是private属性
基类的protected成员在派生类是private属性
基类的private成员在派生类是不可见
总结:
1、基类的私有成员在派生类中不可见;
2、继承方式决定了基类的成员在派生类中的最高访问权限;
3、如果在派生类想访问基类的成员,但是不想通过对象访问它,最好将它设置为protected;
(三)继承时的名字遮盖问题
概念:如果派生类中的成员(包括成员变量和成员函数)和基类中的成员重名(不是虚函数,没有用virtual修饰),那么就会遮蔽从基类继承过来的成员。
所谓遮蔽,就是在派生类中使用该成员(包括在定义派生类时使用,也包括通过派生类对象访问该成员)时,实际上使用的是派生类新增的成员,而不是从基类继承来的
#include <iostream>
using namespace std;

class Base
{
public:
    //因为派生类中有同名成员,导致下面的成员被遮盖
    int aa;
    void func1()
    {
        cout << "Base::func1(), aa=" << aa << endl;
    }
};

class Derived: public Base
{
public:
    int aa;
    int bb;
    void func1()
    {
        cout << "Derived::func1(),aa=" << aa << ",bb=" << bb << endl;
    }
};

int main()
{
    Derived d1;
    d1.aa = 1000;
    d1.bb = 1001;
    d1.func1();

    //通过派生类的对象 + 基类的类名 + :: + 基类的成员
    d1.Base::aa = 100;
    d1.Base::func1();

    return 0;
}
结果:

怎么解决?
//成员变量
derived_obj.Base::aa = 100;
//成员函数
derived_obj.Base::show();
(四)基类和派生类的构造函数
总结:
1、类的构造函数不能被继承
2、在设计派生类时,对继承过来的成员变量的初始化工作也要由派生类的构造函数完成,但是大部分基类都有 private 属性的成员变量,它们在派生类中无法访问,更不能使用派生类的构造函数来初始化。
解决这个问题的思路是:在派生类的构造函数中调用基类的构造函数
3、构造函数的调用顺序
从类的从上往下的调用顺序,先调用基类的构造函数,然后再调用派生类的构造函数
(五)基类和派生类的析构函数
#include <iostream>
using namespace std;

class A
{
public:
    A(int a):aa(a)
    {
        cout << "A的构造函数" << endl;
    }
    ~A()
    {
        cout << "A析构函数" << endl;
    }

protected:
    int aa;
};

class B: public A
{
public:
    B(int a, int b):bb(b),A(a)
    {
        cout << "B构造函数" << endl;
    }
    ~B()
    {
        cout << "B析构函数" << endl;
    }

protected:
    int bb;
};

class Derived: public B
{
public:
    Derived(int a, int b, int d):dd(d), B(a, b)
    {
        cout << "Derived构造函数" << endl;
    }
    ~Derived()
    {
        cout << "Derived析构函数" << endl;
    }
    void show()
    {
        cout << "aa=" << aa << ",bb=" << bb << ",dd="
            << dd << endl;
    }

private:
    int dd;
};

int main()
{
    Derived d1(1, 10, 100);
    d1.show();


    return 0;
}
结果:
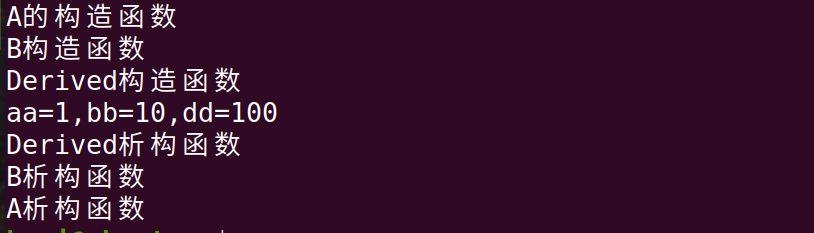
总结:
1、构造函数类似,析构函数也不能被继承。
2、与构造函数不同的是,在派生类的析构函数中不用显式地调用基类的析构函数,因为每个类只有一个析构函数,编译器知道如何选择,无需程序员干涉。
3、析构函数的执行顺序
析构函数的执行顺序是,先执行派生类的析构函数,然后再调用基类的析构函数,它们的调用顺序和构造函数相反的
(六)多继承
形式:
class D: public A, private B, protected C{
//类D新增加的成员
};
#include <iostream>
using namespace std;

class Demo
{
public:
    Demo(int a=0):d1(a)
    {
        cout << "Demo构造函数" << endl;
    }
    ~Demo()
    {
        cout << "Demo析构函数" << endl;
    }
private:
    int d1;
};

class Demo2
{
public:
    Demo2(int a=0):d2(a)
    {
        cout << "Demo2构造函数" << endl;
    }
    ~Demo2()
    {
        cout << "Demo2析构函数" << endl;
    }
private:
    int d2;
};


class A
{
public:
    A(int a):aa(a)
    {
        cout << "A的构造函数" << endl;
    }

    ~A()
    {
        cout << "A的析构函数" << endl;
    }

    void showA()
    {
        cout << "aa=" << aa << endl;
    }
protected:
    int aa;
};

class B
{
public:
    B(int b):bb(b)
    {
        cout << "B的构造函数" << endl;
    }

    ~B()
    {
        cout << "B的析构函数" << endl;
    }

    void showB()
    {
        cout << "bb=" << bb << endl;
    }
protected:
    int bb;
};

class C
{
public:
    C(int c):cc(c)
    {
        cout << "C的构造函数" << endl;
    }

    ~C()
    {
        cout << "C的析构函数" << endl;
    }

    void showC()
    {
        cout << "cc=" << cc << endl;
    }
protected:
    int cc;
};

//构造函数调用的顺序和派生类定义时基类出现的顺序相同
class Derived: public C, protected B, private A
{
public:
    Derived(int a, int b, int c, int d):
        dd(d), demo(a), demo2(b), A(a), B(b), C(c)
    {
        cout << "Derived构造函数" << endl;
    }
    ~Derived()
    {
        cout << "Derived析构函数" << endl;
    }

    void show()
    {
        cout << "aa=" << aa << ",bb=" << bb << "cc="
            << cc << ",dd=" << dd << endl;
        showA();
        showB();
    }

private:
    int dd;
    Demo2 demo2;
    Demo demo;
};


int main()
{
    Derived d1(1, 10, 100, 1000);
    //d1.showA();因为是私有的方式继承,不能对象直接访问
    //d1.showB();使用保护的方式继承,不能通过对象直接访问
    d1.showC();
    d1.show();

    return 0;
}
结果:
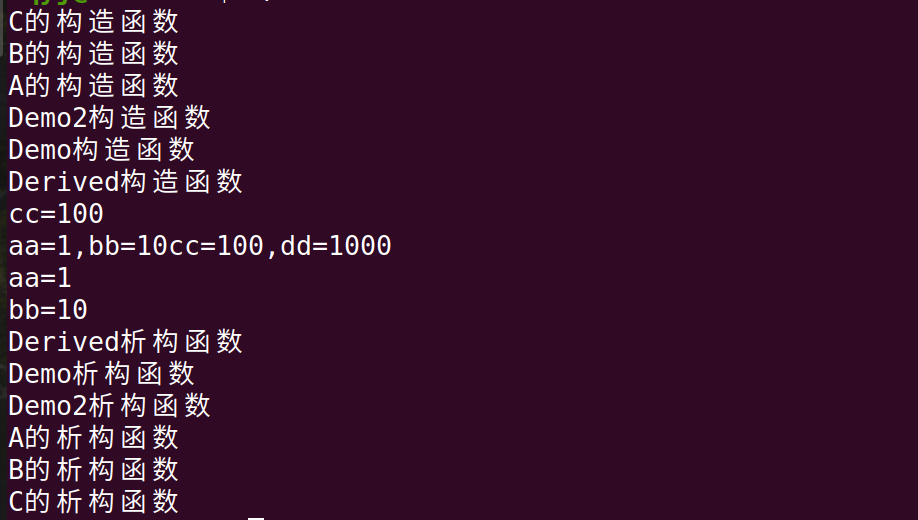
总结:
1、多继承下的构造函数
基类构造函数的调用顺序和和它们在派生类构造函数中出现的顺序无关,而是和声明派生类时基类出现的顺序相同。
仍然以上面的 A、B、C、D 类为例,即使将 D 类构造函数写作下面的形式:
D(形参列表): B(实参列表), C(实参列表), A(实参列表){
//其他操作
}
那么也是先调用 A 类的构造函数,再调用 B 类构造函数,最后调用 C 类构造函数。
构造的调用顺序:
(1)基类的构造(多个基类构造,按照申明派生类时基类出现的顺序)
(2)派生类的成员变量的构造(多个类对象,按照再派生类中出现的顺序)
(3)派生类自己的构造
析构的调用顺序:
与构造的顺序相反
2、命名冲突
当两个或多个基类中有同名的成员时,如果直接访问该成员,就会产生命名冲突,编译器不知道使用哪个基类的成员。
这个时候需要在成员名字前面加上类名和域解析符::,以显式地指明到底使用哪个类的成员
3、多级继承关系在多层级的类的继承关系,A<--B<--C 派生类只负责它的直接基类的构造,不能够去做非直接基类的构造
(七)虚继承和虚基类
形式:
class B: virtual public A{
//类B新增加的成员
};
#include <iostream>
using namespace std;

class A
{
public:
    A(int a):aa(a)
    {
        cout << "A构造函数,aa=" << aa << endl;
    }
    ~A()
    {
        cout << "A析构函数" << endl;
    }
protected:
    int aa;
};

//将类A 声明为虚基类
class B1: virtual public A
{
public:
    B1(int a, int b):b1(b), A(a)
    {
        cout << "B1构造函数,b1=" << b1 << endl;
    }
    ~B1()
    {
        cout << "B1析构函数" << endl;
    }
protected:
    int b1;
};

class B2: virtual public A
{
public:
    B2(int a, int b):b2(b), A(a)
    {
        cout << "B2构造函数,b2=" << b2 << endl;
    }
    ~B2()
    {
        cout << "B2析构函数" << endl;
    }
protected:
    int b2;
};

class Derived: public B1, public B2
{
public:
    Derived(int a, int b1, int b2, int d):dd(d), B1(-100, b1), B2(-200,b2),A(a)
    {
        cout << "Derived构造函数, dd=" << dd << endl;
    }

    ~Derived()
    {
        cout << "Derived析构函数" << endl;
    }

    void show()
    {
        cout << "aa=" << aa << ",b1=" << b1 << ",b2=" << b2
            << ",dd=" << dd << endl;
    }

private:
    int dd;
};

int main()
{
    Derived d1(1, 10, 11, 100);
    d1.show();

    return 0;
}
结果:
(1)没有用virtual修饰类
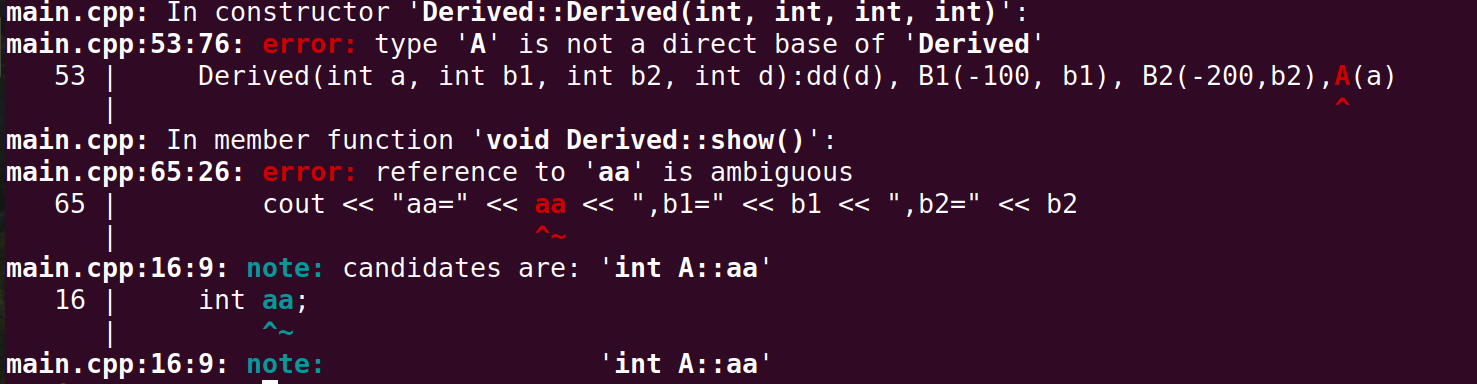 (2)用了虚继承
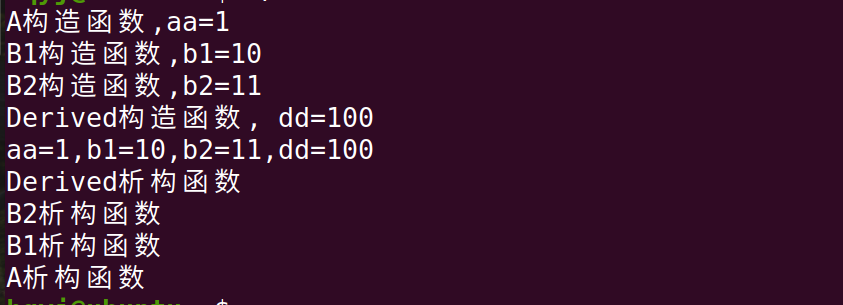
总结:
1、类 A 派生出类 B1 和类 B2,类 C 继承自类 B1 和类 B2,这个时候类 A 中的成员变量和成员函数继承到类 C 中变成了两份,一份来自 A-->B1-->C 这条路径,另一份来自 A-->B2-->C 这条路径 (菱形继承),因为保留多份成员变量不仅占用较多的存储空间,还容易产生命名冲突。
为了解决多继承时的命名冲突和冗余数据问题,C++ 提出了虚继承,使得在派生类中只保留一份间接基类的成员
2、虚继承的目的是让某个类做出声明,承诺愿意共享它的基类。其中,这个被共享的基类就称为虚基类(Virtual Base Class)。
A就是一个虚基类。在这种机制下,不论虚基类在继承体系中出现了多少次,在派生类中都只包含一份虚基类的成员
3、在虚继承中,虚基类是由最终的派生类初始化的,换句话说,最终派生类的构造函数必须要调用虚基类的构造函数。
对最终的派生类来说,虚基类是间接基类,而不是直接基类。这跟普通继承不同,在普通继承中,派生类构造函数中只能调用直接基类的构造函数,不能调用间接基类的
(八)向上转型
概念:类其实也是一种数据类型,也可以发生数据类型转换,不过这种转换只有在基类和派生类之间才有意义,并且只能将派生类赋值给基类,包括将派生类对象赋值给基类对象、将派生类指针赋值给基类指针、将派生类引用赋值给基类引用,这在 C++ 中称为向上转型(Upcasting)。相应地,将基类赋值给派生类称为向下转型(Downcasting)
类型:
1、派生类对象赋值给基类对象
派生类对象的数据已经赋给了基类对象,基类调用的成员函数还是基类的成员函数
2、派生类指针赋值给基类指针
基类的指针指向了派生类的对象的首地址,但是基类指针调用成员函数还是基类的成员函数
3、将派生类对象赋值给基类引用
数据用的是派生的数据,当时调用的基类的成员函数
#include <iostream>
using namespace std;

class Base
{
public:
    Base(int a):b1(a){}
    void show()
    {
        cout << "Base::show(),b1=" << b1 << endl;
    }

    int b1;
};

class Derived: public Base
{
public:
    Derived(int a, int d):d1(d), Base(a){}

    void show()
    {
        cout << "Derived::show(), b1=" << b1 << ",d1=" << d1 << endl;
    }
    int d1;
};

void print(int i, string s="--------------------")
{
    cout << i << s << endl;
}

int main()
{
    Base b1(1);
    b1.show();

    print(1);
    Derived d1(10, 11);
    d1.show();

    //upcast 将派生类赋值给基类
    print(2);
    b1 = d1;
    b1.show();

    //upcast 指针
    print(3);
    Base *pBase;
    pBase = &d1;
    pBase->show();

    //upcast 引用
    print(4);
    Base& ref_Base = d1;
    ref_Base.show();

    return 0;
} 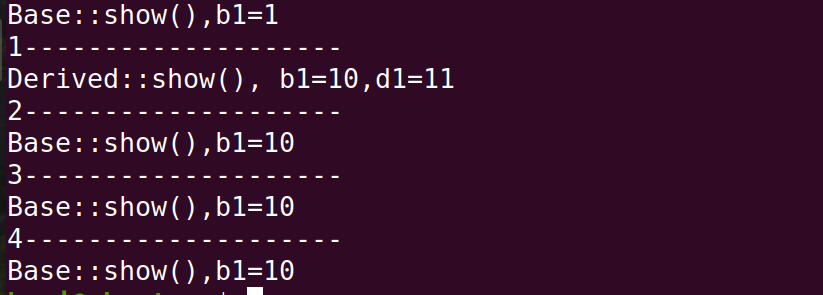
结论:
1、向上转型,类型没有变还是父类类型,如果两个重名函数不是虚函数(没有使用virtual关键字),则调用父类函数(静态绑定),反之调用子类函数(多态,动态绑定),而子类已经帮父类初始化,所以用的是子类的数据
2、编译器虽然通过指针的指向来访问成员变量
3、不能通过指针的指向来访问成员函数,编译器通过类的类型来访问成员函数
(九)继承和组合
继承 is-a (一辆车它继承了电话功能模块,也就拥有了打电话的功能)
组合 has-a (一辆车上拥有一个电话,那这辆车就有了电话的功能)
#include <iostream>
using namespace std;

class Phone{
public:
    void make_call(string name){
        cout << "打电话给" << name << endl;
    }

};

class Car1:public Phone{
public:
    void drive(){
        cout << owner_name << "正在开车" << endl;
    }
    string owner_name;
};

class Car2{
public:
    void drive(){
        cout << owner_name << "正在开车" << endl;
    }
    void make_call(string name){
        phone.make_call(name);
    }
    string owner_name;
    Phone phone;
};

int main()
{

    Car1 c1;
    c1.owner_name = "zhangsan";
    c1.drive();
    c1.make_call("lisi");
    cout << "-------------" << endl;

    Car2 c2;
    c2.owner_name = "haha";
    c2.drive();
    c2.make_call("heihei");
    return 0;
}
继承与组合区别代码:
#include <iostream>
#include <string>

// 基类:Animal
class Animal {
protected:
    std::string name;

public:
    Animal(const std::string& name) : name(name) {}

    void setName(const std::string& newName) {
        name = newName;
    }

    virtual void sound() const = 0;
};

// 派生类:Dog
class Dog : public Animal {
public:
    Dog(const std::string& name) : Animal(name) {}

    void sound() const override {
        std::cout << "The dog " << name << " barks." << std::endl;
    }
};

// 组合类:House
class House {
private:
    Animal* pet;

public:
    House(Animal* animal) : pet(animal) {}

    void playSound() const {
        pet->sound();
    }
};

int main() {
    Dog dog("Buddy");

    House house(&dog);
    house.playSound();

    return 0;
}
结果:
![]()
二十、多态
(一)多态的概念
1、通俗意义的多态
2、C++中的多态
借助与虚函数,基类指针指向基类对象时就使用基类的成员(包括成员函数和成员变量),指向派生类对象时就使用派生类的成员。
换句话说,基类指针可以按照基类的方式来做事,也可以按照派生类的方式来做事,它有多种形态,或者说有多种表现方式,我们将这种现象称为多态(Polymorphism)
3、多态的用处(nike, war_game)
(二)虚函数
1、简单地说,在类中用virtual修饰的成员函数,就是虚函数
2、虚函数的限制:
A、非类的成员函数不能定义为虚函数
B、类的静态成员函数不能定义为虚函数
C、构造函数不能定义为虚函数,但可以将析构函数定义为虚函数
D、只需要在声明函数的类体中使用关键字“virtual”将函数声明为虚函数,而定义函数时不需要使用关键字“virtual”。
E、当将基类中的某一成员函数声明为虚函数后,派生类中的同名函数(函数名相同、参数列表完全一致、返回值类型相关)自动成为虚函数。
3、同名成员函数的覆盖、重载、隐藏
1.覆盖(override)
2.重载(overload)
3.隐藏(hidden)
4、C++多态构成的条件
5、C++多态的原理(虚函数表和虚函数指针)
6、动态联编(了解)
7、抽象类和纯虚函数
纯虚函数:
virtual ReturnType Function(Argument List)= 0
抽象基类:
含有纯虚函数的类就是抽象类
抽象类没有完整的信息,只能是派生类的基类
抽象类不能有实例,不能有静态成员
派生类应该实现抽象类的所有方法
8、虚析构函数
析构函数可以是虚函数,而且一般的建议是析构函数是虚函数
由于指针指向的对象是基类类型,所以delete销毁对象的时候,并不会调用派生类的析构函数,这样就造成了对象销毁不完整,所有需要将析构函数定义为虚函数
二十一、异常/强制类型转换运算符
(一)异常
异常
程序的错误大致可以分为三种,分别是语法错误、逻辑错误和运行时错误:
1、语法错误在编译和链接阶段就能发现,只有100%符合语法规则的代码才能生成可执行程序。 语法错误是最容易发现、最容易定位、最容易排除的错误,程序员最不需要担心的就是这种错误。
2、逻辑错误是说我们编写的代码思路有问题,不能够达到最终的目标,这种错误可以通过调试来解决。
3、运行时错误是指程序在运行期间发生的错误,例如除数为 0、内存分配失败、数组越界、文件不存在等。 C++异常(Exception)机制就是为解决运行时错误而引入的。
1 什么是异常?
1 处理运行时错误的一种机制
2 将错误的发现和错误的处理分离开,这样便于程序的的维护和开发
2 异常的语法
try
{
// 可能抛出异常的语句
throw "this is a exception";
}
catch(exceptionType variable)
{
// 处理异常的语句
}
异常处理的流程
抛出(Throw)--> 检测(Try) --> 捕获(Catch)
注意点:
检测到异常后程序的执行流会发生跳转,从异常点跳转到 catch 所在的位置,位于异常点之后的、并且在当前 try 块内的语句就都不会再执行了;
即使 catch 语句成功地处理了错误,程序的执行流也不会再回退到异常点,所以这些语句永远都没有执行的机会了
3 发生异常的位置
1 异常可以发生在当前的 try 块中
2 也可以发生在 try 块所调用的某个函数中
3 try所调用的函数又调用了另外的一个函数,在最后的函数中发生了异常
结论: 异常发生后代码再也不能被执行
4 异常的数据类型
exceptionType是异常类型,它指明了当前的 catch 可以处理什么类型的异常;
variable是一个变量,用来接收异常信息。当程序抛出异常时,会创建一份数据,这份数据包含了错误信息,
程序员可以根据这些信息来判断到底出了什么问题,接下来怎么处理
1 异常类型可以是 int、char、float、bool 等基本类型
2 也可以是指针、数组、字符串、结构体、类等聚合类型
3 C++语言本身以及标准库中的函数抛出的异常,都是exception类或其子类的异常
5 catch/多级catch
catch:
我们可以将 catch 看做一个没有返回值的函数,当异常发生后 catch 会被调用,并且会接收实参(异常数据)
但是 catch 和真正的函数调用又有区别:
1 真正的函数调用,形参和实参的类型必须要匹配,或者可以自动转换,否则在编译阶段就报错了。
2 而对于catch,异常是在运行阶段产生的,它可以是任何类型,没法提前预测,所以不能在编译阶段判断类型是否正确,只能等到程序运行后,
真的抛出异常了,再将异常类型和 catch 能处理的类型进行匹配,匹配成功的话就“调用”当前的 catch,否则就忽略当前的 catch
多级catch:
在try的代码里,有可能会出现抛出多种的异常,所以我的异常处理要采用多级的catch,如果不多级捕获,系统会中止程序的执行
try{
//可能抛出异常的语句
}catch (exception_type_1 e){
//处理异常的语句
}catch (exception_type_2 e){
//处理异常的语句
}
//其他的catch
catch (exception_type_n e){
//处理异常的语句
}
catch 在匹配过程中的类型转换
1 向上转型
2 const转换
3 数组或函数指针转换
其他的类型转换都不能应用于catch。
6 throw
1 在 C++ 中,我们使用 throw 关键字来显式地抛出异常,
throw 语法:
throw exceptionData;
异常必须显式地抛出,才能被检测和捕获到;如果没有显式的抛出,即使有异常也检测不到
2 throw用作异常规范(了解,不需要掌握)
throw 关键字除了可以用在函数体中抛出异常,还可以用在函数头和函数体之间,指明当前函数能够抛出的异常类型,这称为异常规范(Exception specification)
double func(char param) throw(int); //该函数有可能抛出一个整型的异常数据
double func1(string a) throw(char, int, exception); //该函数有可能抛出3钟异常数据
double func2(int a) throw(); //该函数不抛出异常
异常规范是C++98新增的一项功能,但是后来的C++11已经将它抛弃了,不再建议使用
请抛弃异常规范,不要再使用它
7 C++ exception类:C++标准异常的基类
class exception {
public:
exception () noexcept; //构造函数
exception (const exception&) noexcept; //拷贝构造函数
exception& operator= (const exception&) noexcept; //运算符重载
virtual ~exception(); //虚析构函数
virtual const char* what() const noexcept;
}
在代码中可以直接使用标准异常类(invalid_argument, out_of_range)
8 自定义异常
1 从标准异常派生
2 创建全新的异常类
(二) 强制类型转换运算符
C++ 引入了四种功能不同的强制类型转换运算符以进行强制类型转换:
编译期间就确定转换:
static_cast
reinterpret_cast
const_cast
运行期间确定转换:
dynamic_cast //主要用于向下转换
基本语法:
C++ 强制类型转换运算符的用法如下:
强制类型转换运算符<要转换到的类型>(待转换的表达式)
例如:
float a = 3.14
int b = static_cast<int>(a); //将单浮点数转整数
1 static_cast
static_cast<type-id> (expression)
1 用于基本数据类型之间的转换,如把int转换成char,把float转换成int
2 用于类层次结构中基类(父类)和派生类(子类)之间指针或引用的转换
进行上行转换(把派生类的指针或引用转换成基类表示)是安全的;
进行下行转换(把基类指针或引用转换成派生类表示)时,由于没有动态类型检查,所以是不安全的
3 把空指针转换成目标类型的空指针
4 把任何类型的表达式转换成void类型
2 reinterpret_cast 特别灵活,特别危险,它的安全要程序员自己来保证
reinterpret_cast<type-id> (expression)
用于进行各种不同类型的指针之间、不同类型的引用之间以及指针和能容纳指针的整数类型之间的转换
1 改变指针或引用的类型
2 将指针或引用转换为一个足够长度的整形
3 将整型转换为指针或引用类型
3 const_cast
const_cast 运算符仅用于进行去除 const 属性的转换
将 const 引用转换为同类型的非 const 引用,将 const 指针转换为同类型的非 const 指针时可以使用 const_cast 运算符
4 dynamic_cast
dynamic_cast<type-id> (expression)
1 其他三种都是编译时完成的,dynamic_cast 是运行时处理的,运行时要进行类型检查
2 不能用于内置的基本数据类型的强制转换
3 dynamic_cast 要求 <> 内所描述的目标类型必须为指针或引用。dynamic_cast 转换如果成功的话返回的是指向类的指针或引用,转换失败的话则会返回 nullptr
4 在类的转换时,在类层次间进行上行转换(子类指针指向父类指针)时,dynamic_cast 和 static_cast 的效果是一样的。
在进行下行转换(父类指针转化为子类指针)时,dynamic_cast具有类型检查的功能,比 static_cast 更安全。
向下转换的成功与否还与将要转换的类型有关,即要转换的指针指向的对象的实际类型与转换以后的对象类型一定要相同,否则转换失败。
5 使用dynamic_cast进行转换的,基类中一定要有虚函数,否则编译不通过(类中存在虚函数,就说明它有想要让基类指针或引用指向派生类对象的情况,此时转换才有意义)
static_cast和dynamic_cast的区别:
static_cast它是在编译期间就确定了,向上转换和向下转换都是可以的,但是只有向上转换是安全的;
dynamic_cast它是在运行期间来确定是否转换成功,只支持向上转换,就是只有基类指针真正指向了我要转换的类型,才允许转换成功,需要在代码里检查我的转换的结果
转换的指针如果不为空,表示转换成功,否则转换就失败


 562
562


 被折叠的 条评论
为什么被折叠?
被折叠的 条评论
为什么被折叠?
 到【灌水乐园】发言


