


目录
一、led硬件原理简单介绍
Led 的电路比较简单, 一般是使用三极管搭建一个控制电路。
如下图所示, 是原理图中两个 Led 的控制电路。 KP_COL0 和 VDD50_EN 网络控制 Led 的通断。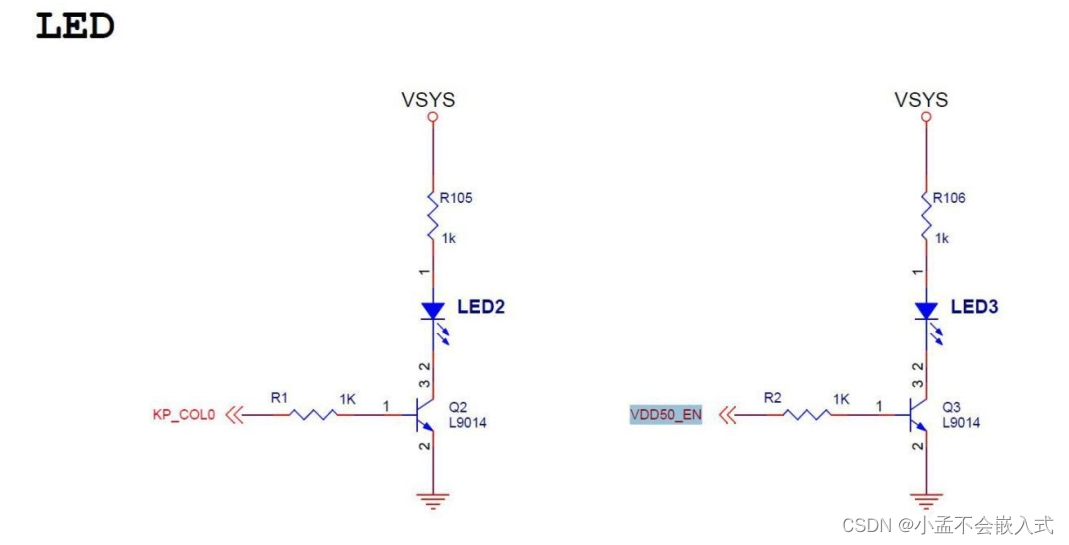
当 KP_COL0 和 VDD50_EN 网络时高电平的时候, 三极管 L9014 的 BE 导通, CE 导通, 相当于 5V 的VSYS 电压加到 1K 和 Led 小灯上, 小灯就会亮。
当 KP_COL0 和 VDD50_EN 网络时低电平的时候, 三极管 L9014 的 BE 会截止, CE 截止, 相当于 5V的 VSYS 电压加到 1K、 Led 小灯和一个无限大的电阻上, 电流为零, 小灯就会灭。
下面给大家介绍一部分涉及 GPIO 调用、 赋值以及配置的函数。
二、gpio申请和释放函数
想用使用任何一个 GPIO 都必须先申请。
在头文件“include/linux/gpio.h”中有 Linux 默认的 GPIO 申请函数, 这个头文件是属于嵌入式 Linux 平台, 任何一个嵌入式 Linux 内核都可以这么使用。
在源码目录中使用命令“vim include/linux/gpio.h”打开该文件。
如下图所示, 就是本节实验中需要用到的函数 gpio_request。
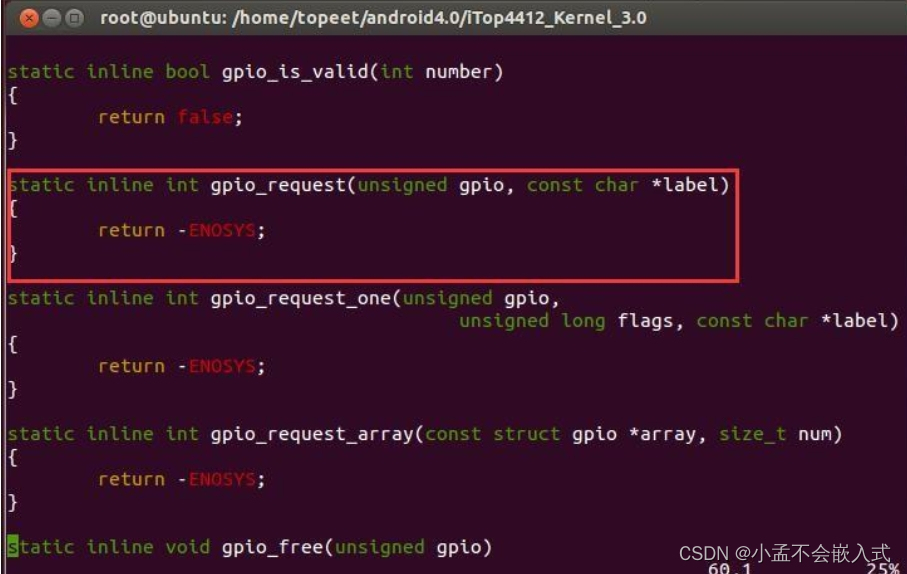
首先这个函数有一个重要的“检测”功能, 就是如果其它地方申请了这个 IO, 那么这里就会返回错误,提示已经被占用了, 这是 Linux 中的一个标准用法。
gpio_request 函数有两个参数
unsigned gpio, 申请的那个 GPIO, 一般是 GPIO 对应的宏定义const char *label, 为 GPIO 取个名字, 便于阅读
如下图所示, 和 gpio_request 函数对应的是 gpio_free 函数。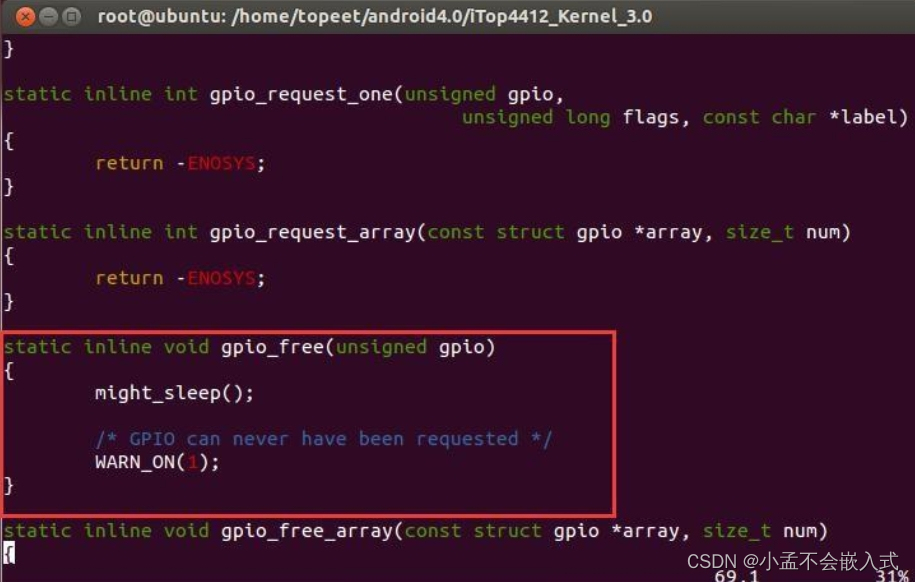
在调用 gpio_request 函数之后, 向系统表明这个 IO 已经被占用了, 在卸载驱动的时候一般需要调用gpio_free 函数将其释放。
gpio_free 函数的参数比较简单, 只有一个 GPIO 参数, 使用 GPIO 对应的宏定义即可。 如下图所示,还有一个赋值函数 gpio_set_value。
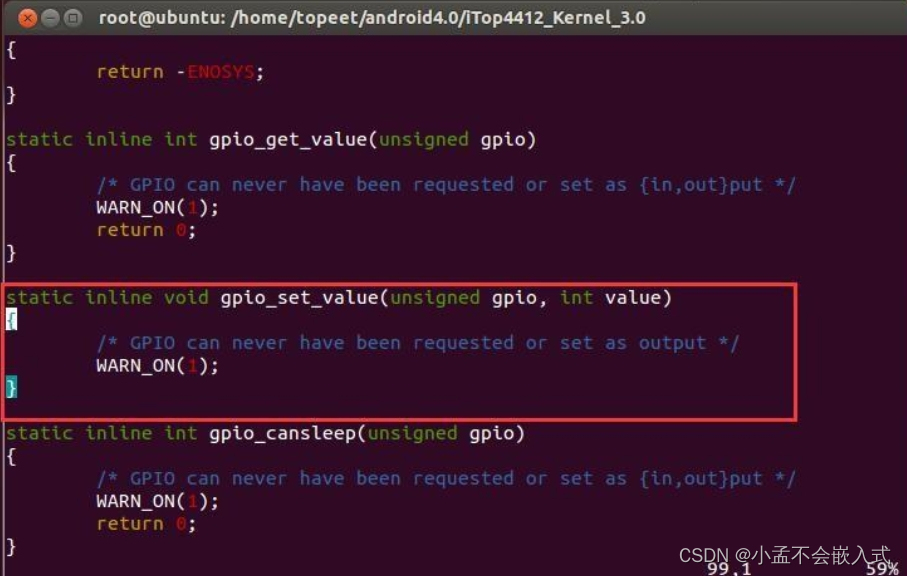
在将 GPIO 配置为输出模式之后, 还需要给 GPIO 赋值, 一般就是高电平和低电平两种。 两个参数分别为
unsigned gpio, GPIO
int value, 高电平 1 和低电平 0。
三、gpio配置参数宏定义
GPIO 在 Linux 初始化, 进行映射之后调用 GPIO 操作函数对 GPIO 宏定义进行操作就是对 GPIO 的操作。
这个 GPIO 宏定义文件都是由原厂提供, 肯定是已经做好的, 属于 BSP 板级开发包。
在源码目录中使用命令“ vim arch/arm/mach-exynos/include/mach/gpio-exynos4.h” 打开该文件。
如下图所示, 可以看到所有的 GPIO 都已经定义了。
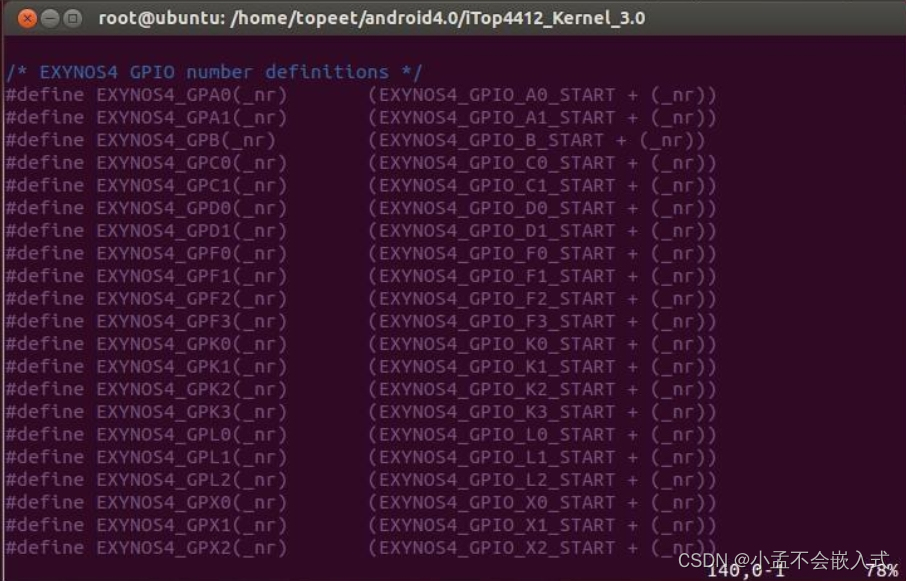
如上图所示, 则两个 Led 的宏定义为 EXYNOS4_GPL2(0), EXYNOS4_GPK1(1)。
四、gpio配置函数和参数
在 Linux 中, 对 GPIO 的配置函数以及参数都已经集成到三星板级开发包中。
先来看一下配置函数, 如下图所示, 在源码目录中使用命令“vim arch/arm/plat-samsung/include/plat/gpio-cfg.h” 打开该文件。
如下图所示, s3c_gpio_cfgpin 函数就是本节实验需要的。
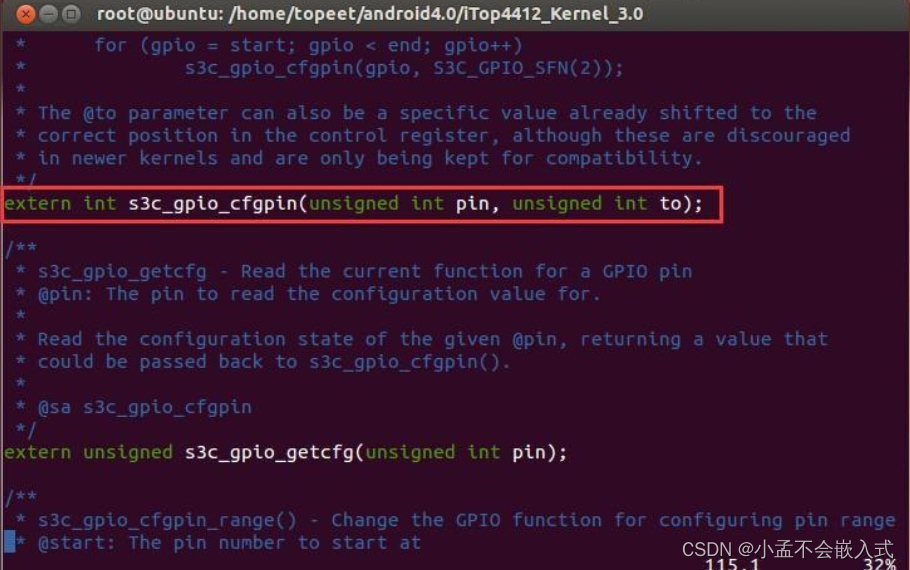
如上图所示, 函数 extern int s3c_gpio_cfgpin(unsigned int pin, unsigned int to); 一般来说带有 s3cxxx 的函数就是三星平台能够通用的函数。
s3c_gpio_cfgpin管脚配置函数
参数 unsigned int pin, 管脚
参数 unsigned int to, 配置参数。
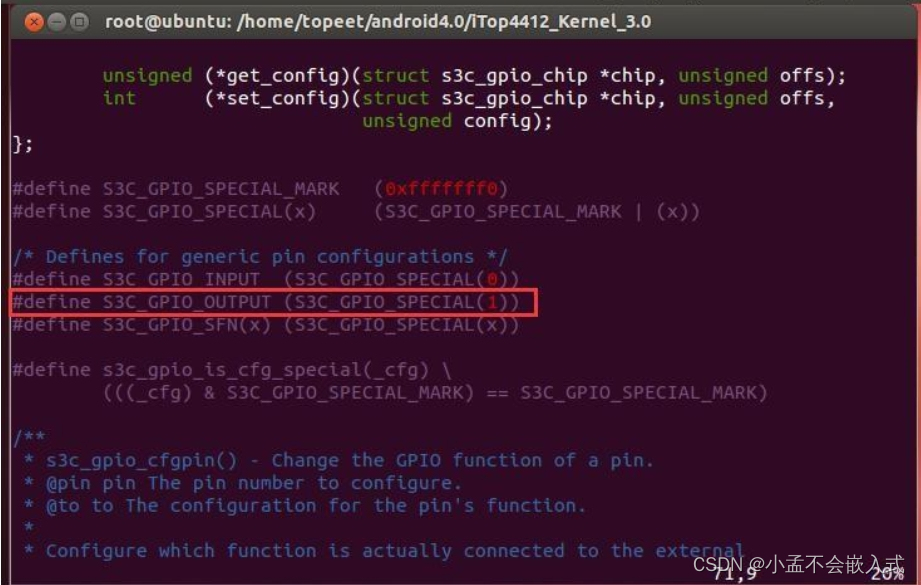
如下图所示, 对于 GPIO 需要将其配置为输出模式, 对应 S3C_GPIO_OUTPUT 宏定义。
五、驱动程序代码和测试代码例程
1.驱动的编写
#include <linux/init.h>
#include <linux/module.h>

/*驱动注册的头文件,包含驱动的结构体和注册和卸载的函数*/
#include <linux/platform_device.h>
/*注册杂项设备头文件*/
#include <linux/miscdevice.h>
/*注册设备节点的文件结构体*/
#include <linux/fs.h>

/*Linux中申请GPIO的头文件*/
#include <linux/gpio.h>
/*三星平台的GPIO配置函数头文件*/
/*三星平台EXYNOS系列平台,GPIO配置参数宏定义头文件*/
#include <plat/gpio-cfg.h>
#include <mach/gpio.h>
/*三星平台4412平台,GPIO宏定义头文件*/
#include <mach/gpio-exynos4.h>

#define DRIVER_NAME "hello_ctl"
#define DEVICE_NAME "hello_ctl"


MODULE_LICENSE("Dual BSD/GPL");
MODULE_AUTHOR("TOPEET");

static long hello_ioctl( struct file *files, unsigned int cmd, unsigned long arg){
	printk("cmd is %d,arg is %d\n",cmd,arg);

	if(cmd > 1){
		printk(KERN_EMERG "cmd is 0 or 1\n");
	}
	if(arg > 1){
		printk(KERN_EMERG "arg is only 1\n");
	}

	gpio_set_value(EXYNOS4_GPL2(0),cmd);

	return 0;
}

static int hello_release(struct inode *inode, struct file *file){
	printk(KERN_EMERG "hello release\n");
	return 0;
}

static int hello_open(struct inode *inode, struct file *file){
	printk(KERN_EMERG "hello open\n");
	return 0;
}

static struct file_operations hello_ops = {
	.owner = THIS_MODULE,
	.open = hello_open,
	.release = hello_release,
	.unlocked_ioctl = hello_ioctl,
};

static  struct miscdevice hello_dev = {
	.minor = MISC_DYNAMIC_MINOR,
	.name = DEVICE_NAME,
	.fops = &hello_ops,
};


static int hello_probe(struct platform_device *pdv){
	int ret;

	printk(KERN_EMERG "\tinitialized\n");

	ret = gpio_request(EXYNOS4_GPL2(0),"LEDS");
	if(ret < 0){
		printk(KERN_EMERG "gpio_request EXYNOS4_GPL2(0) failed!\n");
		return ret;
	}

	s3c_gpio_cfgpin(EXYNOS4_GPL2(0),S3C_GPIO_OUTPUT);

	gpio_set_value(EXYNOS4_GPL2(0),0);

	misc_register(&hello_dev);

	return 0;
}

static int hello_remove(struct platform_device *pdv){

	printk(KERN_EMERG "\tremove\n");
	misc_deregister(&hello_dev);
	return 0;
}

static void hello_shutdown(struct platform_device *pdv){

	;
}

static int hello_suspend(struct platform_device *pdv,pm_message_t pmt){

	return 0;
}

static int hello_resume(struct platform_device *pdv){

	return 0;
}

struct platform_driver hello_driver = {
	.probe = hello_probe,
	.remove = hello_remove,
	.shutdown = hello_shutdown,
	.suspend = hello_suspend,
	.resume = hello_resume,
	.driver = {
		.name = DRIVER_NAME,
		.owner = THIS_MODULE,
	}
};


static int hello_init(void)
{
	int DriverState;

	printk(KERN_EMERG "HELLO WORLD enter!\n");
	DriverState = platform_driver_register(&hello_driver);

	printk(KERN_EMERG "\tDriverState is %d\n",DriverState);
	return 0;
}


static void hello_exit(void)
{
	printk(KERN_EMERG "HELLO WORLD exit!\n");

	platform_driver_unregister(&hello_driver);
}

module_init(hello_init);
module_exit(hello_exit);
2. 测试程序编写
#include <stdio.h>

#include <sys/types.h>
#include <sys/stat.h>
#include <fcntl.h>
#include <unistd.h>
#include <sys/ioctl.h>

main(){
	int fd;
	char *hello_node = "/dev/hello_ctl";

/*O_RDWR只读打开,O_NDELAY非阻塞方式*/
	if((fd = open(hello_node,O_RDWR|O_NDELAY))<0){
		printf("APP open %s failed",hello_node);
	}
	else{
		printf("APP open %s success",hello_node);
		ioctl(fd,1,1);
		sleep(3);
		ioctl(fd,0,1);
		sleep(3);
		ioctl(fd,1,1);
	}

	close(fd);
}


 2650
2650

 被折叠的 条评论
为什么被折叠?
被折叠的 条评论
为什么被折叠?
 到【灌水乐园】发言


