


一,界面布局的通用属性
| 属性名称 | 功能描述 |
|---|---|
| android:id | 设置布局标识 |
| android:layout_width | 设置布局宽度 |
| android:layout_height | 设置布局高度 |
| android:background | 设置布局背景 |
| android:layout_margin | 设置布局外边距 |
| android:padding | 设置布局内边距 |
二、线性布局
线性布局内的子控件为水平或竖直排列。
1、基本语法格式
<LinearLayout xmlns:android="http://schemas.android.com/apk/res/android"
             <!--
              属性=“属性值”...如:
              android:layout_width="match_parent"
              android:layout_height="match_parent"
              -->
/>
match_parent代表该布局的高(宽)度与父布局一致
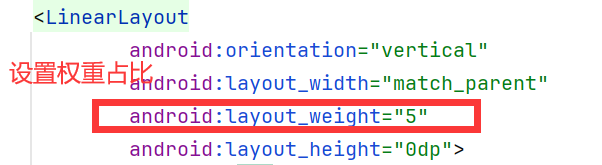
2、自身常用属性
| 属性名称 | 功能描述 |
|---|---|
| android:orientation | 设置布局内控件的排列方式 |
| android:layout_weight | 在布局内设置控件的权重 |
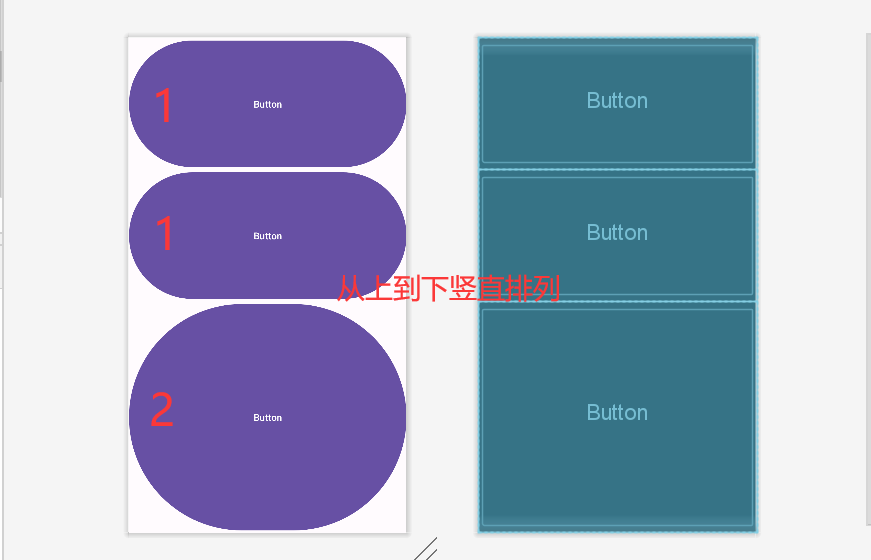
android:orientation:有两个可选值,分别为vertical(竖直排列)和horizontal(水平排列),默认为horizontal
android:layout_weight:在控件中直接用int来表示权重。
示例:
<?xml version="1.0" encoding="utf-8"?>
<LinearLayout xmlns:android="http://schemas.android.com/apk/res/android"
              android:layout_width="match_parent"
              android:layout_height="match_parent"
-->           android:orientation="vertical">
    <Button
            android:text="Button"
            android:layout_width="match_parent"
-->         android:layout_weight="1"
            android:layout_height="wrap_content" android:id="@+id/button6"/>
    <Button
            android:text="Button"
            android:layout_width="match_parent"
-->         android:layout_weight="1"
            android:layout_height="wrap_content" android:id="@+id/button7"/>
    <Button
            android:text="Button"
            android:layout_width="match_parent"
-->         android:layout_weight="2"
            android:layout_height="wrap_content" android:id="@+id/button8"/>
</LinearLayout>
布局结果:
3、实战演练
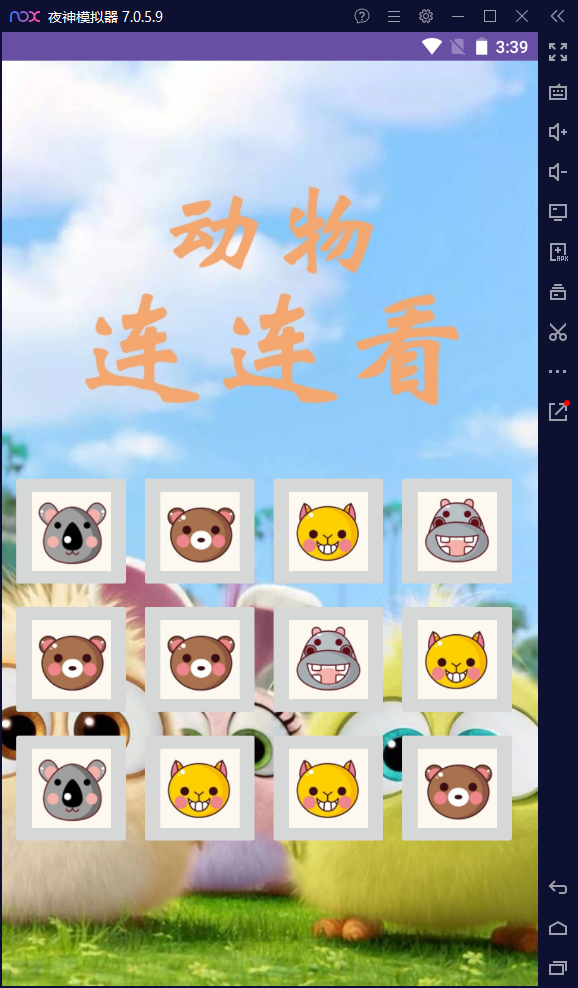
仿写动物连连看的游戏界面。
步骤1:将准备好的图片放置res下的drawable-hdpi文件夹下(默认情况下没有,需要自己手动创建),注意图片应用.png格式,用英文命名
步骤2:为减少代码冗余,在res/values下创建styles.xml文件,为按钮设置统一样式btnStyle
<?xml version="1.0" encoding="utf-8"?>
<resources>
    <style name="btnStyle">
        <item name="android:layout_width">100dp</item>
        <item name="android:layout_height">100dp</item>
        <item name="android:layout_marginRight">8dp</item>
    </style>
</resources>步骤3:排版
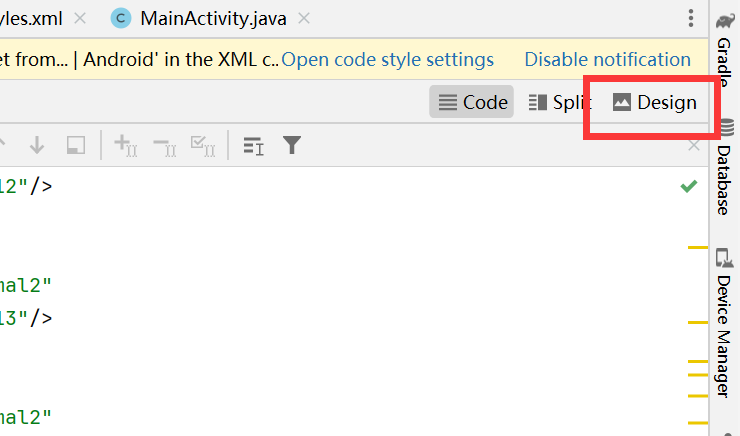
在res/layout文件夹下创建layout.xml,点击右上角Design进行布局

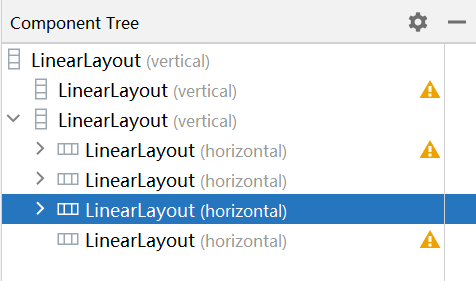
注意这里使用的线性嵌套布局
拉好以后点击Code调整组件样式

步骤4:更改java中运行显示页面(java文件夹中的MainActivity)
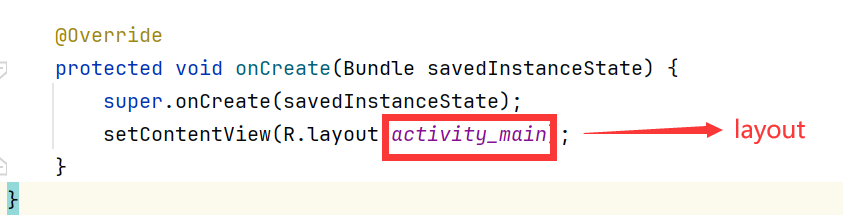
layout.xml完整代码:
<?xml version="1.0" encoding="utf-8"?>
<LinearLayout xmlns:android="http://schemas.android.com/apk/res/android"
              xmlns:app="http://schemas.android.com/apk/res-auto" android:layout_width="match_parent"
              android:layout_height="match_parent"
              android:background="@drawable/background"
              android:orientation="vertical">
    <LinearLayout
            android:orientation="vertical"
            android:layout_width="match_parent"
            android:layout_weight="4"
            android:layout_height="0dp">
    </LinearLayout>
    <LinearLayout
            android:orientation="vertical"
            android:layout_width="match_parent"
            android:layout_weight="5"
            android:layout_height="0dp">
        <LinearLayout
                android:orientation="horizontal"
                android:layout_width="match_parent"
                android:layout_weight="1"
                android:layout_height="0dp">
            <ImageButton
                    style="@style/btnStyle"
                    android:layout_marginLeft="8dp"
                    app:srcCompat="@drawable/animal1"
                    android:id="@+id/imageButton4"/>
            <ImageButton
                    style="@style/btnStyle"
                    app:srcCompat="@drawable/animal3"
                    android:id="@+id/imageButton6"/>
            <ImageButton
                    style="@style/btnStyle"
                    app:srcCompat="@drawable/animal2"
                    android:id="@+id/imageButton5"/>
            <ImageButton
                    style="@style/btnStyle"
                    app:srcCompat="@drawable/animal4"
                    android:id="@+id/imageButton7"/>
        </LinearLayout>
        <LinearLayout
                android:orientation="horizontal"
                android:layout_width="match_parent"
                android:layout_weight="1"
                android:layout_height="0dp">
            <ImageButton
                    style="@style/btnStyle"
                    android:layout_marginLeft="8dp"
                    app:srcCompat="@drawable/animal3"
                    android:id="@+id/imageButton8"/>
            <ImageButton
                    style="@style/btnStyle"
                    app:srcCompat="@drawable/animal3"
                    android:id="@+id/imageButton9"/>
            <ImageButton
                    style="@style/btnStyle"
                    app:srcCompat="@drawable/animal4"
                    android:id="@+id/imageButton10"/>
            <ImageButton
                    style="@style/btnStyle"
                    app:srcCompat="@drawable/animal2"
                    android:id="@+id/imageButton11"/>
        </LinearLayout>
        <LinearLayout
                android:orientation="horizontal"
                android:layout_width="match_parent"
                android:layout_weight="1"
                android:layout_height="0dp">
            <ImageButton
                    style="@style/btnStyle"
                    android:layout_marginLeft="8dp"
                    app:srcCompat="@drawable/animal1"
                    android:id="@+id/imageButton12"/>
            <ImageButton
                    style="@style/btnStyle"
                    app:srcCompat="@drawable/animal2"
                    android:id="@+id/imageButton13"/>
            <ImageButton
                    style="@style/btnStyle"
                    app:srcCompat="@drawable/animal2"
                    android:id="@+id/imageButton14"/>
            <ImageButton
                    style="@style/btnStyle"
                    app:srcCompat="@drawable/animal3"
                    android:id="@+id/imageButton15"/>
        </LinearLayout>
        <LinearLayout
                android:orientation="horizontal"
                android:layout_width="match_parent"
                android:layout_weight="1"
                android:layout_height="0dp">
        </LinearLayout>
    </LinearLayout>
</LinearLayout>
运行结果:
三、相对布局
通过相对定位的方式指定子控件的位置。
1、基本语法格式
<RelativeLayout xmlns:android="http://schemas.android.com/apk/res/android"
              android:layout_width="match_parent"
              android:layout_height="match_parent">

</RelativeLayout>
2、自身常用属性
| 属性名称 | 功能描述 |
|---|---|
| android:layout_centerlnParent | 设置当前控件位于父布局的中央位置 |
| android:layout_centerVertical | 设置当前控件位于父布局的垂直居中位置 |
| android:layout_centerHorizontal | 设置当前控件位于父控件的水平居中位置 |
| android:layout_above | 设置当前控件位于某空间上方 |
| android:layout_below | 设置当前控件位于某空间下方 |
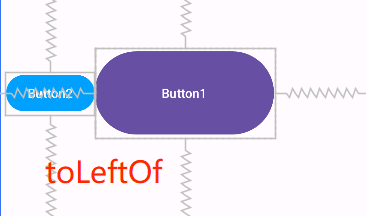
| android:layout_toLeftOf | 设置当前控件位于某空间左侧 |
| android:layout_toRightOf | 设置当前控件位于某空间右侧 |
| android:layout_alignParentTop | 设置当前控件与父控件顶端对齐 |
| android:layout_alignParentLeft | 设置当前控件与父控件左对齐 |
| android:layout_alignParentRight | 设置当前控件与父控件右对齐 |
| android:layout_alignParentBottom | 设置当前控件与父控件底端对齐 |
| android:layout_alignTop | 设置当前控件上边界与某控件上边界对齐 |
| android:layout_alignBottom | 设置当前控件下边界与某控件下边界对齐 |
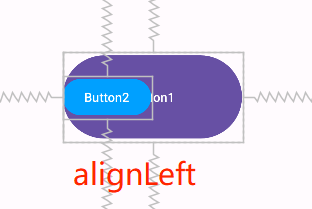
| android:layout_alignLeft | 设置当前控件左边界与某控件左边界对齐 |
| android:layout_alignRight | 设置当前控件右边界与某控件右边界对齐 |
区分:android:layout_toLeftOf与android:layout_alignLeft
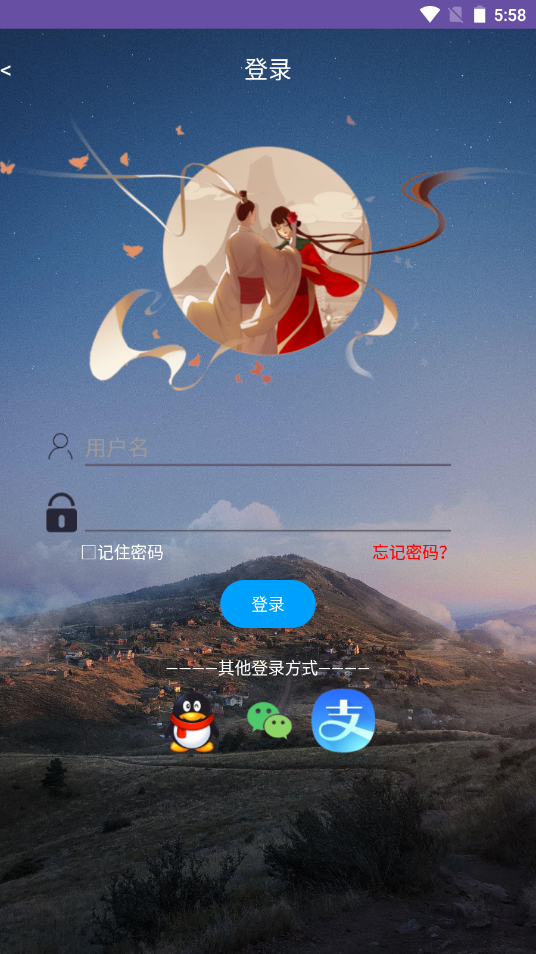
3、实战演练
仿写一个登录页面。
注意事项:
1、res/values/colors.xml需加入蓝色与红色两个颜色的定义(默认只有黑白)
<?xml version="1.0" encoding="utf-8"?>
<resources>
    <color name="black">#FF000000</color>
    <color name="white">#FFFFFFFF</color>
    <color name="red">#ff0000</color>
    <color name="blue">#00a0ff</color>
</resources>
2、<为特殊符号,直接写入无法识别,需用 < 代替
layout1完整代码:
<RelativeLayout xmlns:android="http://schemas.android.com/apk/res/android"
xmlns:app="http://schemas.android.com/apk/res-auto" android:layout_width="match_parent"
android:layout_height="match_parent"
android:background="@drawable/loginbackground"
>
<TextView
android:text="登录"
android:textSize="20dp"
android:textColor="@color/white"
android:layout_centerHorizontal="true"
android:layout_marginTop="20dp"
android:layout_width="wrap_content"
android:layout_height="wrap_content" android:id="@+id/textView3"/>
<TextView
android:text="<"
android:textSize="20dp"
android:textColor="@color/white"
android:layout_alignBottom="@+id/textView3"
android:layout_width="wrap_content"
android:layout_height="wrap_content" android:id="@+id/textView4"/>
<ImageView
android:layout_below="@+id/textView3"
android:layout_marginTop="20dp"
android:layout_width="wrap_content"
android:layout_height="wrap_content" app:srcCompat="@drawable/logintouxiang" android:id="@+id/imageView"/>
<EditText
android:layout_below="@+id/imageView"
android:layout_centerHorizontal="true"
android:layout_marginTop="20dp"
android:layout_width="wrap_content"
android:layout_height="wrap_content"
android:inputType="text"
android:text="用户名"
android:ems="15"
android:id="@+id/editTextText"/>
<ImageView
android:layout_toLeftOf="@+id/editTextText"
android:layout_alignTop="@+id/editTextText"
android:layout_marginTop="5dp"
android:layout_width="wrap_content"
android:layout_height="wrap_content" app:srcCompat="@drawable/loginaccount2" android:id="@+id/imageView2"/>
<EditText
android:layout_below="@+id/editTextText"
android:layout_centerHorizontal="true"
android:layout_marginTop="10dp"
android:layout_width="wrap_content"
android:layout_height="wrap_content"
android:inputType="textPassword"
android:ems="15"
android:id="@+id/editTextTextPassword"/>
<ImageView
android:layout_toLeftOf="@+id/editTextTextPassword"
android:layout_alignTop="@+id/editTextTextPassword"
android:layout_marginTop="5dp"
android:layout_marginRight="3dp"
android:layout_width="wrap_content"
android:layout_height="wrap_content" app:srcCompat="@drawable/loginpassword" android:id="@+id/imageView3"/>
<TextView
android:text="□记住密码"
android:textColor="@color/white"
android:layout_below="@+id/editTextTextPassword"
android:layout_alignLeft="@id/editTextTextPassword"
android:layout_width="wrap_content"
android:layout_height="wrap_content" android:id="@+id/textView"/>
<TextView
android:text="忘记密码?"
android:textColor="@color/red"
android:layout_below="@+id/editTextTextPassword"
android:layout_alignRight="@id/editTextTextPassword"
android:layout_width="wrap_content"
android:layout_height="wrap_content" android:id="@+id/textView2"/>
<Button
android:text="登录"
android:backgroundTint="@color/blue"
android:layout_centerHorizontal="true"
android:layout_below="@+id/textView2"
android:layout_marginTop="10dp"
android:layout_width="80dp"
android:layout_height="wrap_content" android:id="@+id/button"/>
<TextView
android:text="————其他登录方式————"
android:layout_below="@id/button"
android:layout_centerHorizontal="true"
android:layout_marginTop="20dp"
android:textColor="@color/white"
android:layout_width="wrap_content"
android:layout_height="wrap_content" android:id="@+id/textView5"/>
<ImageView
android:layout_below="@+id/textView5"
android:layout_marginTop="8dp"
android:layout_marginRight="10dp"
android:layout_toLeftOf="@+id/imageView5"
android:layout_width="wrap_content"
android:layout_height="wrap_content" app:srcCompat="@drawable/loginqq" android:id="@+id/imageView4"/>
<ImageView
android:layout_below="@+id/textView5"
android:layout_marginTop="8dp"
android:layout_marginRight="10dp"
android:layout_centerHorizontal="true"
android:layout_width="wrap_content"
android:layout_height="wrap_content" app:srcCompat="@drawable/loginwechat" android:id="@+id/imageView5"/>
<ImageView
android:layout_below="@+id/textView5"
android:layout_marginTop="8dp"
android:layout_marginRight="10dp"
android:layout_toRightOf="@id/imageView5"
android:layout_width="wrap_content"
android:layout_height="wrap_content" app:srcCompat="@drawable/loginzhi" android:id="@+id/imageView6"/>
</RelativeLayout>运行结果:
四、表格布局
采用行、列的形式管理控件,不需要明确声明其中包含多少行、多少列,是通过在表格中添加TableRow布局或控件来控制表格的行数,通过在TableRow布局中添加控件来控制表格列数。
1、基本语法格式
<TableLayout xmlns:android="http://schemas.android.com/apk/res/android"
              android:layout_width="match_parent"
              android:layout_height="match_parent">
    <TableRow>
        UI控件
    </TableRow>
    ...
</TableLayout>
2、自身常用属性
由于TableLayout继承自LinearLayout,因此它完全支持LinearLayout所支持的属性,除此以外它还有以下几个属性。
| 属性名称 | 功能描述 |
|---|---|
| android:stretchColumns | 设置可拉伸的列 |
| android:shrinkColumns | 设置可收缩的列 |
| android:collapseColumns | 设置可隐藏的列 |
例:android:stretchColumns=“0”表示第一列可以拉伸
android:shrinkColumns=“1,2”表示第2,3列可以收缩
3、TableLayout的控件的属性
| 控件属性 | 功能描述 |
|---|---|
| android:layout_column | 设置控件显示的位置 |
| android:layout_span | 设置控件占据的列数,默认为1 |
例:android:layout_column=“1”表示在第2个位置显示
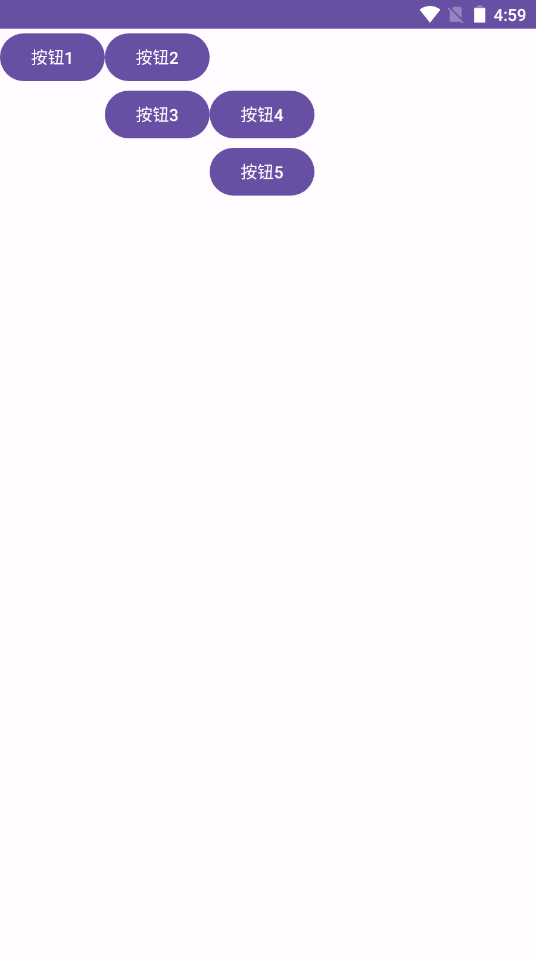
4、实战演练
<TableLayout xmlns:android="http://schemas.android.com/apk/res/android"
             android:layout_width="match_parent"
             android:layout_height="match_parent">
    <TableRow>
        <Button
            android:layout_width="match_parent"
            android:layout_height="match_parent"
            android:layout_column="0"
            android:text="按钮1"
        />
        <Button
                android:layout_width="match_parent"
                android:layout_height="match_parent"
                android:layout_column="1"
                android:text="按钮2"
        />
    </TableRow>
    <TableRow>
        <Button
                android:layout_width="match_parent"
                android:layout_height="match_parent"
                android:layout_column="1"
                android:text="按钮3"
        />
        <Button
                android:layout_width="match_parent"
                android:layout_height="match_parent"
                android:layout_column="2"
                android:text="按钮4"
        />
    </TableRow>
    <TableRow>
        <Button
                android:layout_width="match_parent"
                android:layout_height="match_parent"
                android:layout_column="2"
                android:text="按钮5"
        />
    </TableRow>
</TableLayout>
运行结果:
五、帧布局
帧布局用于在平面上创建一块空白区域,添加到该区域的每一个子控件占一帧,这些帧会一个个叠加在一起,后加入的控件会叠加在上一个控件的上层。默认情况下,帧布局的所有控件会与布局的左上角对齐。
1、基本语法格式
<FrameLayout xmlns:android="http://schemas.android.com/apk/res/android"
              android:layout_width="match_parent"
              android:layout_height="match_parent">
</FrameLayout>
2、自身常用属性
| 属性名称 | 功能描述 |
|---|---|
| android:foreground | 设置FrameLayout容器的前景图像 (始终在所有子控件之上) |
| android:foregroundGravity | 设置前景图像显示位置 |


 5193
5193


 被折叠的 条评论
为什么被折叠?
被折叠的 条评论
为什么被折叠?
 到【灌水乐园】发言


