


一、单个按键读取键值——轮询方式
1.初始化
void Key_Init(void)
{
	RCC_APB2PeriphClockCmd(RCC_APB2Periph_GPIOE,ENABLE);
	GPIO_InitTypeDef GPIO_InitStructure;
	GPIO_InitStructure.GPIO_Mode=GPIO_Mode_IPU;
	GPIO_InitStructure.GPIO_Pin=GPIO_Pin_4|GPIO_Pin_3;
	GPIO_InitStructure.GPIO_Speed=GPIO_Speed_50MHz;
	GPIO_Init(GPIOE,&GPIO_InitStructure);
}
2.获取键值操作
重点理解按键消抖的过程:当我们读取到键值变化时,先延迟20ms之后,检测按键是否松手,若没有就一直等待松手,直到松手之后,在延迟20ms,然后再给变量赋键值。
uint8_t Get_KeyNum(void)
{
	uint8_t keynum=0;
	if(GPIO_ReadInputDataBit(GPIOE,GPIO_Pin_3)==0)//检测按键是否按下
	{
		Delay_ms(20);//延迟20ms等待按下的机械抖动消除
		while(GPIO_ReadInputDataBit(GPIOE,GPIO_Pin_3)==0);//等待按键松手,若不松手则一直while循环等待松手
		Delay_ms(20);//延迟20ms等待松开的机械抖动消除
		keynum=1;//给变量赋键值
	}
	if(GPIO_ReadInputDataBit(GPIOE,GPIO_Pin_4)==0)
	{
		Delay_ms(20);
		while(GPIO_ReadInputDataBit(GPIOE,GPIO_Pin_4)==0);
		Delay_ms(20);
		keynum=2;
	}
	return keynum;
}
3.主函数中调用
通过轮询的方式检测按键,这里注意每次调用函数的时候当按键不按下的时候,键值一直时0。某一时刻按键按下之后便会执行对应的操作,但注意下一次循环依然会把变量keynum赋值为0.
int main(void)
{
	OLED_Init();
	Key_Init();
	Led_Init();
	while(1)
	{
		keynum=Get_KeyNum();
		if(keynum==1)
		{
			LedB_Turn();
		}
		if(keynum==2)
		{
			LedE_Turn();
		}

		OLED_ShowHexNum(1,1,keynum,4,OLED_8X16);
		OLED_Update();
		if(keynum!=0)Delay_ms(500);

	}

}
二、矩阵按键读取键值——轮询方式
原理相同,但是要对键盘进行扫描,这里采用行扫描的方式进行:
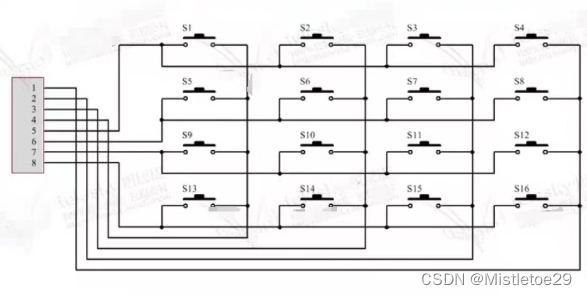

1.端口定义:
#define   C4   GPIO_Pin_0
#define   C3   GPIO_Pin_1
#define   C2   GPIO_Pin_2
#define   C1   GPIO_Pin_3
#define   R4   GPIO_Pin_4
#define   R3   GPIO_Pin_5
#define   R2   GPIO_Pin_6
#define   R1   GPIO_Pin_7
2.端口初始化
这里注意如果是按行扫描,那么控制列的端口需要配置成输入模式,控制行的端口配置成输出模式
void Matrix_Key_Init(void)
{
	RCC_APB2PeriphClockCmd(RCC_APB2Periph_GPIOA,ENABLE);
	GPIO_InitTypeDef GPIO_InitStructure;
	GPIO_InitStructure.GPIO_Mode=GPIO_Mode_IPU;
	GPIO_InitStructure.GPIO_Pin=C1|C2|C3|C4;
	GPIO_InitStructure.GPIO_Speed=GPIO_Speed_50MHz;
	GPIO_Init(GPIOA,&GPIO_InitStructure);
	GPIO_InitStructure.GPIO_Mode=GPIO_Mode_Out_PP;
	GPIO_InitStructure.GPIO_Pin=R1|R2|R3|R4;
	GPIO_Init(GPIOA,&GPIO_InitStructure);
}
3.按键扫描——按行扫描
uint8_t Matrix_Key_GetNum(void)
{
	uint8_t keynum=0;
	GPIO_Write(GPIOA,0X00FF);
	GPIO_WriteBit(GPIOA,R1,Bit_RESET);
	if(GPIO_ReadInputDataBit(GPIOA,C1)==0){Delay_ms(20);while(GPIO_ReadInputDataBit(GPIOA,C1)==0);Delay_ms(20);keynum=16;}
	if(GPIO_ReadInputDataBit(GPIOA,C2)==0){Delay_ms(20);while(GPIO_ReadInputDataBit(GPIOA,C2)==0);Delay_ms(20);keynum=15;}
	if(GPIO_ReadInputDataBit(GPIOA,C3)==0){Delay_ms(20);while(GPIO_ReadInputDataBit(GPIOA,C3)==0);Delay_ms(20);keynum=14;}
	if(GPIO_ReadInputDataBit(GPIOA,C4)==0){Delay_ms(20);while(GPIO_ReadInputDataBit(GPIOA,C4)==0);Delay_ms(20);keynum=13;}

	GPIO_Write(GPIOA,0X00FF);
	GPIO_WriteBit(GPIOA,R2,Bit_RESET);
	if(GPIO_ReadInputDataBit(GPIOA,C1)==0){Delay_ms(20);while(GPIO_ReadInputDataBit(GPIOA,C1)==0);Delay_ms(20);keynum=12;}
	if(GPIO_ReadInputDataBit(GPIOA,C2)==0){Delay_ms(20);while(GPIO_ReadInputDataBit(GPIOA,C2)==0);Delay_ms(20);keynum=11;}
	if(GPIO_ReadInputDataBit(GPIOA,C3)==0){Delay_ms(20);while(GPIO_ReadInputDataBit(GPIOA,C3)==0);Delay_ms(20);keynum=10;}
	if(GPIO_ReadInputDataBit(GPIOA,C4)==0){Delay_ms(20);while(GPIO_ReadInputDataBit(GPIOA,C4)==0);Delay_ms(20);keynum=9;}

	GPIO_Write(GPIOA,0X00FF);
	GPIO_WriteBit(GPIOA,R3,Bit_RESET);
	if(GPIO_ReadInputDataBit(GPIOA,C1)==0){Delay_ms(20);while(GPIO_ReadInputDataBit(GPIOA,C1)==0);Delay_ms(20);keynum=8;}
	if(GPIO_ReadInputDataBit(GPIOA,C2)==0){Delay_ms(20);while(GPIO_ReadInputDataBit(GPIOA,C2)==0);Delay_ms(20);keynum=7;}
	if(GPIO_ReadInputDataBit(GPIOA,C3)==0){Delay_ms(20);while(GPIO_ReadInputDataBit(GPIOA,C3)==0);Delay_ms(20);keynum=6;}
	if(GPIO_ReadInputDataBit(GPIOA,C4)==0){Delay_ms(20);while(GPIO_ReadInputDataBit(GPIOA,C4)==0);Delay_ms(20);keynum=5;}

	GPIO_Write(GPIOA,0X00FF);
	GPIO_WriteBit(GPIOA,R4,Bit_RESET);
	if(GPIO_ReadInputDataBit(GPIOA,C1)==0){Delay_ms(20);while(GPIO_ReadInputDataBit(GPIOA,C1)==0);Delay_ms(20);keynum=4;}
	if(GPIO_ReadInputDataBit(GPIOA,C2)==0){Delay_ms(20);while(GPIO_ReadInputDataBit(GPIOA,C2)==0);Delay_ms(20);keynum=3;}
	if(GPIO_ReadInputDataBit(GPIOA,C3)==0){Delay_ms(20);while(GPIO_ReadInputDataBit(GPIOA,C3)==0);Delay_ms(20);keynum=2;}
	if(GPIO_ReadInputDataBit(GPIOA,C4)==0){Delay_ms(20);while(GPIO_ReadInputDataBit(GPIOA,C4)==0);Delay_ms(20);keynum=1;}

	return keynum;
}
4.主循环调用验证
#include "main.h"
uint8_t keynum;
int main(void)
{
	OLED_Init();
	Matrix_Key_Init();
	while(1)
	{
		keynum=Matrix_Key_GetNum();
		if(keynum!=0)
		{
			OLED_ShowString(1,1,"KEYNUM: ",OLED_8X16);
			OLED_ShowNum(66,1,keynum,2,OLED_8X16);
			OLED_Update();
		}

	}
}
PS:最后发现键值反了,最后倒着把键值改了,不过影响不大
三、矩阵键盘密码锁
实现密码锁逻辑(key1-10表示数字,10代表0,11为确认,12为退格)
#include "main.h"
uint8_t keynum,count;
uint16_t user_input,password;
int main(void)
{
	OLED_Init();
	Matrix_Key_Init();
	OLED_ShowString(0,0,"PLEASE INPUT PASSWORD:",OLED_6X8);
	OLED_Update();
	password=3030;
	while(1)
	{
		OLED_ShowNum(0,32,count,4,OLED_8X16);
		OLED_Update();
		keynum=Matrix_Key_GetNum();
		if(keynum<=10 && keynum>0 &&count<4&&count>=0)
		{
			keynum%=10;
			user_input*=10;
			user_input+=keynum;
			OLED_ShowNum(0,16,user_input,4,OLED_8X16);
			OLED_Update();
			count++;
		}
		if(keynum==11)
		{
				if(user_input==password)
			{
				OLED_Clear();
				OLED_ShowString(0,0,"PASSWORD RIGHT!",OLED_6X8);
				OLED_Update();
				Delay_ms(2000);
				count=user_input=keynum=0;
				OLED_ShowString(0,0,"PLEASE INPUT PASSWORD:",OLED_6X8);
				OLED_Update();

			}
			else
			{
				OLED_Clear();
				OLED_ShowString(0,0,"PASSWORD ERRO!",OLED_6X8);
				OLED_Update();
				Delay_ms(2000);
				count=user_input=keynum=0;
				OLED_ShowString(0,0,"PLEASE INPUT PASSWORD:",OLED_6X8);
				OLED_Update();
			}
		}
		if(keynum==12)
		{
			user_input/= 10;
			OLED_ShowNum(0,16,user_input,4,OLED_8X16);
			OLED_Update();
			count--;
		}
	}
}


 1051
1051


 被折叠的 条评论
为什么被折叠?
被折叠的 条评论
为什么被折叠?
 到【灌水乐园】发言


