


d2l笔记:3.7 softmax回归的简洁实现
引入包
import torch
from torch import nn
from d2l import torch as d2l
导入数据集
batch_size = 256
train_iter, test_iter = d2l.load_data_fashion_mnist(batch_size)
来看看 d2l.load_data_fashion_mnist(batch_size) 里面是什么样的:
def load_data_fashion_mnist(batch_size, resize=None):
    """Download the Fashion-MNIST dataset and then load it into memory.

    Defined in :numref:`sec_fashion_mnist`"""
    trans = [transforms.ToTensor()]
    if resize:
        trans.insert(0, transforms.Resize(resize))
    trans = transforms.Compose(trans)
    mnist_train = torchvision.datasets.FashionMNIST(
        root="../data", train=True, transform=trans, download=True)
    mnist_test = torchvision.datasets.FashionMNIST(
        root="../data", train=False, transform=trans, download=True)
    return (data.DataLoader(mnist_train, batch_size, shuffle=True,
                            num_workers=get_dataloader_workers()),
            data.DataLoader(mnist_test, batch_size, shuffle=False,
                            num_workers=get_dataloader_workers()))
这个函数可以很方便地将 MNIST 数据集加载进来。
首先,使用 transforms.ToTensor() 将图片转换为张量。
ToTensor()可以将图像或数组转换为PyTorch所需的张量表示形式,并执行类型转换、通道重排等操作。如果输入的 PIL Image 属于以下模式之一:(L, LA, P, I, F, RGB, YCbCr, RGBA, CMYK, 1),或者 numpy.ndarray 的数据类型是
np.uint8,则将数据范围从 [0, 255] 缩放到 [0.0, 1.0]。还可以将 HWC(高度、宽度、通道)的图像格式转换为 CHW(通道、高度、宽度)的 tensor 格式。
如果需要 Resize,也可以在参数中说明。
用 Compose([ ..., ..., ... ]) 将多个图像预处理步骤结合在一起,这是非常常用的方法。
最后就是用 torchvision.datasets. ???(...) 返回数据集了。
初始化模型参数
softmax 回归是一个单层神经网络,其输出层是全连接层。
y
j
^
=
exp
(
o
j
)
∑
k
exp
(
o
k
)
\hat{y_j} = \frac{\exp(o_j)}{\sum_k\exp(o_k)}
yj^=∑kexp(ok)exp(oj)
其输出由输入特征的仿射变换决定,因此是一个线性模型。
实际使用时模型包括一层展平层和一层全连接层。
net = nn.Sequential(nn.Flatten(), nn.Linear(784, 10))
Flatten 层可以将输入的多维张量一维化,常用在卷积层向全连接层的过渡。
源码中的例子:
Examples::
>>> input = torch.randn(32, 1, 5, 5)
>>> # With default parameters
>>> m = nn.Flatten()
>>> output = m(input)
>>> output.size()
torch.Size([32, 25])
>>> # With non-default parameters
>>> m = nn.Flatten(0, 2)
>>> output = m(input)
>>> output.size()
torch.Size([160, 5])
初始化权重(均值为0,标准差为0.01)
def init_weights(m):
    if type(m) == nn.Linear:
        nn.init.normal_(m.weight, std=0.01)

net.apply(init_weights) # 对所有的层都进行这个函数操作
先定义一个以层为参数的函数,在函数中,判断层的类型,如果是全连接层,则对其权重进行初始化。用 net.apply() 将函数运用在各个层上。
softmax 的实现
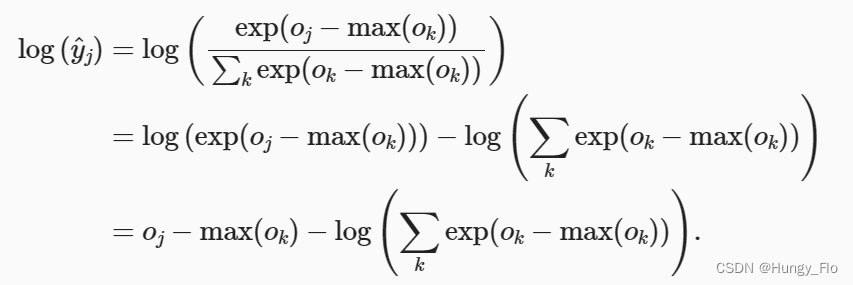
我们可以直接计算模型的输出,然后使用交叉熵损失进行优化,但是,由于各种数据类型能表示的数字是有限的,当计算指数时,可能发生数值溢出,造成数值稳定性问题。
这体现了理想与现实的距离,表现了推理和实现的区别。(突然升华)
为了解决这个问题,可以使用下面的技巧:
softmax 是这样的:
y
j
^
=
exp
(
o
j
)
∑
k
exp
(
o
k
)
\hat{y_j} = \frac{\exp(o_j)}{\sum_k\exp(o_k)}
yj^=∑kexp(ok)exp(oj)
是指数形式。
交叉熵损失是这样的:
l
(
y
,
y
^
)
=
−
∑
j
=
1
q
y
i
log
y
^
j
l(\mathbf{y,\hat{y}}) = - \sum\limits^{q}_{j=1}y_i\log \hat{y}_j
l(y,y^)=−j=1∑qyilogy^j
是对数形式。
因此,
先将用全连接层算出来的预测数据 o k o_k ok 减去 max ( o k ) \max(o_k) max(ok) 。
再将softmax与交叉熵直接结合起来算
注意不需要单独算softmax函数了,直接进行下面的调用即可:
loss = nn.CrossEntropyLoss(reduction='none')
CrossEntropyLoss() 是 softmax 和交叉熵损失的结合,所以把模型的直接输出用这个损失函数进行处理即可!
优化算法
使用随机梯度下降,学习率为0.1
trainer = torch.optim.SGD(net.parameters(), lr=0.1)
训练
num_epochs = 10
d2l.train_ch3(net, train_iter, test_iter, loss, num_epochs, trainer)
看一下 train_ch3 的源码:
def train_ch3(net, train_iter, test_iter, loss, num_epochs, updater):
    """Train a model (defined in Chapter 3).

    Defined in :numref:`sec_softmax_scratch`"""
    animator = Animator(xlabel='epoch', xlim=[1, num_epochs], ylim=[0.3, 0.9],
                        legend=['train loss', 'train acc', 'test acc'])
    for epoch in range(num_epochs):
        train_metrics = train_epoch_ch3(net, train_iter, loss, updater)
        test_acc = evaluate_accuracy(net, test_iter)
        animator.add(epoch + 1, train_metrics + (test_acc,))
    train_loss, train_acc = train_metrics
    assert train_loss < 0.5, train_loss
    assert train_acc <= 1 and train_acc > 0.7, train_acc
    assert test_acc <= 1 and test_acc > 0.7, test_acc
在其中又调用了很多相关的函数:
Animator 用于画图
train_epoch_ch3 用于训练
evaluate_accuracy 用于评估准确率
限于篇幅不再进一步展开。


 1236
1236


 被折叠的 条评论
为什么被折叠?
被折叠的 条评论
为什么被折叠?
 到【灌水乐园】发言


