


1.arduino IDE环境配置
安装esp32开发板
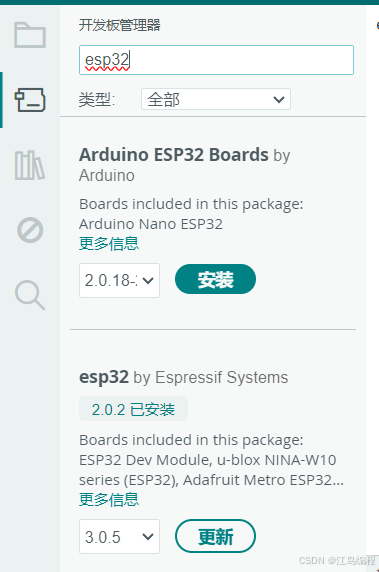
选择开发板类型

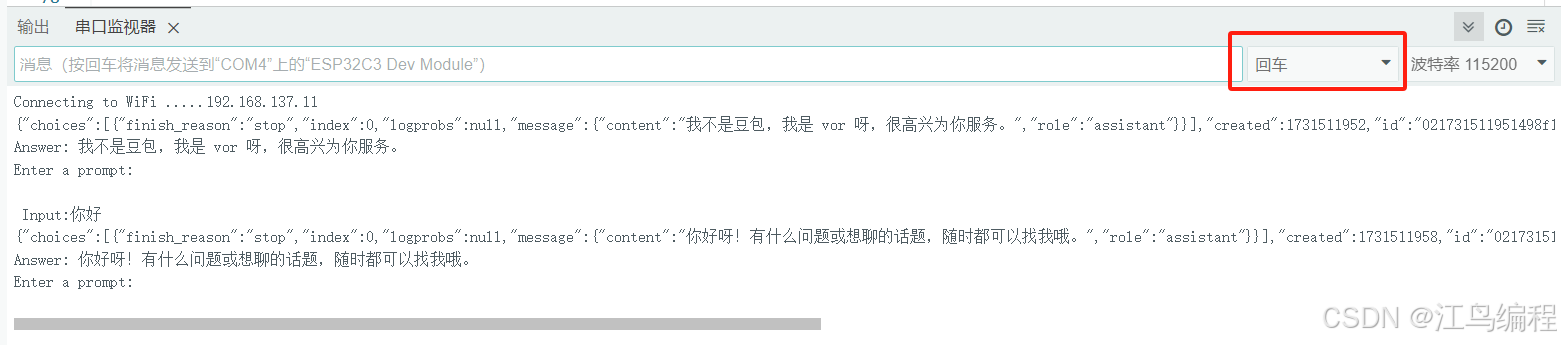
串口配置
这个很重要

2.代码
#include <WiFi.h>
#include <HTTPClient.h>
#include <ArduinoJson.h>

// 1. Replace with your network credentials
const char* ssid = "输入你的WIFI名称";
const char* password = "WIFI密码";

// 2. Replace with your OpenAI API key
const char* doubao_apiKey = "豆包API key";

// Send request to OpenAI API
String inputText = "你好,豆包!";
String apiUrl = "https://ark.cn-beijing.volces.com/api/v3/chat/completions";

String answer;
String getGPTAnswer(String inputText) {
  HTTPClient http;
  http.setTimeout(20000);
  http.begin(apiUrl);
  http.addHeader("Content-Type", "application/json");
  String token_key = String("Bearer ") + doubao_apiKey;
  http.addHeader("Authorization", token_key);
  String payload = "{\"model\":\"接入点名称\",\"messages\":[{\"role\":\"system\",\"content\":\"你是我的AI助手vor,你必须用中文回答且字数不超过85个\"},{\"role\":\"user\",\"content\":\"" + inputText + "\"}],\"temperature\": 0.3}";

  int httpResponseCode = http.POST(payload);
  if (httpResponseCode == 200) {
    String response = http.getString();
    http.end();
    Serial.println(response);

    // Parse JSON response
    DynamicJsonDocument jsonDoc(1024);
    deserializeJson(jsonDoc, response);
    String outputText = jsonDoc["choices"][0]["message"]["content"];
    return outputText;
    // Serial.println(outputText);
  } else {
    http.end();
    Serial.printf("Error %i \n", httpResponseCode);
    return "<error>";
  }
}

void setup() {
  // Initialize Serial
  Serial.begin(115200);

  // Connect to Wi-Fi network
  WiFi.mode(WIFI_STA);
  WiFi.begin(ssid, password);
  Serial.print("Connecting to WiFi ..");
  while (WiFi.status() != WL_CONNECTED) {
    Serial.print('.');
    delay(1000);
  }
  Serial.println(WiFi.localIP());
  answer = getGPTAnswer(inputText);
  Serial.println("Answer: " + answer);
  Serial.println("Enter a prompt:");
}

void loop() {
  // do nothing
  if (Serial.available()) {
    inputText = Serial.readStringUntil('\r');  //  \r表示结束符为回车符
    // inputText.trim();
    Serial.println("\n Input:" + inputText);

    answer = getGPTAnswer(inputText);
    Serial.println("Answer: " + answer);
    Serial.println("Enter a prompt:");
  }
  // delay(2);
}
3.注意事项
改成回车,因为程序设置了读取输入的字符串读到/r(回车符)就结束


 1万+
1万+

 被折叠的 条评论
为什么被折叠?
被折叠的 条评论
为什么被折叠?
 到【灌水乐园】发言


