


前言
本文通过实现一个简单的用户管理系统的分层架构来比对Java和GoLang在分层架构上的实现方式的明显差异,大体上Web服务都类似于此。
一、Java分层架构
项目结构:
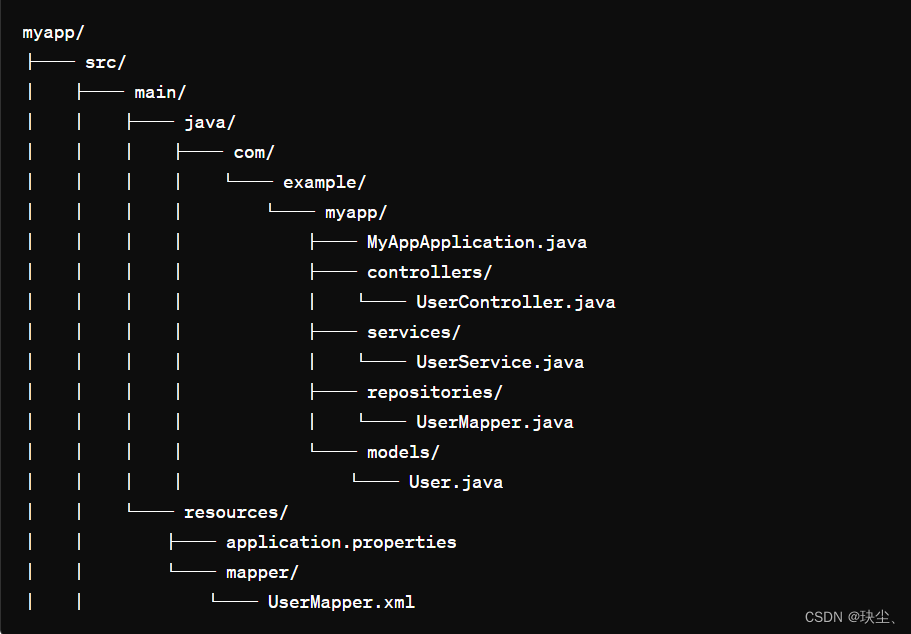
Java的分层架构通常是基于成熟的企业级应用开发框架,如Spring、Java EE等。这些框架已经标准化了Java应用的分层结构,常见的分层架构包括:
1.持久层(User.java)
定义数据库实体模型。
代码实现:(我们用Springboot来实现)
package com.example.myapp.models;

public class User {

    private Long id;
    private String name;
    private String email;

    // Getters and Setters
    public Long getId() {
        return id;
    }

    public void setId(Long id) {
        this.id = id;
    }

    public String getName() {
        return name;
    }

    public void setName(String name) {
        this.name = name;
    }

    public String getEmail() {
        return email;
    }

    public void setEmail(String email) {
        this.email = email;
    }
}
2.数据访问层(Mapper)
封装数据库操作,使用MyBatis进行SQL查询和数据操作。
UserMapper.java代码实现:
package com.example.myapp.repositories;

import com.example.myapp.models.User;
import org.apache.ibatis.annotations.*;

@Mapper
public interface UserMapper {

    @Select("SELECT * FROM users WHERE id = #{id}")
    User findById(Long id);

    @Insert("INSERT INTO users(name, email) VALUES(#{name}, #{email})")
    @Options(useGeneratedKeys = true, keyProperty = "id")
    void save(User user);
}
UserMapper.xml代码实现:
<?xml version="1.0" encoding="UTF-8" ?>
<!DOCTYPE mapper
        PUBLIC "-//mybatis.org//DTD Mapper 3.0//EN"
        "http://mybatis.org/dtd/mybatis-3-mapper.dtd">

<mapper namespace="com.example.myapp.repositories.UserMapper">

    <select id="findById" parameterType="long" resultType="com.example.myapp.models.User">
        SELECT * FROM users WHERE id = #{id}
    </select>

    <insert id="save" parameterType="com.example.myapp.models.User" useGeneratedKeys="true" keyProperty="id">
        INSERT INTO users (name, email) VALUES (#{name}, #{email})
    </insert>

</mapper>
3.业务逻辑层(UserService.java)
封装业务逻辑,调用数据访问层与数据库进行交互。
代码实现:
package com.example.myapp.services;

import org.springframework.beans.factory.annotation.Autowired;
import org.springframework.stereotype.Service;
import com.example.myapp.models.User;
import com.example.myapp.repositories.UserMapper;

@Service
public class UserService {

    @Autowired
    private UserMapper userMapper;

    public User getUserById(Long id) {
        return userMapper.findById(id);
    }

    public User createUser(User user) {
        userMapper.save(user);
        return user;
    }
}
4.控制层(UserController.java)
处理HTTP请求,调用服务层进行业务逻辑处理,返回响应。
代码实现:
package com.example.myapp.controllers;

import org.springframework.beans.factory.annotation.Autowired;
import org.springframework.http.ResponseEntity;
import org.springframework.web.bind.annotation.*;

import com.example.myapp.models.User;
import com.example.myapp.services.UserService;

@RestController
@RequestMapping("/users")
public class UserController {

    @Autowired
    private UserService userService;

    @GetMapping("/{id}")
    public ResponseEntity<User> getUser(@PathVariable Long id) {
        User user = userService.getUserById(id);
        if (user != null) {
            return ResponseEntity.ok(user);
        } else {
            return ResponseEntity.notFound().build();
        }
    }

    @PostMapping
    public ResponseEntity<User> createUser(@RequestBody User user) {
        User createdUser = userService.createUser(user);
        return ResponseEntity.ok(createdUser);
    }
}
5.应用入口(MyAppApplication.java)
package com.example.myapp;

import org.springframework.boot.SpringApplication;
import org.springframework.boot.autoconfigure.SpringBootApplication;

@SpringBootApplication
public class MyAppApplication {

    public static void main(String[] args) {
        SpringApplication.run(MyAppApplication.class, args);
    }
}
6.应用配置
配置数据库连接和MyBatis相关设置。
application.properties代码实现:
# MySQL database configuration
spring.datasource.url=jdbc:mysql://localhost:3306/mydatabase?useSSL=false&serverTimezone=UTC
spring.datasource.username=root
spring.datasource.password=password
spring.datasource.driver-class-name=com.mysql.cj.jdbc.Driver

# MyBatis configuration
mybatis.config-location=classpath:mybatis-config.xml
mybatis.mapper-locations=classpath:mapper/*.xml

# Hibernate properties (if using JPA features for database initialization)
spring.jpa.hibernate.ddl-auto=update
spring.jpa.show-sql=true
mybatis-config.xml代码实现:
<?xml version="1.0" encoding="UTF-8" ?>
<!DOCTYPE configuration
        PUBLIC "-//mybatis.org//DTD Config 3.0//EN"
        "http://mybatis.org/dtd/mybatis-3-config.dtd">

<configuration>
    <typeAliases>
        <typeAlias type="com.example.myapp.models.User" alias="User"/>
    </typeAliases>
    <mappers>
        <mapper resource="mapper/UserMapper.xml"/>
    </mappers>
</configuration>
7.pom.xml文件(使用MySQL)
确保你的pom.xml文件正确配置了springboot和mybatis依赖。
<project xmlns="http://maven.apache.org/POM/4.0.0"
         xmlns:xsi="http://www.w3.org/2001/XMLSchema-instance"
         xsi:schemaLocation="http://maven.apache.org/POM/4.0.0 http://maven.apache.org/xsd/maven-4.0.0.xsd">
    <modelVersion>4.0.0</modelVersion>

    <groupId>com.example</groupId>
    <artifactId>myapp</artifactId>
    <version>0.0.1-SNAPSHOT</version>
    <packaging>jar</packaging>

    <name>myapp</name>
    <description>Demo project for Spring Boot and MyBatis</description>

    <parent>
        <groupId>org.springframework.boot</groupId>
        <artifactId>spring-boot-starter-parent</artifactId>
        <version>2.6.6</version>
        <relativePath/> <!-- lookup parent from repository -->
    </parent>

    <properties>
        <java.version>11</java.version>
        <mybatis-spring-boot.version>2.2.0</mybatis-spring-boot.version>
    </properties>

    <dependencies>
        <!-- Spring Boot Starter Web -->
        <dependency>
            <groupId>org.springframework.boot</groupId>
            <artifactId>spring-boot-starter-web</artifactId>
        </dependency>

        <!-- MyBatis Spring Boot Starter -->
        <dependency>
            <groupId>org.mybatis.spring.boot</groupId>
            <artifactId>mybatis-spring-boot-starter</artifactId>
            <version>${mybatis-spring-boot.version}</version>
        </dependency>

        <!-- MySQL Connector -->
        <dependency>
            <groupId>mysql</groupId>
            <artifactId>mysql-connector-java</artifactId>
            <scope>runtime</scope>
        </dependency>

        <!-- Spring Boot Starter Test -->
        <dependency>
            <groupId>org.springframework.boot</groupId>
            <artifactId>spring-boot-starter-test</artifactId>
            <scope>test</scope>
        </dependency>
    </dependencies>

    <build>
        <plugins>
            <plugin>
                <groupId>org.springframework.boot</groupId>
                <artifactId>spring-boot-maven-plugin</artifactId>
            </plugin>
        </plugins>
    </build>

</project>
二、Go分层架构
目录结构:
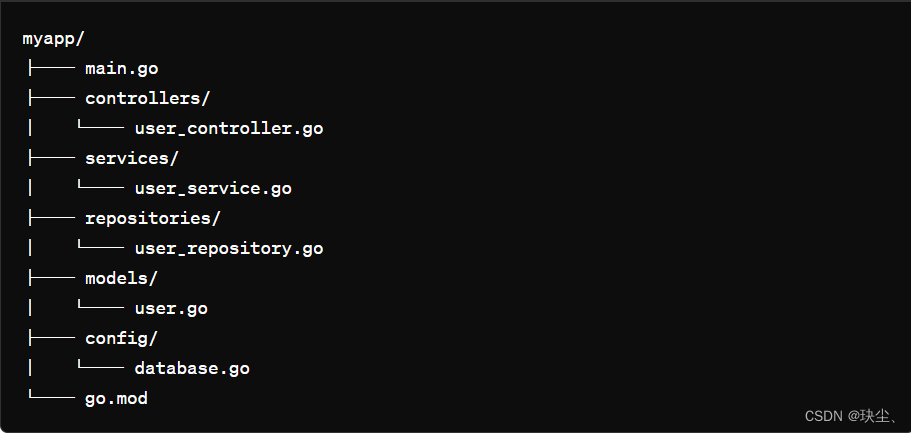
Go语言通常采用简洁和高效的设计原则,分层架构也相对简洁。常见的Go项目分层架构包括:
1.持久层(user.go)
定义数据库实体模型。
代码实现:(使用Gin作为Web框架,GORM作为ORM框架)
package model

import (
	"gorm.io/gorm"
	"time"
)

type User struct {
	Id        uint   `gorm:"primarykey"`
	UserId    string `gorm:"unique;not null"`
	Nickname  string `gorm:"not null"`
	Password  string `gorm:"not null"`
	Email     string `gorm:"not null"`
	CreatedAt time.Time
	UpdatedAt time.Time
	DeletedAt gorm.DeletedAt `gorm:"index"`
}

func (u *User) TableName() string {
	return "users"

}
2.数据库配置(database.go)
初始化数据库连接和自动迁移。
代码实现:
package config

import (
    "log"
    "os"
    "gorm.io/driver/mysql"
    "gorm.io/gorm"
    "myapp/models"
)

var DB *gorm.DB

func InitDB() {
    dsn := os.Getenv("MYSQL_DSN")
    var err error
    DB, err = gorm.Open(mysql.Open(dsn), &gorm.Config{})
    if err != nil {
        log.Fatal("Failed to connect to database:", err)
    }

    err = DB.AutoMigrate(&models.User{})
    if err != nil {
        log.Fatal("Failed to migrate database:", err)
    }
}
在这里,MYSQL_DSN 是MySQL的Data Source Name,你可以通过环境变量来设置,例如:
MYSQL_DSN="user:password@tcp(127.0.0.1:3306)/dbname?charset=utf8mb4&parseTime=True&loc=Local"
3.数据访问层(user_repository.go)
封装数据库操作,使用GORM进行CRUD操作。
代码实现:
package repositories

import (
    "myapp/models"
    "gorm.io/gorm"
)

type UserRepository interface {
    FindById(id uint) (models.User, error)
    Save(user models.User) (models.User, error)
}

type userRepository struct {
    db *gorm.DB
}

func NewUserRepository(db *gorm.DB) UserRepository {
    return &userRepository{db: db}
}

func (r *userRepository) FindById(id uint) (models.User, error) {
    var user models.User
    result := r.db.First(&user, id)
    return user, result.Error
}

func (r *userRepository) Save(user models.User) (models.User, error) {
    result := r.db.Create(&user)
    return user, result.Error
}
4.业务逻辑层(user_service.go)
封装业务逻辑,调用数据访问层与数据库进行交互。
代码实现:
package services

import (
    "myapp/models"
    "myapp/repositories"
)

type UserService interface {
    GetUserById(id uint) (models.User, error)
    CreateUser(user models.User) (models.User, error)
}

type userService struct {
    userRepository repositories.UserRepository
}

func NewUserService(userRepository repositories.UserRepository) UserService {
    return &userService{userRepository: userRepository}
}

func (s *userService) GetUserById(id uint) (models.User, error) {
    return s.userRepository.FindById(id)
}

func (s *userService) CreateUser(user models.User) (models.User, error) {
    return s.userRepository.Save(user)
}
5.控制层(user_controller.go)
处理HTTP请求,调用服务层进行业务逻辑处理,返回响应。
代码实现:
package controllers

import (
    "net/http"
    "strconv"
    "github.com/gin-gonic/gin"
    "myapp/models"
    "myapp/services"
)

type UserController struct {
    userService services.UserService
}

func NewUserController(userService services.UserService) *UserController {
    return &UserController{userService: userService}
}

func (c *UserController) GetUser(ctx *gin.Context) {
    id, _ := strconv.Atoi(ctx.Param("id"))
    user, err := c.userService.GetUserById(uint(id))
    if err != nil {
        ctx.JSON(http.StatusNotFound, gin.H{"message": "User not found"})
        return
    }
    ctx.JSON(http.StatusOK, user)
}

func (c *UserController) CreateUser(ctx *gin.Context) {
    var user models.User
    if err := ctx.ShouldBindJSON(&user); err != nil {
        ctx.JSON(http.StatusBadRequest, gin.H{"error": err.Error()})
        return
    }
    createdUser, err := c.userService.CreateUser(user)
    if err != nil {
        ctx.JSON(http.StatusInternalServerError, gin.H{"error": err.Error()})
        return
    }
    ctx.JSON(http.StatusOK, createdUser)
}
6.主程序入口(main.go)
代码实现:
package main

import (
    "myapp/config"
    "myapp/controllers"
    "myapp/repositories"
    "myapp/services"
    "github.com/gin-gonic/gin"
)

func main() {
    // Initialize database
    config.InitDB()

    // Initialize repositories, services and controllers
    userRepository := repositories.NewUserRepository(config.DB)
    userService := services.NewUserService(userRepository)
    userController := controllers.NewUserController(userService)

    // Initialize Gin router
    router := gin.Default()

    // Define routes
    router.GET("/users/:id", userController.GetUser)
    router.POST("/users", userController.CreateUser)

    // Start server
    router.Run(":8080")
}
7.go.mod 文件(使用MySQL)
确保你的go.mod文件正确配置了Gin和GORM依赖。
代码实现:
module myapp

go 1.19

require (
    github.com/gin-gonic/gin v1.9.1
    gorm.io/driver/mysql v1.5.1
    gorm.io/gorm v1.25.7
)
三、主要差异点
1.语言特性
Java(Spring Boot)
- 类型安全:Java是静态类型语言,编译时就会进行类型检查,避免了运行时的类型错误。
- 面向对象:Java是面向对象编程(OOP)的语言,使用类和对象来组织代码。
- 丰富的标准库:Java标准库非常丰富,提供了大量的API供开发者使用。
Go(Gin)
- 简洁性:Go语言语法简洁,设计之初就强调了简洁和易读性。
- 内置并发:Go内置了轻量级的
goroutines和channels,非常适合处理并发任务。 - 编译速度快:Go的编译速度非常快,并且编译后的二进制文件可以直接部署。
2.框架设计
Spring Boot
- 自动配置:Spring Boot提供了大量的自动配置,极大地简化了项目的配置和启动。
- 依赖注入:Spring框架的核心是依赖注入(DI),通过IoC容器管理对象的创建和生命周期。
- 模块化:Spring生态系统非常丰富,涵盖了各种功能(如
Spring Data、Spring Security等)。
Gin
- 轻量级:Gin是一个轻量级的Web框架,性能高且使用简单。
- 中间件:Gin提供了灵活的中间件机制,可以方便地添加各种中间件来处理请求。
- 直接操作数据库:与Spring的依赖注入不同,Gin中的数据库操作通常是直接进行的,使用
GORM等ORM框架。
3. 配置方式
Spring Boot
- 基于注解:大量使用注解来简化配置,例如
@SpringBootApplication、@RestController、@Autowired等。 - 外部化配置:通过
application.properties或application.yml文件来进行配置,支持多环境配置。
Gin
- 代码配置:大部分配置都是通过代码完成的,比较显式和直观。
- 环境变量:通常通过环境变量或配置文件来管理配置,使用
Viper等库可以简化配置管理。
4. 依赖管理
Spring Boot
- Maven/Gradle:Spring Boot项目通常使用
Maven或Gradle来管理依赖,定义在pom.xml或build.gradle中。 - 依赖版本管理:Spring Boot提供了版本管理机制,通过
spring-boot-dependencies来统一管理版本。
Gin
- Go Modules:Go语言使用
Go Modules来管理依赖,通过go.mod文件定义模块和依赖。 - 直接下载:Go的依赖管理直接下载源码包,构建时再编译。
四、小结
在选择框架时,需要根据具体的项目需求、团队的技术背景、项目的长期维护性等因素进行考虑。Spring Boot适合大型、复杂的企业级应用开发,有成熟的生态系统和社区支持;Gin则适合快速开发、性能要求高的应用,代码简洁易维护。每种框架都有其优势和适用场景,开发者可以根据实际情况选择最合适的框架。


 1991
1991

 被折叠的 条评论
为什么被折叠?
被折叠的 条评论
为什么被折叠?
 到【灌水乐园】发言


