


文章目录
一、Spring概述
①Spring是一个开源框架
②Spring为简化企业级开发而生,使用Spring,JavaBean就可以实现很多以前要靠EJB才能实现的功能。同样的功能,在EJB中要通过繁琐的配置和复杂的代码才能够实现,而在Spring中却非常的优雅和简洁。
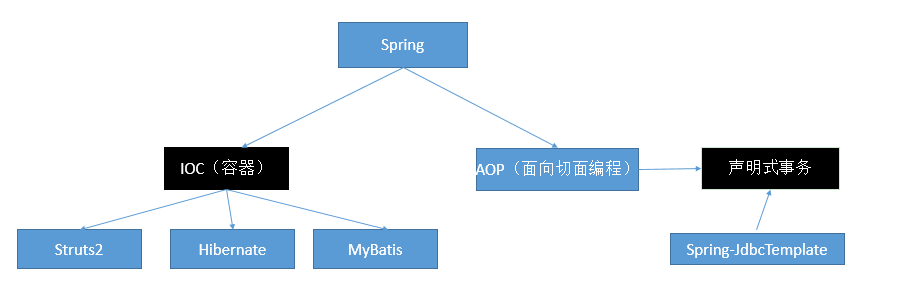
③Spring是一个IOC(DI)和AOP容器框架。
④Spring的优良特性
-
[1]非侵入式:基于Spring开发的应用中的对象可以不依赖于Spring的API
-
[2]依赖注入:DI——Dependency Injection,反转控制(IOC)最经典的实现。
-
[3]面向切面编程:Aspect Oriented Programming——AOP
-
[4]容器:Spring是一个容器,因为它包含并且管理应用对象的生命周期
-
[5]组件化:Spring实现了使用简单的组件配置组合成一个复杂的应用。在 Spring 中可以使用XML和Java注解组合这些对象。
-
[6]一站式:在IOC和AOP的基础上可以整合各种企业应用的开源框架和优秀的第三方类库(实际上Spring 自身也提供了表述层的SpringMVC和持久层的Spring JDBC)。
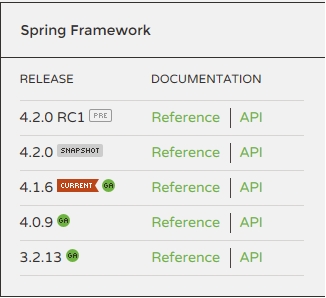
⑤Spring目前的版本
⑥Spring模块
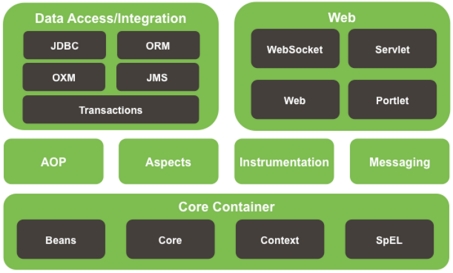
Test:Spring的单元测试模块;
spring-test-4.0.0.RELEASE
Core Container:核心容器(IOC);黑色代表这部分的功能由哪些jar包组成;要使用这个部分的完整功能,这些jar都需要导入
spring-beans-4.0.0.RELEASE、
spring-core-4.0.0.RELEASE、
spring-context-4.0.0.RELEASE、
spring-expression-4.0.0.RELEASE
AOP+Aspects(面向切面编程模块)
spring-aop-4.0.0.RELEASE、
spring-aop-4.0.0.RELEASE
数据访问/:Spring数据库访问模块
spring-jdbc-4.0.0.RELEASE、spring-orm(Object Relation Mapping)-4.0.0.RELEASE、
spring-ox(xml)m-4.0.0.RELEASE、spring-jms-4.0.0.RELEASE、(Intergration)
spring-tx-4.0.0.RELEASE(事务)
Web:Spring开发web应用的模块;
spring-websocket(新的技术)-4.0.0.RELEASE、
spring-web-4.0.0.RELEASE、和原生的web相关(servlet)
spring-webmvc-4.0.0.RELEASE、开发web项目的(web)
spring-webmvc-portlet-4.0.0.RELEASE(开发web应用的组件集成)
用哪个模块导哪个包(建议)
1.安装Spring插件
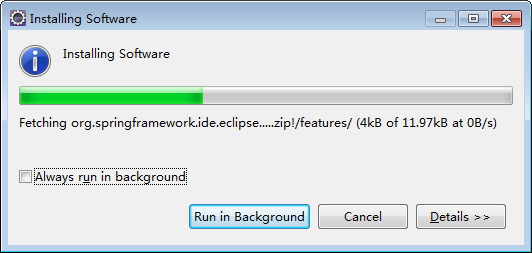
开发Spring框架的应用,经常要写框架的配置文件,写起来复杂,我们需要提示;需要给eclipse中安装插件;(提供提示功能);
1)、不想装插件;使用Spring官方提供的sts开发工具(装好插件的eclipse)
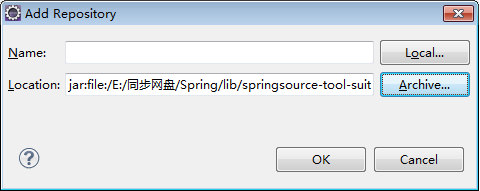
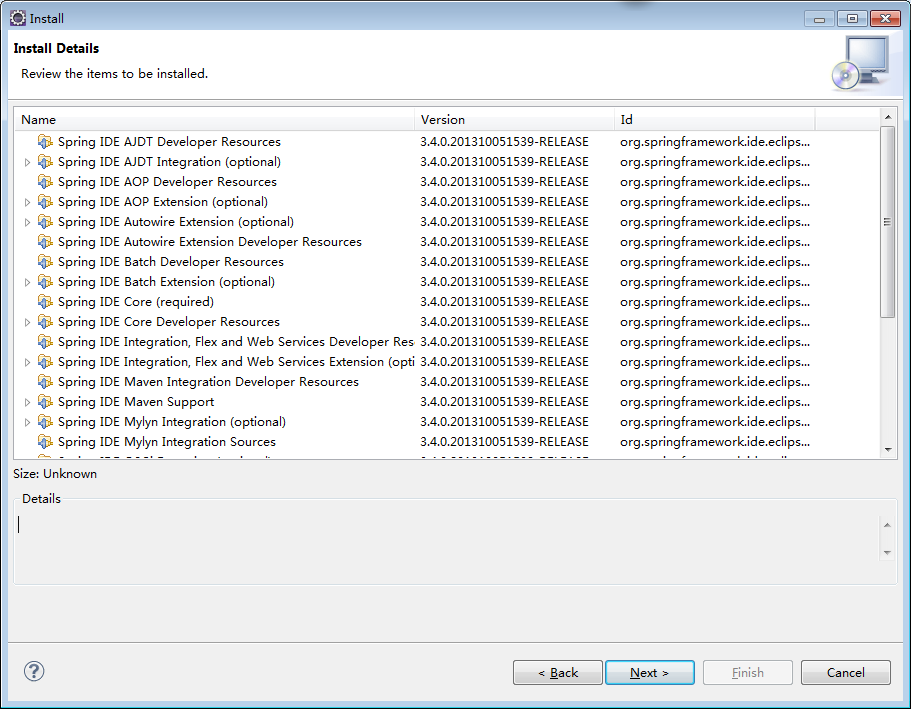
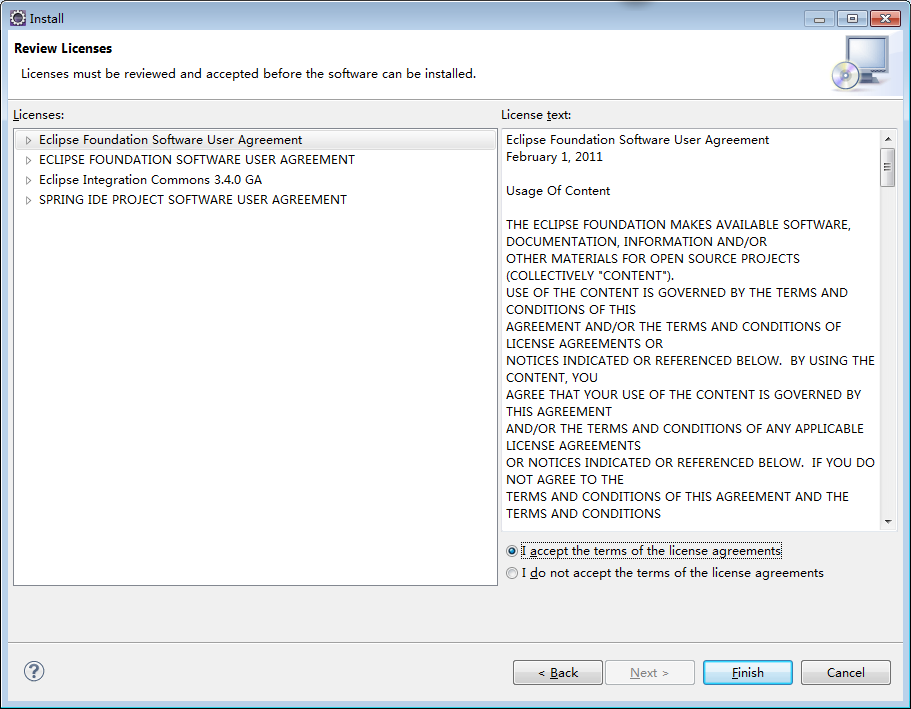
2)、装插件;
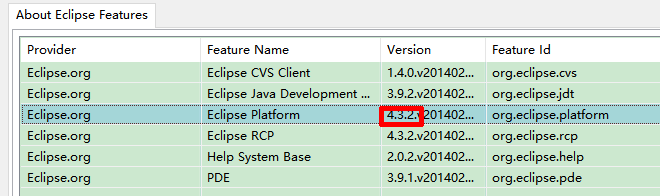
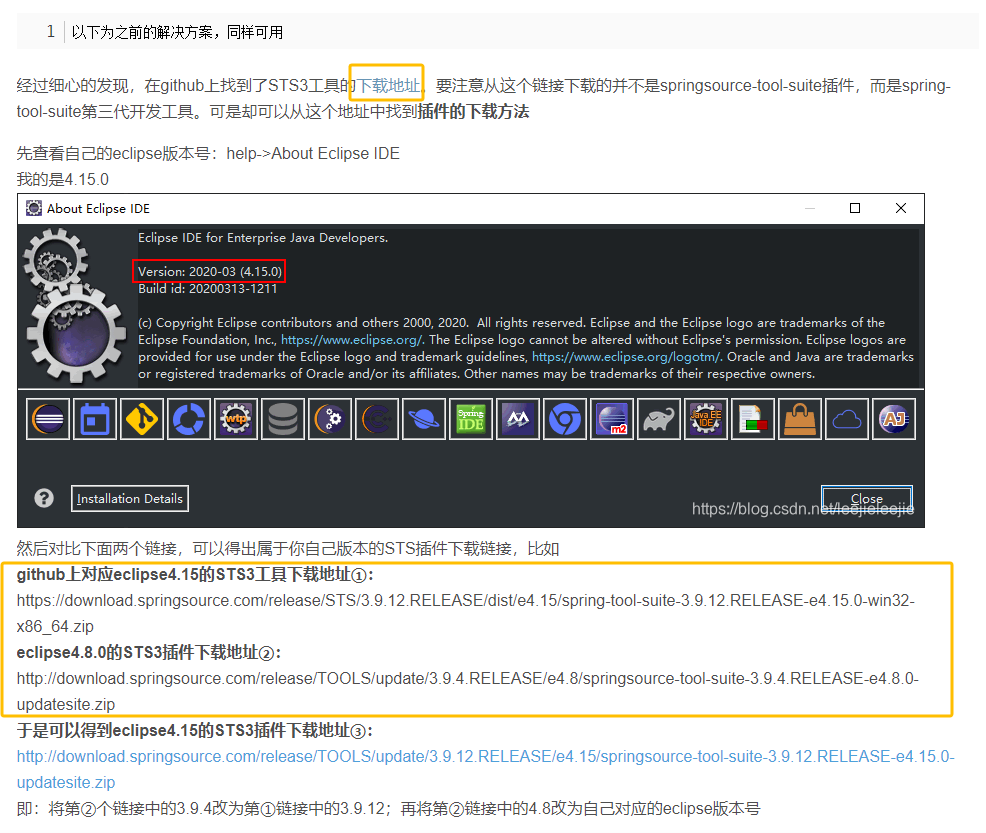
1)、查看当前eclispe的版本;
Help->About Eclipse–>点击自己eclipse的图标
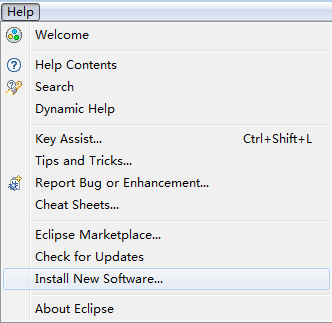
②操作步骤:
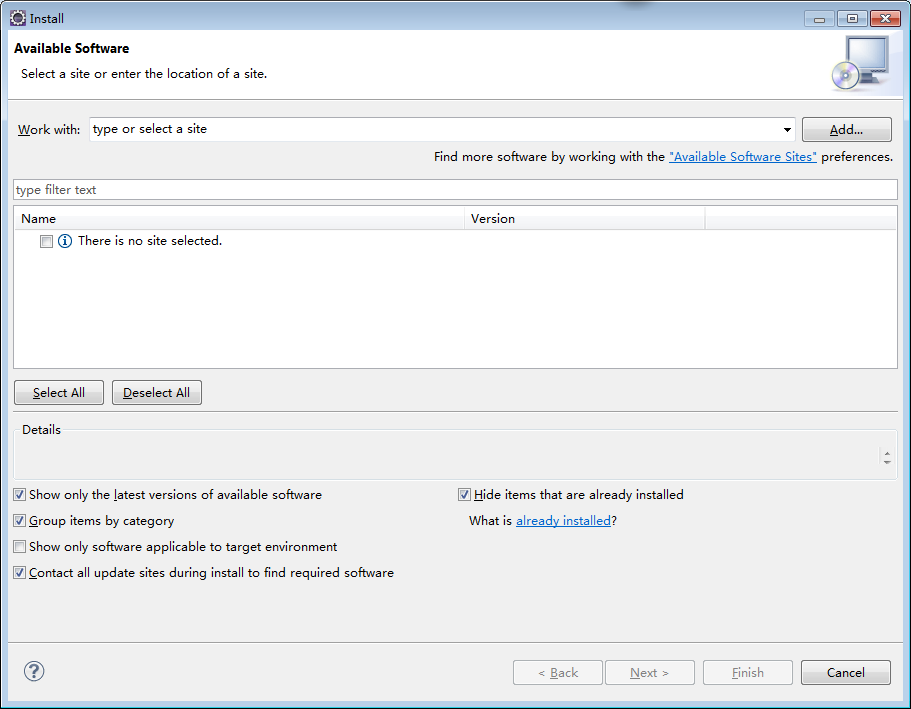
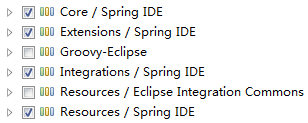
注意哟,这里只选择带有Spring IDE的就可以了呢
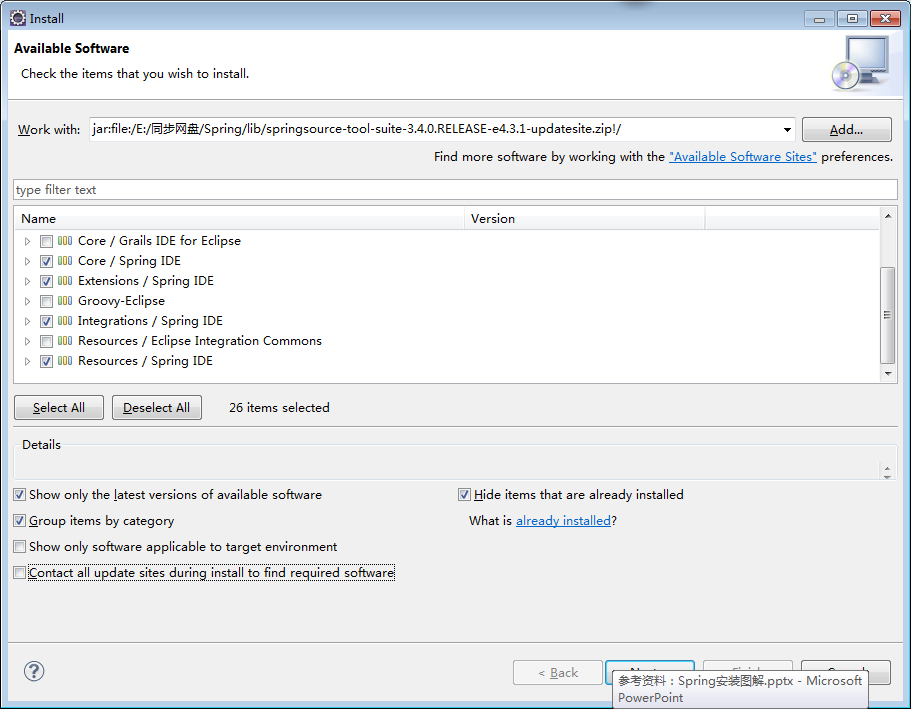
这里的勾勾去掉,Contact all update sites during install to find required software
点这里的YES重启Eclipse使插件生效
2. 搭建Spring运行时环境
①加入JAR包
[1]Spring自身JAR包:spring-framework-4.0.0.RELEASE\libs目录下
spring-beans-4.0.0.RELEASE.jar
spring-context-4.0.0.RELEASE.jar
spring-core-4.0.0.RELEASE.jar
spring-expression-4.0.0.RELEASE.jar
[2]commons-logging-1.1.1.jar
②根据需要创建Spring配置文件
3 HelloWorld
①目标:使用Spring创建对象,为属性赋值
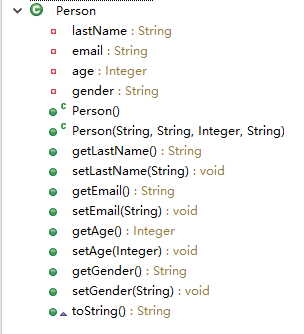
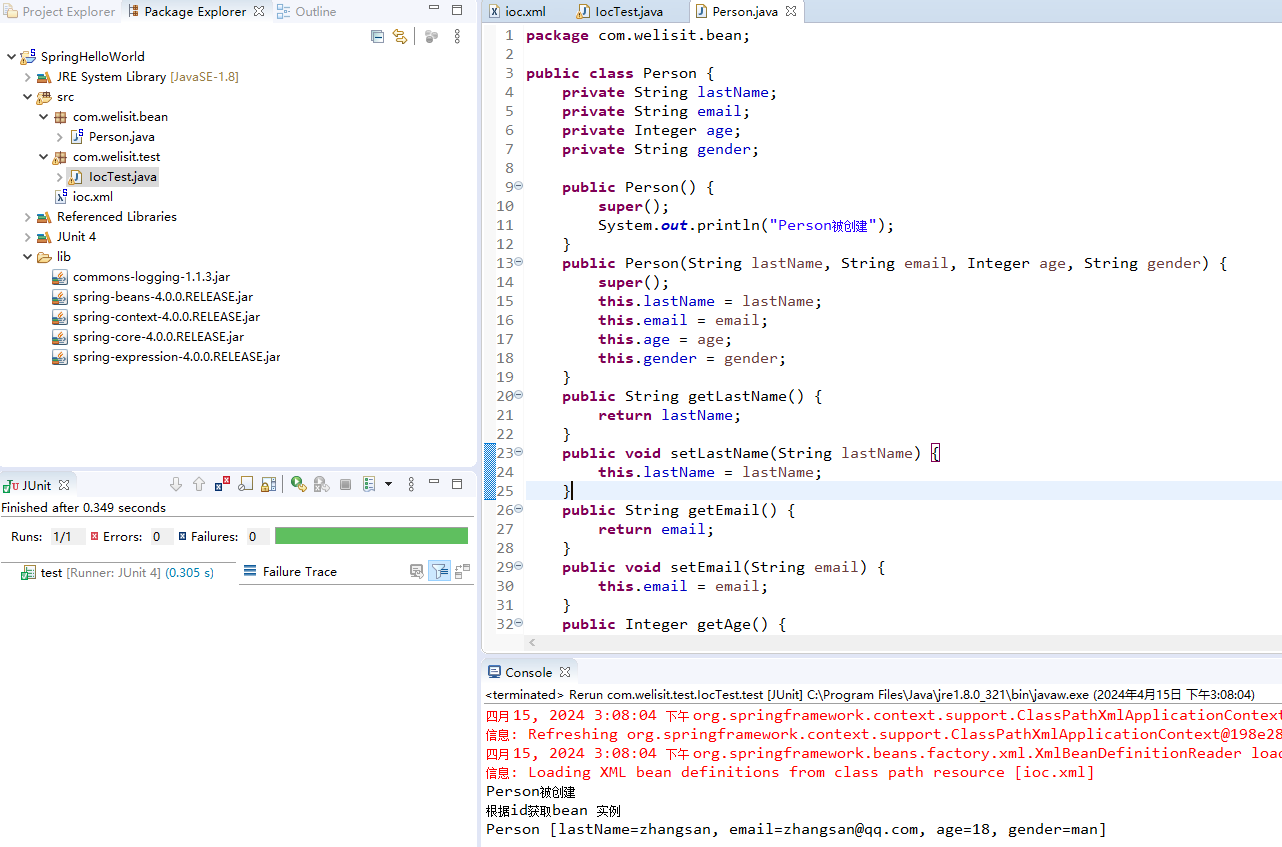
②创建Person类
③创建Spring配置文件
<!-- 使用bean元素定义一个由IOC容器创建的对象 -->
<!-- class属性指定用于创建bean的全类名 -->
<!-- id属性指定用于引用bean实例的标识 -->
<bean class="com.welisit.bean.Person" id="person01">
    <!-- 使用property子元素为bean的属性赋值 -->
    <property name="lastName" value="zhangsan"></property>
    <property name="gender" value="man"></property>
    <property name="email" value="zhangsan@qq.com"></property>
    <property name="age" value="18"></property>
</bean>
④测试:通过Spring的IOC容器创建Student类实例
//1.创建IOC容器对象
ApplicationContext iocContainer =
		new ClassPathXmlApplicationContext("ioc.xml");

//2.根据id值获取bean实例对象
Student student = (Student) iocContainer.getBean("student");

//3.打印bean
System.out.println(student);
⑤验证:Spring在创建IOC容器对象时,就已经完成了bean的创建和属性的赋值。
4.框架特性测试流程
1.导包
核心容器
spring-beans-4.0.0.RELEASE.jar
spring-context-4.0.0.RELEASE.jar
spring-core-4.0.0.RELEASE.jar
spring-expression-4.0.0.RELEASE.jar
commons-logging-1.1.3.jar
Spring运行的时候依赖一个日志包;没有就报错;
2.写配置
spring的配置文件中,集合了spring的ioc容器管理的所有组件(会员清单);
创建一个Spring Bean Configuration File(Spring的bean配置文件);
<?xml version="1.0" encoding="UTF-8"?>
<beans xmlns="http://www.springframework.org/schema/beans"
	xmlns:xsi="http://www.w3.org/2001/XMLSchema-instance"
	xsi:schemaLocation="http://www.springframework.org/schema/beans http://www.springframework.org/schema/beans/spring-beans.xsd">

	<bean class="com.welisit.bean.Person" id="person01">
		<property name="lastName" value="zhangsan"></property>
		<property name="gender" value="man"></property>
		<property name="email" value="zhangsan@qq.com"></property>
		<property name="age" value="18"></property>
	</bean>
</beans>
3.测试
@Test
	public void test() {
		//1.创建IOC容器对象
		ApplicationContext iocContainer = new ClassPathXmlApplicationContext("ioc.xml");

		System.out.println("根据id获取bean 实例");
		//2.根据id值获取bean实例对象
		Person student = (Person) iocContainer.getBean("person01");

		//3.打印bean
		System.out.println(student);
	}
**new ClassPathXMlApplicationContext(“ioc.xml”);ioc容器的配置文件在类路径下;**FileSystemXmlApplicationContext(“F://ioc.xml”);ioc容器的配置文件在磁盘路径下;
/**
     * 存在的几个问题;
     * 1)、src,源码包开始的路径,称为类路径的开始;
     *      所有源码包里面的东西都会被合并放在类路径里面;
     *      java:/bin/
     *      web:/WEB-INF/classes/
     * 2)、导包commons-logging-1.1.3.jar(依赖)
     * 3)、先导包再创建配置文件;
     * 4)、Spring的容器接管了标志了s的类;
     */
/**
     * 几个细节:
     * 1)、ApplicationContext(IOC容器的接口)
     * 2)、给容器中注册一个组件;我们也从容器中按照id拿到了这个组件的对象?
     *      组件的创建工作,是容器完成;
     *      Person对象是什么时候创建好了呢?
     *      容器中对象的创建在容器创建完成的时候就已经创建好了;
     * 3)、同一个组件在ioc容器中是单实例的;容器启动完成都已经创建准备好的;
     * 4)、容器中如果没有这个组件,获取组件?报异常
     * org.springframework.beans.factory.NoSuchBeanDefinitionException:
     * No bean named 'person03' is defined
     * 5)、ioc容器在创建这个组件对象的时候,(property)会利用setter方法为javaBean的属性进行赋值;
     * 6)、javaBean的属性名是由什么决定的?getter/setter方法是属性名;set去掉后面那一串首字母小写就是属性名;
     *      private String lastName;?
     *      所有getter/setter都自动生成!
     */
/**
     * 从容器中拿到这个组件
     */
    @Test
    public void test() {
        //ApplicationContext:代表ioc容器
        //ClassPathXmlApplicationContext:当前应用的xml配置文件在 ClassPath下
        //根据spring的配置文件得到ioc容器对象
        //ApplicationContext ioc = new ClassPathXmlApplicationContext("com/atguigu/bean/ioc.xml");
        ApplicationContext ioc = new ClassPathXmlApplicationContext("ioc.xml");
        //容器帮我们创建好对象了;
        System.out.println("容器启动完成....");
        Person bean = (Person) ioc.getBean("person01");
        Object bean2 = ioc.getBean("person01");
        System.out.println(bean == bean2);

        System.out.println("==================");
        Object bean3 = ioc.getBean("person03");

    }
二、IOC和Bean的配置
1 IOC和DI
1.1 IOC(Inversion of Control):反转控制。
在应用程序中的组件需要获取资源时,传统的方式是组件主动的从容器中获取所需要的资源,在这样的模式下开发人员往往需要知道在具体容器中特定资源的获取方式,增加了学习成本,同时降低了开发效率。
反转控制的思想完全颠覆了应用程序组件获取资源的传统方式:反转了资源的获取方向——改由容器主动的将资源推送给需要的组件,开发人员不需要知道容器是如何创建资源对象的,只需要提供接收资源的方式即可,极大的降低了学习成本,提高了开发的效率。这种行为也称为查找的被动形式。
1.2 DI(Dependency Injection):依赖注入。
IOC的另一种表述方式:即组件以一些预先定义好的方式(例如:setter 方法)接受来自于容器的资源注入。相对于IOC而言,这种表述更直接。
1.3 IOC容器在Spring中的实现
[1]在通过IOC容器读取Bean的实例之前,需要先将IOC容器本身实例化。
[2]Spring提供了IOC容器的两种实现方式
(1)BeanFactory:IOC容器的基本实现,是Spring内部的基础设施,是面向Spring本身的,不是提供给开发人员使用的。
(2)ApplicationContext:BeanFactory的子接口,提供了更多高级特性。面向Spring的使用者,几乎所有场合都使用ApplicationContext而不是底层的BeanFactory。
1.4 ApplicationContext的主要实现类
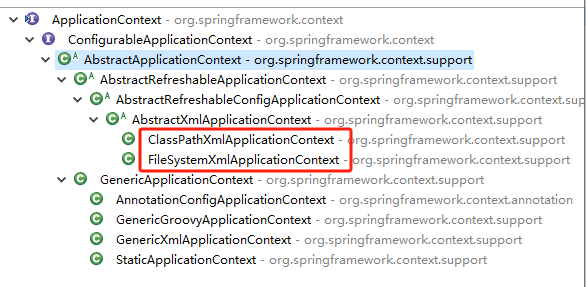
[1]ClassPathXmlApplicationContext:对应类路径下的XML格式的配置文件
[2]FileSystemXmlApplicationContext:对应文件系统中的XML格式的配置文件
[3]在初始化时就创建单例的bean,也可以通过配置的方式指定创建的Bean是多实例的。
1.5 ConfigurableApplicationContext
[1]是ApplicationContext的子接口,包含一些扩展方法
[2]refresh()和close()让ApplicationContext具有启动、关闭和刷新上下文的能力。
1.6 WebApplicationContext
专门为WEB应用而准备的,它允许从相对于WEB根目录的路径中完成初始化工作
2 通过类型获取bean
从IOC容器中获取bean时,除了通过id值获取,还可以通过bean的类型获取。但如果同一个类型的bean在XML文件中配置了多个,则获取时会抛出异常,所以同一个类型的bean在容器中必须是唯一的。
HelloWorld helloWorld = cxt.getBean(HelloWorld.class);
3 给bean的属性赋值
3.1 赋值的途经
①通过bean的setXxx()方法赋值
HelloWorld中使用的就是这种方式
②通过bean的构造器赋值
<bean id="book" class="com.atguigu.spring.bean.Book" >
 <constructor-arg value= "10010"/>
 <constructor-arg value= "Book01"/>
 <constructor-arg value= "Author01"/>
 <constructor-arg value= "20.2"/>
</bean >
●通过索引index值指定参数位置
<bean id="book" class="com.atguigu.spring.bean.Book" >
  <constructor-arg value= "10010" index ="0"/>
  <constructor-arg value= "Book01" index ="1"/>
  <constructor-arg value= "Author01" index ="2"/>
  <constructor-arg value= "20.2" index ="3"/>
</bean >
●通过类型type不同区分重载的构造器
<bean id="book" class="com.atguigu.spring.bean.Book" >
      <constructor-arg value= "10010" index ="0" type="java.lang.Integer" />
      <constructor-arg value= "Book01" index ="1" type="java.lang.String" />
      <constructor-arg value= "Author01" index ="2" type="java.lang.String" />
      <constructor-arg value= "20.2" index ="3" type="java.lang.Double" />
</bean >
③给bean的级联属性赋值
<bean id="action" class="com.atguigu.spring.ref.Action">
  <property name="service" ref="service"/>
  <!-- 设置级联属性(了解) -->
  <property name="service.dao.dataSource" value="DBCP"/>
</bean>
④p名称空间
为了简化XML文件的配置,越来越多的XML文件采用属性而非子元素配置信息。
Spring从2.5版本开始引入了一个新的p命名空间,可以通过<bean>元素属性的方式配置Bean的属性。
使用p命名空间后,基于XML的配置方式将进一步简化。
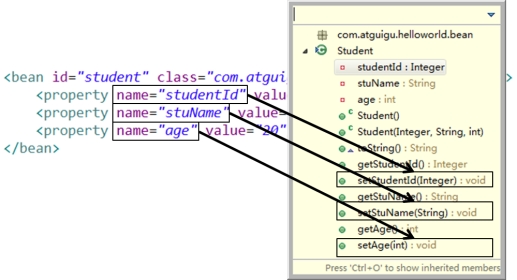
<bean
	id="studentSuper"
	class="com.atguigu.helloworld.bean.Student"
	p:studentId="2002" p:stuName="Jerry2016" p:age="18" />
3.2可以使用的值
①字面量
[1]可以使用字符串表示的值,可以通过value属性或value子节点的方式指定
[2]基本数据类型及其封装类、String等类型都可以采取字面值注入的方式
[3]若字面值中包含特殊字符,可以使用<![CDATA[]]>把字面值包裹起来
②null值
 <bean class="com.atguigu.spring.bean.Book" id="bookNull" >
     <property name= "bookId" value ="2000"/>
     <property name= "bookName">
         <null/>
     </property>
     <property name= "author" value ="nullAuthor"/>
     <property name= "price" value ="50"/>
</bean >
③外部已声明的bean
<bean id="shop" class="com.atguigu.spring.bean.Shop" >
    <property name= "book" ref ="book"/>
</bean >
④内部bean
当bean实例仅仅给一个特定的属性使用时,可以将其声明为内部bean。内部bean声明直接包含在<property>或<constructor-arg>元素里,不需要设置任何id或name属性
内部bean不能使用在任何其他地方
<bean id="shop2" class="com.atguigu.spring.bean.Shop" >
    <property name= "book">
        <bean class= "com.atguigu.spring.bean.Book" >
           <property name= "bookId" value ="1000"/>
           <property name= "bookName" value="innerBook" />
           <property name= "author" value="innerAuthor" />
           <property name= "price" value ="50"/>
        </bean>
    </property>
</bean >
3.3集合属性
在Spring中可以通过一组内置的XML标签来配置集合属性,例如:<list>,<set>或<map>。
①数组和List
配置java.util.List类型的属性,需要指定<list>标签,在标签里包含一些元素。这些标签可以通过<value>指定简单的常量值,通过<ref>指定对其他Bean的引用。通过<bean>指定内置bean定义。通过<null/>指定空元素。甚至可以内嵌其他集合。
数组的定义和List一样,都使用<list>元素。
配置java.util.Set需要使用<set>标签,定义的方法与List一样。
<bean id="shop" class="com.atguigu.spring.bean.Shop" >
           <property name= "categoryList">
               <!-- 以字面量为值的List集合 -->
               <list>
                    <value> 历史</value >
                    <value> 军事</value >
               </list>
           </property>
           <property name= "bookList">
               <!-- 以bean的引用为值的List集合 -->
               <list>
                    <ref bean= "book01"/>
                    <ref bean= "book02"/>
               </list>
           </property>
     </bean >
②Map
Java.util.Map通过<map>标签定义,<map>标签里可以使用多个<entry>作为子标签。每个条目包含一个键和一个值。
必须在<key>标签里定义键。
因为键和值的类型没有限制,所以可以自由地为它们指定<value>、<ref>、<bean>或<null/>元素。
可以将Map的键和值作为<entry>的属性定义:简单常量使用key和value来定义;bean引用通过key-ref和value-ref属性定义。
<bean id="cup" class="com.atguigu.spring.bean.Cup">
	<property name="bookMap">
		<map>
			<entry>
				<key>
					<value>bookKey01</value>
				</key>
				<ref bean="book01"/>
			</entry>
			<entry>
				<key>
					<value>bookKey02</value>
				</key>
				<ref bean="book02"/>
			</entry>
		</map>
	</property>
</bean>
③Properties
使用<props>定义java.util.Properties,该标签使用多个<prop>作为子标签。每个<prop>标签必须定义key属性
<bean class="com.atguigu.spring.bean.DataSource" id="dataSource">
	<property name="properties">
		<props>
			<prop key="userName">root</prop>
			<prop key="password">root</prop>
			<prop key="url">jdbc:mysql:///test</prop>
			<prop key="driverClass">com.mysql.jdbc.Driver</prop>
		</props>
	</property>
</bean>
④集合类型的bean
如果只能将集合对象配置在某个bean内部,则这个集合的配置将不能重用。我们需要将集合bean的配置拿到外面,供其他bean引用。
配置集合类型的bean需要引入util名称空间
<util:list id="bookList">
	<ref bean="book01"/>
	<ref bean="book02"/>
	<ref bean="book03"/>
	<ref bean="book04"/>
	<ref bean="book05"/>
</util:list>

<util:list id="categoryList">
	<value>编程</value>
	<value>极客</value>
	<value>相声</value>
	<value>评书</value>
</util:list>
4 通过工厂创建bean
4.1 静态工厂
调用静态工厂方法创建bean是将对象创建的过程封装到静态方法中。当客户端需要对象时,只需要简单地调用静态方法,而不用关心创建对象的细节。
声明通过静态方法创建的bean需要在bean的class属性里指定静态工厂类的全类名,同时在factory-method属性里指定工厂方法的名称。最后使用<constrctor-arg>元素为该方法传递方法参数。
<!-- 静态工厂 -->
<bean class="com.welisit.bean.StaticFactory" factory-method="createPerson" id="staticFactory">
<constructor-arg value="zhangsan"></constructor-arg>
</bean>
4.2 实例工厂
实例工厂方法:将对象的创建过程封装到另外一个对象实例的方法里。当客户端需要请求对象时,只需要简单的调用该实例方法而不需要关心对象的创建细节。
实现方式
①配置工厂类实例的bean
②在factory-method属性里指定该工厂方法的名称
③使用 construtor-arg 元素为工厂方法传递方法参数
<!-- 实例工厂 -->
<bean class="com.welisit.bean.PersonFactory" id="personFactory">
</bean>

<bean id="personfc" class="com.welisit.bean.Person" factory-bean="personFactory" factory-method="create">
<constructor-arg value="wangwu"></constructor-arg>
</bean>
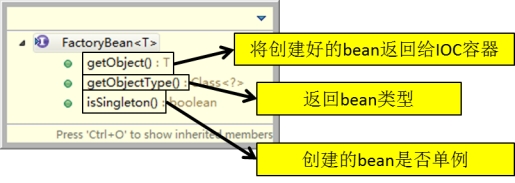
4.3 FactoryBean
Spring中有两种类型的bean,一种是普通bean,另一种是工厂bean,即FactoryBean。
工厂bean跟普通bean不同,其返回的对象不是指定类的一个实例,其返回的是该工厂bean的getObject方法所返回的对象。
工厂bean必须实现org.springframework.beans.factory.FactoryBean接口。
<bean id="product" class="com.atguigu.spring.bean.ProductFactory">
	<property name="productName" value="Mp3" />
</bean>
5 bean的高级配置
5.1 配置信息的继承
①背景
查看下面两个Employee的配置,其中dept属性是重复的。
<bean id="dept" class="com.atguigu.parent.bean.Department">
	<property name="deptId" value="100"/>
	<property name="deptName" value="IT"/>
</bean>

<bean id="emp01" class="com.atguigu.parent.bean.Employee">
	<property name="empId" value="1001"/>
	<property name="empName" value="Tom"/>
	<property name="age" value="20"/>

	<!-- 重复的属性值 -->
	<property name="detp" ref="dept"/>
</bean>

<bean id="emp02" class="com.atguigu.parent.bean.Employee">
	<property name="empId" value="1002"/>
	<property name="empName" value="Jerry"/>
	<property name="age" value="25"/>

	<!-- 重复的属性值 -->
	<property name="detp" ref="dept"/>
</bean>
②配置信息的继承
<!-- 以emp01作为父bean,继承后可以省略公共属性值的配置 -->
<bean id="emp02" parent="emp01">
	<property name="empId" value="1002"/>
	<property name="empName" value="Jerry"/>
	<property name="age" value="25"/>
</bean>
Spring允许继承bean的配置,被继承的bean称为父bean。继承这个父bean的bean称为子bean
子bean从父bean中继承配置,包括bean的属性配置
子bean也可以覆盖从父bean继承过来的配置
③补充说明
父bean可以作为配置模板,也可以作为bean实例。若只想把父bean作为模板,可以设置<bean>的abstract 属性为true,这样Spring将不会实例化这个bean
如果一个bean的class属性没有指定,则必须是抽象bean
并不是<bean>元素里的所有属性都会被继承。比如:autowire,abstract等。
也可以忽略父bean的class属性,让子bean指定自己的类,而共享相同的属性配置。但此时abstract必须设为true。
5.2 bean之间的依赖
有的时候创建一个bean的时候需要保证另外一个bean也被创建,这时我们称前面的bean对后面的bean有依赖。例如:要求创建Employee对象的时候必须创建Department。这里需要注意的是依赖关系不等于引用关系,Employee即使依赖Department也可以不引用它。
<bean id="emp03" class="com.atguigu.parent.bean.Employee" depends-on="dept">
	<property name="empId" value="1003"/>
	<property name="empName" value="Kate"/>
	<property name="age" value="21"/>
</bean>
5.3 bean的作用域
在Spring中,可以在<bean>元素的scope属性里设置bean的作用域,以决定这个bean是单实例的还是多实例的。
默认情况下,Spring只为每个在IOC容器里声明的bean创建唯一一个实例,整个IOC容器范围内都能共享该实例:所有后续的getBean()调用和bean引用都将返回这个唯一的bean实例。该作用域被称为singleton,它是所有bean的默认作用域。
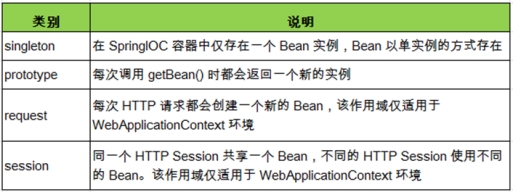
当bean的作用域为单例时,Spring会在IOC容器对象创建时就创建bean的对象实例。而当bean的作用域为prototype时,IOC容器在获取bean的实例时创建bean的实例对象。
5.4 bean的生命周期
①Spring IOC容器可以管理bean的生命周期,Spring允许在bean生命周期内特定的时间点执行指定的任务。
②Spring IOC容器对bean的生命周期进行管理的过程:
-
[1]通过构造器或工厂方法创建bean实例
-
[2]为bean的属性设置值和对其他bean的引用
-
[3]调用bean的初始化方法
-
[4]bean可以使用了
-
[5]当容器关闭时,调用bean的销毁方法
③在配置bean时,通过init-method和destroy-method 属性为bean指定初始化和销毁方法
④bean的后置处理器
-
[1]bean后置处理器允许在调用初始化方法前后对bean进行额外的处理
-
[2]bean后置处理器对IOC容器里的所有bean实例逐一处理,而非单一实例。其典型应用是:检查bean属性的正确性或根据特定的标准更改bean的属性。
-
[3] bean后置处理器时需要实现接口:org.springframework.beans.factory.config.BeanPostProcessor。在初始化方法被调用前后,Spring将把每个bean实例分别传递给上述接口的以下两个方法:
-
postProcessBeforeInitialization(Object, String)
-
postProcessAfterInitialization(Object, String)
-
⑤添加bean后置处理器后bean的生命周期
-
[1]通过构造器或工厂方法创建bean实例
-
[2]为bean的属性设置值和对其他bean的引用
-
[3]将bean实例传递给bean后置处理器的**postProcessBeforeInitialization()**方法
-
[4]调用bean的初始化方法
-
[5]将bean实例传递给bean后置处理器的**postProcessAfterInitialization()**方法
-
[6]bean可以使用了
-
[7]当容器关闭时调用bean的销毁方法
5.5 引用外部属性文件
当bean的配置信息逐渐增多时,查找和修改一些bean的配置信息就变得愈加困难。这时可以将一部分信息提取到bean配置文件的外部,以properties格式的属性文件保存起来,同时在bean的配置文件中引用properties属性文件中的内容,从而实现一部分属性值在发生变化时仅修改properties属性文件即可。这种技术多用于连接数据库的基本信息的配置。
①直接配置
<!-- 直接配置 -->
<bean id="dataSource" class="com.mchange.v2.c3p0.ComboPooledDataSource">
	<property name="user" value="root"/>
	<property name="password" value="root"/>
	<property name="jdbcUrl" value="jdbc:mysql:///test"/>
	<property name="driverClass" value="com.mysql.jdbc.Driver"/>
</bean>
②创建properties属性文件
prop.userName=root
prop.password=root
prop.url=jdbc:mysql:///test
prop.driverClass=com.mysql.jdbc.Driver
③引入context名称空间

④指定properties属性文件的位置
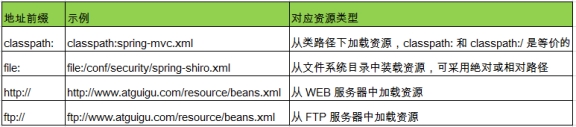
<!-- 指定properties属性文件的位置 -->
<!-- classpath:xxx 表示属性文件位于类路径下 -->
<context:property-placeholder location="classpath:jdbc.properties"/>
⑤从properties属性文件中引入属性值
<!-- 从properties属性文件中引入属性值 -->
<bean id="dataSource" class="com.mchange.v2.c3p0.ComboPooledDataSource">
	<property name="user" value="${prop.userName}"/>
	<property name="password" value="${prop.password}"/>
	<property name="jdbcUrl" value="${prop.url}"/>
	<property name="driverClass" value="${prop.driverClass}"/>
</bean>
注意:不要在配置文件中使用
${username},这个值在spring中有特殊含义,是spring内定的关键字
5.6 自动装配
①自动装配的概念
[1]手动装配:以value或ref的方式明确指定属性值都是手动装配。
[2]自动装配:根据指定的装配规则,不需要明确指定,Spring自动将匹配的属性值注入bean中。
②装配模式
[1]根据类型自动装配:将类型匹配的bean作为属性注入到另一个bean中。若IOC容器中有多个与目标bean类型一致的bean,Spring将无法判定哪个bean最合适该属性,所以不能执行自动装配
[2]根据名称自动装配:必须将目标bean的名称和属性名设置的完全相同
[3]通过构造器自动装配:当bean中存在多个构造器时,此种自动装配方式将会很复杂。不推荐使用。
<!-- 自动装配 -->
<bean class="com.welisit.bean.Car" id="car">
	<property name="name" value="bwm"></property>
</bean>

<bean class="com.welisit.bean.Person" id="person" autowire="byType">
	<property name="lastName" value="zhaoliu"></property>
</bean>
③选用建议
相对于使用注解的方式实现的自动装配,在XML文档中进行的自动装配略显笨拙,在项目中更多的使用注解的方式实现。
6 SpEL
6.1 简介
Spring Expression Language,Spring表达式语言,简称SpEL。支持运行时查询并可以操作对象图。
和JSP页面上的EL表达式、Struts2中用到的OGNL表达式一样,SpEL根据JavaBean风格的getXxx()、setXxx()方法定义的属性访问对象图,完全符合我们熟悉的操作习惯。
6.2 基本语法
SpEL使用**#{…}**作为定界符,所有在大框号中的字符都将被认为是SpEL表达式。
6.3 使用字面量
●整数:<property name=“count” value=“#{5}”/>
●小数:<property name=“frequency” value=“#{89.7}”/>
●科学计数法:<property name=“capacity” value=“#{1e4}”/>
●String类型的字面量可以使用单引号或者双引号作为字符串的定界符号
<property name=“name” value=“#{‘Chuck’}”/>
<property name=‘name’ value=‘#{“Chuck”}’/>
●Boolean:<property name=“enabled” value=“#{false}”/>
6.4 引用其他bean
<bean id="emp04" class="com.atguigu.parent.bean.Employee">
	<property name="empId" value="1003"/>
	<property name="empName" value="Kate"/>
	<property name="age" value="21"/>
	<property name="detp" value="#{dept}"/>
</bean>
6.5 引用其他bean的属性值作为自己某个属性的值
<bean id="emp05" class="com.atguigu.parent.bean.Employee">
	<property name="empId" value="1003"/>
	<property name="empName" value="Kate"/>
	<property name="age" value="21"/>
	<property name="deptName" value="#{dept.deptName}"/>
</bean>
6.6 调用非静态方法
<!-- 创建一个对象,在SpEL表达式中调用这个对象的方法 -->
<bean id="salaryGenerator" class="com.atguigu.spel.bean.SalaryGenerator"/>

<bean id="employee" class="com.atguigu.spel.bean.Employee">
	<!-- 通过对象方法的返回值为属性赋值 -->
	<property name="salayOfYear" value="#{salaryGenerator.getSalaryOfYear(5000)}"/>
</bean>
6.7 调用静态方法
<bean id="employee" class="com.atguigu.spel.bean.Employee">
	<!-- 在SpEL表达式中调用类的静态方法 -->
	<property name="circle" value="#{T(java.lang.Math).PI*20}"/>
</bean>
6.8 运算符
①算术运算符:+、-、*、/、%、^
②字符串连接:+
③比较运算符:<、>、==、<=、>=、lt、gt、eq、le、ge
④逻辑运算符:and, or, not, |
⑤三目运算符:判断条件?判断结果为true时的取值:判断结果为false时的取值
⑥正则表达式:matches
7 通过注解配置bean
7.1 概述
相对于XML方式而言,通过注解的方式配置bean更加简洁和优雅,而且和MVC组件化开发的理念十分契合,是开发中常用的使用方式。
7.2 使用注解标识组件
①普通组件:@Component
标识一个受Spring IOC容器管理的组件
②持久化层组件:@Respository
标识一个受Spring IOC容器管理的持久化层组件
③业务逻辑层组件:@Service
标识一个受Spring IOC容器管理的业务逻辑层组件
④表述层控制器组件:@Controller
标识一个受Spring IOC容器管理的表述层控制器组件
⑤组件命名规则
[1]默认情况:使用组件的简单类名首字母小写后得到的字符串作为bean的id
[2]使用组件注解的value属性指定bean的id
注意:事实上Spring并没有能力识别一个组件到底是不是它所标记的类型,即使将@Respository注解用在一个表述层控制器组件上面也不会产生任何错误,所以@Respository、@Service、@Controller这几个注解仅仅是为了让开发人员自己明确当前的组件扮演的角色。
7.3 扫描组件
组件被上述注解标识后还需要通过Spring进行扫描才能够侦测到。
①指定被扫描的package
<context:component-scan base-package="com.atguigu.component"/>
②详细说明
[1]base-package属性指定一个需要扫描的基类包,Spring容器将会扫描这个基类包及其子包中的所有类。
[2]当需要扫描多个包时可以使用逗号分隔。
[3]如果仅希望扫描特定的类而非基包下的所有类,可使用resource-pattern属性过滤特定的类,示例:
<context:component-scan
	base-package="com.atguigu.component"
	resource-pattern="autowire/*.class"/>
[4]包含与排除
●<context:include-filter>子节点表示要包含的目标类
注意:通常需要与use-default-filters属性配合使用才能够达到“仅包含某些组件”这样的效果。即:通过将use-default-filters属性设置为false,禁用默认过滤器,然后扫描的就只是include-filter中的规则指定的组件了。
●<context:exclude-filter>子节点表示要排除在外的目标类
●component-scan下可以拥有若干个include-filter和exclude-filter子节点
●过滤表达式
| 类别 | 示例 | 说明 |
|---|---|---|
| annotation | com.atguigu.XxxAnnotation | 过滤所有标注了XxxAnnotation的类。这个规则根据目标组件是否标注了指定类型的注解进行过滤。 |
| assignable | com.atguigu.BaseXxx | 过滤所有BaseXxx类的子类。这个规则根据目标组件是否是指定类型的子类的方式进行过滤。 |
| aspectj | com.atguigu.*Service+ | 所有类名是以Service结束的,或这样的类的子类。这个规则根据AspectJ表达式进行过滤。 |
| regex | com\.atguigu\.anno.* | 所有com.atguigu.anno包下的类。这个规则根据正则表达式匹配到的类名进行过滤。 |
| custom | com.atguigu.XxxTypeFilter | 使用XxxTypeFilter类通过编码的方式自定义过滤规则。该类必须实现org.springframework.core.type.filter.TypeFilter接口 |
<context:component-scan base-package="com.welisit.auto">
	<context:exclude-filter type="annotation" expression="com.welisit.bean.MyAnnotation"/>
</context:component-scan>
③JAR包
必须在原有JAR包组合的基础上再导入一个:spring-aop-4.0.0.RELEASE.jar
7.1 组件装配
①需求
Controller组件中往往需要用到Service组件的实例,Service组件中往往需要用到Repository组件的实例。Spring可以通过注解的方式帮我们实现属性的装配。
②实现依据
在指定要扫描的包时,<context:component-scan> 元素会自动注册一个bean的后置处理器:AutowiredAnnotationBeanPostProcessor的实例。该后置处理器可以自动装配标记了**@Autowired**、@Resource或@Inject注解的属性。
③@Autowired注解
[1]根据类型实现自动装配。
[2]构造器、普通字段(即使是非public)、一切具有参数的方法都可以应用@Autowired注解
[3]默认情况下,所有使用@Autowired注解的属性都需要被设置。当Spring找不到匹配的bean装配属性时,会抛出异常。
[4]若某一属性允许不被设置,可以设置@Autowired注解的required属性为 false
[5]默认情况下,当IOC容器里存在多个类型兼容的bean时,Spring会尝试匹配bean的id值是否与变量名相同,如果相同则进行装配。如果bean的id值不相同,通过类型的自动装配将无法工作。此时可以在@Qualifier注解里提供bean的名称。Spring甚至允许在方法的形参上标注@Qualifiter注解以指定注入bean的名称。
[6]@Autowired注解也可以应用在数组类型的属性上,此时Spring将会把所有匹配的bean进行自动装配。
[7]@Autowired注解也可以应用在集合属性上,此时Spring读取该集合的类型信息,然后自动装配所有与之兼容的bean。
[8]@Autowired注解用在java.util.Map上时,若该Map的键值为String,那么 Spring将自动装配与值类型兼容的bean作为值,并以bean的id值作为键。
spring自带的。
④@Resource
@Resource注解要求提供一个bean名称的属性,若该属性为空,则自动采用标注处的变量或方法名作为bean的名称。j2ee自带的
⑤@Inject
@Inject和@Autowired注解一样也是按类型注入匹配的bean,但没有reqired属性。用于EJB容器的
| 对比项 | @Autowired | @Resource |
|---|---|---|
| 注解来源 | Spring注解 | JDK注解(JSR-250标准注解,属于J2EE) |
| 装配方式 | 优先按类型 | 优先按名称 |
| 属性 | required | name、type |
| 作用范围 | 字段、setter方法、构造器 | 字段、setter方法 |
8 泛型依赖注入
8.1 简介
Spring 4.x中可以为子类注入子类对应的泛型类型的成员变量的引用。
8.2 实现
[1]组件基类
public class BaseRepository<T> {

	public void save() {
		System.out.println("Saved by BaseRepository");
	}

}
public class BaseService<T> {

	@Autowired
	private BaseRepository<T> repository;

	public void add() {
		repository.save();
	}

}
[2]组件实体类
@Repository
public class UserRepository extends BaseRepository<User>{

	public void save() {
		System.out.println("Saved by UserRepository");
	}

}
@Service
public class UserService extends BaseService<User>{

}
[3]模型实体类
public class User {

}
[4]测试
ApplicationContext ioc = new ClassPathXmlApplicationContext("di.xml");

UserService us = (UserService) ioc.getBean("userService");

us.add();
执行结果
Saved by UserRepository
8.3 Spring单元测试
1.导入spring-test-4.0.0.RELEASE.jar包
2.添加注解
//@ContextConfiguration(classes=SpringConfig.class)
// 指定spring配置文件
@ContextConfiguration(locations={"classpath:applicationContext2.xml"})
// 指定用哪个类进行测试
@RunWith(value=SpringJUnit4ClassRunner.class)
public class IocTest {}
9 整合多个配置文件
9.1 Spring允许通过<import>将多个配置文件引入到一个文件中,进行配置文件的集成。这样在启动Spring容器时,仅需要指定这个合并好的配置文件就可以。
9.2 import元素的resource属性支持Spring的标准的路径资源
10 ioc源码
IOC:
1、IOC是一个容器
2、容器启动的时候创建所有单实例对象
3、我们可以直接从容器中获取到这个对象
SpringIOC:
1)、ioc容器的启动过程?启动期间都做了什么(什么时候创建所有单实例bean)
2)、ioc是如何创建这些单实例bean,并如何管理的;到底保存在了那里?
思路: 从HelloWorld开始,调试每个方法的作用;
ClassPathXMLApplicationContext构造器
ApplicationContext ioc =new ClassPathXmlApplicationContext("ioc.xml")
this(new String[] {configLocation}, true, null);
public ClassPathXmlApplicationContext(String[] configLocations, boolean refresh, ApplicationContext parent)
            throws BeansException {

        super(parent);
        setConfigLocations(configLocations);
        if (refresh) {
               //所有单实例bean创建完成
            refresh();
        }
    }

BeanFactory:Bean工厂;
refresh();实现;Spring;BeanFactory的流程;也是ioc容器的创建流程
@Override
    public void refresh() throws BeansException, IllegalStateException {
        synchronized (this.startupShutdownMonitor) {
            // Prepare this context for refreshing.
            prepareRefresh();

            // Tell the subclass to refresh the internal bean factory.
               //Spring解析xml配置文件将要创建的所有bean的配置信息保存起来,观看Spring对xml的解析
            ConfigurableListableBeanFactory beanFactory = obtainFreshBeanFactory();

            // Prepare the bean factory for use in this context.
            prepareBeanFactory(beanFactory);

            try {
                // Allows post-processing of the bean factory in context subclasses.
                postProcessBeanFactory(beanFactory);

                // Invoke factory processors registered as beans in the context.
                invokeBeanFactoryPostProcessors(beanFactory);

                // Register bean processors that intercept bean creation.
                registerBeanPostProcessors(beanFactory);

                // Initialize message source for this context.
                //支持国际化功能的;
                initMessageSource();

                // Initialize event multicaster for this context.
                initApplicationEventMulticaster();

                // Initialize other special beans in specific context subclasses.
               //留给子类的方法
                onRefresh();

                // Check for listener beans and register them.
                registerListeners();

                // Instantiate all remaining (non-lazy-init) singletons.
               //初始化所有单实例bean的地方
                finishBeanFactoryInitialization(beanFactory);

                // Last step: publish corresponding event.
                finishRefresh();
            }

            catch (BeansException ex) {
                // Destroy already created singletons to avoid dangling resources.
                destroyBeans();

                // Reset 'active' flag.
                cancelRefresh(ex);

                // Propagate exception to caller.
                throw ex;
            }
        }
    }
finishBeanFactoryInitialization(beanFactory);实现
AbstractApplicationContext:
protected void finishBeanFactoryInitialization(ConfigurableListableBeanFactory beanFactory) {
        // Initialize conversion service for this context.
        if (beanFactory.containsBean(CONVERSION_SERVICE_BEAN_NAME) &&
                beanFactory.isTypeMatch(CONVERSION_SERVICE_BEAN_NAME, ConversionService.class)) {
            beanFactory.setConversionService(
                    beanFactory.getBean(CONVERSION_SERVICE_BEAN_NAME, ConversionService.class));
        }

        // Initialize LoadTimeWeaverAware beans early to allow for registering their transformers early.
        String[] weaverAwareNames = beanFactory.getBeanNamesForType(LoadTimeWeaverAware.class, false, false);
        for (String weaverAwareName : weaverAwareNames) {
            getBean(weaverAwareName);
        }

        // Stop using the temporary ClassLoader for type matching.
        beanFactory.setTempClassLoader(null);

        // Allow for caching all bean definition metadata, not expecting further changes.
        beanFactory.freezeConfiguration();

        // Instantiate all remaining (non-lazy-init) singletons.初始化所有单实例
        beanFactory.preInstantiateSingletons();
    }
DefaultListableBeanFactory:bean工厂;创建bean
@Override
    public void preInstantiateSingletons() throws BeansException {
        if (this.logger.isDebugEnabled()) {
            this.logger.debug("Pre-instantiating singletons in " + this);
        }

          //拿到所有要创建的bean的名字
        List<String> beanNames;
        synchronized (this.beanDefinitionMap) {
            // Iterate over a copy to allow for init methods which in turn register new bean definitions.
            // While this may not be part of the regular factory bootstrap, it does otherwise work fine.
            beanNames = new ArrayList<String>(this.beanDefinitionNames);
        }


          //按顺序创建bean
        for (String beanName : beanNames) {
            //根据beandid获取到bean的定义信息;
            RootBeanDefinition bd = getMergedLocalBeanDefinition(beanName);

               //判断bean是单实例的,并且不是抽象的,并且不是懒加载的
            if (!bd.isAbstract() && bd.isSingleton() && !bd.isLazyInit()) {
                   //是否是一个实现了FactoryBean接口的bean
                if (isFactoryBean(beanName)) {
                    final FactoryBean<?> factory = (FactoryBean<?>) getBean(FACTORY_BEAN_PREFIX + beanName);
                    boolean isEagerInit;
                    if (System.getSecurityManager() != null && factory instanceof SmartFactoryBean) {
                        isEagerInit = AccessController.doPrivileged(new PrivilegedAction<Boolean>() {
                            @Override
                            public Boolean run() {
                                return ((SmartFactoryBean<?>) factory).isEagerInit();
                            }
                        }, getAccessControlContext());
                    }
                    else {
                        isEagerInit = (factory instanceof SmartFactoryBean &&
                                ((SmartFactoryBean<?>) factory).isEagerInit());
                    }
                    if (isEagerInit) {
                        getBean(beanName);
                    }
                }
                else {
                    getBean(beanName);
                }
            }
        }
    }
getBean(beanName);创建bean的细节
getBean(){
           //所有的getBean掉的是它
          doGetBean(name, null, null, false);
}
AbstractBeanFactory:doGetBean(name, null, null, false);
@SuppressWarnings("unchecked")
    protected <T> T doGetBean(
            final String name, final Class<T> requiredType, final Object[] args, boolean typeCheckOnly)
            throws BeansException {

        final String beanName = transformedBeanName(name);
        Object bean;

        // Eagerly check singleton cache for manually registered singletons.
          //先从已经注册的所有单实例bean中看有没有个bean。第一次创建bean是没有的;
        Object sharedInstance = getSingleton(beanName);
        if (sharedInstance != null && args == null) {
            if (logger.isDebugEnabled()) {
                if (isSingletonCurrentlyInCreation(beanName)) {
                    logger.debug("Returning eagerly cached instance of singleton bean '" + beanName +
                            "' that is not fully initialized yet - a consequence of a circular reference");
                }
                else {
                    logger.debug("Returning cached instance of singleton bean '" + beanName + "'");
                }
            }
            bean = getObjectForBeanInstance(sharedInstance, name, beanName, null);
        }

        else {
            // Fail if we're already creating this bean instance:
            // We're assumably within a circular reference.
            if (isPrototypeCurrentlyInCreation(beanName)) {
                throw new BeanCurrentlyInCreationException(beanName);
            }

            // Check if bean definition exists in this factory.
            BeanFactory parentBeanFactory = getParentBeanFactory();
            if (parentBeanFactory != null && !containsBeanDefinition(beanName)) {
                // Not found -> check parent.
                String nameToLookup = originalBeanName(name);
                if (args != null) {
                    // Delegation to parent with explicit args.
                    return (T) parentBeanFactory.getBean(nameToLookup, args);
                }
                else {
                    // No args -> delegate to standard getBean method.
                    return parentBeanFactory.getBean(nameToLookup, requiredType);
                }
            }

            if (!typeCheckOnly) {
                markBeanAsCreated(beanName);
            }

            try {
                final RootBeanDefinition mbd = getMergedLocalBeanDefinition(beanName);
                checkMergedBeanDefinition(mbd, beanName, args);

                // Guarantee initialization of beans that the current bean depends on.
               //拿到创建当前bean之前需要提前创建的bean。depends-on属性;如果有就循环创建
                String[] dependsOn = mbd.getDependsOn();

                if (dependsOn != null) {
                    for (String dependsOnBean : dependsOn) {
                        if (isDependent(beanName, dependsOnBean)) {
                            throw new BeanCreationException("Circular depends-on relationship between '" +
                                    beanName + "' and '" + dependsOnBean + "'");
                        }
                        registerDependentBean(dependsOnBean, beanName);
                        getBean(dependsOnBean);
                    }
                }


                // Create bean instance.创建bean实例
                if (mbd.isSingleton()) {
                    sharedInstance = getSingleton(beanName, new ObjectFactory<Object>() {
                        @Override
                        public Object getObject() throws BeansException {
                            try {
                                return createBean(beanName, mbd, args);
                            }
                            catch (BeansException ex) {
                                // Explicitly remove instance from singleton cache: It might have been put there
                                // eagerly by the creation process, to allow for circular reference resolution.
                                // Also remove any beans that received a temporary reference to the bean.
                                destroySingleton(beanName);
                                throw ex;
                            }
                        }
                    });
                    bean = getObjectForBeanInstance(sharedInstance, name, beanName, mbd);
                }

                else if (mbd.isPrototype()) {
                    // It's a prototype -> create a new instance.
                    Object prototypeInstance = null;
                    try {
                        beforePrototypeCreation(beanName);
                        prototypeInstance = createBean(beanName, mbd, args);
                    }
                    finally {
                        afterPrototypeCreation(beanName);
                    }
                    bean = getObjectForBeanInstance(prototypeInstance, name, beanName, mbd);
                }

                else {
                    String scopeName = mbd.getScope();
                    final Scope scope = this.scopes.get(scopeName);
                    if (scope == null) {
                        throw new IllegalStateException("No Scope registered for scope '" + scopeName + "'");
                    }
                    try {
                        Object scopedInstance = scope.get(beanName, new ObjectFactory<Object>() {
                            @Override
                            public Object getObject() throws BeansException {
                                beforePrototypeCreation(beanName);
                                try {
                                    return createBean(beanName, mbd, args);
                                }
                                finally {
                                    afterPrototypeCreation(beanName);
                                }
                            }
                        });
                        bean = getObjectForBeanInstance(scopedInstance, name, beanName, mbd);
                    }
                    catch (IllegalStateException ex) {
                        throw new BeanCreationException(beanName,
                                "Scope '" + scopeName + "' is not active for the current thread; " +
                                "consider defining a scoped proxy for this bean if you intend to refer to it from a singleton",
                                ex);
                    }
                }
            }
            catch (BeansException ex) {
                cleanupAfterBeanCreationFailure(beanName);
                throw ex;
            }
        }

        // Check if required type matches the type of the actual bean instance.
        if (requiredType != null && bean != null && !requiredType.isAssignableFrom(bean.getClass())) {
            try {
                return getTypeConverter().convertIfNecessary(bean, requiredType);
            }
            catch (TypeMismatchException ex) {
                if (logger.isDebugEnabled()) {
                    logger.debug("Failed to convert bean '" + name + "' to required type [" +
                            ClassUtils.getQualifiedName(requiredType) + "]", ex);
                }
                throw new BeanNotOfRequiredTypeException(name, requiredType, bean.getClass());
            }
        }
        return (T) bean;
    }
DefaultSingletonBeanRegistry:
/** Cache of singleton objects: bean name --> bean instance */
private final Map<String, Object> singletonObjects = new ConcurrentHashMap<String, Object>(64);
getSingleton方法;
public Object getSingleton(String beanName, ObjectFactory<?> singletonFactory) {
        Assert.notNull(beanName, "'beanName' must not be null");
        synchronized (this.singletonObjects) {
               //先从一个地方将这个beanget出来
            Object singletonObject = this.singletonObjects.get(beanName);
            if (singletonObject == null) {
                if (this.singletonsCurrentlyInDestruction) {
                    throw new BeanCreationNotAllowedException(beanName,
                            "Singleton bean creation not allowed while the singletons of this factory are in destruction " +
                            "(Do not request a bean from a BeanFactory in a destroy method implementation!)");
                }
                if (logger.isDebugEnabled()) {
                    logger.debug("Creating shared instance of singleton bean '" + beanName + "'");
                }
                beforeSingletonCreation(beanName);
                boolean recordSuppressedExceptions = (this.suppressedExceptions == null);
                if (recordSuppressedExceptions) {
                    this.suppressedExceptions = new LinkedHashSet<Exception>();
                }
                try {
                    //创建bean
                    singletonObject = singletonFactory.getObject();
                }
                catch (BeanCreationException ex) {
                    if (recordSuppressedExceptions) {
                        for (Exception suppressedException : this.suppressedExceptions) {
                            ex.addRelatedCause(suppressedException);
                        }
                    }
                    throw ex;
                }
                finally {
                    if (recordSuppressedExceptions) {
                        this.suppressedExceptions = null;
                    }
                    afterSingletonCreation(beanName);
                }
               //添加创建的bean
                addSingleton(beanName, singletonObject);
            }
            return (singletonObject != NULL_OBJECT ? singletonObject : null);
        }
    }
创建好的对象最终会保存在一个map中;
ioc容器之一:保存单实例bean的地方;
ioc就是一个容器,单实例bean保存在一个map中;
DefaultSingletonBeanRegistry-singletonObjects
BeanFactory和ApplicationContext的区别;
ApplicationContext是BeanFactory的子接口;
BeanFactory:bean工厂接口;负责创建bean实例;容器里面保存的所有单例bean其实是一个map; Spring最底层的接口;
ApplicationContext:是容器接口;更多的负责容器功能的实现;(可以基于beanFactory创建好的对象之上完成强大的容器)容器可以从map获取这个bean,并且aop。di。在ApplicationContext接口的下的这些类里面;
BeanFactory最底层的接口,ApplicationContext留给程序员使用的ioc容器接口;ApplicationContext是BeanFactory的子接口;ApplicationContext
Spring里面最大的模式就是工厂模式;
<bean class="">\</bean>
BeanFactory:bean工厂;工厂模式;帮用户创建bean
三、AOP前奏
1 提出问题
●情景:数学计算器
●要求
①执行加减乘除运算
②日志:在程序执行期间追踪正在发生的活动
③验证:希望计算器只能处理正数的运算
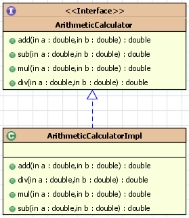
●常规实现
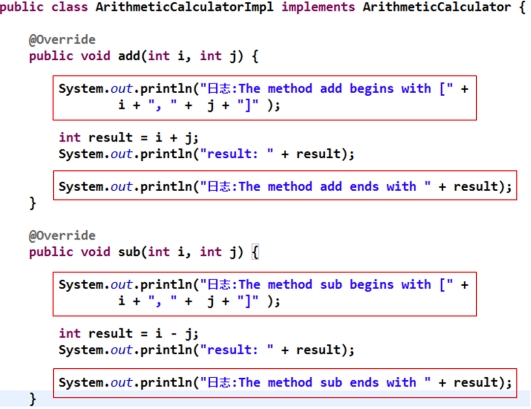
●问题
-
代码混乱:越来越多的非业务需求(日志和验证等)加入后,原有的业务方法急剧膨胀。每个方法在处理核心逻辑的同时还必须兼顾其他多个关注点。
-
代码分散: 以日志需求为例,只是为了满足这个单一需求,就不得不在多个模块(方法)里多次重复相同的日志代码。如果日志需求发生变化,必须修改所有模块。
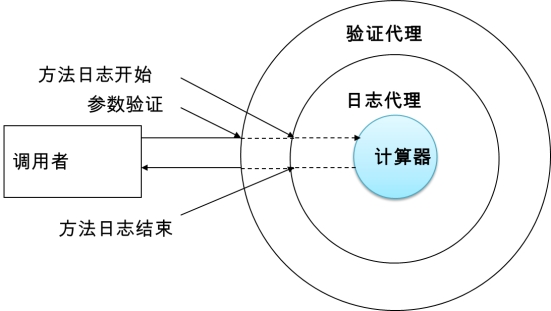
2 动态代理
代理设计模式的原理:使用一个代理将对象包装起来,然后用该代理对象取代原始对象。任何对原始对象的调用都要通过代理。代理对象决定是否以及何时将方法调用转到原始对象上。
3 数学计算器的改进
3.1 日志处理器
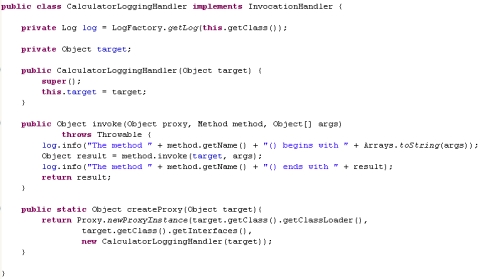
3.2 验证处理器
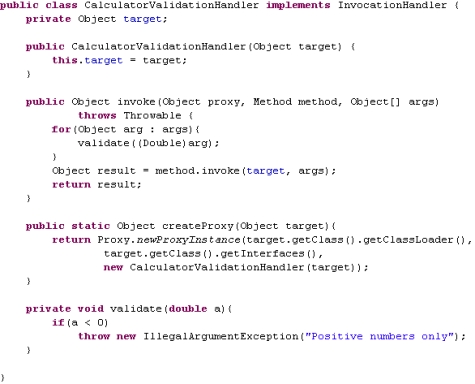
3.3 测试代码
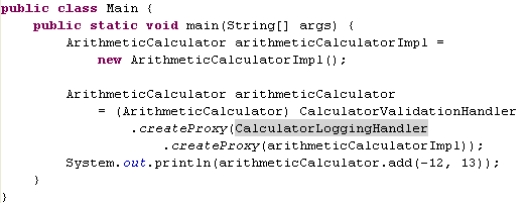
原生动态代理的缺点:
- 写起来难
- jdk默认的动态代理,如果目标对象没有实现任何接口,是无法为他创建代理对象的;
四、AOP概述
1 AOP概述
●AOP(Aspect-Oriented Programming,面向切面编程):是一种新的方法论,是对传统 OOP(Object-Oriented Programming,面向对象编程)的补充。
●AOP编程操作的主要对象是切面(aspect),而切面模块化横切关注点。
●在应用AOP编程时,仍然需要定义公共功能,但可以明确的定义这个功能应用在哪里,以什么方式应用,并且不必修改受影响的类。这样一来横切关注点就被模块化到特殊的类里——这样的类我们通常称之为“切面”。
●AOP的好处:
-
每个事物逻辑位于一个位置,代码不分散,便于维护和升级
-
业务模块更简洁,只包含核心业务代码
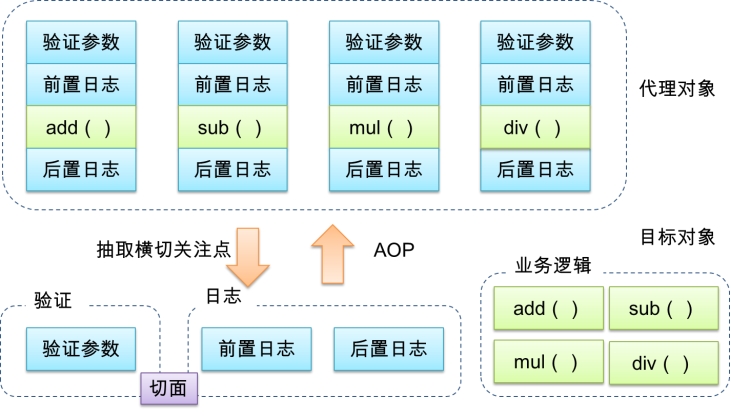
2 AOP术语
2.1 横切关注点
从每个方法中抽取出来的同一类非核心业务。
2.2 切面(Aspect)
封装横切关注点信息的类,每个关注点体现为一个通知方法。
2.3 通知(Advice)
切面必须要完成的各个具体工作
2.4 目标(Target)
被通知的对象
2.5 代理(Proxy)
向目标对象应用通知之后创建的代理对象
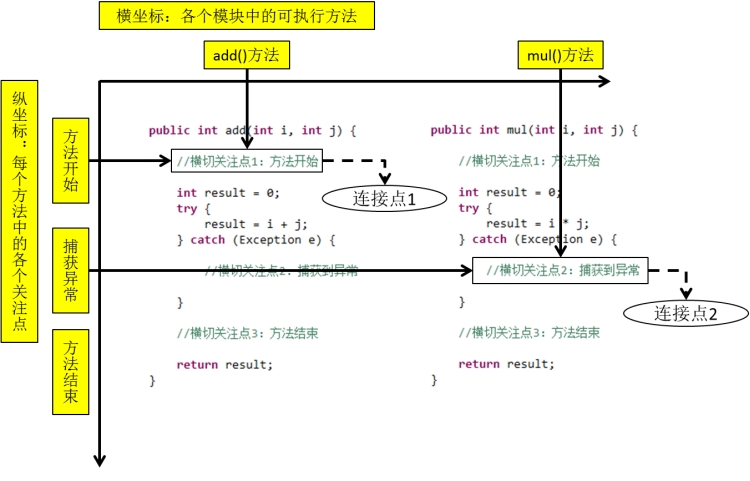
2.6 连接点(Joinpoint)
横切关注点在程序代码中的具体体现,对应程序执行的某个特定位置。例如:类某个方法调用前、调用后、方法捕获到异常后等。
在应用程序中可以使用横纵两个坐标来定位一个具体的连接点:
2.7 切入点(pointcut):
定位连接点的方式。每个类的方法中都包含多个连接点,所以连接点是类中客观存在的事物。如果把连接点看作数据库中的记录,那么切入点就是查询条件——AOP可以通过切入点定位到特定的连接点。切点通过org.springframework.aop.Pointcut 接口进行描述,它使用类和方法作为连接点的查询条件。

3 AspectJ
3.1 简介
AspectJ:Java社区里最完整最流行的AOP框架。
在Spring2.0以上版本中,可以使用基于AspectJ注解或基于XML配置的AOP。
3.2 在Spring中启用AspectJ注解支持
①导入JAR包
●aopalliance.jar
●aspectj.weaver.jar
●spring-aspects.jar
②引入aop名称空间
③配置
<aop:aspectj-autoproxy>
当Spring IOC容器侦测到bean配置文件中的<aop:aspectj-autoproxy>元素时,会自动为与AspectJ切面匹配的bean创建代理
3.3 用AspectJ注解声明切面
①要在Spring中声明AspectJ切面,只需要在IOC容器中将切面声明为bean实例。
②当在Spring IOC容器中初始化AspectJ切面之后,Spring IOC容器就会为那些与 AspectJ切面相匹配的bean创建代理。
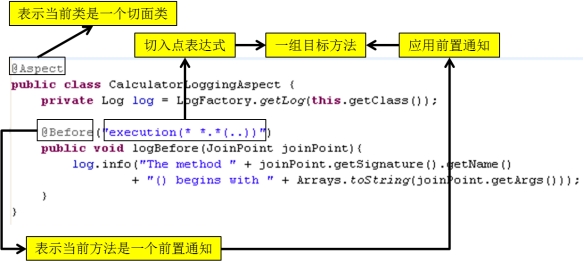
③在AspectJ注解中,切面只是一个带有@Aspect注解的Java类,它往往要包含很多通知。
④通知是标注有某种注解的简单的Java方法。
⑤AspectJ支持5种类型的通知注解:
[1]@Before:前置通知,在方法执行之前执行
[2]@After:后置通知,在方法执行之后执行
[3]@AfterRunning:返回通知,在方法返回结果之后执行
[4]@AfterThrowing:异常通知,在方法抛出异常之后执行
[5]@Around:环绕通知,围绕着方法执行
五、AOP细节
1 切入点表达式
1.1 作用
通过表达式的方式定位一个或多个具体的连接点。
1.2 语法细节
①切入点表达式的语法格式
execution([权限修饰符] [返回值类型] [简单类名/全类名] [方法名]([参数列表]))
②举例说明
| 表达式 | execution(***** com.atguigu.spring.ArithmeticCalculator.*(…)) |
|---|---|
| 含义 | ArithmeticCalculator接口中声明的所有方法。第一个“”代表任意修饰符及任意返回值。第二个“”代表任意方法。“…”匹配任意数量、任意类型的参数。若目标类、接口与该切面类在同一个包中可以省略包名。 |
| 表达式 | execution(public * ArithmeticCalculator.*(…)) |
|---|---|
| 含义 | ArithmeticCalculator接口的所有公有方法 |
| 表达式 | execution(public double ArithmeticCalculator.*(…)) |
|---|---|
| 含义 | ArithmeticCalculator接口中返回double类型数值的方法 |
| 表达式 | execution(public double ArithmeticCalculator.*(double, …)) |
|---|---|
| 含义 | 第一个参数为double类型的方法。“…” 匹配任意数量、任意类型的参数。 |
| 表达式 | execution(public double ArithmeticCalculator.*(double, double)) |
|---|---|
| 含义 | 参数类型为double,double类型的方法 |
③在AspectJ中,切入点表达式可以通过 “&&”、“||”、“!”等操作符结合起来。
| 表达式 | execution (* *.add(int,…)) || execution(* *.sub(int,…)) |
|---|---|
| 含义 | 任意类中第一个参数为int类型的add方法或sub方法 |
1.3 切入点表达式应用到实际的切面类中
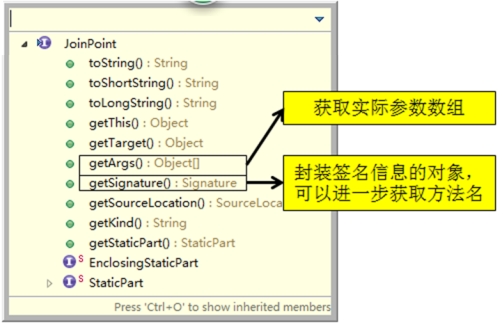
2 当前连接点细节
2.1 概述
切入点表达式通常都会是从宏观上定位一组方法,和具体某个通知的注解结合起来就能够确定对应的连接点。那么就一个具体的连接点而言,我们可能会关心这个连接点的一些具体信息,例如:当前连接点所在方法的方法名、当前传入的参数值等等。这些信息都封装在JoinPoint接口的实例对象中。
2.2 JoinPoint
3 通知
3.1 概述
-
在具体的连接点上要执行的操作。
-
一个切面可以包括一个或者多个通知。
-
通知所使用的注解的值往往是切入点表达式。
3.2 前置通知
-
前置通知:在方法执行之前执行的通知
-
使用@Before注解
3.3 后置通知
-
后置通知:后置通知是在连接点完成之后执行的,即连接点返回结果或者抛出异常的时候
-
使用@After注解
3.4 返回通知
-
返回通知:无论连接点是正常返回还是抛出异常,后置通知都会执行。如果只想在连接点返回的时候记录日志,应使用返回通知代替后置通知。
-
使用@AfterReturning注解
-
在返回通知中访问连接点的返回值
-
在返回通知中,只要将returning属性添加到@AfterReturning注解中,就可以访问连接点的返回值。该属性的值即为用来传入返回值的参数名称
-
必须在通知方法的签名中添加一个同名参数。在运行时Spring AOP会通过这个参数传递返回值
-
原始的切点表达式需要出现在pointcut属性中
-

3.5 异常通知
-
异常通知:只在连接点抛出异常时才执行异常通知
-
将throwing属性添加到@AfterThrowing注解中,也可以访问连接点抛出的异常。Throwable是所有错误和异常类的顶级父类,所以在异常通知方法可以捕获到任何错误和异常。
-
如果只对某种特殊的异常类型感兴趣,可以将参数声明为其他异常的参数类型。然后通知就只在抛出这个类型及其子类的异常时才被执行

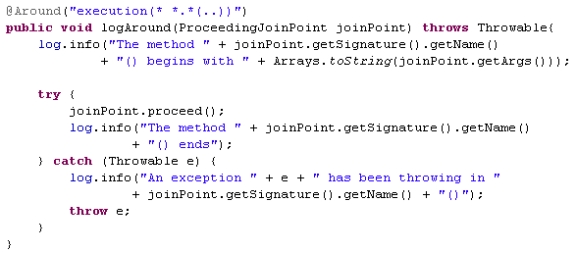
3.6 环绕通知
-
环绕通知是所有通知类型中功能最为强大的,能够全面地控制连接点,甚至可以控制是否执行连接点。
-
对于环绕通知来说,连接点的参数类型必须是ProceedingJoinPoint。它是 JoinPoint的子接口,允许控制何时执行,是否执行连接点。
-
在环绕通知中需要明确调用ProceedingJoinPoint的proceed()方法来执行被代理的方法。如果忘记这样做就会导致通知被执行了,但目标方法没有被执行。
-
注意:环绕通知的方法需要返回目标方法执行之后的结果,即调用 joinPoint.proceed();的返回值,否则会出现空指针异常。
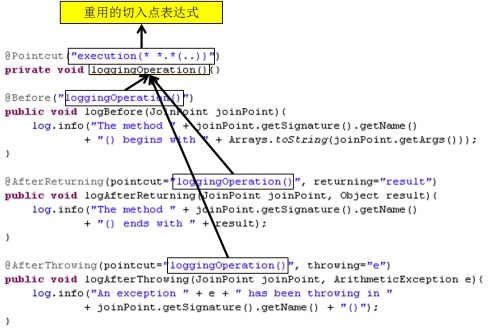
3.7 重用切入点定义
-
在编写AspectJ切面时,可以直接在通知注解中书写切入点表达式。但同一个切点表达式可能会在多个通知中重复出现。
-
在AspectJ切面中,可以通过@Pointcut注解将一个切入点声明成简单的方法。切入点的方法体通常是空的,因为将切入点定义与应用程序逻辑混在一起是不合理的。
-
切入点方法的访问控制符同时也控制着这个切入点的可见性。如果切入点要在多个切面中共用,最好将它们集中在一个公共的类中。在这种情况下,它们必须被声明为public。在引入这个切入点时,必须将类名也包括在内。如果类没有与这个切面放在同一个包中,还必须包含包名。
-
其他通知可以通过方法名称引入该切入点
3.8 指定切面的优先级
-
在同一个连接点上应用不止一个切面时,除非明确指定,否则它们的优先级是不确定的。
-
切面的优先级可以通过实现Ordered接口或利用@Order注解指定。
-
实现Ordered接口,getOrder()方法的返回值越小,优先级越高。
-
若使用@Order注解,序号出现在注解中


切面类
@Aspect
@Component
public class LogUtil {

	@Pointcut("execution(public int com.welisit.bean.Calculator.*(int, int))")
	public void commonPointCut() {}

	@Before("commonPointCut()")
	public void logStart(JoinPoint joinPoint) {
		// 方法名称
		Signature signature = joinPoint.getSignature();
		String name = signature.getName();
		Object[] args = joinPoint.getArgs();
		System.out.println("【前置通知】方法名称:" + name + ",方法参数:" + Arrays.toString(args));
	}

	@AfterReturning(pointcut="commonPointCut()", returning="result")
	public void logReturn(JoinPoint joinPoint, Object result) {
		Signature signature = joinPoint.getSignature();
		String name = signature.getName();
		Object[] args = joinPoint.getArgs();
		System.out.println("【返回通知】方法名称:" + name + ",方法参数:" + Arrays.toString(args) + ",返回值:" + result);
	}

	@AfterThrowing(pointcut="commonPointCut()", throwing="e")
	public void logThrow(JoinPoint joinPoint, Exception e) {
		Signature signature = joinPoint.getSignature();
		String name = signature.getName();
		Object[] args = joinPoint.getArgs();
		System.out.println(e.getLocalizedMessage());
		System.out.println(e.getCause());
		System.out.println(e.getMessage());
		System.out.println("【异常通知】方法名称:" + name + ",方法参数:" + Arrays.toString(args) + ", 异常:" + e);
	}

	@After("commonPointCut()")
	public void logEnd(JoinPoint joinPoint) {
		Signature signature = joinPoint.getSignature();
		String name = signature.getName();
		Object[] args = joinPoint.getArgs();
		System.out.println("【后置通知】方法名称:" + name + ",方法参数:" + Arrays.toString(args));
	}

	@Around("commonPointCut()")
	public Object around(ProceedingJoinPoint joinPoint) throws Throwable {
		Signature signature = joinPoint.getSignature();
		String name = signature.getName();
		Object[] args = joinPoint.getArgs();
		try {
			System.out.println("【环绕前置】方法名称:" + name + ",方法参数:" + Arrays.toString(args));
			Object result = joinPoint.proceed();
			System.out.println("【环绕返回】方法名称:" + name + ",方法参数:" + Arrays.toString(args) + ",返回结果:" + result);
			return result;
		} catch (Exception e) {
			System.out.println("【环绕异常】方法名称:" + name + ",方法参数:" + Arrays.toString(args) + ", 异常信息:" + e);
			throw e;
		} finally {
			System.out.println("【环绕后置】方法名称:" + name + ",方法参数:" + Arrays.toString(args));
		}

	}

}
applicationContext.xml
<?xml version="1.0" encoding="UTF-8"?>
<beans xmlns="http://www.springframework.org/schema/beans"
	xmlns:xsi="http://www.w3.org/2001/XMLSchema-instance"
	xmlns:context="http://www.springframework.org/schema/context"
	xmlns:aop="http://www.springframework.org/schema/aop"
	xsi:schemaLocation="http://www.springframework.org/schema/beans http://www.springframework.org/schema/beans/spring-beans.xsd
		http://www.springframework.org/schema/context http://www.springframework.org/schema/context/spring-context-4.0.xsd
		http://www.springframework.org/schema/aop http://www.springframework.org/schema/aop/spring-aop-4.0.xsd">
    <!-- 组件扫描 将添加注解的类加入到IOC容器中 -->
<context:component-scan base-package="com.welisit"></context:component-scan>
    <!-- aop配置自动扫描注解-->
<aop:aspectj-autoproxy></aop:aspectj-autoproxy>
</beans>
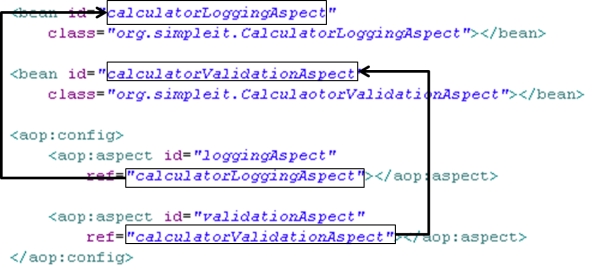
六、AOP XML
1 概述
除了使用AspectJ注解声明切面,Spring也支持在bean配置文件中声明切面。这种声明是通过aop名称空间中的XML元素完成的。
正常情况下,基于注解的声明要优先于基于XML的声明。通过AspectJ注解,切面可以与AspectJ兼容,而基于XML的配置则是Spring专有的。由于AspectJ得到越来越多的 AOP框架支持,所以以注解风格编写的切面将会有更多重用的机会。
2 配置细节
在bean配置文件中,所有的Spring AOP配置都必须定义在<aop:config>元素内部。对于每个切面而言,都要创建一个<aop:aspect>元素来为具体的切面实现引用后端bean实例。
切面bean必须有一个标识符,供<aop:aspect>元素引用。
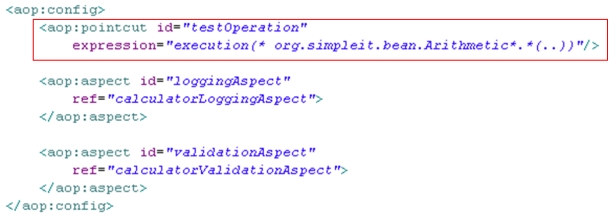
3 声明切入点
-
切入点使用<aop:pointcut>元素声明。
-
切入点必须定义在<aop:aspect>元素下,或者直接定义在<aop:config>元素下。
-
定义在<aop:aspect>元素下:只对当前切面有效
-
定义在<aop:config>元素下:对所有切面都有效
-
-
基于XML的AOP配置不允许在切入点表达式中用名称引用其他切入点。
4 声明通知
-
在aop名称空间中,每种通知类型都对应一个特定的XML元素。
-
通知元素需要使用<pointcut-ref>来引用切入点,或用<pointcut>直接嵌入切入点表达式。
-
method属性指定切面类中通知方法的名称
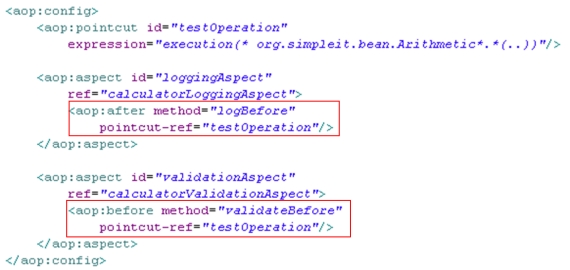
<?xml version="1.0" encoding="UTF-8"?>
<beans xmlns="http://www.springframework.org/schema/beans"
	xmlns:xsi="http://www.w3.org/2001/XMLSchema-instance"
	xmlns:context="http://www.springframework.org/schema/context"
	xmlns:aop="http://www.springframework.org/schema/aop"
	xsi:schemaLocation="http://www.springframework.org/schema/beans http://www.springframework.org/schema/beans/spring-beans.xsd
		http://www.springframework.org/schema/context http://www.springframework.org/schema/context/spring-context-4.0.xsd
		http://www.springframework.org/schema/aop http://www.springframework.org/schema/aop/spring-aop-4.0.xsd">

<bean class="com.welisit.bean.Calculator" id="calculator"></bean>
    <!-- 加入切面类-->
<bean class="com.welisit.util.LogUtil" id="logUtil"></bean>

<aop:config>
<aop:pointcut expression="execution(public int com.welisit.bean.Calculator.*(int, int))" id="myPointCut"/>
	<aop:aspect ref="logUtil">
		<aop:around method="around" pointcut-ref="myPointCut"/>
		<aop:before method="logStart" pointcut-ref="myPointCut"/>
		<aop:after method="logEnd" pointcut-ref="myPointCut"/>
		<aop:after-returning method="logReturn" returning="result" pointcut-ref="myPointCut"/>
		<aop:after-throwing method="logThrow" throwing="e" pointcut-ref="myPointCut"/>

	</aop:aspect>
</aop:config>

</beans>


 369
369

 被折叠的 条评论
为什么被折叠?
被折叠的 条评论
为什么被折叠?
 到【灌水乐园】发言


