


1.网络API:
wx.request(Object)接口 用于发起HTTPS请求。
wx.uploadFile(Object)接口用于将本地资源上传到后台服务器。
wx.downloadFile(Object)接口用于下载文件资源到本地。
wx.connectSocket(Object)接口 用于创建一个WebSocket连接。
wx.sendSocketMessage(Object)接口 用于实现通过WebSocket连接发送数据。
wx.closeSocket(Object)接口用于关闭WebSocket连接。
wx.onSocketOpen(CallBack)接口 用于监听WebSocket连接打开事件。
wx.onSocketError(CallBack)接口 用于监听WebSocket错误。
wx.onSocketMessage(CallBack)接口 用于实现监听WebSocket接收到服务器的消息事件。
wx.onSocketClose(CallBack)接口 用于实现监听WebSocket关闭。
发起网络请求
wx. request(Object)实现向服务器发送请求、获取数据等各种网络交互操作,其相关参数如表6-1所示。一个微信小程序同时只能有5个网络请求连接,并且是HTTPS请求。


示例代码如下:
//index.wxml
<button type="primary" bind:tap="getbaidutap">获取HTMl数据</button>
<textarea value='{{html}}' auto-heightmaxlength="0"></textarea>

//index.js
Page({
  data:{
    html:""
  },
  getbaidutap:function(){
    var that=this;
    wx.request({
      url:'http://www.baidu.com',  //百度网址
      data:{},  //发送数据为空
      header:{'Content-Type':'application/json'},
      success:function(res){
        console.log(res);
        that.setData({
        html:res.data
        })
      }
    })
  }
})
效果图如下:

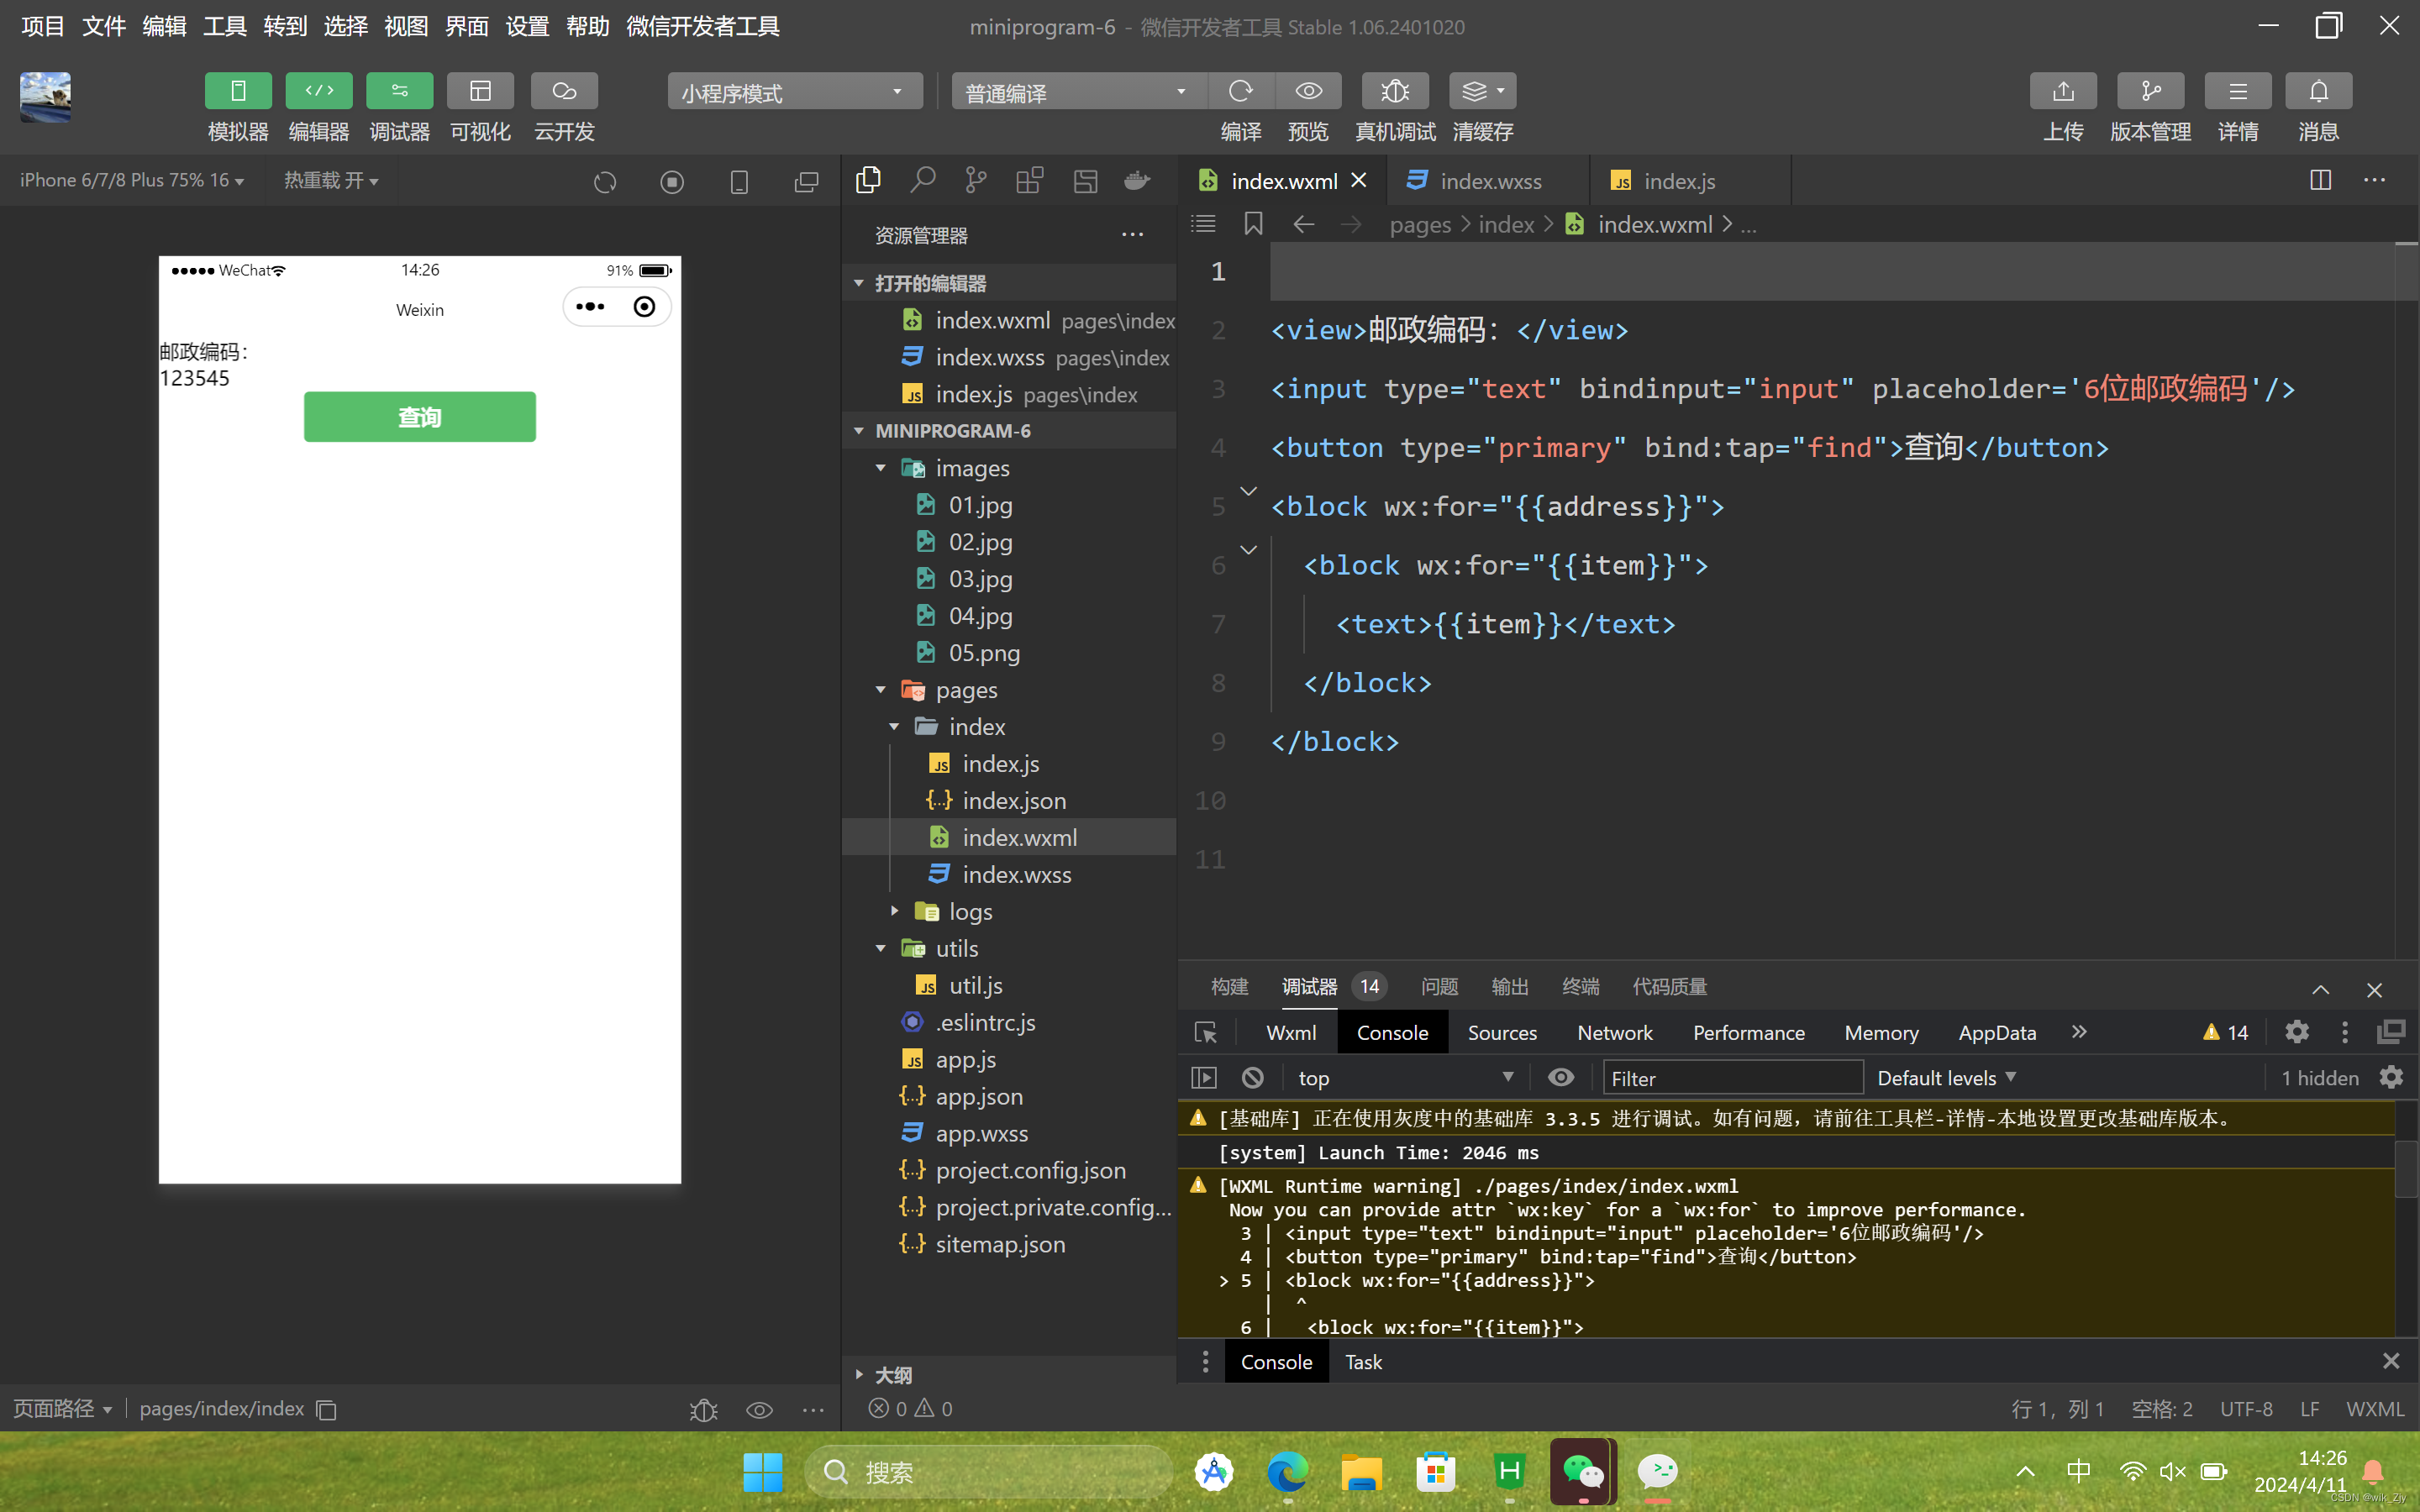
例如,通过wx.request(Object)的CET方法获取邮政编码对应的地址信息。
示例代码如下:
//index.wxml
<view>邮政编码:</view>
<input type="text" bindinput="input" placeholder='6位邮政编码'/>
<button type="primary" bind:tap="find">查询</button>
<block wx:for="{{address}}">
  <block wx:for="{{item}}">
    <text>{{item}}</text>
  </block>
</block>

//index.js
Page({
  data:{
    postcode:"",
    address:[],
    errMsg:"",
    error_code:-1,
  },
  input:function(e){
    this.setData({
      postcode:e.detail.value,
    })
    console.log(e.detail.value)
  },
  find:function(){
    var postcode=this.data.postcode;
    if(postcode!=null&&postcode!=""){
      var self=this;
      wx.showToast({
        title:'正在查询,请稍后....',
        icon:'loading',
        duration:1000
      });
      wx.request({
        url:'https://v.juhe.cn/postcode/query',
        data:{
          'postcode':postcode,
          'key':'0ff9bfccdf147476e067de994eb5496e'
        },
        header:{
          // 'Content-Type':'application/json',
          'Content-Type':'application/json',
        },
        method:'GET',
        success:function(res){
          wx.hideToast();
          if(res.data.error_code==0){
            console.log(res);
            self.setData({
              errMsg:"",
              error_code:res.data.error_code,
              address:res.data.result.list
            })
          }
          else{
            self.setData({
              errMsg:res.data.reason||res.data.reason,
              error_code:res.data.error_code
            })
          }
        }
      })
    }
  }
})
效果图如下:
上传文件
wx.uploadFile(Object)接口用于将本地资源上传到开发者服务器,并在客户端发起一个HTTPS POST请求,其属性值如下表所示。
通过wx.uploadFile(Object),可以将图片上传到服务器并显示。
示例代码如下:
//index.wxml
<button type="primary" bind:tap="uploadimage">上传图片</button>
<image  src="{{img}}" mode="widthFix"/>

//index.js
Page({
  data:{
    img:null,
  },
  uploadimage:function(){
    var that=this;
    //选择图片
    wx.chooseImage({
      success:function(res){
        var tempFilePaths=res.tempFilePaths
        upload(that,tempFilePaths);
      }
    })
    function upload(page,path){
    //显示toast提示消息
      wx.showToast({
        icon:"loading",
        title:"正在上传"
      }),
      wx.uploadFile({
        url:"http://localhost/",
        filePath:path[0],
        name:'file',
        success:function(res){
          console.log(res);
          if(res.statusCode!=200){
            wx.showModal({
              title:'提示',
              content:'上传失败',
              showCancel:false
            })
            return;
          }
          var data=res.data
          page.setData({  //上传成功修改显示头像
            img:path[0]
          })
        },
        fail:function(e){
          console.log(e);
          wx.showModal({
            title:'提示',
            content:'上传失败',
            showCancel:false
          })
        },
        complete:function(){
       //隐藏Toast
          wx.hideToast();
        }
      })
    }
  }
})
效果图如下: 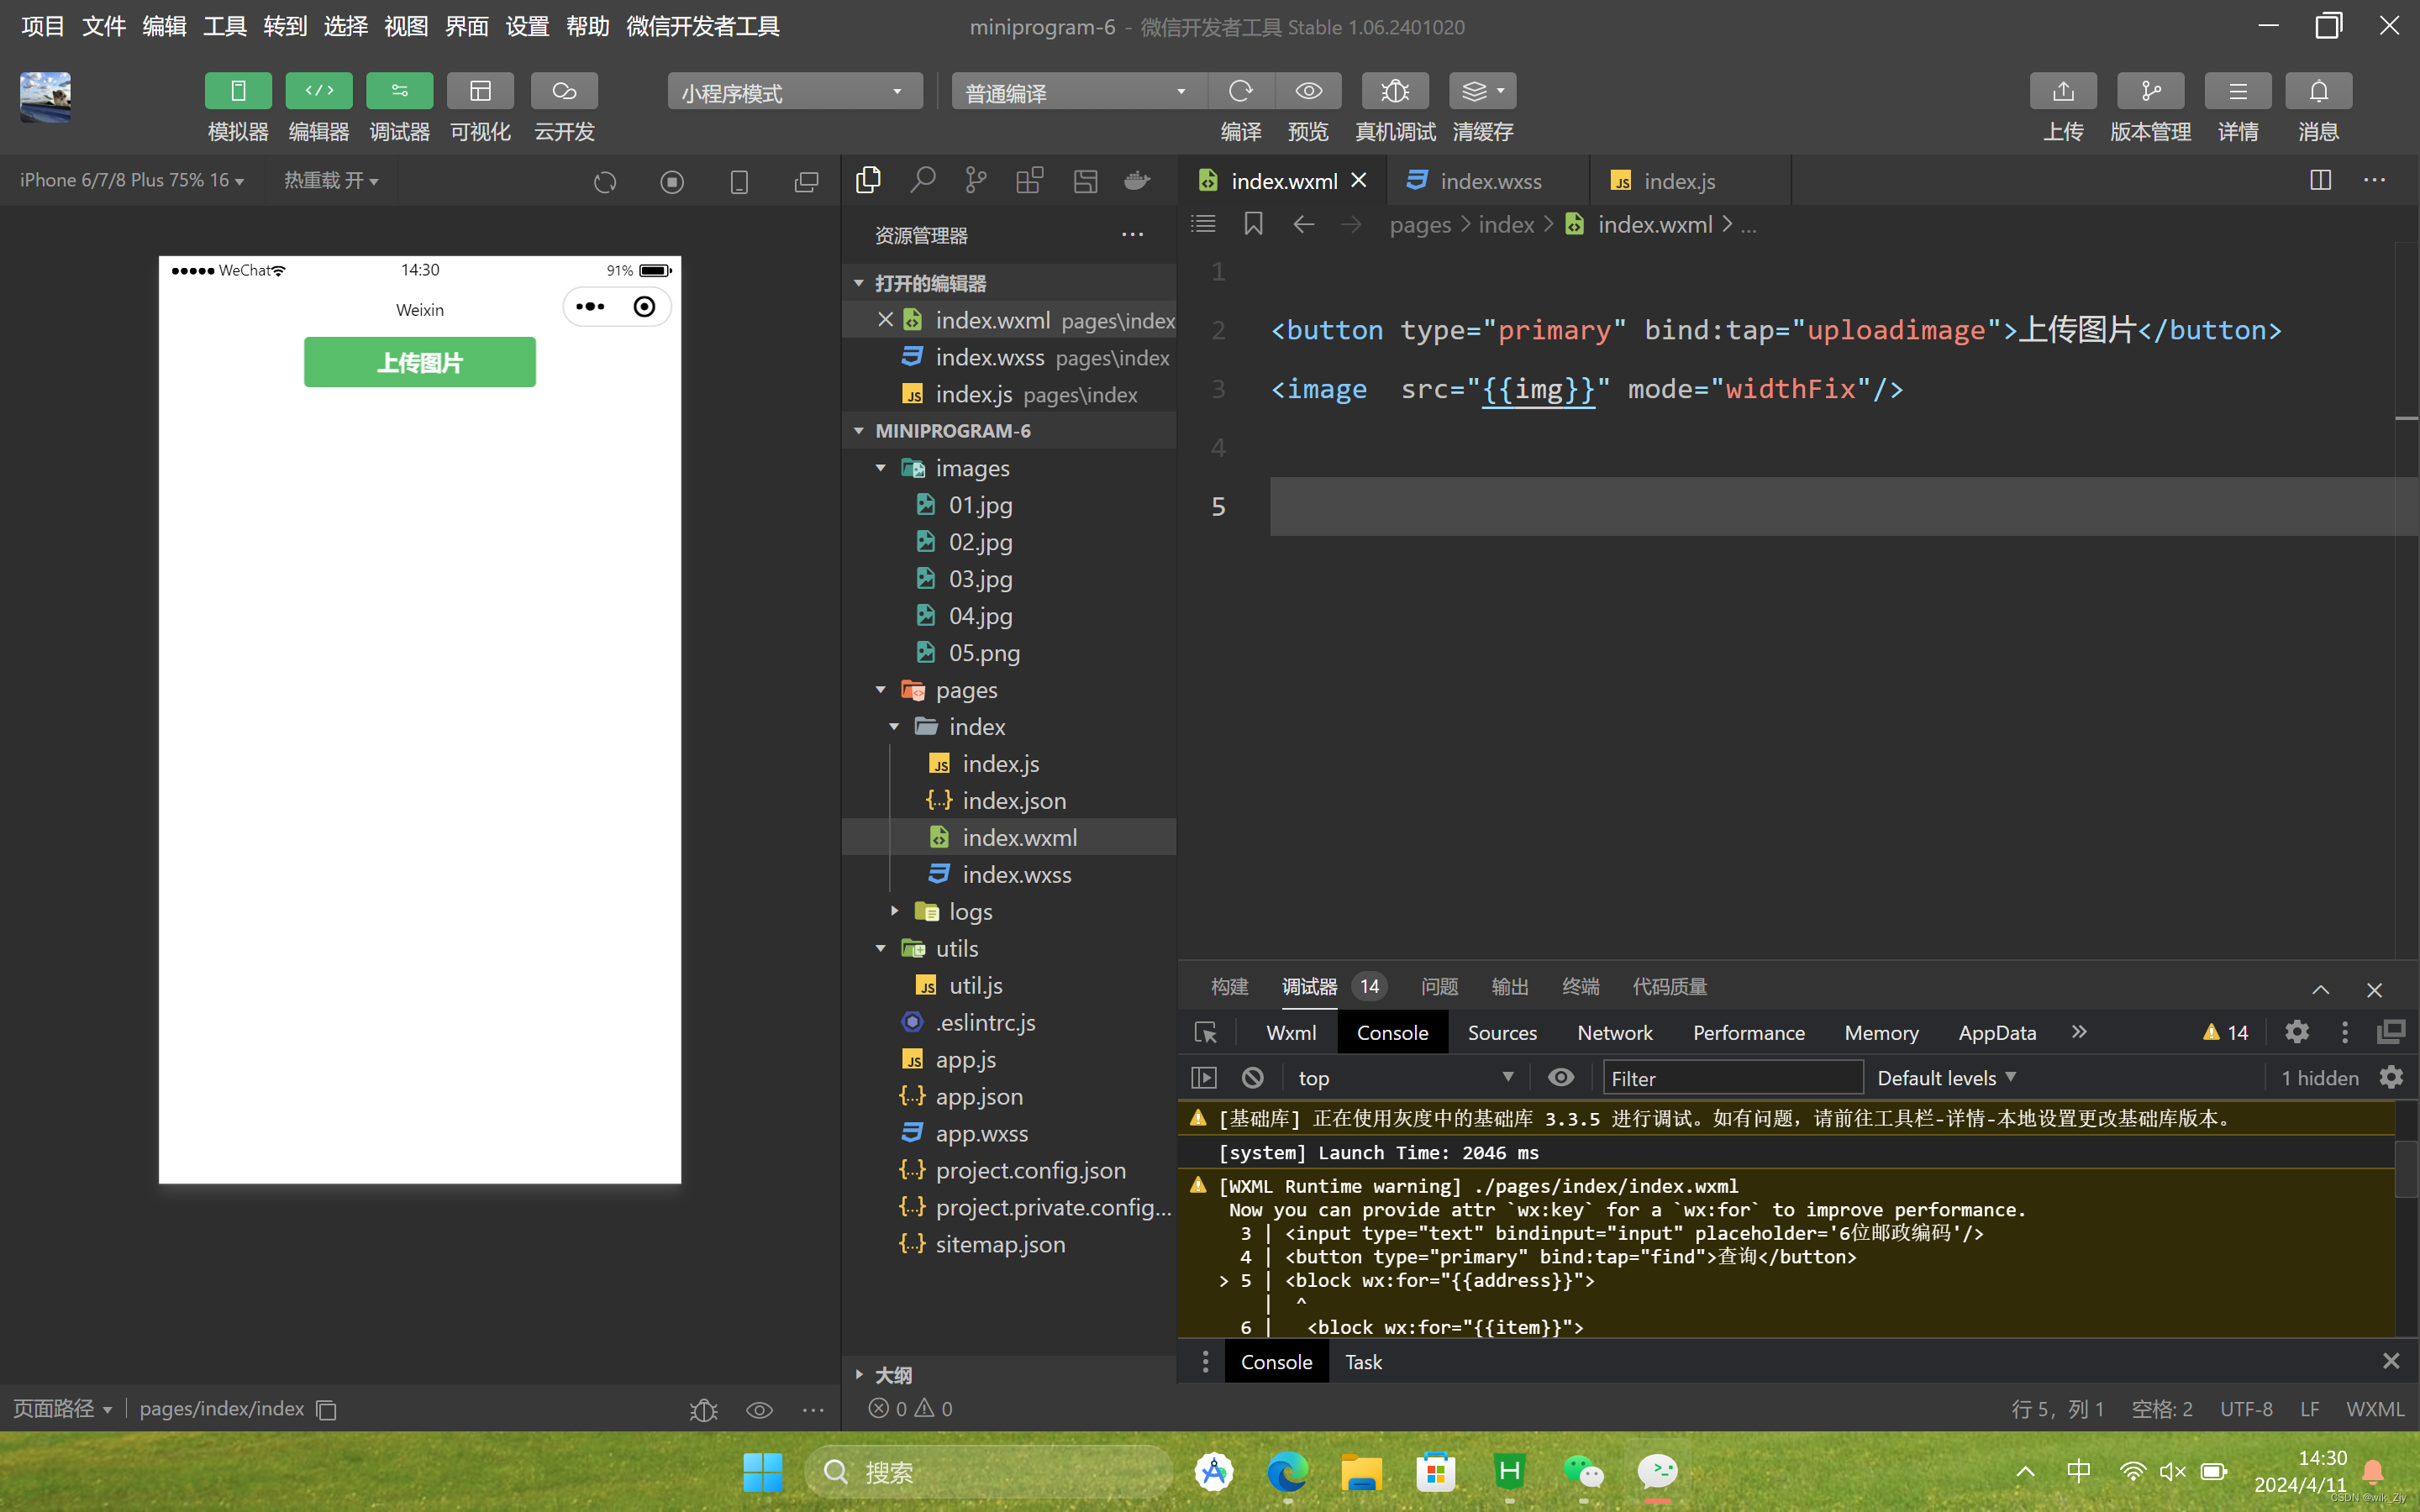
下载文件
wx. downloadFile(Object)接口用于实现从开发者服务器下载文件资源到本地,在客户端直接发起一个HTTPGET请求,返回文件的本地临时路径。其相关属性如下表所示。
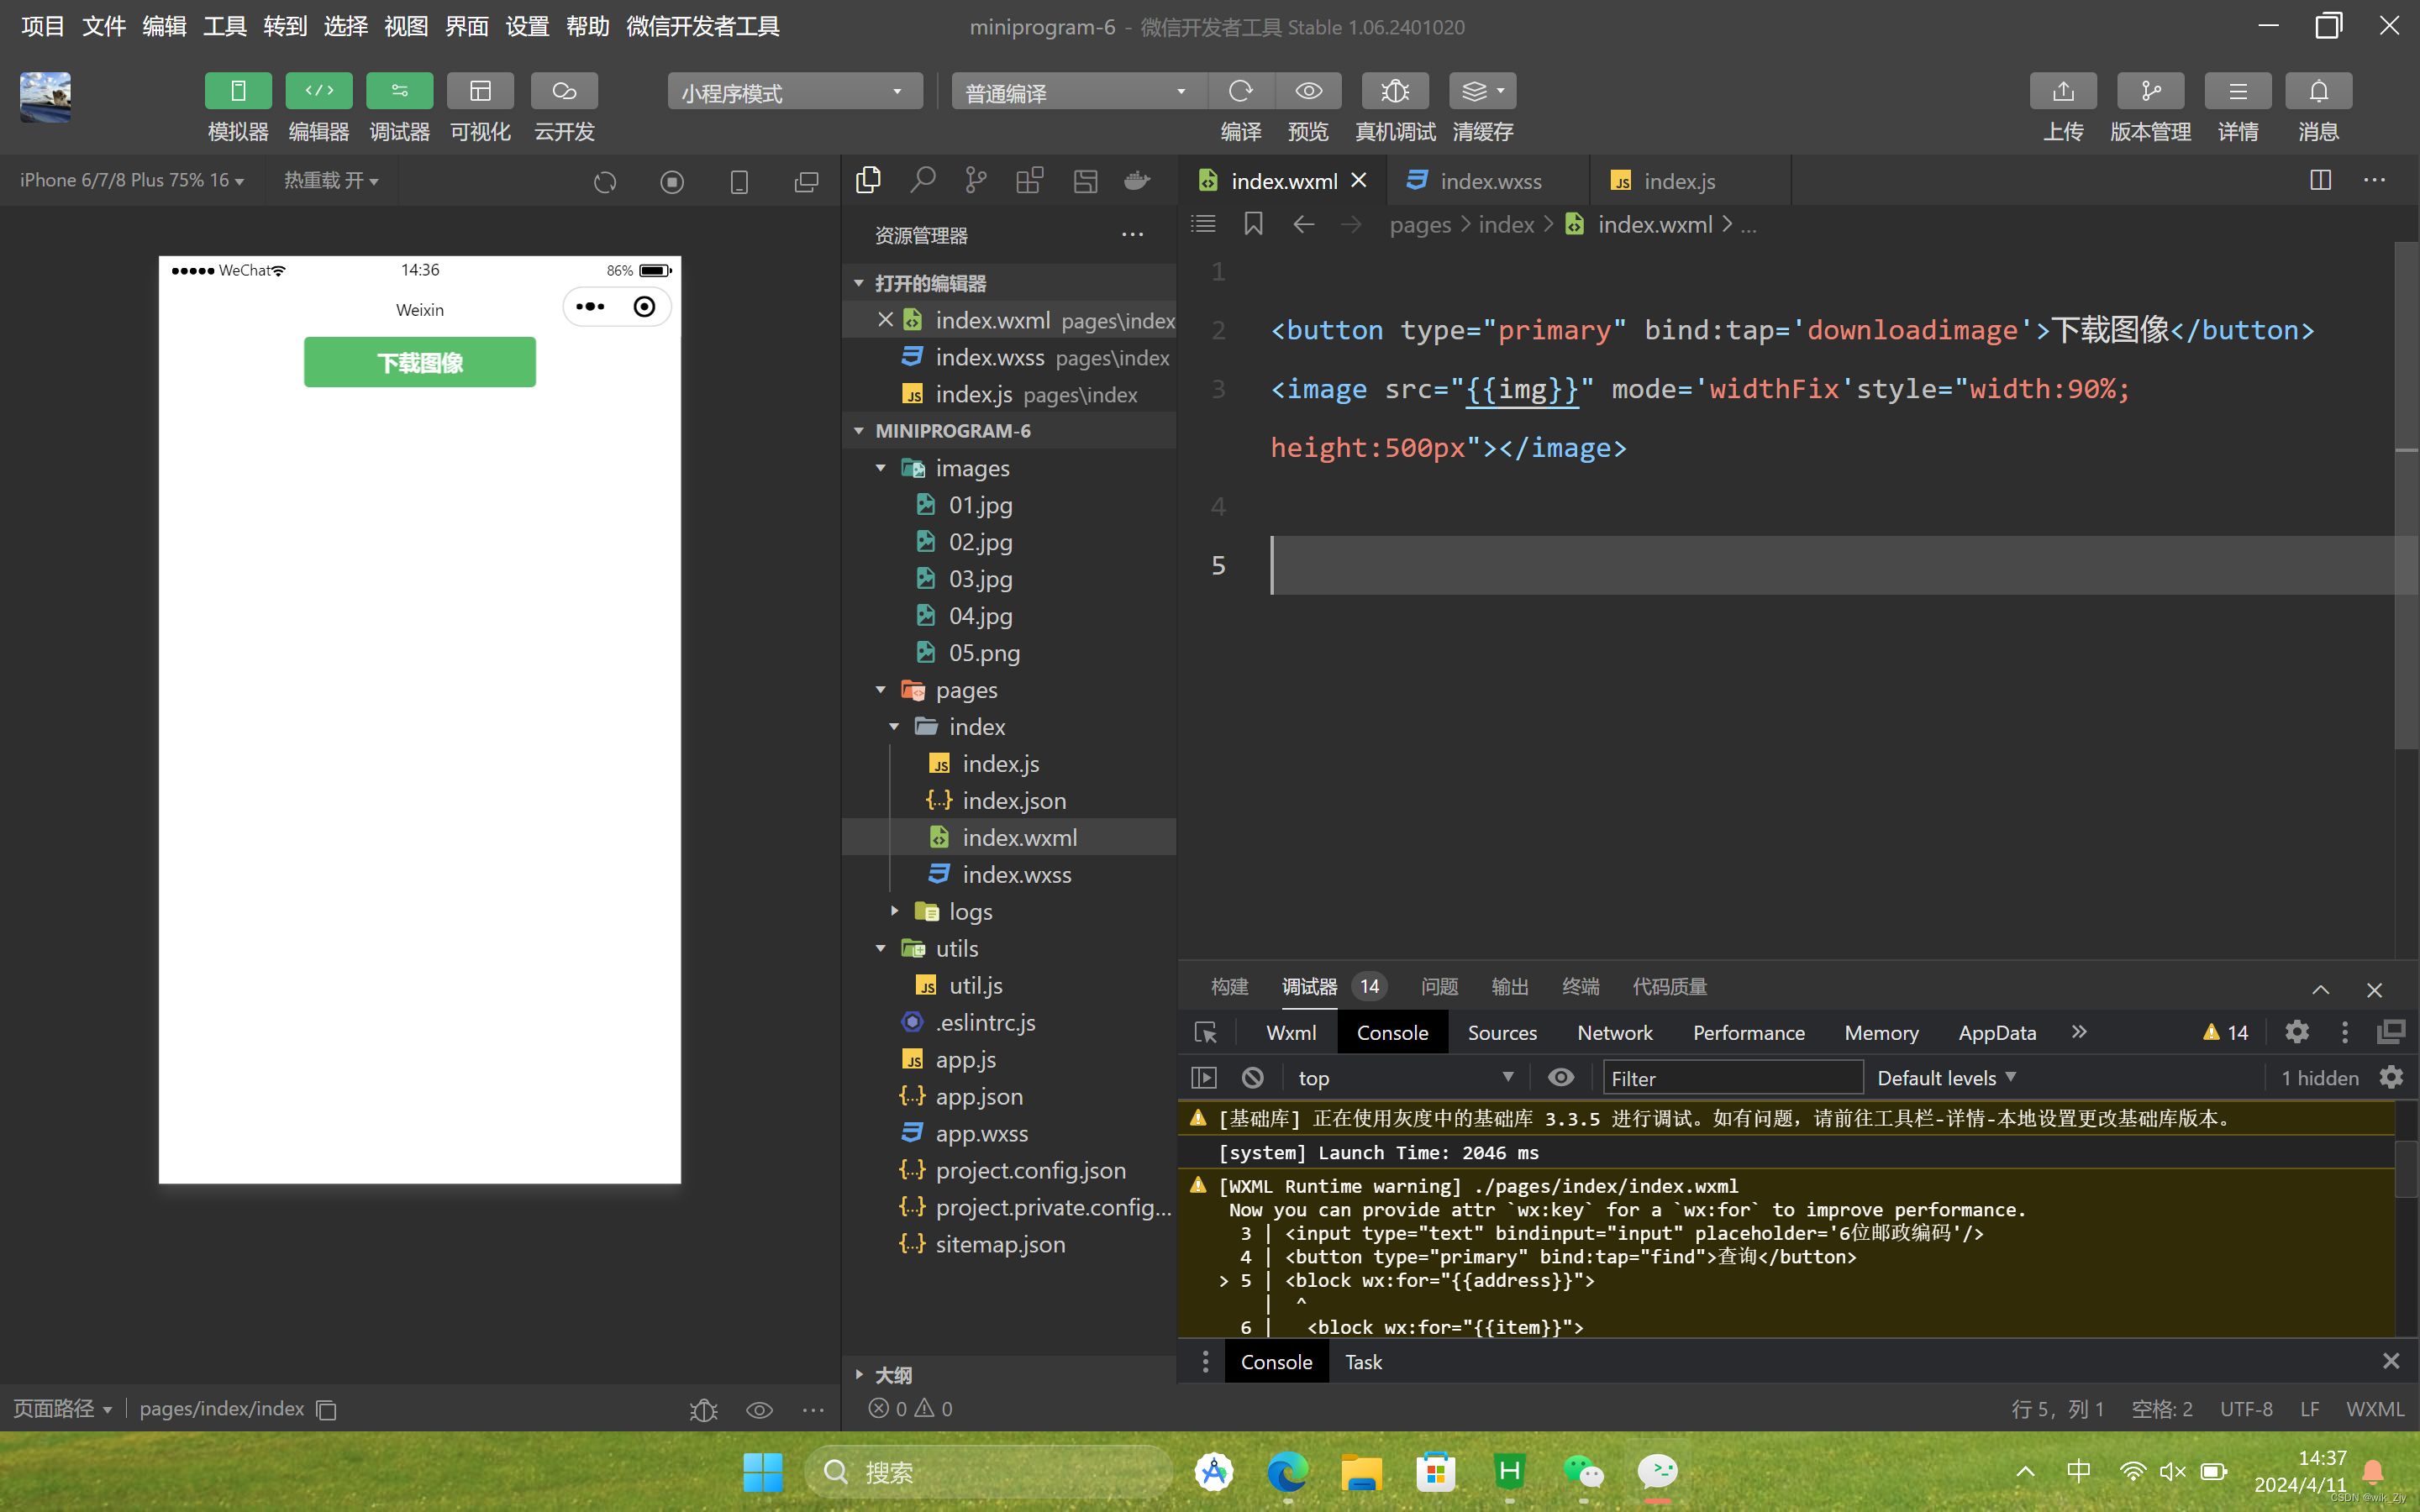
例如,通过wx. downloadFile(Object)实现从服务器中下载图片,后台服务采用WAMP软件在本机搭建。
示例代码如下:
//index.wxml
<button type="primary" bind:tap='downloadimage'>下载图像</button>
<image src="{{img}}" mode='widthFix'style="width:90%;height:500px"></image>

//index.js
Page({
  data:{
    img:null
  },
  downloadimage:function(){
    var that=this;
    wx.downloadFile({
      url:"http://localhost/l.jpg",
      success:function(res){
        console.log(res)
        that.setData({
          img:res.tempFilePath
        })
      }
    })
  }
})
效果图如下:
2. 多媒体API:
多媒体API主要包括图片API、录音API、音频播放控制API、音乐播放控制API等,其目的是丰富小程序的页面功能。
图片API
图片API实现对相机拍照图片或本地相册图片进行处理,主要包括以下4个API接口:
wx.chooseImage(Object)接口用于从本地相册选择图片或使用相机拍照。
wx.previewImage(Object)接口 用于预览图片。
wx.getImageInfo(Object)接口用于获取图片信息。
wx.saveImageToPhotosAlbum(Object)接口 用于保存图片到系统相册。
1.选择图片或拍照
wx. chooseImage(Object)接口用于从本地相册选择图片或使用相机拍照。拍照时产生的临时路径在小程序本次启动期间可以正常使用,若要持久保存,则需要调用wx. saveFile保存图片到本地。其属性值如下表所示。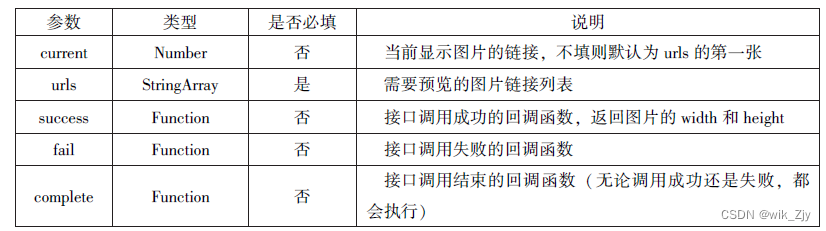
若调用成功,则返回tempFilePaths和tempFiles,tempFilePaths表示图片在本地临时文件路径列表。tempFiles表示图片的本地文件列表,包括path和size。
示例代码如下:
//index.js
wx.chooseImage({
  count:2,//默认值为9
  sizeType:['original','compressed'],//可以指定是原图还是压缩图,默认两者都有
  sourceType:['album','camera'],//可以指定来源是相册还是相机,默认两者都有
  success:function(res){
    var tempFilePaths =res.tempFilePaths
    var tempFiles=res.tempFiles
    console.log(tempFilePaths)
    console.log(tempFiles)
  }
})
2.预览图片
wx. previewImage(Object)接口主要用于预览图片,其相关属性如下表所示。
示例代码如下:
//index.js
wx.previewImage({
  //定义显示第二张
  current:"http://bmob-cdn-16488.b0.upaiyun.com/2018/02/05/2.png",
  urls:["http://bmob-cdn-16488.b0.upaiyun.com/2018/02/05/1.png",
  "http://bmob-cdn-16488.b0.upaiyun.com/2018/02/05/2.png",
  "http://bmob-cdn-16488.b0.upaiyun.com/2018/02/05/3.png"
]
})
3.获取图片信息
wx. getImageInfo(Object)接口用于获取图片信息,其相关属性值如下表所示。
示例代码如下:
//index.js
wx.chooseImage({
  success:function(res){
    wx.getImageInfo({
      src:res.tempFilePaths[0],
      success:function(e){
        console.log(e.width)
        console.log(e.height)
      }
    })
  },
})
4.保存图片到系统相册
wx. saveImageToPhotosAlbum(Object)接口用于保存图片到系统相册,需要得到用户授权scope.writePhotosAlbum。其相关属性如下表所示。
示例代码如下
//index.js
wx.chooseImage({
  success:function(res){
    wx.saveImageToPhotosAlbum({
      filePath:res.tempFilePaths[0],
      success:function(e){
        console.log(e)
      }
    })
  },
})
录音API
录音API提供了语言控制的功能,主要包括以下两个API接口:
wx.startRecord(Object)接口用于实现开始录音。
wx.stopRecord(Object)接口用于实现主动调用停止录音。
1.开始录音
wx. startRecord(Object)接口用于实现开始录音。当主动调用wx.stopRecord(Object)接口或者录音超过1分钟时,系统自动结束录音,并返回录音文件的临时文件路径。若要持久保存,则需要调用wx. saveFile()接口。其相关参数如下表所示。
2.停止录音
wx.stopRecord(Object)接口用于实现主动调用停止录音。
示例代码如下:
//index.js
wx.startRecord()
({
  success:function(res){
    var tempFilePath=res.tempFilePath
  },
  fail:function(res){
    //录音失败
  }
})
setTimeout(function(){
  //结束录音
  wx.stopRecord()
},1000)
音频播放控制API
音频播放控制API主要用于对语音媒体文件的控制,包括播放、暂停、停止及audio组件的控制,主要包括以下3个API:
wx.playVoice(Object)接口 用于实现开始播放语音。
wx.pauseVoice(Object)接口用于实现暂停正在播放的语音。
wx.stopVoice(Object)接口 用于结束播放语音。
1.播放语音
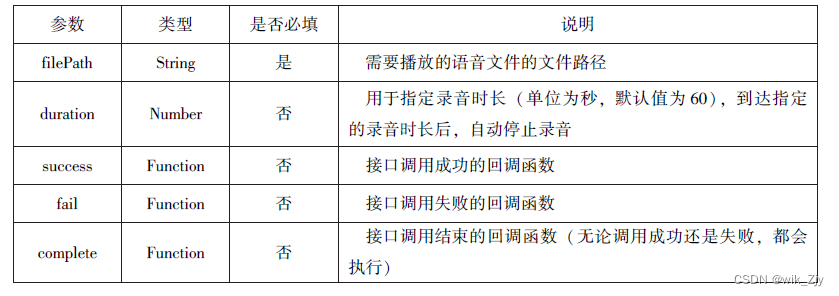
wx. playVoice(Object)接口用于开始播放语音,同时只允许一个语音文件播放,如果前一个语音文件还未播放完,则中断前一个语音文件的播放。其相关参数如下表所示。
示例代码如下:
//index.js
wx.startRecord({
  success:function(res){
    var tempFilePath=res.tempFilePath
    wx.playVoice({   //录音完后立即播放
      filePath:tempFilePath,
      complete:function(){
      }
    })
  }
})
2.暂停播放
wx.pauseVoice(Object)用于暂停正在播放的语音。再次调用wx.playVoice(Object)播放同一文件时,会从暂停处开始播放。如果想从头开始播放,则需要先调用wx.stopVoice(Object).
示例代码如下:
//index.js
wx.startRecord({
  success:function(res){
    var tempFilePath=res.tempFilePath
    wx.playVoice({
      filePath:tempFilePath
    })
    setTimeout(function(){
      //暂停播放
      wx.pauseVoice()
    },5000)
  }
})
3.结束播放
wx.stopVoice(Object)用于结束播放语音。
示例代码如下:
//index.js
wx.startRecord({
success:function(res){
var tempFilePath=res.tempFilePath
wx.playVoice({
filePath:tempFilePath
})
setTimeout(function(){
wx.stopVoice()
},5000)
}
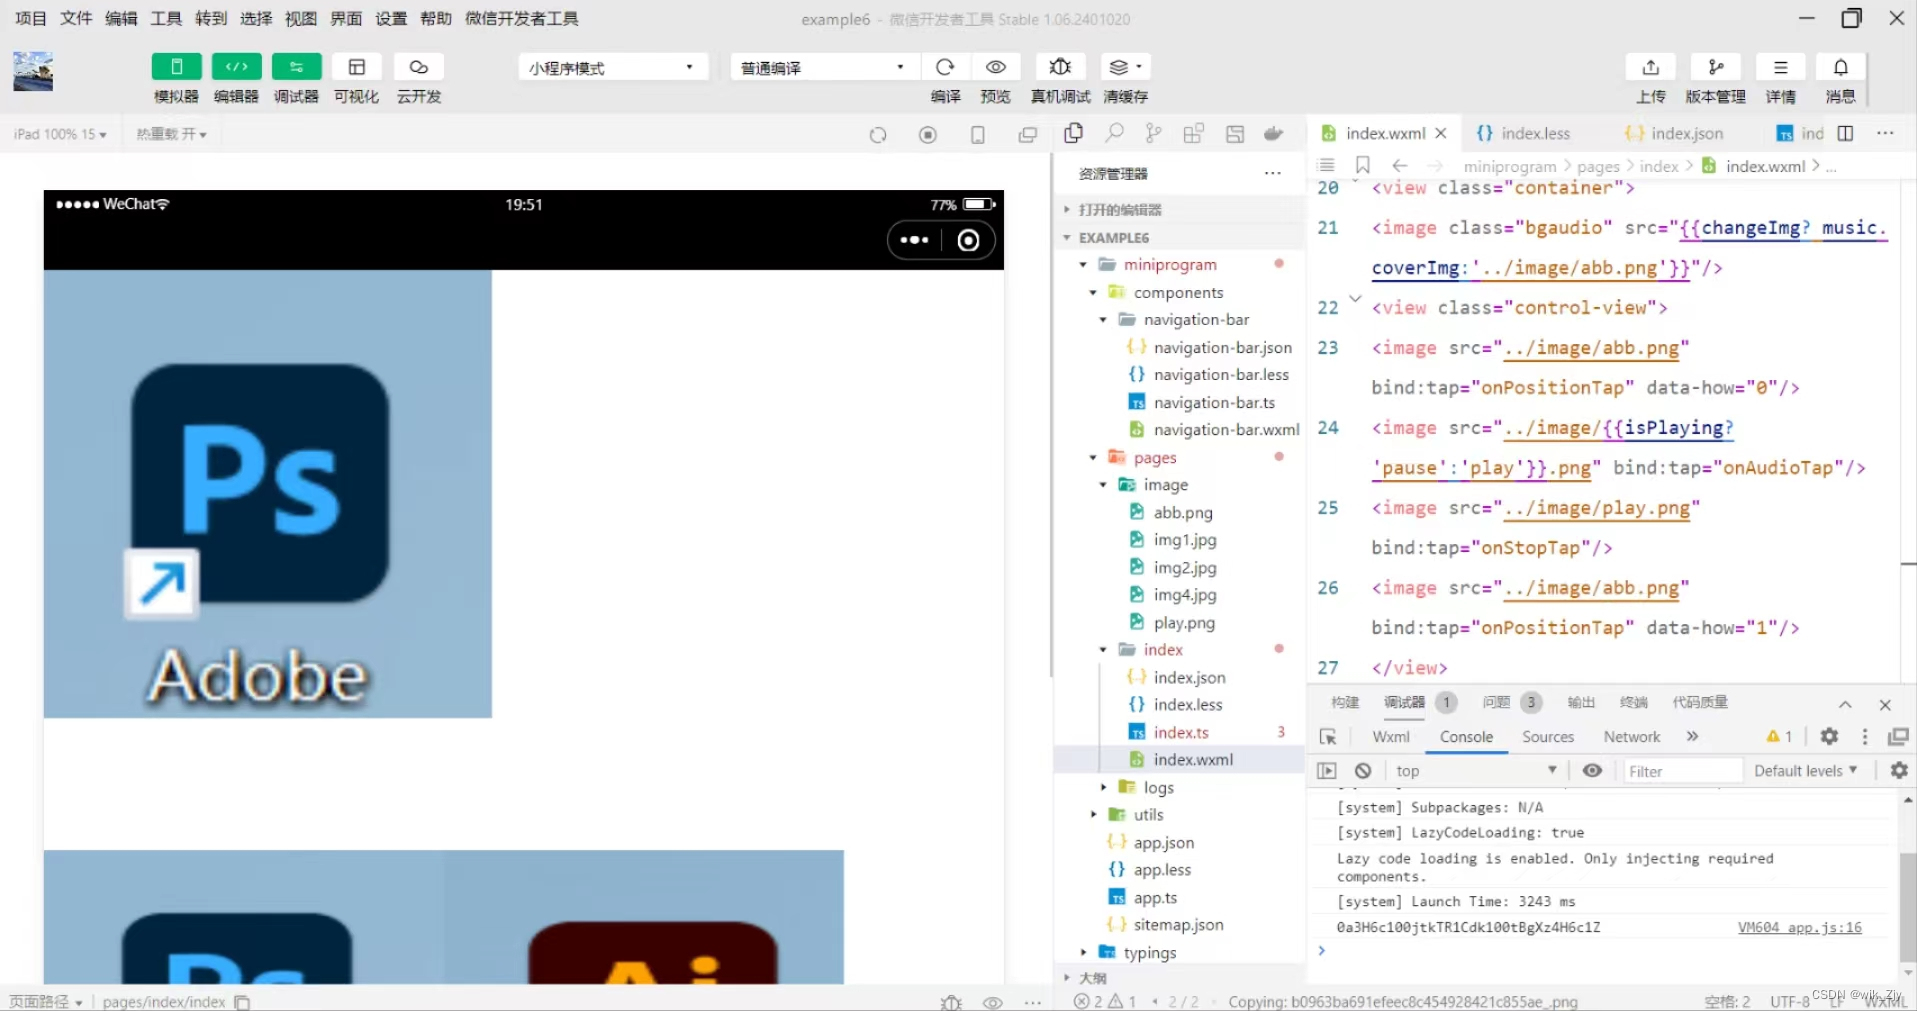
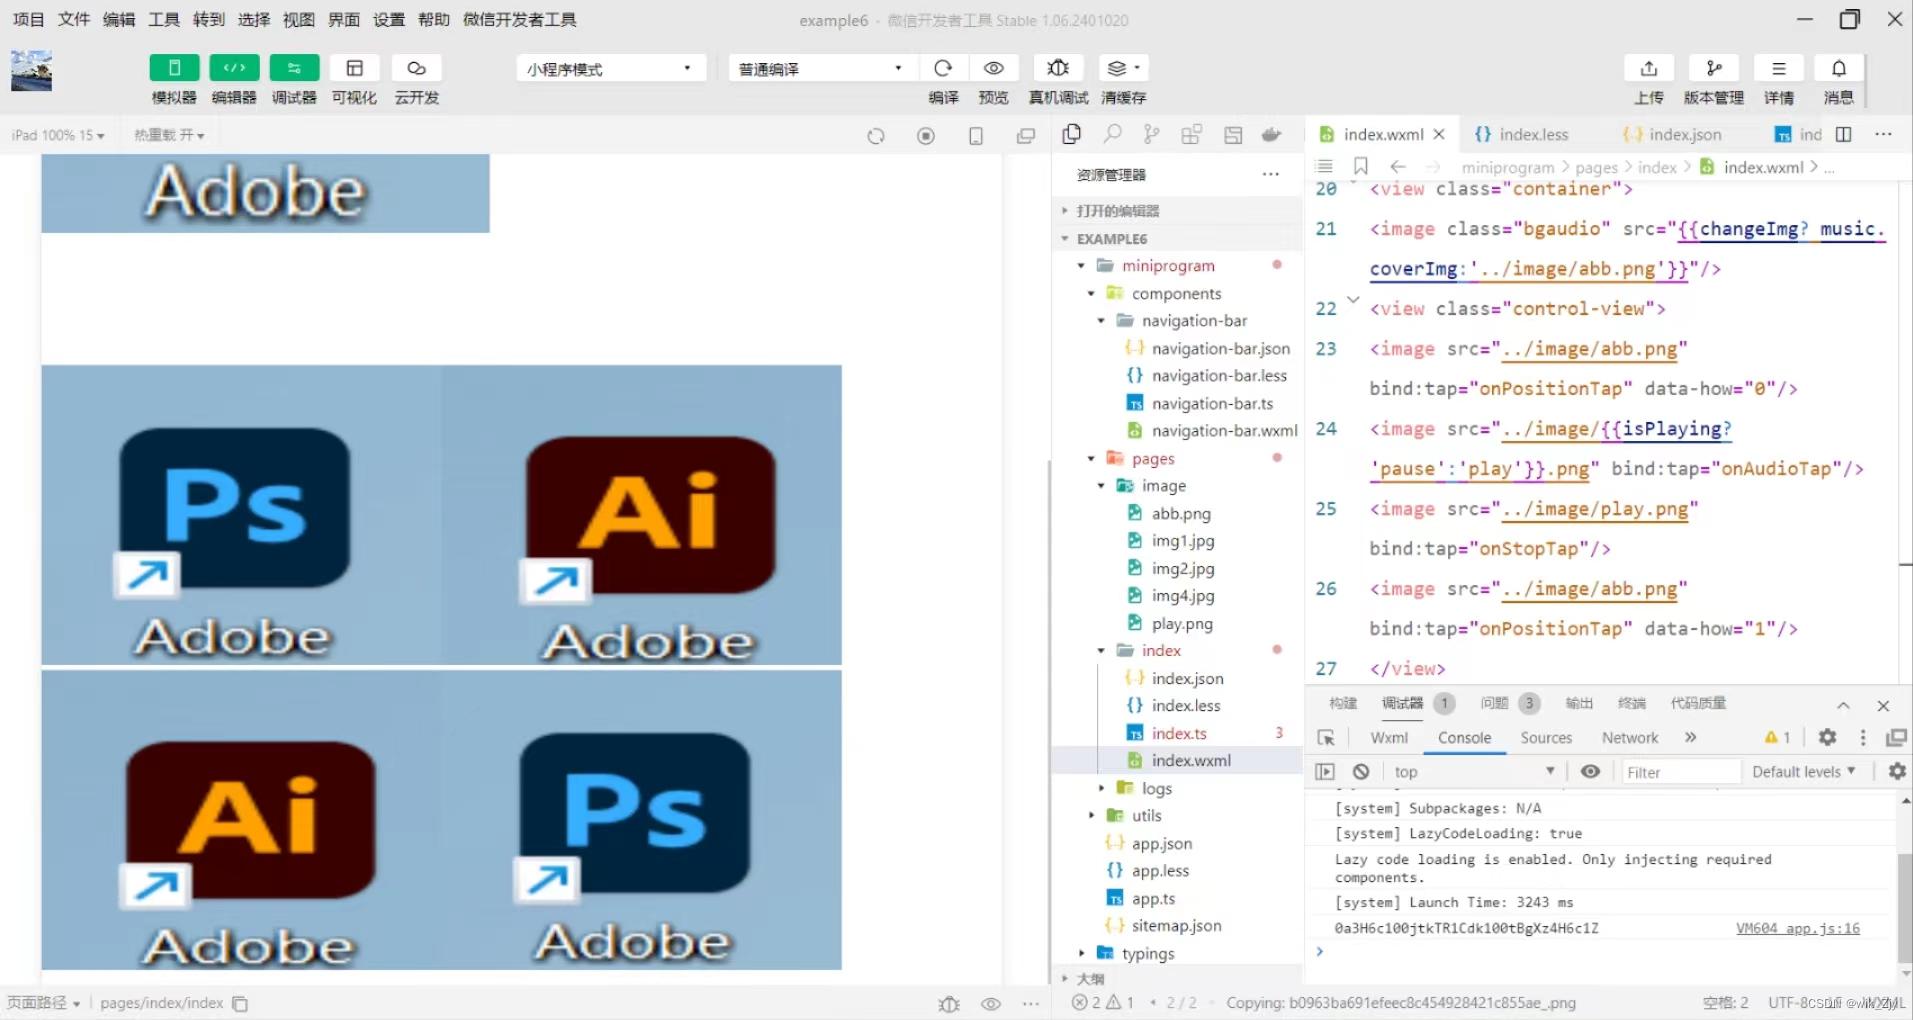
})案例展示
示例代码如下:
index.wxml:
//index.wxml
<view class="container">
<image class="bgaudio" src="{{changeImg? music.coverImg:'../image/abb.png'}}"/>
<view class="control-view">
<image src="../image/abb.png" bind:tap="onPositionTap" data-how="0"/>
<image src="../image/{{isPlaying?'pause':'play'}}.png" bind:tap="onAudioTap"/>
<image src="../image/play.png" bind:tap="onStopTap"/>
<image src="../image/abb.png" bind:tap="onPositionTap" data-how="1"/>
</view>
</view>
index.wxss:
//index.wxss
.bgaudio{
  height: 350rpx;
  width: 350rpx;
  margin-bottom: 100rpx;
}
.control-viewimage{
  height: 64rpx;
  width: 64rpx;
  margin: 30rpx;
}
index.json:
{ }index.js:
//index.js
Page({
  data:{
    isPlaying:false,
    coverImgchangedImg:false,
    music:{
      "url":
      "http://bmob-cdn-16488.b0.upaiyun.com/2018/02/09/117e4alb405195b18061299e2de89597.mp3",
      "titie":"盛晓玫-有一天",
      "coverImg":
      "http://bmob-cdn-16488.b0.upaiyun.com/2018/02/09/f604297140c9681880cc3d3e581f7724.jpg"
    },
  },
  onLoad:function(){
    this.onAudioState();
  },
  onAudioTap:function(event){
    if(this.data.isPlaying){
      wx.pauseBackgroundAudio();
    }else{
      let music =this.data.music;
      wx.playBackgroundAudio({
        dataUrl:music.url,
        title:music.titie,
        coverImgUrl:music.coverImg
      })
    }
  },
  onStopTap:function(){
    let that=this;
    wx.stopBackgroundAudio({
      success:function(){
        that.setData({isPlaying:false,changedImg:false});
      }
    })
  },
  onPositionTap:function(event){
    let how=event.target.dataset.how;
    wx.getBackgroundAudioPlayerState({
      success:function(res){
        let status=res.duration;
        if(status===1){
          let duration=res.duration;
          let currentPosition=res.currentPosition;
          if(how==="0"){
            let position=currentPosition-10;
            if(position<0){
              position=1;
            }
            wx.seekBackgroundAudio({
              position:position
            });
            wx.showToast({title:"快退10s",duration:500});
          }
          if(how==="1"){
            let position=currentPosition+10;
            if(position>duration){
              position=duration-1;
            }
            wx.seekBackgroundAudio({
              position:position
            });
            wx.showToast({title:"快进10s",duration:500});
          }
        }else{
          wx.showToast({title:"音乐未播放",duration:800});
        }
      }
    })
  },
  onAudioState:function(){
    let that=this;
    wx.onBackgroundAudioPlay(function(){
      that.setData({isPlaying:true,changedImg:true});
      console.log("on play");
    });
    wx.onBackgroundAudioPause(function(){
      that.setData({isPlaying:false});
      console.log("on pause");
    });
    wx.onBackgroundAudioStop(function(){
      that.setData({isPlaying:false,changedImg:false});
      console.log("on stop");
    });
  }
})
效果图如下:
2.文件API :
从网络上下载或录音的文件都是临时保存的,若要持久保存,需要用到文件API。文件API提供了打开、保存、删除等操作本地文件的能力,主要包括以下5个API接口:
1. wx.saveFile(Object)接口 用于保存文件到本地。
2.wx.getSavedFileList(Object)接口 用于获取本地已保存的文件列表。
3.wx.getSaveFileInfo(Object)接口 用于获取本地文件的文件信息。
4.wx.removeSaveFile(Object)接口 用于删除本地存储的文件。
5.wx.openDocument(Object)接口 用于新开页面打开文档,支持格式:doc、xls、ppt、pdf、docx、xlsx、ppts。
1.保存文件
wx. saveFile(Object)用于保存文件到本地,其相关参数如下图所示。
示例代码如下:
saveImg:function(){
  wx.chooseImage({
    count:1,
    sizeType:['original','compressed'],
    sourceType:['album','camera'],
    success:function(res){
      var tempFilePaths=res.tempFilePaths[0]
      wx.saveFile({
        tempFilePath:tempFilePaths,
        success:function(res){
          var saveFilePath=res.savedFilePath;
          console.log(saveFilePath)
        }
      })
    }
  })
}
2.获取本地文件列表
wx. getSavedFileList(Object)接口用于获取本地已保存的文件列表,如果调用成功,则返回文件的本地路径、文件大小和文件保存时的时间戳(从1970/01/01 08: 00: 00到当前时间的秒数)文件列表。其相关参数如下表所示。
示例代码如下:
wx.getSavedFileList({
  success:function(res){
    that.setData({
      fileList:res.fileList
    })
  }
})
3.获取本地文件的文件信息
wx. getSaveFileInfo(Object)接口用于获取本地文件的文件信息,此接口只能用于获取已保存到本地的文件,若需要获取临时文件信息,则使用wx. getFileInfo(Object)接口。其相关参数如下表所示。
示例代码如下:
wx.chooseImage({
    count:1,
    sizeType:['original','compressed'],
    sourceType:['album','camera'],
    success:function(res){
      var tempFilePaths=res.tempFilePaths[0]
    wx.saveFile({
     tempFilePath:tempFilePaths,
          filePath:saveFilePath,
          success:function(res){
            var saveFilePath=res.saveFilePath;
            wx.getSavedFileInfo({
              filePath:saveFilePath,
              success:function(res){
            console.log(res.size)
          }
        })
      }
    })
  }
  })
4.删除本地文件
wx. removeSaveFile(Object)接口用于删除本地存储的文件,其相关参数如下表所示。
示例代码如下:
wx.getSavedFileList({
      success:function(res){
        if(res.fileList.length>0){
          wx.removeSavedFile({
            filePath:res.fileList[0].filePath,
            complete:function(res){
              console.log(res)
            }
          })
        }
      }
    })
5.打开文档
wx. openDocument(Object)接口用于新开页面打开文档,支持格式有doc、xls、ppt、pdf、docx、xlsx、pptx,其相关参数如下表所示。
示例代码如下:
wx.downloadFile({
  url:"http://locahost/fm2.pdf",
  success:function(res){
    var tempFilePath=res.tempFilePath;
    wx.openDocument({
      filePath: tempFilePath,
      success:function(res){
        console.log("打开成功")
      }
    })
  }
  })
本地数据及缓存API
小程序提供了以键值对的形式进行本地数据缓存功能,并且是永久存储的,但最大不超过10 MB,其目的是提高加载速度。数据缓存的接口主要有4个:
1. wx.setStorage(Object)或wx.setStorageSync(key, data)接口 用于设置缓存数据。
2.wx.getStorage(Object)或wx.getStorageSync(key)接口 用于获取缓存数据。
3.wx.removeStorage(Object)或wx.removeStorageSync(key)接口 用于删除指定缓存数据。
4.wx.clearStorage()或wx.clearStorageSync()接口 用于清除缓存数据。
5. 其中,带Sync后缀的为同步接口,不带Sync后缀的为异步接口。
保存数据
1.wx.setStorage(Object)
wx.setStorage(Object)接口将数据存储到本地缓存接口指定的key中,接口执行后会覆盖原来key对应的内容。其参数如下表所示。
示例代码如下:
wx.setStorage({
  key:'name',
  data:'sdy',
  success:function(res){
    console.log(res)
  }
})
2.wx.setStorageSync(key,data)
wx.setStorageSync(key,data)是同步接口,其参数只有key和data。
示例代码如下:
wx.setStorageSync('age','25')获取数据
1.wx.getStorage(Object)
wx.getStorage(Object)接口是从本地缓存中异步获取指定key对应的内容。其相关参赛如下表所示。
示例代码如下:
wx.getStorage({
  key:'name',
  success:function(res){
    console.log(res.data)
  },
})
2.wx.getStorageSync(key)
wx.getStorageSync(key) 从本地缓存中同步获取指定key对应的内容。 其参数只有key。
示例代码如下:
try{
  var value=wx.getStorageSync('age')
  if(value){
    console.log("获取成功"+value)
  }
}catch(e){
  console.log("获取失败")
}
删除数据
1.wx.removeStorage(Object)
wx.removeStorage(Object)接口用于从本地缓存中异步移除指定key。其相关参数如下表所示。
示例代码如下:
wx.removeStorage({
  key:'name',
  success:function(res){
    console.log("删除成功")
  },
  fail:function(){
    console.log("删除失败")
  }
})
2.wx.removeStorageSync(key)
wx.removeStorageSync(key)接口用于从本地缓存中同步删除指定key对应的内容。 其参数只有key。
示例代码如下:
try{
  wx.removeStorageSync('name')
}catch(e){
  //Do something when catch error
}
清空数据
1.wx.clearStorage()
wx.clearStorage()接口用于异步清理本地数据缓存, 没有参数。
示例代码如下:
wx.getStorage({
  key:'name',
  success:function(res){
    wx.clearStorage()    //清理本地数据缓存
  }
})
2.wx.clearStorageSync()
wx.clearStorageSync()接口用于同步清理本地数据缓存。
示例代码如下:
try{
  wx.clearStorageSync()
}catch(e){
 }
3.位置信息API:
小程序可以通过位置信息API来获取或显示本地位置信息,小程序支持WGS84和GCj02标准,WGS84标准为地球坐标系,是国际上通用的坐标系;GCj02标准是中国国家测绘局制定的地理信息系统的坐标系统,是由WGS84坐标系经加密后的坐标系,又称为火星坐标系。默认为WGS84标准,若要查看位置需要使用GCj02标准。主要包括以下3个API接口:
1.wx.getLocation(Object)接口用于获取位置信息。
2.wx.chooseLocation(Object)接口 用于选择位置信息。
3.wx.openLocation(Object)接口用于通过地图显示位置。
获取位置信息
wx.getLocation(Object)接口用于获取当前用户的地理位置、速度, 需要用户开启定位功能, 当用户离开小程序后, 无法获取当前的地理位置及速度, 当用户点击“显示在聊天顶部” 时, 可以获取到定位信息,其相关参数如下表所示。
示例代码如下:
wx.getLocation({
  type:'wgs84',
  success:function(res){
    console.log("经度:"+res.longitude);
    console.log("纬度"+res.latitude);
    console.log("速度"+res.longitude);
    console.log("位置的精确度" +res.accuracy);
    console.log("水平精确度"+res.horizontalAccuracy);
    console.log("垂直精确度"+res.verticalAccuracy);
  },
})
选择位置信息
wx.chooseLocation(Object)接口用于在打开的地图中选择位置,用户选择位置后可返回当前位置的名称、地址、经纬度信息。其相关参数如下表所示。
示例代码如下:
wx.chooseLocation({
  success:function(res){
    console.log("位置的名称"+res.name)
    console.log("位置的地址"+res.address)
    console.log("位置的经度"+res.longitude)
    console.log("位置的纬度"+res.latitude)
  }
})
显示位置信息
wx.openLocation(Object)接口用于在微信内置地图中显示位置信息,其相关参数如下表所示。
示例代码如下:
wx.getLocation({
  type:'gcj02',//返回可以用于wx.openLocation的经纬度
  success:function(res){
    var latitude=res.latitude
    var longitude=res.longitude
    wx.openLocation({
      latitude:latitude,
      longitude:longitude,
      scale:10,
      name:'智慧国际酒店',
      address:'西安市长安区西长安区300号'
    })
  }
})
4.设备相关API:
设备相关的接口用于获取设备相关信息,主要包括系统信息、网络状态、拨打电话及扫码等。主要包括以下5个接口API:
1.wx.getSystemInfo(Object)接口、wx.getSystemInfoSync()接口 用于获取系统信息。
2.wx.getNetworkType(Object)接口 用于获取网络类型。
3.wx.onNetworkStatusChange(CallBack)接口 用于监测网络状态改变。
4.wx.makePhoneCall(Object)接口 用于拨打电话。
5.wx.scanCode(Object)接口 用于扫描二维码
获取系统信息
wx. getSystemInfo(Object)接口、wx. getSystemInfoSync()接口分别用于异步和同步获取系统信息。其相关参数如下表所示。
示例代码如下:
wx.getSystemInfo({
  success:function(res){
    console.log("手机型号"+res.model)
    console.log("设备像素比"+res.pixelRatio)
    console.log("窗口的宽度"+res.windowWidth)
    console.log("窗口的高度"+res.windowHeight)
    console.log("微信的版本号"+res.version)
    console.log("操作系统版本"+res.system)
    console.log("客户端平台"+res.platform)
  },
})
网络状态
1.获取网络状态
wx. getNetworkType(Object)用于获取网络类型,其相关参数如下表所示。
如果wx. getNetworkType()接口被成功调用,则返回网络类型包,有wifi、2G、3G、4G、unknown(Android下不常见的网络类型)、none(无网络)。
示例代码如下:
wx.getNetworkType({
  success:function(res){
    console.log(res.networkType)
  },
})
2.监听网络状态变化
wx. onNetworkStatusChange(CallBack)接口用于监听网络状态变化,当网络状态变化时,返回当前网络状态类型及是否有网络连接。
示例代码如下:
wx.onNetworkStatusChange(function(res){
  console.log("网络是否连接:"+res.isConnected)
  console.log("变化后的网络类型:"+res.networkType)
})
拨打电话
wx. makePhoneCall(Object)接口用于实现调用手机拨打电话,其相关参数如下表所示。
示例代码如下:
wx.makePhoneCall({
  phoneNumber:'18092585093'  //需要拨打的号码
})
扫描二维码
wx. scanCode(Object)接口用于调起客户端扫码界面,扫码成功后返回相应的内容,其相关参数如下表所示。
示例代码如下:
//允许从相机和相册扫码
wx.scanCode({
  success:(res)=>{
    console.log(res.result)
    console.log(res.scanType)
    console.log(res.charSet)
    console.log(res.path)
  }
})

//只允许从相机扫码
wx.scanCode({
  onlyFromCamera:true,
  success:(res)=>{
    console.log(res)
  }
})


 768
768


 被折叠的 条评论
为什么被折叠?
被折叠的 条评论
为什么被折叠?
 到【灌水乐园】发言


