Third Training–Android Activity(UI) + Events
William Yi on 2016/11/16
Personal Email: williamyi96@gmail.com
Statement:
This archive is created by William Yi and it’s all the harvests which is properly shown to the freshmen of AS.
You can never copy this archive without permission!
Precondition
- Can use basic part of java language smoothly such as the class, interface, exception and so on.
- Have succeed in downloading the JDK for Android and your version of Android Studio is needed to at least 2.0 or later.
- Eager to enjoy the hard , tiring but meaningful and helpful period during when will coming soon.
- Want to be a professional Android developer and follow the guidance of your tutor.
Basic Info about Android
Android is based on the IntelliJ Ideal which is a very good and powerful java platform and Android is the mobile operating system.
An Android app mainly contains four parts/module:
- Activity
- BroadCastReciever
- ContentProvider
- Service
They mainly communicate with each by what we called ”intent” which is just like the message in OOP.
The process how an app is developed:
java → android SDK tools → resources files debug → .apk file → download
More detailed information can be found at the developer.android.com.
Four Important Modules
Activity
We always regard it as the UI of an app, and an well organized app always contains so many UIs/Activities. Each activity shows one unique function of a huge app.
For example: WeChat
Service
it is a component that runs in the background to perform long-running operations or to perform work for remote processes.
Content providers
A content provider manages a shared set of app data.
Broadcast receivers
It is a component that responds to system-wide broadcast announcements.
How do they communicate with ec?
Activities, services, and broadcast receivers are activated by an asynchronous message called an intent.
Intents bind individual components to each other at runtime(you can think of them as the messengers that request an action from other components)
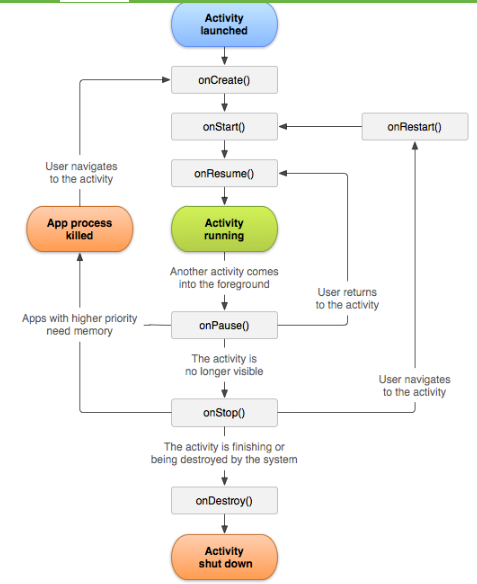
Activity LifeCycle
This following picture shows the details about how an activity starts and how it stops or destroys by calling several different method.
If you have a good understanding about the lifecycle about android then you will have a deeper understanding about android and the structure of android.
Layout(LinearLayout and RelativeLayout)
Linear Layout, just like it’s name, the layout is linearly independent with each other while Relative Layout is relevant to each other.
LinearLayout Example: ToggleButton and Switch(Function of Button)
activity_main.xml
<?xml version="1.0" encoding="utf-8"?>
<LinearLayout xmlns:android="http://schemas.android.com/apk/res/android"
    xmlns:tools="http://schemas.android.com/tools"
    android:id="@+id/activity_main"
    android:orientation="vertical"
    android:layout_width="match_parent"
    android:layout_height="match_parent"
    tools:context="com.example.dell1.plumblossom.MainActivity">

    <!--Define a ToggleButton-->
    <ToggleButton
        android:id="@+id/toggle"
        android:layout_width="wrap_content"
        android:layout_height="wrap_content"
        android:textOff="Horizental"
        android:textOn="Vertical"
        android:checked="true"/>
    <!--Define a switch button-->
    <Switch
        android:id="@+id/aSwitch"
        android:layout_width="wrap_content"
        android:layout_height="wrap_content"
        android:textOff="Horrizental"
        android:textOn="Vertical"
        android:thumb="@drawable/leaf"
        android:checked="true"/>
    <!-- Define a dynamic linearly layout-->
    <LinearLayout
        android:id="@+id/changer"
        android:orientation="vertical"
        android:layout_width="match_parent"
        android:layout_height="match_parent">
        <Button
            android:layout_width="wrap_content"
            android:layout_height="wrap_content"
            android:text="Button One"/>
        <Button
            android:layout_width="wrap_content"
            android:layout_height="wrap_content"
            android:text="Button Two"/>
        <Button
            android:layout_width="wrap_content"
            android:layout_height="wrap_content"
            android:text="Button Three"/>
    </LinearLayout>
</LinearLayout>
MainActivity_java
package com.example.dell1.plumblossom;

import android.support.v7.app.AppCompatActivity;
import android.os.Bundle;
import android.widget.CompoundButton;
import android.widget.LinearLayout;
import android.widget.Switch;
import android.widget.ToggleButton;

public class MainActivity extends AppCompatActivity {
    ToggleButton toggleButton;
    Switch aSwitch;

    @Override
    protected void onCreate(Bundle savedInstanceState) {
        super.onCreate(savedInstanceState);
        setContentView(R.layout.activity_main);
        toggleButton = (ToggleButton) findViewById(R.id.toggle);
        aSwitch= (Switch) findViewById(R.id.aSwitch);
        final LinearLayout changer = (LinearLayout) findViewById(R.id.changer);
        CompoundButton.OnCheckedChangeListener listener = new CompoundButton.OnCheckedChangeListener() {
            @Override
            public void onCheckedChanged(CompoundButton button, boolean isChecked) {
                if(isChecked) {
                    changer.setOrientation(LinearLayout.VERTICAL);
                    toggleButton.setChecked(true);
                    aSwitch.setChecked(true);
                } else {
                    changer.setOrientation(LinearLayout.HORIZONTAL);
                    toggleButton.setChecked(false);
                    aSwitch.setChecked(false);
                }
            }
        };
        toggleButton.setOnCheckedChangeListener(listener);
        aSwitch.setOnCheckedChangeListener(listener);
    }
}
RelativeLayout Example: Plum Blossom
activity_main.xml
<?xml version="1.0" encoding="utf-8"?>
<RelativeLayout xmlns:android="http://schemas.android.com/apk/res/android"
    xmlns:tools="http://schemas.android.com/tools"
    android:id="@+id/activity_main"
    android:layout_width="match_parent"
    android:layout_height="match_parent"
    tools:context="com.example.dell1.plumblossom.MainActivity">

    <!-- Set the position of the first target plum blossom-->
    <TextView
        android:id="@+id/center"
        android:layout_width="wrap_content"
        android:layout_height="wrap_content"
        android:background="@drawable/leaf"
        android:layout_centerInParent="true"/>
    <!-- Set the Relative Layout of the plum above the target one-->
    <TextView
        android:layout_width="wrap_content"
        android:layout_height="wrap_content"
        android:background="@drawable/leaf"
        android:layout_above="@+id/center"
        android:layout_alignLeft="@+id/center"/>
    <!-- Set the Relative layout of the plum under the target one-->
    <TextView
        android:layout_width="wrap_content"
        android:layout_height="wrap_content"
        android:background="@drawable/leaf"
        android:layout_below="@+id/center"
        android:layout_alignLeft="@id/center"/>
    <!-- Set the Relative layout of the  plum left-->
    <TextView
        android:layout_width="wrap_content"
        android:layout_height="wrap_content"
        android:background="@drawable/leaf"
        android:layout_toLeftOf="@id/center"
        android:layout_alignBottom="@id/center"/>
    <!-- Set the Relative layout of the plum right-->
    <TextView
        android:layout_width="wrap_content"
        android:layout_height="wrap_content"
        android:background="@drawable/leaf"
        android:layout_alignTop="@id/center"
        android:layout_toRightOf="@id/center"/>
</RelativeLayout>
TextView and EditText
TextView is the place that you can show a string in a layout while EditTest is derive from it and EditTest itself could be writeable.
TextView Example: HelloWorld
It is very easy. I suppose all of you can show t on your own.EditText Example: FriendlyUI, CheckButton
<?xml version="1.0" encoding="utf-8"?>
<TableLayout xmlns:android="http://schemas.android.com/apk/res/android"
    xmlns:tools="http://schemas.android.com/tools"
    android:id="@+id/activity_main"
    android:stretchColumns="1"
    android:layout_width="match_parent"
    android:layout_height="match_parent"
    tools:context="com.example.dell1.plumblossom.MainActivity">

    <TableRow>
        <TextView
            android:layout_width="match_parent"
            android:layout_height="wrap_content"
            android:text="用户名:"
            android:textSize="16sp"/>
        <EditText
            android:layout_width="match_parent"
            android:layout_height="wrap_content"
            android:hint="请填写登录账号"
            android:selectAllOnFocus="true"/>
    </TableRow>

    <TableRow>
        <TextView
            android:layout_width="match_parent"
            android:layout_height="wrap_content"
            android:text="密码:"
            android:textSize="16sp"/>
        <EditText
            android:layout_width="match_parent"
            android:layout_height="wrap_content"
            android:inputType="numberPassword"/>
    </TableRow>

    <TableRow>
        <TextView
            android:layout_width="match_parent"
            android:layout_height="wrap_content"
            android:text="年龄"
            android:textSize="16sp"/>
        <EditText
            android:layout_width="match_parent"
            android:layout_height="wrap_content"
            android:inputType="number"/>
    </TableRow>

    <TableRow>
        <TextView
            android:layout_width="match_parent"
            android:layout_height="wrap_content"
            android:text="生日"
            android:textSize="16sp"/>
        <EditText
            android:layout_width="match_parent"
            android:layout_height="wrap_content"
            android:inputType="date"/>
    </TableRow>

    <TableRow>
        <TextView
            android:layout_width="match_parent"
            android:layout_height="wrap_content"
            android:text="电话号码"
            android:textSize="16sp" />
        <EditText
            android:layout_width="match_parent"
            android:layout_height="wrap_content"
            android:hint="请填写您的电话号码"
            android:selectAllOnFocus="true"
            android:inputType="phone"/>
    </TableRow>

    <TableRow>
        <Button
            android:layout_width="wrap_content"
            android:layout_height="wrap_content"
            android:text="注册"/>
    </TableRow>
</TableLayout>
ImageView
ImageView Example: QuickContactBadge
activity_main.xml
<?xml version="1.0" encoding="utf-8"?>
<LinearLayout
    xmlns:android="http://schemas.android.com/apk/res/android"
    android:layout_width="match_parent"
    android:layout_height="match_parent">
    <QuickContactBadge
        android:id="@+id/badge"
        android:layout_height="wrap_content"
        android:layout_width="wrap_content"
        android:src="@drawable/ic_launcher"/>
    <TextView
        android:layout_width="match_parent"
        android:layout_height="wrap_content"
        android:textSize="16dp"
        android:text="My contacter"/>
</LinearLayout>
MainActivity.java
<?xml version="1.0" encoding="utf-8"?>
<LinearLayout
    xmlns:android="http://schemas.android.com/apk/res/android"
    android:layout_width="match_parent"
    android:layout_height="match_parent">
    <QuickContactBadge
        android:id="@+id/badge"
        android:layout_height="wrap_content"
        android:layout_width="wrap_content"
        android:src="@drawable/ic_launcher"/>
    <TextView
        android:layout_width="match_parent"
        android:layout_height="wrap_content"
        android:textSize="16dp"
        android:text="My contacter"/>
</LinearLayout>
Data and Time
Data and Time Example: DataPicker and TimePicker
activity_main.xml
<?xml version="1.0" encoding="utf-8"?>
<LinearLayout
    xmlns:android="http://schemas.android.com/apk/res/android"
    xmlns:tools="http://schemas.android.com/tools"
    android:orientation="vertical"
    android:id="@+id/activity_main"
    android:layout_width="match_parent"
    android:layout_height="match_parent"
    android:paddingBottom="@dimen/activity_vertical_margin"
    android:paddingLeft="@dimen/activity_horizontal_margin"
    android:paddingRight="@dimen/activity_horizontal_margin"
    android:paddingTop="@dimen/activity_vertical_margin"
    tools:context="com.example.dell1.calendarview.MainActivity">

    <TextView
        android:layout_width="wrap_content"
        android:layout_height="wrap_content"
        android:text="@string/PickDate"/>
    <!--set the date by CalendarView-->
    <CalendarView
        android:layout_width="match_parent"
        android:layout_height="match_parent"
        android:firstDayOfWeek="3"
        android:shownWeekCount="4"
        android:selectedWeekBackgroundColor="#aff"
        android:focusedMonthDateColor="#f00"
        android:weekSeparatorLineColor="#ff0"
        android:unfocusedMonthDateColor="#f9f"
        android:id="@+id/calenderView">
    </CalendarView>
</LinearLayout>
Dialog Content
Remain to be an extension: Content Example: AlertDialog
Extension: AdapterView, SimpleAdapterView


 2万+
2万+

 被折叠的 条评论
为什么被折叠?


