


----------------------
下载并解压 BuildPatch Tool 压缩包
Windows 系统的电脑上下载 BuildPatch Tool 压缩包(虽然它自带了 Linux,macOS 与 Windows 的支持,但请不要尝试在 macOS 上使用它…毕竟官方文档都只考虑了 Windows,能好用到哪去⬇️ BuildPatch Tool 下载地址
上传信息准备
在完成上传之后你需要首先找到 Build Patch Tool Credentials,这相当于 Epic 给你准备的一个传包专用的账号密码组合。你可以在 Epic Games 后台的具体项目页面 > Product Settings (在侧边栏上) > BPT Credentials 上获得
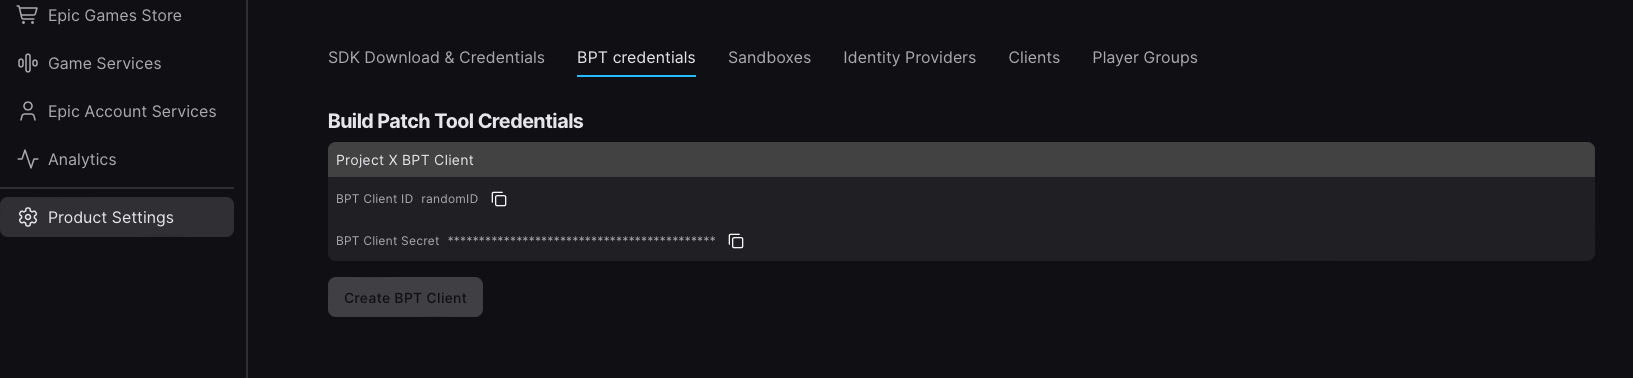
在这里我们假定拿到的 BPT Client ID 为 randomID,BPT Client Secret 为 mima12345 请拿小本本记好这两个值,等会要考!
1. 访问后台管理包文件的页面
随后通过Epic Games 后台的具体项目页面 > Epic Game Store(在侧边栏上) > Artifacts and Binaries 访问管理包文件的后台页面。
在这个页面和整个 Epic Games 后台上可以看到他们家特色的三个沙盒结构,分别为:Dev,Stage,Live。

在我理解中,你可以认为 Dev 为开发者自己使用的生产环境,进行开发调试和配置设置的部分,在准备妥当之后,开发者或发行商可以将 Dev 沙盒内的设置推送到 Stage 进行测试。 在确定无误之后,便可以进行审核请求,要求 Epic Games Store 对游戏内容与商店页面进行最后审核。在审核通过后,你即可通过推送 Live 沙盒进行对用户的全量发布
请注意:在没有确认具体发售时间的情况下,Epic Games Store 的后台只会将游戏以即将发布的模式进行预发布。在确认了具体发售时间之后,Epic Games Store 团队将会对所有的游戏设置进行进一步的游戏审核(一般为3-5个工作)。
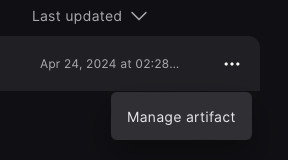
在 Dev 的 Tab 下,找到最右侧的三个小点,在弹出的二级菜单中点击 Manage Artifact.
在出现的新页面中,点右侧的 Instructions

然后点击中间的 Command line template for this artifact,你的剪贴板上就会自动获取以下的内容,拿个记事本记录一下!
注意!由于我们遇到的很多人都有填错的部分,所以请尽情的使用它来获得对应的命令并让它自动填一部分(准确来说三个)的信息。能不要自己填的就一定不要自己填!!
BuildPatchTool.exe -OrganizationId="<组织的ID号,你将会自动获得>" -ProductId="<产品的ID号,你将会自动获得>" -ArtifactId="<Artifact 的ID号,你将会自动获得>" -ClientId="<YourClientId>" -ClientSecret="<YourSecret>" -mode=UploadBinary -BuildRoot="<LocationOfLocalBuild>" -CloudDir="<YourCloudDir>" -BuildVersion="<YourBuildVersion>" -AppLaunch="<AppToRun>" -AppArgs="<LaunchArguments>" -FileAttributeList="<LocationOfAttributesFile>" -FileIgnoreList="<LocationOfIgnoreFile>"
2. 准备剩余的上传信息
接下来的事情就变的简单起来了。你必须填写内容为:
- ClientId 与 ClientSecret:还记得开头 Build Patch Tool Credentials 嘛,狠狠地用起来!这里我们用我们假定的 BPT Client ID
randomID,BPT Client Secretmima12345 - BuildRoot:填写你的包的所在地址。举个例子
D:/MyGmame/ - CloudDir:虽然官方文档说这是选填,但不幸的是其实它是个必填项目,你可以写一个类似于你包所在位置下的一个位置。 举个例子
D:/MyGmame/Cache/ - BuildVersion: 填写你的游戏版本号。举个例子
1.0.0 - AppLaunch: 填写你的游戏的启动项目。举个例子
gamelauncher.exe - AppArgs: 填写启动游戏时需要使用的额外命令行,可以为空。这里我们使用空。
于是组装之前在记事本上记录的内容,就能获得完整的使用命令:
BuildPatchTool.exe -OrganizationId="<组织的ID号,你将会自动获得>" -ProductId="<产品的ID号,你将会自动获得>" -ArtifactId="<Artifact 的ID号,你将会自动获得>" -ClientId="randomID" -ClientSecret="mima12345" -mode=UploadBinary -BuildRoot="D:/MyGmame/" -CloudDir="D:/MyGmame/Cache/" -BuildVersion="1.0.0" -AppLaunch="gamelauncher.exe" -AppArgs="" -FileAttributeList="" -FileIgnoreList=""
拿出你喜欢的命令行工具进行使用吧!
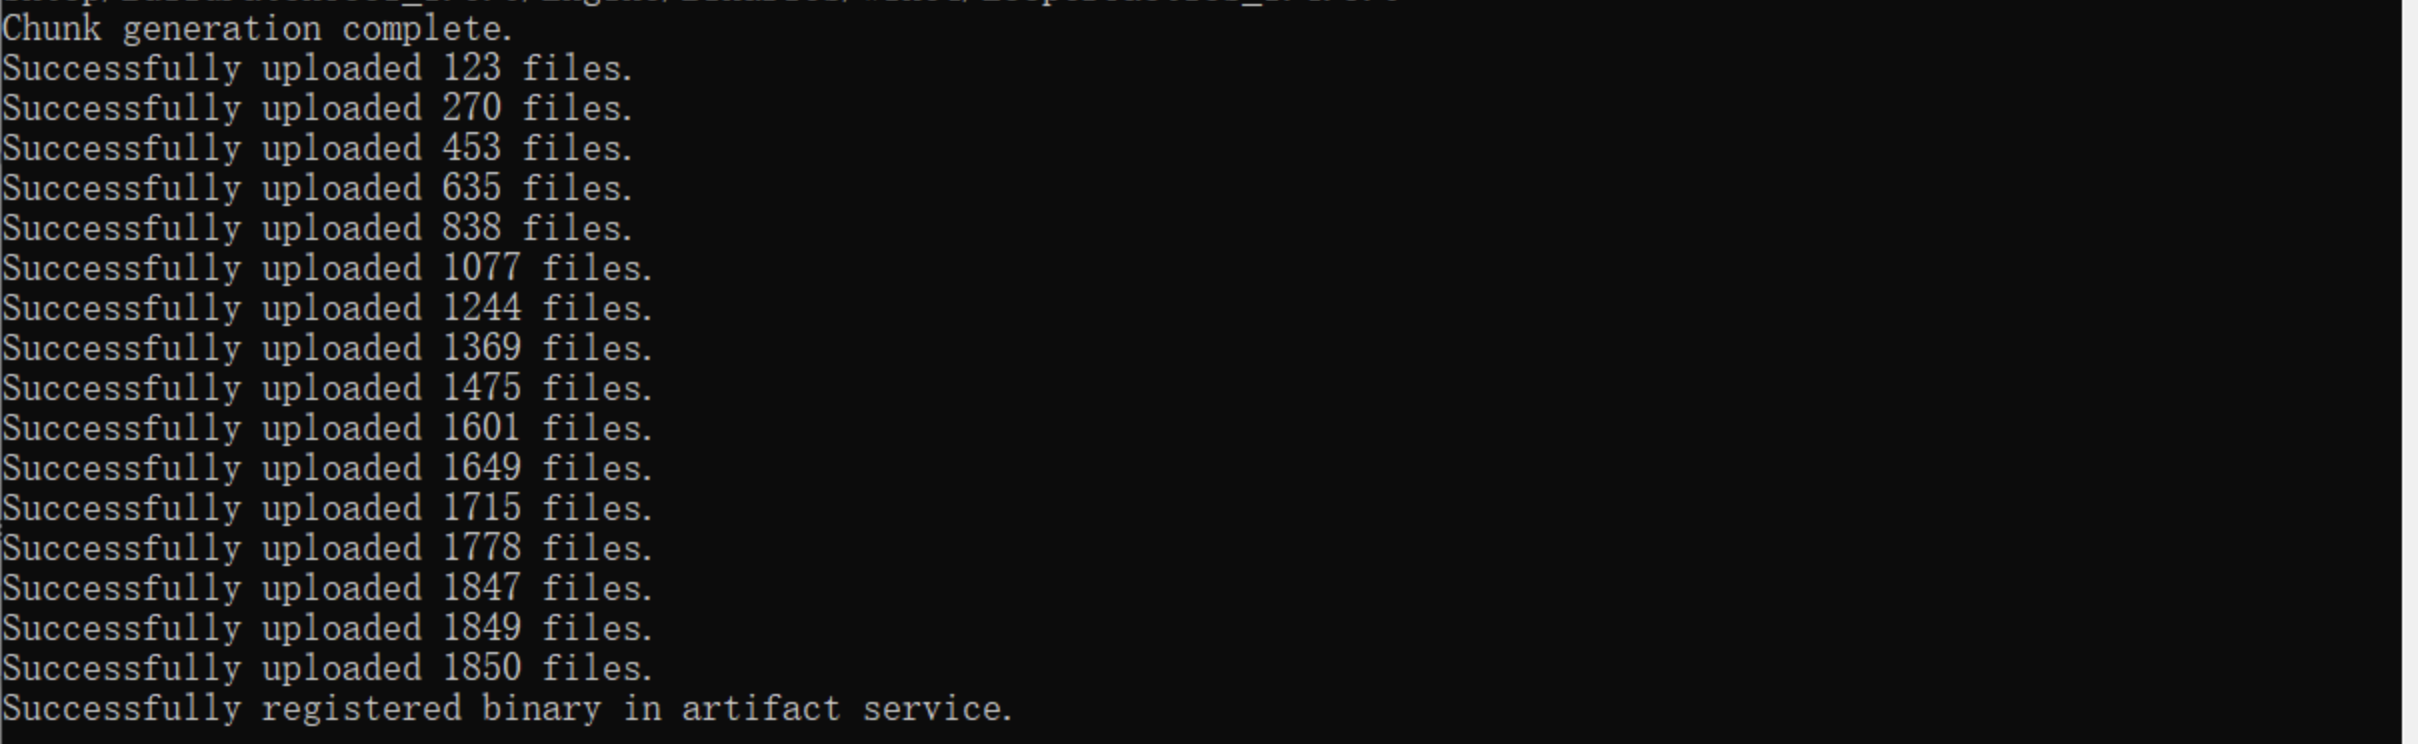
🕺 开始上传!
如果看到如下的代码的话就代表着一件事情,恭喜你上传成功!
---------------------------
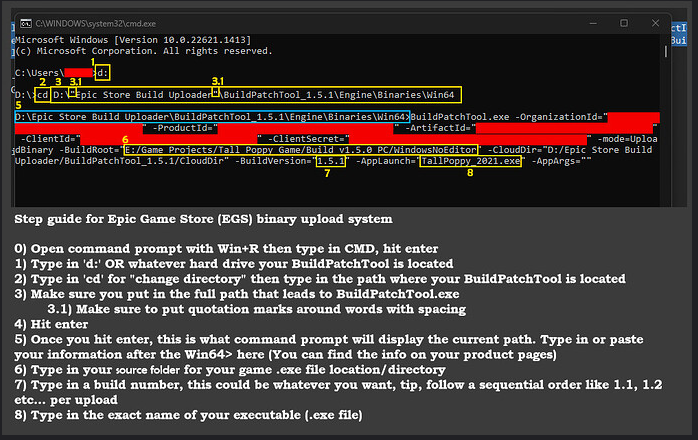
If you get error 3 when you run BuildPatchTool follow the instructions:如果你在运行BuildPatchTool时得到错误3,请遵循说明:
- BuildPatchTool must not be run directly but through another program such as cmd or powershell but even if the program is run through the command line it will still throw error 3.BuildPatchTool不能直接运行,但通过另一个程序,如cmd或powershell,但即使程序是通过命令行运行,它仍然会抛出错误3。
- Open the command prompt. 打开命令提示符。
- While in the command prompt, you must move to the folder where BuildPatchTool.exe is located.在命令提示符中,您必须移动到BuildPatchTool.exe所在的文件夹。
- To move it, use the command: cd DIRECTORY LOCATION (for example: C:\Users\GalacticGames\Downloads\BuildPatchTool_1.5.1\Engine\Binaries\Win64)要移动它,使用命令:cd DIRECTORY LOCATION(例如:C:\Users\GalacticGames\Downloads\BuildPatchTool_1.5.1\Engine\Binaries\Win64)
- Once in the folder where BuildPatchTool.exe is located, enter this long command. But you must fill it with your information.一旦进入BuildPatchTool.exe所在的文件夹,输入这个长命令。但是你必须填上你的信息。
Here is the command: 命令如下:
BuildPatchTool. exe -OrganizationId=“<YourOrg” -ProductId=“<YourProduct” -ArtifactId=“<YourArtifact” -ClientId=“<YourClientId” -ClientSecret=“<YourSecret” -mode=UploadBinary - BuildRoot=“<LocationOfLocalBuild” -CloudDir=“<YourCloudDir” -BuildVersion=“<YourBuildVersion” -AppLaunch=“<AppToRun” -AppArgs=“<LaunchArguments”BuildPatchTool。. exe - organizationid = "
Fill in everything by deleting the text and sharp brackets but leaving the quotes. Here is an example: appLaunch=“GalacticGames.exe”通过删除文本和尖括号填充所有内容,但保留引号。示例如下:appLaunch= “ GalacticGames.exe ”
- OrganizationId=“Enter the organization id here, which you can find on dev.epicgames in your organization settings”OrganizationId= “在这里输入组织id,您可以在dev.epicgames的组织设置中找到它”
- ProductId=“Enter your product id here, which you can find on dev.epicgames.com in the Epic Games Store section on the top right when you expand your product”ProductId= “在这里输入你的产品id,当你扩展你的产品时,你可以在dev.epicgames.com的Epic Games Store部分找到这个id。”
- ArtifactId=“Enter your artifact id here. You can find it in Artifacts and Binaries”ArtifactId= "在这里输入您的工件id。您可以在Artifacts and Binaries中找到它。”
- ClientId=“Enter the BPT client id here. This will be found in the product settings on the bottom left under BPT Credentials/ Build Patch Tool Credentials”ClientId= "在这里输入BPT客户端id。这将在左下角的BPT凭证/构建补丁工具凭证下的产品设置中找到。
- ClientSecret=“Enter the id of the secret client here. It will find this in the product settings on the bottom left in BPT Credentials/ Build Patch Tool Credentials”"ClientSecret= "在这里输入秘密客户端的id。它会在BPT凭证/构建补丁工具凭证的左下角的产品设置中找到。
- BuildRoot=“Enter here the path to the folder where your Build (your finished game) is located”BuildRoot=“在这里输入你的构建(你完成的游戏)所在文件夹的路径”
- CloudDir=“Enter the sectu to our cloud here. If you don’t have a cloud don’t fill in or delete anything. The Cloud folder will be created automatically next to BuildPatchTool.exe”CloudDir= "在这里输入我们的云的分区。如果你没有云,不要填充或删除任何东西。Cloud文件夹将自动创建在BuildPatchTool.exe旁边。
- BuildVersion="Enter the version of your game here. For example 1.0 it doesn’t matter but the version must not be repeated. "BuildVersion=“在这里输入游戏的版本。例如1.0,这并不重要,但版本不能重复。”
- AppLaunch=“Here you enter the name of the file that should be run to launch your game. Ex: GalacticGames.exe”AppLaunch=“在这里你输入应该运行的文件名来启动你的游戏。例:GalacticGames.exe”
- AppArgs=“Enter the arguments for the launch here or do not fill in the field it is not needed”在这里输入启动的参数,或者不填写不需要的字段。
Unfortunately, you’ll have to enter this every time you want to upload something to Epic. If you haven’t typed any fields make sure that after the default text there is this bracket: > (I didn’t type it in because it didn’t show up after publishing).不幸的是,每次你想要上传内容到Epic时,你都必须输入这个选项。如果您没有键入任何字段,请确保在默认文本后面有这个括号:>(我没有键入它,因为它在发布后没有显示)。
------------------


 被折叠的 条评论
为什么被折叠?
被折叠的 条评论
为什么被折叠?
 到【灌水乐园】发言


