


前面已经介绍了PyTorch的数据结构及自动求导机制,充分运行这些技术可以大大提高我们的开发效率。这章将介绍PyTorch的另一利器:神经网络工具箱。利用这个工具箱,设计一个神经网络就像搭积木一样,可以极大简化我们构建模型的任务。
本章主要讨论如何使用PyTorch神经网络工具箱来构建网络,主要内容如下:
介绍神经网络核心组件
如何构建一个神经网络
构建神经网络的主要工具
如何训练模型
实现神经网络实例
3.1 神经网络核心组件
神经网络看起来很复杂,节点很多,层数多,参数更多。但核心部分或组件不多,把这些组件确定后,这个神经网络基本就确定了。这些核心组件包括:
层:神经网络的基本结构,将输入张量转换为输出张量。
模型:层构成的网络。
损失函数:参数学习的目标函数,通过最小化损失函数来学习各种参数。
优化器:如何是损失函数最小,这就涉及到优化器。
当然这些核心组件不是独立的,它们之间、它们与神经网络其他组件之间有密切关系。为便于大家理解,我们把这些关键组件及相互关系用图3-1表示。

图3-1 神经网络关键组件及相互关系示意图
多个层链接在一起构成一个模型或网络,输入数据通过这个模型转换为预测值。预测值与真实值共同构成损失函数的输入,损失函数输出损失值(损失值可以是距离、概率值等),该损失值用于衡量预测值与目标结果的匹配或相似程度。优化器利用损失值更新权重参数,目标是使损失值越来越小。这是一个循环过程,当损失值达到一个阀值或循环次数到达指定次数时,循环结束。
接下来利用PyTorch的nn工具箱,构建一个神经网络实例。nn中对这些组件都有现成包或类,可以直接使用,非常方便。
3.2 PyTorch构建神经网络的主要工具
使用PyTorch构建神经网络使用的主要工具(或类)及相互关系,如图3-2所示。
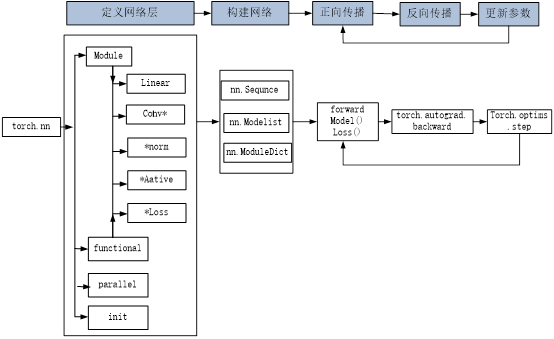
图3-2 PyTorch实现神经网络主要工具及相互关系
从图3-2可知,可以基于Module类或函数(nn.functional)构建网络层。nn中的大多数层(layer)在functional中都有与之对应的函数。nn.functional中的函数与nn.Module中的layer的主要区别是后者继承自Module类,可自动提取可学习的参数,而nn.functional更像是纯函数。两者功能相同,性能也没有很大区别,那么如何选择呢?卷积层、全连接层、dropout层等含有可学习参数,一般使用nn.Module,而激活函数、池化层不含可学习参数,可以使用nn.functional中对应的函数。
3.2.1 nn.Module
前面我们使用autograd及Tensor实现机器学习实例时,需要做不少设置,如对叶子节点的参数requires_grad设置为True,然后调用backward,再从grad属性中提取梯度。对于大规模的网络,autograd太过于底层和烦琐。为了简单、有效解决这个问题,nn是一个有效工具。它是专门为深度学习设计的一个模块,而nn.Module是nn的一个核心数据结构。nn.Module可以是神经网络的某个层,也可以是包含多层的神经网络。在实际使用中,最常见的做法是继承nn.Module,生成自己的网络/层,如3.4节实例中,我们定义的Net类就采用这种方法(class Net(torch.nn.Module))。nn中已实现了绝大多数层,包括全连接层、损失层、激活层、卷积层、循环层等。这些层都是nn.Module的子类,能够自动检测到自己的参数,并将其作为学习参数,且针对GPU运行进行了CuDNN优化。
3.2.2 nn.functional
nn中的层,一类是继承了nn.Module,其命名一般为nn.Xxx(第一个是大写),如nn.Linear、nn.Conv2d、nn.CrossEntropyLoss等。另一类是nn.functional中的函数,其名称一般为nn.funtional.xxx,如nn.funtional.linear、nn.funtional.conv2d、nn.funtional.cross_entropy等。从功能来说两者相当,基于nn.Mudle能实现的层,也可以基于nn.funtional实现,反之亦然,而且性能方面两者也没有太大差异。不过在具体使用时,两者还是有区别的,主要区别如下。
1) nn.Xxx继承于nn.Module,nn.Xxx 需要先实例化并传入参数,然后以函数调用的方式调用实例化的对象并传入输入数据。它能够很好的与nn.Sequential结合使用,而nn.functional.xxx无法与nn.Sequential结合使用。
2) nn.Xxx不需要自己定义和管理weight、bias参数;而nn.functional.xxx需要你自己定义weight、bias,每次调用的时候都需要手动传入weight、bias等参数, 不利于代码复用。
3) dropout操作在训练和测试阶段是有区别的,使用nn.Xxx方式定义dropout,在调用model.eval()之后,自动实现状态的转换,而使用nn.functional.xxx却无此功能。
总的来说,两种功能都是相同的,但PyTorch官方推荐:具有学习参数的(例如,conv2d、 linear、batch_norm、dropout等)情况采用nn.Xxx方式,没有学习参数的(例如,maxpool, loss func, activation func)等情况选择使用nn.functional.xxx或者nn.Xxx方式。3.5节中使用激活层,我们采用无学习参数的F.relu方式来实现,即nn.functional.xxx方式。
3.3 构建模型
第2章介绍使用PyTorch实现机器学习任务的几个实例,具体步骤好像不少,但关键就是选择网络层,构建网络,然后选择损失和优化器。在nn工具箱中,可以直接引用的网络很多,有全连接层、卷积层、循环层、正则化层、激活层等。接下来将介绍PyTorch的主要工具或模块,采用不同方法构建如图3-3所示的神经网络。
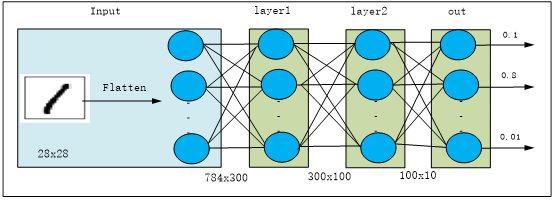
图3-3 神经网络结构
如图3-3所示,先把28x28的图像展平为784向量,layer1和layer2分别包括一个全连接层、一个批量归一化层,激活函数都是ReLU,输出层的激活函数为softmax。
PyTorch构建模型大致有以下3种方式。
1) 继承nn.Module基类构建模型。
2) 使用nn.Sequential按层顺序构建模型。
3) 继承nn.Module基类构建模型,又使用相关模型容器(如nn.Sequential,nn.ModuleList,nn.ModuleDict等)进行封装。
在这3种方法中,第1种方式最为常见;第2种方式比较简单,非常适合与初学者;第3种方式较灵活但复杂一些。
3.3.1 继承nn.Module基类构建模型
利用这种方法构建模型,先定义一个类,使之继承nn.Module基类。把模型中需要用到的层放在构造函数__init__()中,在forward方法中实现模型的正向传播。具体代码如下。
1)导入模块。
import torch
from torch import nn
import torch.nn.functional as F
2) 构建模型。
class Model_Seq(nn.Module):
    """
    通过继承基类nn.Module来构建模型
    """
    def __init__(self, in_dim, n_hidden_1, n_hidden_2, out_dim):
        super(Model_Seq, self).__init__()
        self.flatten = nn.Flatten()
        self.linear1= nn.Linear(in_dim, n_hidden_1)
        self.bn1=nn.BatchNorm1d(n_hidden_1)
        self.linear2= nn.Linear(n_hidden_1, n_hidden_2)
        self.bn2 = nn.BatchNorm1d(n_hidden_2)
        self.out = nn.Linear(n_hidden_2, out_dim)


    def forward(self, x):
        x=self.flatten(x)
        x=self.linear1(x)
        x=self.bn1(x)
        x = F.relu(x)
        x=self.linear2(x)
        x=self.bn2(x)
        x = F.relu(x)
        x=self.out(x)
        x = F.softmax(x,dim=1)
        return x
3)查看模型。
##对一些超参数赋值
in_dim, n_hidden_1, n_hidden_2, out_dim=28 * 28, 300, 100, 10
model_seq= Model_Seq(in_dim, n_hidden_1, n_hidden_2, out_dim)
print(model_seq)
运行结果如下:
Model_Seq(
(flatten): Flatten(start_dim=1, end_dim=-1)
(linear1): Linear(in_features=784, out_features=300, bias=True)
(bn1): BatchNorm1d(300, eps=1e-05, momentum=0.1, affine=True, track_running_stats=True)
(linear2): Linear(in_features=300, out_features=100, bias=True)
(bn2): BatchNorm1d(100, eps=1e-05, momentum=0.1, affine=True, track_running_stats=True)
(out): Linear(in_features=100, out_features=10, bias=True)
)
3.3.2 使用nn.Sequential按层顺序构建模型
使用nn.Sequential构建模型,因其内部实现了forward函数,因此可以不用写forward函数。nn.Sequential里面的模块按照先后顺序进行排列的,所以必须确保前一个模块的输出大小和下一个模块的输入大小是一致的。使用这种方法一般构建较简单的模型。 以下是使用nn.Sequential搭建模型的几种等价方法。
1.利用可变参数
Python中的函数参数个数是可变(或称为不定长参数),PyTorch中的有些函数也类似,如nn.Sequential(*args)就是一例。
1)导入模块。
import torch
from torch import nn
2)构建模型。
Seq_arg = nn.Sequential(
    nn.Flatten(),
    nn.Linear(in_dim,n_hidden_1),
    nn.BatchNorm1d(n_hidden_1),
    nn.ReLU(),
    nn.Linear(n_hidden_1, n_hidden_2),
    nn.BatchNorm1d(n_hidden_2),
    nn.ReLU(),
    nn.Linear(n_hidden_2, out_dim),
    nn.Softmax(dim=1)
)
3)查看模型。
in_dim, n_hidden_1, n_hidden_2, out_dim=28 * 28, 300, 100, 10
print(Seq_arg)
运行结果如下:
Sequential(
(0): Flatten(start_dim=1, end_dim=-1)
(1): Linear(in_features=784, out_features=300, bias=True)
(2): BatchNorm1d(300, eps=1e-05, momentum=0.1, affine=True, track_running_stats=True)
(3): ReLU()
(4): Linear(in_features=300, out_features=100, bias=True)
(5): BatchNorm1d(100, eps=1e-05, momentum=0.1, affine=True, track_running_stats=True)
(6): ReLU()
(7): Linear(in_features=100, out_features=10, bias=True)
(8): Softmax(dim=1)
)
这种方式构建时不能给每个层指定名称,如果需要给每个层指定名称,可使用add_module方法或OrderedDict方法。
2.使用add_module方法
1)构建模型。
Seq_module = nn.Sequential()
Seq_module.add_module("flatten",nn.Flatten())
Seq_module.add_module("linear1",nn.Linear(in_dim,n_hidden_1))
Seq_module.add_module("bn1",nn.BatchNorm1d(n_hidden_1))
Seq_module.add_module("relu1",nn.ReLU())
Seq_module.add_module("linear2",nn.Linear(n_hidden_1, n_hidden_2))
Seq_module.add_module("bn2",nn.BatchNorm1d(n_hidden_2))
Seq_module.add_module("relu2",nn.ReLU())
Seq_module.add_module("out",nn.Linear(n_hidden_2, out_dim))
Seq_module.add_module("softmax",nn.Softmax(dim=1))
2)查看模型。
in_dim, n_hidden_1, n_hidden_2, out_dim=28 * 28, 300, 100, 10
print(Seq_module)
运行结果如下:
Sequential(
(flatten): Flatten(start_dim=1, end_dim=-1)
(linear1): Linear(in_features=784, out_features=300, bias=True)
(bn1): BatchNorm1d(300, eps=1e-05, momentum=0.1, affine=True, track_running_stats=True)
(relu1): ReLU()
(linear2): Linear(in_features=300, out_features=100, bias=True)
(bn2): BatchNorm1d(100, eps=1e-05, momentum=0.1, affine=True, track_running_stats=True)
(relu2): ReLU()
(out): Linear(in_features=100, out_features=10, bias=True)
(softmax): Softmax(dim=1)
)
3.使用OrderedDict
1)导入模块。
import torch
from torch import nn
from collections import OrderedDict
2)构建模型。
Seq_dict = nn.Sequential(OrderedDict([
("flatten",nn.Flatten()),
("linear1",nn.Linear(in_dim,n_hidden_1)),
("bn1",nn.BatchNorm1d(n_hidden_1)),
("relu1",nn.ReLU()),
("linear2",nn.Linear(n_hidden_1, n_hidden_2)),
("bn2",nn.BatchNorm1d(n_hidden_2)),
("relu2",nn.ReLU()),
("out",nn.Linear(n_hidden_2, out_dim)),
("softmax",nn.Softmax(dim=1))]))
3)查看模型。
in_dim, n_hidden_1, n_hidden_2, out_dim=28 * 28, 300, 100, 10
print(Seq_dict)
运行结果如下:
Sequential(
(flatten): Flatten(start_dim=1, end_dim=-1)
(linear1): Linear(in_features=784, out_features=300, bias=True)
(bn1): BatchNorm1d(300, eps=1e-05, momentum=0.1, affine=True, track_running_stats=True)
(relu1): ReLU()
(linear2): Linear(in_features=300, out_features=100, bias=True)
(bn2): BatchNorm1d(100, eps=1e-05, momentum=0.1, affine=True, track_running_stats=True)
(relu2): ReLU()
(out): Linear(in_features=100, out_features=10, bias=True)
(softmax): Softmax(dim=1)
)
3.3.3 继承nn.Module基类并应用模型容器来构建模型
当模型的结构比较复杂时,可以应用模型容器(如nn.Sequential,nn.ModuleList,
nn.ModuleDict)对模型的部分结构进行封装,以增强模型的可读性,或减少代码量。
1.使用nn.Sequential模型容器
1)导入模块。
import torch
from torch import nn
import torch.nn.functional as F
2)构建模型。
class Model_lay(nn.Module):
    """
    使用sequential构建网络,Sequential()函数的功能是将网络的层组合到一起
    """
    def __init__(self, in_dim, n_hidden_1, n_hidden_2, out_dim):
        super(Model_lay, self).__init__()
        self.flatten = nn.Flatten()
        self.layer1 = nn.Sequential(nn.Linear(in_dim, n_hidden_1),nn.BatchNorm1d(n_hidden_1))
        self.layer2 = nn.Sequential(nn.Linear(n_hidden_1, n_hidden_2),nn.BatchNorm1d(n_hidden_2))
        self.out = nn.Sequential(nn.Linear(n_hidden_2, out_dim))


    def forward(self, x):
        x=self.flatten(x)
        x = F.relu(self.layer1(x))
        x = F.relu(self.layer2(x))
        x = F.softmax(self.out(x),dim=1)
        return x
3)查看模型。
in_dim, n_hidden_1, n_hidden_2, out_dim=28 * 28, 300, 100, 10
model_lay= Model_lay(in_dim, n_hidden_1, n_hidden_2, out_dim)
print(model_lay)
运行结果如下:
Model_lay(
(flatten): Flatten(start_dim=1, end_dim=-1)
(layer1): Sequential(
(0): Linear(in_features=784, out_features=300, bias=True)
(1): BatchNorm1d(300, eps=1e-05, momentum=0.1, affine=True, track_running_stats=True)
)
(layer2): Sequential(
(0): Linear(in_features=300, out_features=100, bias=True)
(1): BatchNorm1d(100, eps=1e-05, momentum=0.1, affine=True, track_running_stats=True)
)
(out): Sequential(
(0): Linear(in_features=100, out_features=10, bias=True)
)
)
2.使用nn.ModuleList模型容器
1)导入模块。
import torch
from torch import nn
import torch.nn.functional as F
2)构建模型。
class Model_lst(nn.Module):

    def __init__(self, in_dim, n_hidden_1, n_hidden_2, out_dim):
        super(Model_lst, self).__init__()
        self.layers = nn.ModuleList([
        nn.Flatten(),
        nn.Linear(in_dim,n_hidden_1),
        nn.BatchNorm1d(n_hidden_1),
        nn.ReLU(),
        nn.Linear(n_hidden_1, n_hidden_2),
        nn.BatchNorm1d(n_hidden_2),
        nn.ReLU(),
        nn.Linear(n_hidden_2, out_dim),
        nn.Softmax(dim=1)])
    def forward(self,x):
        for layer in self.layers:
            x = layer(x)
        return x
3)查看模型。
in_dim, n_hidden_1, n_hidden_2, out_dim=28 * 28, 300, 100, 10
model_lst = Model_lst(in_dim, n_hidden_1, n_hidden_2, out_dim)
print(model_lst)
运行结果如下:
Model_lst(
(layers): ModuleList(
(0): Flatten(start_dim=1, end_dim=-1)
(1): Linear(in_features=784, out_features=300, bias=True)
(2): BatchNorm1d(300, eps=1e-05, momentum=0.1, affine=True, track_running_stats=True)
(3): ReLU()
(4): Linear(in_features=300, out_features=100, bias=True)
(5): BatchNorm1d(100, eps=1e-05, momentum=0.1, affine=True, track_running_stats=True)
(6): ReLU()
(7): Linear(in_features=100, out_features=10, bias=True)
(8): Softmax(dim=1)
)
)
3.使用nn.ModuleDict模型容器
1)导入模块。
import torch
from torch import nn
2)构建模型。
class Model_dict(nn.Module):

    def __init__(self,in_dim, n_hidden_1,n_hidden_2,out_dim):
        super(Model_dict, self).__init__()
        self.layers_dict = nn.ModuleDict({"flatten":nn.Flatten(),
        "linear1":nn.Linear(in_dim,n_hidden_1),
        "bn1":nn.BatchNorm1d(n_hidden_1),
        "relu":nn.ReLU(),
        "linear2":nn.Linear(n_hidden_1, n_hidden_2),
        "bn2":nn.BatchNorm1d(n_hidden_2),
        "out":nn.Linear(n_hidden_2, out_dim),
        "softmax":nn.Softmax(dim=1)
        })
    def forward(self,x):
        layers = ["flatten","linear1","bn1","relu","linear2","bn2","relu","out","softmax"]
        for layer in layers:
            x = self.layers_dict[layer](x)
        return x
其中激活函数ReLU在模型中应该出现2次,但函数相同,故在定义字典时,只需定义一次,但在定义forward函数的列表中需要出现2次。
3)查看模型。
in_dim, n_hidden_1, n_hidden_2, out_dim=28 * 28, 300, 100, 10
model_dict = Model_dict(in_dim, n_hidden_1, n_hidden_2, out_dim)
print(model_dict)
运行结果如下:
Model_dict(
(layers_dict): ModuleDict(
(flatten): Flatten(start_dim=1, end_dim=-1)
(linear1): Linear(in_features=784, out_features=300, bias=True)
(bn1): BatchNorm1d(300, eps=1e-05, momentum=0.1, affine=True, track_running_stats=True)
(relu): ReLU()
(linear2): Linear(in_features=300, out_features=100, bias=True)
(bn2): BatchNorm1d(100, eps=1e-05, momentum=0.1, affine=True, track_running_stats=True)
(out): Linear(in_features=100, out_features=10, bias=True)
(softmax): Softmax(dim=1)
)
)
3.3.4 自定义网络模块
利用以上方法,自定义一些典型的网络模块,如残差网络(ResNet18)中的残差块,如图3-4所示。
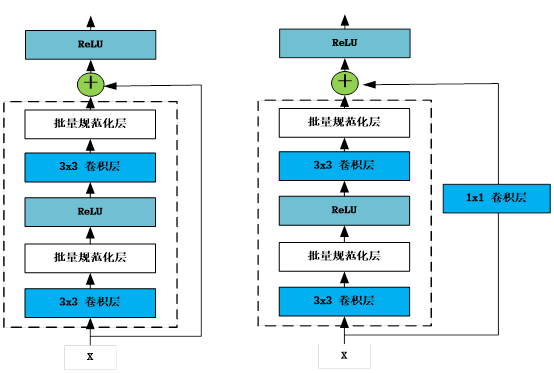
图3-4 残差块网络结构
残差块有两种,一种是正常的模块方式,如图3-4左图,将输入与输出相加,然后应用激活函数ReLU。 另一种是为使输入与输出形状一致,需添加通过1×1卷积调整通道和分辨率,如图3-4中的右图所示。这些模块中用到卷积层、批量规范化层,具体将在第6章详细介绍,这里我们只需要了解这些是网络层即可。
1)定义图3-4左图的残差模块。
import torch
import torch.nn as nn
from torch.nn import functional as F


class RestNetBasicBlock(nn.Module):
    def __init__(self, in_channels, out_channels, stride):
        super(RestNetBasicBlock, self).__init__()
        self.conv1 = nn.Conv2d(in_channels, out_channels, kernel_size=3, stride=stride, padding=1)
        self.bn1 = nn.BatchNorm2d(out_channels)
        self.conv2 = nn.Conv2d(out_channels, out_channels, kernel_size=3, stride=stride, padding=1)
        self.bn2 = nn.BatchNorm2d(out_channels)

    def forward(self, x):
        output = self.conv1(x)
        output = F.relu(self.bn1(output))
        output = self.conv2(output)
        output = self.bn2(output)
        return F.relu(x + output)
2)定义图3-4右图的残差模块。
class RestNetDownBlock(nn.Module):
    def __init__(self, in_channels, out_channels, stride):
        super(RestNetDownBlock, self).__init__()
        self.conv1 = nn.Conv2d(in_channels, out_channels, kernel_size=3, stride=stride[0], padding=1)
        self.bn1 = nn.BatchNorm2d(out_channels)
        self.conv2 = nn.Conv2d(out_channels, out_channels, kernel_size=3, stride=stride[1], padding=1)
        self.bn2 = nn.BatchNorm2d(out_channels)
        self.extra = nn.Sequential(
            nn.Conv2d(in_channels, out_channels, kernel_size=1, stride=stride[0], padding=0),
            nn.BatchNorm2d(out_channels)
        )

    def forward(self, x):
        extra_x = self.extra(x)
        output = self.conv1(x)
        out = F.relu(self.bn1(output))

        out = self.conv2(out)
        out = self.bn2(out)
        return F.relu(extra_x + out)
3)组合这两个模块得到现代经典RetNet18网络结构。
class RestNet18(nn.Module):
    def __init__(self):
        super(RestNet18, self).__init__()
        self.conv1 = nn.Conv2d(3, 64, kernel_size=7, stride=2, padding=3)
        self.bn1 = nn.BatchNorm2d(64)
        self.maxpool = nn.MaxPool2d(kernel_size=3, stride=2, padding=1)

        self.layer1 = nn.Sequential(RestNetBasicBlock(64, 64, 1),
                                    RestNetBasicBlock(64, 64, 1))

        self.layer2 = nn.Sequential(RestNetDownBlock(64, 128, [2, 1]),
                                    RestNetBasicBlock(128, 128, 1))

        self.layer3 = nn.Sequential(RestNetDownBlock(128, 256, [2, 1]),
                                    RestNetBasicBlock(256, 256, 1))

        self.layer4 = nn.Sequential(RestNetDownBlock(256, 512, [2, 1]),
                                    RestNetBasicBlock(512, 512, 1))

        self.avgpool = nn.AdaptiveAvgPool2d(output_size=(1, 1))

        self.fc = nn.Linear(512, 10)

    def forward(self, x):
        out = self.conv1(x)
        out = self.layer1(out)
        out = self.layer2(out)
        out = self.layer3(out)
        out = self.layer4(out)
        out = self.avgpool(out)
        out = out.reshape(x.shape[0], -1)
        out = self.fc(out)
        return out


 705
705


 被折叠的 条评论
为什么被折叠?
被折叠的 条评论
为什么被折叠?
 到【灌水乐园】发言


