


RelativeLayout
相对布局,如果我们想在app中实现复杂的布局,缺了它肯定不行的,前面介绍的LinearLayout适用于顺序排列的布局,然而RelativeLayout则适用于各种排列方式。
XML Attribute
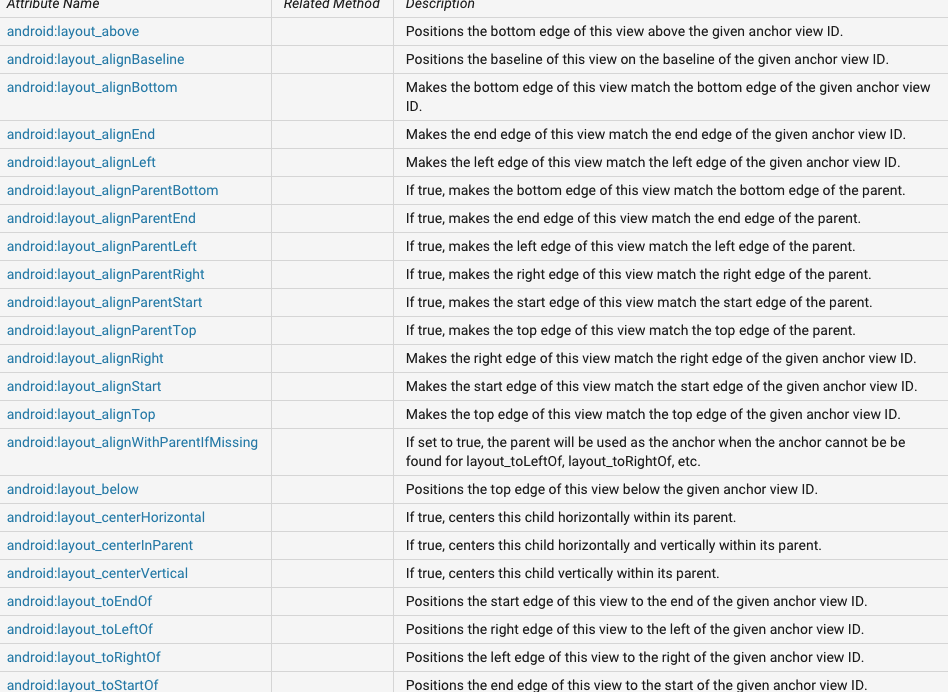
上面都是我们适用RelativeLayout布局时可以用到的属性,具体我就不一个个去介绍每一个属性的用法,我们只需要知道每个View都可以根据parent和其他View来进行布局,分别四个方位:
- top (上)
- bottom(下)
- left(左)
- right(右)
eg:
android:layout_alignParentTop
如果为”true”的话,表示该view的边界 对齐父视图顶部边界。
android:layout_centerVertical
如果为”true”的话,表示在父视图中竖直方向居中。
android:layout_below
定位指定View视图的顶部边界对齐指定ID视图的底部边界。
eg:android:layout_below=”@+id/button2”
android:layout_toRightOf
定位指定View视图的左边界对齐指定ID视图的右边界。
eg: android:layout_toRightOf=”@+id/button”
举例
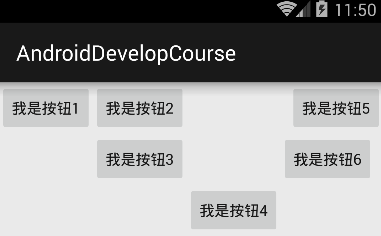
<?xml version="1.0" encoding="utf-8"?>
<RelativeLayout xmlns:android="http://schemas.android.com/apk/res/android"
    android:layout_width="match_parent"
    android:layout_height="match_parent">

    <Button
        android:id="@+id/button"
        android:layout_width="wrap_content"
        android:layout_height="wrap_content"
        android:text="我是按钮1" />

    <Button
        android:id="@+id/button2"
        android:layout_toRightOf="@+id/button"
        android:layout_width="wrap_content"
        android:layout_height="wrap_content"
        android:text="我是按钮2" />

    <Button
        android:id="@+id/button3"
        android:layout_width="wrap_content"
        android:layout_height="wrap_content"
        android:layout_below="@+id/button2"
        android:layout_alignLeft="@+id/button2"
        android:text="我是按钮3" />
    <Button
        android:id="@+id/button4"
        android:layout_width="wrap_content"
        android:layout_height="wrap_content"
        android:text="我是按钮4"
        android:layout_below="@+id/button3"
        android:layout_toRightOf="@+id/button3"
        android:layout_toEndOf="@+id/button3" />
    <Button
        android:id="@+id/button5"
        android:layout_width="wrap_content"
        android:layout_height="wrap_content"
        android:text="我是按钮5"
        android:layout_alignParentRight="true"/>

    <Button
        android:id="@+id/button6"
        android:layout_width="wrap_content"
        android:layout_height="wrap_content"
        android:text="我是按钮6"
        android:layout_below="@+id/button5"
        android:layout_toRightOf="@+id/button4"
        android:layout_toEndOf="@+id/button4" />
</RelativeLayout>
最后
大家可以先感受下,下面这样的一个界面应该如何搭建起来,这个是小巫参与开发的一款app,界面还算比较美观简洁,就是这样的一个界面需要我们用代码堆砌起来,我们需要把基础打牢才能做出好看的app,所以希望初学者不要急躁,多自己手写布局代码,把基本的属性设置都了解过一遍,这样搭建界面的时候才不会迷茫。

转载请注明:IT_xiao小巫 http://blog.csdn.net/wwj_748


 1万+
1万+


 被折叠的 条评论
为什么被折叠?
被折叠的 条评论
为什么被折叠?
 到【灌水乐园】发言


