


目录
先将 nginx编译安装直至 systemctl命令使用 nginx服务
nginx 优化
应用程序配置文件优化
性能优化
IO多路复用 use epoll;
设置工作进程数 worker_processes 与CPU数量相同或auto;
工作进程静态绑核 worker_cpu_affinity
设置并发 worker_connections worker_rlimit_nofile
连接保持超时 keepalive_timeout 服务器超时时间 [客户端超时时间];
网页压缩 gzip on;
页面缓存时间 expires 时间;安全优化
隐藏版本号 server_tokens off; 修改源代码
防盗链 valid_referers if ($invalid_referer) {rewrite }
设置运行用户/组 user 用户名 组名;
限制单个ip的访问频率 limit_conn_zone limit_req
限制单个ip的连接数 limit_req_zone limit_conn日志分割 脚本 + crontab
系统内核优化
/etc/sysctl.conf 内核参数配置文件
net.ipv4.tcp_syncookies = 1
开启SYN Cookies,当出现SYN等待队列溢出时,启用cookies来处理,可防范少量SYN攻击
net.ipv4.tcp_tw_reuse = 1
开启重用,允许将TIME-WAIT sockets重新用于新的TCP连接
net.ipv4.tcp_tw_recycle = 1
开启TCP连接中TIME-WAIT sockets的快速回收
net.ipv4.tcp_fin_timeout = 30
修改系默认的 TIMEOUT 时间(MSL值)
net.ipv4.tcp_max_tw_buckets = 6000
系统同时保持TIME-WAIT的最大数量
net.ipv4.ip_local_port_range = 1024 65535
外向连接的端口范围,默认为32768 60999
net.ipv4.tcp_max_syn_backlog = 65536
系统能接受的tcp半连接的最大队列数,TCP三次握手建立阶段接受SYN请求队列的最大长度
net.core.somaxconn = 65536
每一个端口最大的 Listen 监听队列的长度(排队等待接收的最大连接数)
需要配合Nginx的配置参数一起调整 listen 80 backlog=65536;net.ipv4.tcp_keepalive_time = 600
发送keepalive探测包消息的频率,确认客户端是否断网
nginx编译安装常用模块
http_gzip_module              #网页压缩模块
http_stub_status_module       #状态统计模块
http_auth_basic_module        #网页用户认证模块
http_fastcgi_module           #fastcgi转发 php-fpm的模块
http_rewrite_module           #URL重写模块
http_ssl_module               #https安全加密模块
http_limit_conn_module        #限制最大连接数模块
http_limit_req_module         #限制最大访问频率模块
http_proxy_module             #请求转发模块
http_image_filter_module      #图片处理模块
http_upstream_*_module        #负载均衡服务器列表模块
stream_*_module               #四层代理转发模块
生产中建议设置
/etc/security/limits.conf   内核限制文件

*   soft    noproc          65535         打开的进程数
*   hard    noproc          65535
*   soft    nofile          65535         打开的文件数
*   hard    nofile          65535
*   soft    memlock         unlimited     不做内存锁定
*   hard    memlock         unlimited
nginx 内核限制文件优化
/etc/security/limits.conf #内核限制文件路径
先将 nginx编译安装直至 systemctl命令使用 nginx服务
安全优化
隐藏 nginx版本号
查看版本号
#方法一:使用 curl命令访问主机IP
[root@localhost ~]# curl -I http://192.168.88.110
HTTP/1.1 200 OK
Server: nginx/1.25.3 #版本号
Date: Tue, 12 Dec 2023 01:45:11 GMT
Content-Type: text/html
Content-Length: 615
Last-Modified: Tue, 12 Dec 2023 01:23:56 GMT
Connection: keep-alive
ETag: "6577b62c-267"
Accept-Ranges: bytes
#方法二
#cd到指定目录
[root@localhost ~]# cd /usr/local/nginx/html/
#将一个图片传输到虚拟机中
[root@localhost html]# rz -E
rz waiting to receive.
[root@localhost html]# ls
50x.html index.html 下载.jpg
#如果是中文需要改为自定义英文
[root@localhost html]# mv 下载.jpg xia.jpg
[root@localhost html]# ls
50x.html index.html xia.jpg—— 进入虚拟机进行操作 ——


隐藏版本信息
方法一
#进入配置文件修改
[root@localhost html]# vim /usr/local/nginx/conf/nginx.conf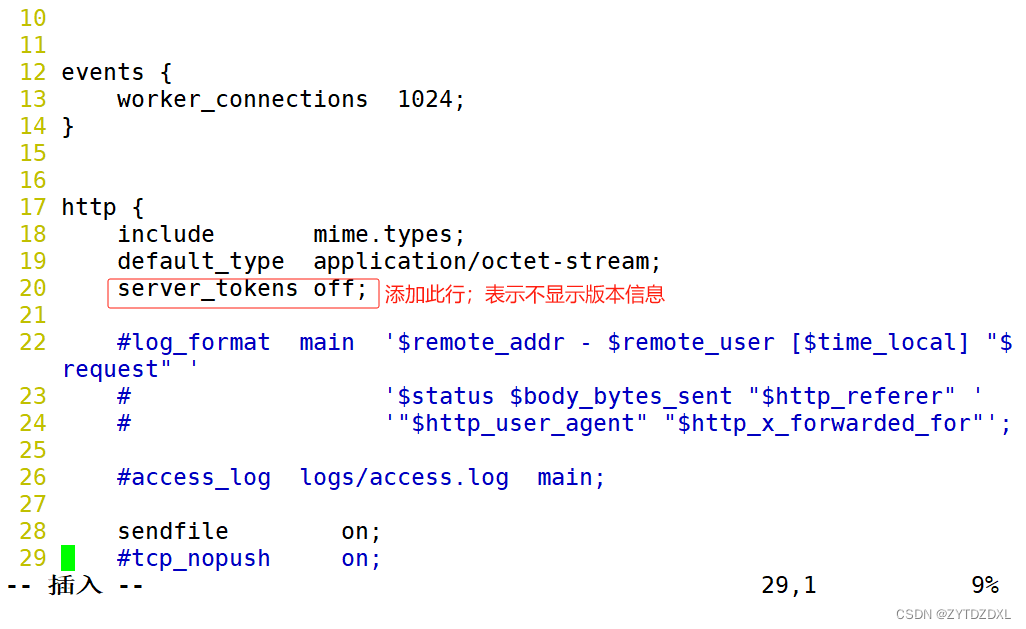
#检查 nginx语法是否正确
[root@localhost html]# nginx -t
nginx: the configuration file /usr/local/nginx/conf/nginx.conf syntax is ok
nginx: configuration file /usr/local/nginx/conf/nginx.conf test is successful

#重启 nginx服务
[root@localhost html]# systemctl restart nginx.service

#验证版本号是否隐藏
[root@localhost html]# curl -I http://192.168.88.110
HTTP/1.1 200 OK
Server: nginx #已经隐藏
Date: Tue, 12 Dec 2023 03:12:49 GMT
Content-Type: text/html
Content-Length: 615
Last-Modified: Tue, 12 Dec 2023 01:23:56 GMT
Connection: keep-alive
ETag: "6577b62c-267"
Accept-Ranges: bytes
方法二
#cd到安装文件位置
[root@localhost html]# cd /opt

#停止 nginx服务
[root@localhost opt]# systemctl stop nginx.service

#cd到指定目录
[root@localhost opt]# cd nginx-1.25.3/

#cd到内核文件所在目录
[root@localhost nginx-1.25.3]# cd src/core/

#进入配置文件
[root@localhost core]# vim nginx.h
#查看之前的配置
[root@localhost core]# nginx -V
nginx version: nginx/1.25.3
built by gcc 4.8.5 20150623 (Red Hat 4.8.5-44) (GCC)
configure arguments: --prefix=/usr/local/nginx --user=nginx --group=nginx --with-http_stub_status_module

#cd到指定目录进行编译安装
[root@localhost core]# cd /opt/nginx-1.25.3/
[root@localhost nginx-1.25.3]# ./configure --prefix=/usr/local/nginx --user=nginx --group=nginx --with-http_stub_status_module
[root@localhost nginx-1.25.3]# make && make install

#进入配置文件进行更改
[root@localhost nginx-1.25.3]# vim /usr/local//nginx/conf/nginx.conf
#重启 nginx服务
[root@localhost nginx-1.25.3]# systemctl restart nginx

#验证
[root@localhost nginx-1.25.3]# curl -I http://192.168.88.110
HTTP/1.1 200 OK
Server: mhy/123 #显示为自定义内容
Date: Tue, 12 Dec 2023 03:45:37 GMT
Content-Type: text/html
Content-Length: 615
Last-Modified: Tue, 12 Dec 2023 01:23:56 GMT
Connection: keep-alive
ETag: "6577b62c-267"
Accept-Ranges: bytes
修改用户与组
#创建一个自定义用户
[root@localhost nginx-1.25.3]# useradd -s /sbin/nologin mhy
#进入配置文件进行更改
[root@localhost nginx-1.25.3]# vim /usr/local//nginx/conf/nginx.conf
#重启 nginx服务
[root@localhost nginx-1.25.3]# systemctl restart nginx.service

#查看是否修改成功
[root@localhost nginx-1.25.3]# ps aux |grep mhy
mhy       56039  0.0  0.0  23068  1380 ?        S    12:05   0:00 nginx: worker process
root      56041  0.0  0.0 112676   980 pts/1    R+   12:05   0:00 grep --color=auto mhy
限制单个 IP的访问频率和连接数
#进入配置文件并进行添加修改
[root@localhost ~]# vim /usr/local/nginx/conf/nginx.conf
limit_req_zone $binary_remote_addr zone=req_zone:1m rate=20r/s; limit_conn_zone $binary_remote_addr zone=addr:10m;
...
limit_req zone=req_zone burst=5 nodelay;
limit_conn addr 5;
...

防盗链相关设置
-
在企业网站服务中,一般都要配置防盗链功能,以避免网站内容被非法盗用,造成经济损失,也避免了不必要的带宽浪费
-
Nginx 的防盗链功能也非常强大,在默认情况下,只需要进行很简单的配置,即可实现防盗链处理
准备两台虚拟机,编译安装 nginx,源主机:192.168.88.110
盗链主机:192.168.88.60
—— 配置源主机
#cd到指定目录,下载图片
[root@localhost ~]# cd /usr/local/nginx/html/
[root@localhost html]# ls
50x.html  index.html  R-C.jpg

#进入配置文件,添加配置
[root@localhost html]# vim /etc/hosts
#进入配置文件,添加配置
[root@localhost html]# vim index.html
显示结果;源主机上操作

—— 配置盗链主机
#yum安装 httpd服务
[root@localhost ~]# yum install -y httpd

#cd到指定目录
[root@localhost ~]# cd /var/www/html/

#进入配置文件
[root@localhost html]# vim index.html
<html>
<body>
<h1>盗链</h1>
<img src="http://www.wx.com/R-C.jpg"/>
</body>
</html>
#进入配置文件
[root@localhost html]# vim /etc/hosts
#重启 http服务
[root@localhost html]# systemctl restart httpd
在盗链主机上访问本机网址;访问源主机网址


在源主机里配置防盗链
#在指定目录下 /usr/local/nginx/html/添加防盗图片
[root@localhost html]# ls
16212205693486036.jpg  50x.html  index.html  R-C.jpg

#将图片名更改为 error.png
[root@localhost html]# mv  16212205693486036.jpg  error.png
[root@localhost html]# ls
50x.html  error.png  index.html  R-C.jpg

#进入配置文件
[root@localhost html]# vim /usr/local/nginx/conf/nginx.conf
        location ~* \.(jpg|gif|swf)$ {
                        valid_referers none blocked *.wx.com wx.com;
                        if ( $invalid_referer ) {
                                rewrite ^/ http://www.wx.com/error.png;
             }
} 
#重启 nginx服务
[root@localhost html]# systemctl restart nginx

#检查 nginx配置是否有语法错误
[root@localhost html]# nginx -t
nginx: the configuration file /usr/local/nginx/conf/nginx.conf syntax is ok
nginx: configuration file /usr/local/nginx/conf/nginx.conf test is successful
实验结果
在源主机上访问源主机网址 www.wx.com

在盗链主机上访问源主机网址 www.wx.com以及访问盗链主机自己的网址 www.hi.com,都会显示源主机设定的防盗图片,隐藏真实图片


nginx 日志分割脚本
#cd到指定目录,日志分割脚本要在此目录下
[root@localhost ~]# cd /usr/local/nginx

#编写脚本,自定义脚本名
[root@localhost nginx]# vim nginx_log.sh
#!/bin/bash
#this is used for cutting nginx logs
##定义日志收集的目录
newlogpath=/var/log/nginx
##定义区分日志的标识,采用时间标记,计划每天一次日志分割
lastday=`date -d "-1 day" +%Y%m%d`
##找到应用程序生成日志的源路径
oldlogpath=/usr/local/nginx/logs
##定义应用程序的pid号 也就是nginx的master进程号
pid=`cat ${oldlogpath}/nginx.pid`
##先判断收集日志的目录是否存在,没有则创建,有则进行下一步
[ -d $newlogpath ]||mkdir $newlogpath
##使用mv命令进行日志分割,将生成的访问日志和错误日志都移动到收集日志的目录下,并添加时间标记
mv $oldlogpath/access.log $newlogpath/access.log.$lastday
mv $oldlogpath/error.log $newlogpath/error.log.$lastday
##重新生成新的日志,便于nginx记录后续访问事务
kill -USR1 $pid
##删除大于30天的日志,释放磁盘空间
find $newlogpath -mtime +30 -exec rm -rf {} \;#给脚本文件添加运行权限
[root@localhost nginx]# chmod +x /usr/local/nginx/nginx_log.sh
#编辑定时任务,每天执行一次
[root@localhost nginx]#crontab -e
* * */1 * * /usr/local/nginx/nginx_log.shnginx 内核优化
#进入配置文件,添加配置
[root@localhost ~]# vim /etc/sysctl.conf
net.ipv4.tcp_syncookies = 1
net.ipv4.tcp_tw_reuse = 1
net.ipv4.tcp_tw_recycle = 1
net.ipv4.tcp_fin_timeout = 30
net.ipv4.tcp_max_tw_buckets = 5000
net.ipv4.ip_local_port_range = 1024 65535
net.ipv4.tcp_max_syn_backlog = 8192
net.core.somaxconn = 10000
net.ipv4.tcp_keepalive_time = 1200
性能优化,每次更改完要记得重启服务哟
页面缓存时间
#进入配置文件
[root@localhost ~]# vim /usr/local/nginx/conf/nginx.conf
#cd到指定目录,并传输一张图片 ha.jpg
[root@localhost ~]# cd /usr/local/nginx/html
[root@localhost html]# ls
50x.html  error.png  ha.jpg  index.html  R-C.jpg

#重启 nginx服务
[root@localhost html]# systemctl restart nginx
实验结果;搜索成功后,电脑键盘按F12,才出现以下右边的界面

设置工作进程数
#进入配置文件
[root@localhost ~]# vim /usr/local/nginx/conf/nginx.conf
工作进程静态绑核
#进入配置文件
[root@localhost ~]# vim /usr/local/nginx/conf/nginx.conf
注释:根据虚拟机的处理器个数决定,例:虚拟机有四个处理器,那就是 0001 0010 0100 1000;虚拟机有三个处理器,那就是 001 010 100

设置并发
#进入配置文件
[root@localhost ~]# vim /usr/local/nginx/conf/nginx.conf
连接保持超时
#进入配置文件
[root@localhost ~]# vim /usr/local/nginx/conf/nginx.conf
网页压缩
#进入配置文件
[root@localhost ~]# vim /usr/local/nginx/conf/nginx.conf
   gzip on;
   gzip_min_length 1k;
   gzip_buffers 4 64k;
   gzip_http_version 1.1;
   gzip_comp_level 6;
   gzip_vary on;
   gzip_types text/plain text/javascript application/x-javascript text/css text/xml application/xml application/xml+rss image/jpg image/jpeg image/png image/gif application/x-httpd-php application/javascript application/json;
#注释
gzip on; #取消注释,开启gzip压缩功能
gzip_min_length 1k; #最小压缩文件大小
gzip_buffers 4 64k; #压缩缓冲区,大小为4个64k缓冲区
gzip_http_version 1.1; #压缩版本(默认1.1,前端如果是squid2.5请使用1.0)
gzip_comp_level 6; #压缩比率
gzip_vary on; #支持前端缓存服务器存储压缩页面
gzip_types text/plain text/javascript application/x-javascript text/css text/xml application/xml application/xml+rss image/jpg image/jpeg image/png image/gif application/x-httpd-php application/javascript application/json; #压缩类型,表示哪些网页文档启用压缩功能
#重启服务
[root@localhost ~]# systemctl restart nginx
实验结果


 259
259


 被折叠的 条评论
为什么被折叠?
被折叠的 条评论
为什么被折叠?
 到【灌水乐园】发言


