


原文链接:点击打开链接
Updates:
* November 2013
  - Added v1.1 of the standard example code, with a small
    fix to clear vertex array state after drawing.
* February 2013
  - Added a version that works with OpenGL ES 2.0, provided
    by Aleksandar Kodzhabashev.
* January 2013
  - Added a version that includes z-values for rendering text
    in 3D space. It was written by Jocelyn Demoy.
* September 2012
  - Added a mirror for the code download.
  - Added a Scala port of the code, provided by Alexey Aksenov.
This post is intended for developers. It describes the method I used for rendering high-quality dynamic text efficiently using OpenGL ES 1.0, with TrueType/OpenType font files.
One of the most frustrating things I have encountered while working with 3D APIs (such as OpenGL) is the complete lack of support for text rendering . Because of this unexplainable shortcoming, we have to implement text rendering on our own. Before starting with my Android game, I had already done this multiple times for both Direct3D and OpenGL, using methods ranging from static text on a bitmap to complete bitmap fonts (usually generated via a tool).
Sadly, these implementations did not translate well to OpenGL ES....so I had to do it again :)
Interested? Keep reading for details and a download of full source code that can be used immediately in any project, without limitation!
Initially, I went with a quick implementation using Codehead's Bitmap Font Generator (CBFG) . It was easy, fast and great to have text display implemented without any real work :) It's a great tool.
However, at some point I realized that in order for me to support high quality text (i.e. without using scaling) at all resolutions, I would have to generate a font bitmap for each resolution. This was compounded by the fact that I wanted two different sized fonts (and again did not want to do any scaling). The result was around 6-10 Megabytes worth of uncompressed font bitmaps (and that was without support for obscure resolutions). It just wasn't going to work out for me...so I decided that I needed a better solution.
I wanted to build a dynamic text engine that works with OpenGL ES in Android. The idea of this system is to "generate" the same type of font bitmap that CBFG does, but it does so at run-time using a standard TrueType (.ttf) or OpenType (.otf) font file. Using this method I would only need to include the font file(s), which are usually quite small, and it could then generate correctly scaled fonts for whatever resolution the game was run on.
I had implemented a dynamic text rendering system like this once before using Direct3D on Windows, but never in OpenGL. Also, the Direct3D one was using Windows GDI for generating the font bitmaps so it was basically useless for Android. I could not find any description or code that does exactly this anywhere on the web. The closest was some Android SDK example which renders full strings to a texture and then displays the texture. This was not nearly "dynamic" enough for strings that change "per frame", but it provided the groundwork for what I had in mind.
NOTE: As far as I know, libgdx uses this same way of rendering text, but I did not want to spend the time "unhooking" their implementation from the rest of the engine. I wanted code that I could use without having to employ an entire game engine.
But enough about what led me to this solution. Let's look at how it works:
The entire generation of the font bitmap (or atlas, as some people call it) is performed in a single method . The following image shows what a font bitmap, generated by the code I use here, looks like.
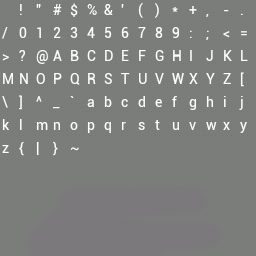
Note that it is rendered on a grey background; the actual bitmap has a transparent background. Also, my method uses alpha only for the characters, and they can be rendered in any color.
The whole process is actually quite easy. We generate the bitmap (as a texture), calculate and store the size of each character, as well as it's location on the texture (UV coordinates). There are some other finer details, but we'll get to that.
The Code
License: The code is released under the CC0 1.0 public domain license - in English it means that there are NO restrictions placed on usage of the code in any way.
Download the source code ( mirror ).
Download the source code v1.1 .
Download the source code (includes a copy of the CC0 1.0 public domain license).
Download the source code v1.1 (includes a copy of the CC0 1.0 public domain license).
Update (Sept 2012): The code has been ported to Scala by Alexey Aksenov . It can be found here .
Update (Jan 2013): A new version of the example which uses z-values for rendering (allowing placement in 3D space) was done by Jocelyn Demoy . It can be found here .
Update (Feb 2013): A new version of the example which uses OpenGL ES 2.0 for rendering is provided by Aleksandar Kodzhabashev . It can be found here .
The included source files are as follows:
- Texample.java and TexampleRenderer.java - these files are from the OpenGL ES 1.0 Android SDK sample. They only serve as a place to test the rest of the code. Ignore these if you intend to use the code in an existing project.
- Vertices.java and SpriteBatch.java - these are used for "batch-rendering" characters, which is the only efficient way of rendering dynamic text. These provide no special text-related operations and can be replaced if you have an existing rendering solution.
- TextureRegion.java - this is just a little helper class that makes it easier to define a region on a texture (i.e. the UV coordinates) for each character.
- GLText.java - this holds the GLText class which does all of the text-related work (generation, rendering, etc.). If you replace the render calls, this is the only file that you need.
So let's look at the code for GLText and I'll discuss the subtle details :)
Constants & Members
First, we need to define some constant values:
public final static int CHAR_START = 32;
   public final static int CHAR_END = 126;
   public final static int CHAR_CNT = (((CHAR_END - CHAR_START)+1)+1 );

   public final static int CHAR_NONE = 32;
   public final static int CHAR_UNKNOWN = (CHAR_CNT-1);

   public final static int FONT_SIZE_MIN = 6;
   public final static int FONT_SIZE_MAX = 180;
   public final static int CHAR_BATCH_SIZE = 100;
- CHAR_START and CHAR_END define the ASCII character range of the characters we want.
- CHAR_CNT is the total number of characters (the extra +1 is for the "unknown" character).
- CHAR_NONE defines which ASCII character to use for "unknown" characters. Here I used '32', which is the ASCII code for space, but you could change this to any valid ASCII code.
- CHAR_UNKNOWN is the index of the "unknown" character.
- FONT_SIZE_MIN/MAX is the minimum and maximum pixel size supported for creating fonts. The minimum size is not that important but maximum is needed since maximum texture size is limited.
- CHAR_BATCH_SIZE is the number of characters that are batched when rendering (this value should be tweaked depending on requirements...smaller values use less memory, larger values use more).
Next up, the members of the class:
GL10 gl;
   AssetManager assets;
   SpriteBatch batch;

   int fontPadX, fontPadY;

   float fontHeight;
   float fontAscent;
   float fontDescent;

   int textureId;
   int textureSize;
   TextureRegion textureRgn;
   float charWidthMax;
   float charHeight;
   final float[] charWidths;
   TextureRegion[] charRgn;
   int cellWidth, cellHeight;
   int rowCnt, colCnt;

   float scaleX, scaleY;
   float spaceX;
- gl and assets - these are obtained from the GLSurfaceView and Context (respectively) and cached.
- fontPadX, fontPadY - these are padding values to use for each character. They indicate the number of spacing pixels to add on each axis between characters. Padding is added to both sides of each axis (i.e. a fontPadX value of 1 means 1 pixel on the left and one pixel on the right). Use these if characters in a font overlap. Note that these values do not affect spacing beween characters when rendering (use spaceX for that).
- fontHeight, fontAscent, fontDescent - these are the metrics of the font obtained from Android. Use them manually when rendering for accurate text positioning.
- textureId, textureSize, textureRgn - the ID of the generated texture (containing the font characters), it's size (square, power of two), and a region used to render it (for debug purposes).
- charWidthMax - the width of the widest character in the font.
- charHeight - the height of all characters (maximum).
- charWidths - the array of character widths (exact width per character).
- charRgn - the array of character regions on the texture.
- cellWidth, cellHeight - the width and height of each cell on the texture (including padding, etc).
- rowCnt, colCnt - the number of rows and columns on the texture.
- scaleX, scaleY - these are rendering values used to scale the rendered text. A value of 1.0 means unscaled, values less than one make the text smaller, and values larger than one make it bigger.
- spaceX - this value indicates the amount of extra spacing (on the X-axis) to add between characters when rendering.
The class contains various accessors and utility methods which are self explanatory (and well commented). Here I will only focus on two methods: load() and draw() , which create the font from a file and renders a string with it, respectively.
The load() Method
First up is the load() method, which has the following prototype:
public boolean load(String file, int size, int padX, int padY)
- file - the filename of the TrueType (.ttf) or OpenType (.otf) font file in the assets folder. You could use files from other locations and it should be easy to do if required (see the code below).
- size - the desired size (height) of the font.
- padX, padY - the desired X and Y axis padding to use.
And now for the actual code:
Typeface tf = Typeface.createFromAsset( assets, file );
   Paint paint = new Paint();
   paint.setAntiAlias( true );
   paint.setTextSize( size );
   paint.setColor( 0xffffffff );
   paint.setTypeface( tf );

   Paint.FontMetrics fm = paint.getFontMetrics();
   fontHeight = (float)Math.ceil( Math.abs( fm.bottom ) + Math.abs( fm.top ) );
   fontAscent = (float)Math.ceil( Math.abs( fm.ascent ) );
   fontDescent = (float)Math.ceil( Math.abs( fm.descent ) );
Here we create a TypeFace instance from the specified font file (if you want to use font files from locations other than the assets folder, this call would need to be changed). Then we create and configure a Paint instance, which will be used to draw the actual characters to the texture. We also set the typeface for the Paint instance to the one created from the file. And finally, we get the font metrics from the Paint instance and save the values for future use.
char[] s = new char[2];
   charWidthMax = charHeight = 0;
   float[] w = new float[2];
   int cnt = 0;
   for ( char c = CHAR_START; c <= CHAR_END; c++ ) {
      s[0] = c;
      paint.getTextWidths( s, 0, 1, w );
      charWidths[cnt] = w[0];
      if ( charWidths[cnt] > charWidthMax )
         charWidthMax = charWidths[cnt];
      cnt++;
   }
   s[0] = CHAR_NONE;
   paint.getTextWidths( s, 0, 1, w );
   charWidths[cnt] = w[0];
   if ( charWidths[cnt] > charWidthMax )
      charWidthMax = charWidths[cnt];
   cnt++;

   charHeight = fontHeight;
Next we use the Paint instance (with set TypeFace ) to determine the exact width of each character, and save that to an array which is used at render time to properly space the characters in a string. During this operation we also track and save the widest character's width. Finally we simply set the character height to the font height.
cellWidth = (int)charWidthMax + ( 2 * fontPadX );
   cellHeight = (int)charHeight + ( 2 * fontPadY );
   int maxSize = cellWidth > cellHeight ? cellWidth : cellHeight;
   if ( maxSize < FONT_SIZE_MIN || maxSize > FONT_SIZE_MAX )
      return false;
At this point we calculate the cell sizes to use for each character on the texture. Each cell is the exact same size, so we need to use a size that is large enough to contain the widest character. We also need to take the specified padding into consideration. Finally we get the largest dimension (from width and height) and make sure that the cell size fits within our defined minimum and maximum size range (if not, we return an error).
if ( maxSize <= 24 )
      textureSize = 256;
   else if ( maxSize <= 40 )
      textureSize = 512;
   else if ( maxSize <= 80 )
      textureSize = 1024;
   else
      textureSize = 2048;
Now that we have the maximum size, we need to determine how large the texture must be in order to hold all of the defined characters. Here I have done that manually, but it could be computed from the cell size (if desired). The main thing is that these values will require modification if the defined character range changes.
Bitmap bitmap;
   bitmap = Bitmap.createBitmap( textureSize, textureSize, Bitmap.Config.ALPHA_8 );
   Canvas canvas = new Canvas( bitmap );
   bitmap.eraseColor( 0x00000000 );

   colCnt = textureSize / cellWidth;
   rowCnt = (int)Math.ceil( (float)CHAR_CNT / (float)colCnt );
At this point we can create a Bitmap of the determined texture size. Notice that we use only an alpha channel for the bitmap. This is not compulsory - you could use full ARGB (it would be required if you intend to use stroked fonts). However, I found that using alpha only created better looking text (and I have no intention of ever using stroked fonts). Use of an alpha channel only also decreases the memory requirement of the texture. We also create a Canvas and attach the Bitmap to it so that we can draw to it. We then set the bitmap to have a transparent background (alpha = 0). Finally, we calculate the number of columns and rows for the characters on the bitmap (while this is not actually needed in this implementation, I left it since it may be useful at some point).
float x = fontPadX;
   float y = ( cellHeight - 1 ) - fontDescent - fontPadY;
   for ( char c = CHAR_START; c <= CHAR_END; c++ ) {
      s[0] = c;
      canvas.drawText( s, 0, 1, x, y, paint );
      x += cellWidth;
      if ( ( x + cellWidth - fontPadX ) > textureSize ) {
         x = fontPadX;
         y += cellHeight;
      }
   }
   s[0] = CHAR_NONE;
   canvas.drawText( s, 0, 1, x, y, paint );
Finally we can generate our font bitmap. First, we set the (x,y) coordinate (bottom/left of character) for the first character (note that padding is included in this). Then we loop for each of our defined characters and render them to the canvas (i.e. the bitmap) using our configured paint instance (which has the font file set as typeface). After rendering, we advance on the x-axis for the next character. Finally we test to see if the edge of the bitmap has been reached, and if so we reset the x-axis and move down to the next line on the y-axis. After rendering the defined characters we also render the "unknown" character.
int[] textureIds = new int[1];
   gl.glGenTextures( 1, textureIds, 0 );
   textureId = textureIds[0];

   gl.glBindTexture( GL10.GL_TEXTURE_2D, textureId );
   gl.glTexParameterf( GL10.GL_TEXTURE_2D, GL10.GL_TEXTURE_MIN_FILTER,
                       GL10.GL_NEAREST );
   gl.glTexParameterf( GL10.GL_TEXTURE_2D, GL10.GL_TEXTURE_MAG_FILTER,
                       GL10.GL_LINEAR );
   gl.glTexParameterf( GL10.GL_TEXTURE_2D, GL10.GL_TEXTURE_WRAP_S,
                       GL10.GL_CLAMP_TO_EDGE );
   gl.glTexParameterf( GL10.GL_TEXTURE_2D, GL10.GL_TEXTURE_WRAP_T,
                       GL10.GL_CLAMP_TO_EDGE );

   GLUtils.texImage2D( GL10.GL_TEXTURE_2D, 0, bitmap, 0 );

   gl.glBindTexture( GL10.GL_TEXTURE_2D, 0 );
   bitmap.recycle();
Next we generate a new texture, bind it, and set the filtering and wrapping to use. Very basic OpenGL stuff. Then we transfer the bitmap to the texture using GLUtils (which makes it very simple). Finally we unbind the texture and release the bitmap.
x = 0;
   y = 0;
   for ( int c = 0; c < CHAR_CNT; c++ ) {
      charRgn[c] = new TextureRegion( textureSize, textureSize,
                          x, y, cellWidth-1, cellHeight-1 );
      x += cellWidth;
      if ( x + cellWidth > textureSize ) {
         x = 0;
         y += cellHeight;
      }
   }
Finally we setup a texture region (ie. UV coordinates) for each character on the bitmap. We could have done this while rendering the characters, but I prefer to keep it separate. The rendering code will use these regions to quickly select the correct character to render. Note that these do not use the padding values, they use to the entire cell size (which includes the padding already).
And that is that. Our font bitmap is created, and we have all the information required to render strings using it. Which brings us to...
The draw() Method
The draw() method has the following prototype:
public void draw(String text, float x, float y)
- text - the string to render.
- x, y - the (x,y) position to render the text at. Note that this is the bottom/left corner of the first character.
The code for the draw method is very short and simple:
float chrHeight = cellHeight * scaleY;
   float chrWidth = cellWidth * scaleX;
   int len = text.length();
   x += ( chrWidth / 2.0f ) - ( fontPadX * scaleX );
   y += ( chrHeight / 2.0f ) - ( fontPadY * scaleY );
   for ( int i = 0; i < len; i++ ) {
      int c = (int)text.charAt( i ) - CHAR_START;
      if ( c < 0 || c >= CHAR_CNT )
         c = CHAR_UNKNOWN;
      batch.drawSprite( x, y, chrWidth, chrHeight, charRgn[c] );
      x += ( charWidths[c] + spaceX ) * scaleX;
   }
This code renders the actual string. First we calculate our scaled cell width and height (we do this here since we may want to change scaling values between draw calls, so caching them won't work).
Next we calculate the length of the string (i.e. the number of characters it contains).
Then we setup the initial rendering position based on the given (x,y) coordinates. The reason for the weird looking code is that the SpriteBatch used renders sprites centered at (x,y) but we want text to originate at the bottom/left. What is important however is that we include the scale and font padding in this calculation, to properly position the first character.
Once we have our starting position we loop for each character in the string (i.e. the remaining code is executed for each character).
We extract an index for the character, based on it's ASCII code. Basically, we get the code of the character (the charAt() call) and then adjust it by our start character's ASCII code (since that would be at position 0 in our arrays). We also need to validate that the character exists within our defined range, and if not we use the "unknown" character instead.
The sprite batch then takes care of the drawing, given the (x,y) coordinate, the size to render, as well as the region on the texture for this character. Again, any rendering code can be used here, all that is important is to use these values for rendering.
Finally, we adjust the x-axis coordinate for the next character. To do this we advance by the current character's width (as calculated in load() , not the cell width) as well as by the currently set spaceX value. The resulting amount must also be scaled by the currently set scaleX value.
And that is that. Dynamic text rendering using font files... check !
Usage & Notes
Included in the source code is an example of using the class. See the TexampleRenderer.java file for full details (and comments).
First we need to create an instance and then load the font - this should be done at initialization time, for example in the onSurfaceCreated() method. We can create any number of font instances, as required. This code assumes that the context member has been set, and a font file called "Roboto-Regular.ttf" exists in the assets folder. The code looks as follows:
private GLText glText;

   public void onSurfaceCreated(GL10 gl, EGLConfig config) {
      glText = new GLText( gl, context.getAssets() );
      glText.load( "Roboto-Regular.ttf", 14, 2, 2 );
   }
Next, and this is very important, we must prepare for rendering by enabling 2D texturing, as well as alpha blending (and setting a blend function). Without these, rendering won't work (regardless of what method you use to render). The reason being that the font bitmap is a texture which requires alpha blending. This code would go in the onDrawFrame() method (or a similar location, where rendering is required). The code looks as follows (very basic example):
public void onDrawFrame(GL10 gl) {
      gl.glClear( GL10.GL_COLOR_BUFFER_BIT );
      gl.glMatrixMode( GL10.GL_MODELVIEW );
      gl.glLoadIdentity();

      gl.glEnable( GL10.GL_TEXTURE_2D );
      gl.glEnable( GL10.GL_BLEND );
      gl.glBlendFunc( GL10.GL_SRC_ALPHA, GL10.GL_ONE_MINUS_SRC_ALPHA );

      glText.begin( 1.0f, 1.0f, 1.0f, 1.0f );
      glText.draw( "Test String :)", 0, 0 );
      glText.draw( "Line 1", 50, 50 );
      glText.draw( "Line 2", 100, 100 );
      glText.end();

      glText.begin( 0.0f, 0.0f, 1.0f, 1.0f );
      glText.draw( "More Lines...", 50, 150 );
      glText.draw( "The End.", 50, 150 + glText.getCharHeight() );
      glText.end();

      gl.glDisable( GL10.GL_BLEND );
      gl.glDisable( GL10.GL_TEXTURE_2D );
   }
NOTE: the glText.begin() and glText.end() methods were not discussed, but basically they just start and end a batch rendering. They also provide an easy way to set the font color (using this rendering system, font color is set per batch, not per draw call).
Source Code
License: The code is released under the CC0 1.0 public domain license - in English it means that there are NO restrictions placed on usage of the code in any way.
Download the source code ( mirror ).
Download the source code (includes a copy of the CC0 1.0 public domain license).
Update (Sept 2012): The code has been ported to Scala by Alexey Aksenov . It can be found here .
Update (Jan 2013): A new version of the example which uses z-values for rendering (allowing placement in 3D space) was done by Jocelyn Demoy . It can be found here .
Update (Feb 2013): A new version of the example which uses OpenGL ES 2.0 for rendering is provided by Aleksandar Kodzhabashev . It can be found here .
The archive contains two folders:
"Texample" - full IntelliJ IDEA CE (my IDE of choice for Android development) project
"Texample (Code Only)" - just the 5 .java source files (create your own project, using your preferred IDE)
For this example I used a min-sdk=3 and a target-sdk=15 (i.e. Android 1.6 to Android 4.0), since the code should work on all android versions.
Here is a screenshot of the test application running:
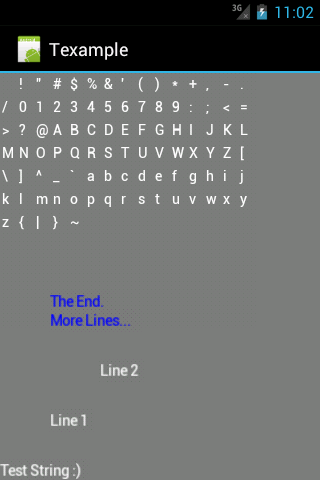
Hope this makes text rendering much easier for some people :) Feel free to leave comments and check out my free game flipt on the Android market for an example of the text rendering in action, or just for some fun!


 1147
1147


 被折叠的 条评论
为什么被折叠?
被折叠的 条评论
为什么被折叠?
 到【灌水乐园】发言


