


在用Zend Studio13.5创建Zend Framework 2.4.9时遇到的问题以及解决方案:
出现的错误:
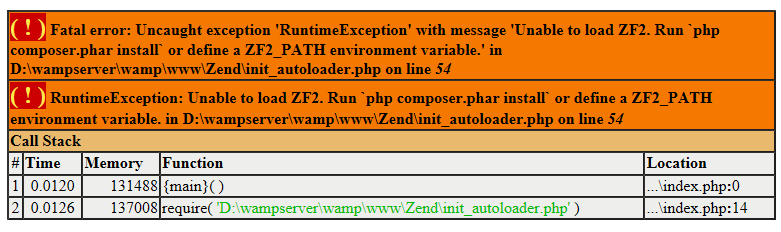
Fatal error: Uncaught exception ‘RuntimeException’ with message ‘Unable to load ZF2. Run php composer.phar install or define a ZF2_PATH environment variable.’ in D:\wampserver\wamp\www\Zend\init_autoloader.php on line 54
RuntimeException: Unable to load ZF2. Run php composer.phar install or define a ZF2_PATH environment variable. in D:\wampserver\wamp\www\Zend\init_autoloader.php on line 54
意思就是找不到ZF2这个框架,看一下 init_autoloader.php 文件,没有兴趣看原理的可以直接看后面的解决方案
<?php
/**
 * Zend Framework (http://framework.zend.com/)
 *
 * @link      http://github.com/zendframework/ZendSkeletonApplication for the canonical source repository
 * @copyright Copyright (c) 2005-2015 Zend Technologies USA Inc. (http://www.zend.com)
 * @license   http://framework.zend.com/license/new-bsd New BSD License
 */

/**
 * This autoloading setup is really more complicated than it needs to be for most
 * applications. The added complexity is simply to reduce the time it takes for
 * new developers to be productive with a fresh skeleton. It allows autoloading
 * to be correctly configured, regardless of the installation method and keeps
 * the use of composer completely optional. This setup should work fine for
 * most users, however, feel free to configure autoloading however you'd like.
 */

// Composer autoloading
if (file_exists('vendor/autoload.php')) {
    $loader = include 'vendor/autoload.php';
}

if (class_exists('Zend\Loader\AutoloaderFactory')) {
    return;
}

$zf2Path = false;

if (is_dir('vendor/ZF2/library')) {
    $zf2Path = 'vendor/ZF2/library';
} elseif (getenv('ZF2_PATH')) {      // Support for ZF2_PATH environment variable or git submodule
    $zf2Path = getenv('ZF2_PATH');
} elseif (get_cfg_var('zf2_path')) { // Support for zf2_path directive value
    $zf2Path = get_cfg_var('zf2_path');
}

if ($zf2Path) {
    if (isset($loader)) {
        $loader->add('Zend', $zf2Path);
        $loader->add('ZendXml', $zf2Path);
        // include $zf2Path . '/Zend/Loader/AutoloaderFactory.php';
    } else {
        include $zf2Path . '/Zend/Loader/AutoloaderFactory.php';
        Zend\Loader\AutoloaderFactory::factory(array(
            'Zend\Loader\StandardAutoloader' => array(
                'autoregister_zf' => true
            )
        ));
    }
}

if (!class_exists('Zend\Loader\AutoloaderFactory')) {
    throw new RuntimeException('Unable to load ZF2. Run `php composer.phar install` or define a ZF2_PATH environment variable.');
}可以从这里下载Zend Framework包,看一下下面的解压目录,
其实主要加载的是Zend与ZendXml这两个目录,简单说一下这个自动加载文件是怎样找这两个目录的
1、先尝试用Composer这个管理工具加载
具体文件在 vendor/autoload.php 和 vendor/composer/autoload_real.php 这两个文件中,前一个文件调用后一个文件执行库查找,后一个文件在 vendor/composer/autoload_namespaces.php , vendor/composer/autoload_psr4.php , vendor/composer/autoload_classmap.php 查找需要的配置文件,而后两个文件中放的就是 Zend 与 ZendXml 的工作路径
<?php

// autoload_psr4.php @generated by Composer

$vendorDir = dirname(dirname(__FILE__));
$baseDir = dirname($vendorDir);

return array(
    'Zend\\' => array($vendorDir . '/zendframework/zendframework/library/Zend'),
);
<?php

// autoload_namespaces.php @generated by Composer

$vendorDir = dirname(dirname(__FILE__));
$baseDir = dirname($vendorDir);

return array(
    'ZendXml' => array($vendorDir . '/zendframework/zendxml/library'),
);
然后你会发现这两个路径下啥东西也没有,所以你可以创建 Zend 和 ZendXml 两个路径,把相应的包导进去,一定要在 Zend Studio 就是在 /zendframework/zendxml/library 上右键 -> 新建(两个)文件夹 -> 导入(import),如果你在项目目录下创建,再怎么刷新也找不到创建的目录,感觉很不爽啊
2、用 getenv('ZF2_PATH') 加载
这个是要在 Apache 的 http.conf 文件夹配置的。比如说我的 wamp 的配置文件目录就是 D:\wampserver\wamp\bin\apache\apache2.4.18\conf\http.conf ,在后面加上下面这行代码,后面的目录替换成你自己的 library ,重启服务
SetEnv ZF2_PATH "E:\Zend\library"3、用 get_cfg_var('zf2_path') 加载
这个配置文件是 php.ini ,我的目录是 D:\wampserver\wamp\bin\apache\apache2.4.18\bin\php.ini ,加上下面一句,重启服务
zf2_path = "E:\Zend\library"对于后面两个,还要改一下 init_autoloader.php 文件:
if ($zf2Path) {
    if (isset($loader)) {
        $loader->add('Zend', $zf2Path);
        $loader->add('ZendXml', $zf2Path);
        include $zf2Path . '/Zend/Loader/AutoloaderFactory.php'; // add this
    } else {
        include $zf2Path . '/Zend/Loader/AutoloaderFactory.php';
        Zend\Loader\AutoloaderFactory::factory(array(
            'Zend\Loader\StandardAutoloader' => array(
                'autoregister_zf' => true
            )
        ));
    }
}即使你后来删除了环境变量还是会存在,如果不想用了,就设置成空,或者到php 手册中寻找方案。
解决方案
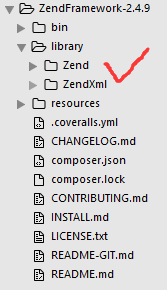
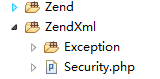
1、在 /zendframework/zendxml/library 下右键创建两个目录: Zend 和 ZendXml 后,再把下载好的库文件 ZendFramework-2.4.9\library 导入,最后/zendframework/zendxml/library 这个目录下大概是这个样子:
2、在 Apache 的 http.conf 文件(参考路径:D:\wampserver\wamp\bin\apache\apache2.4.18\conf\http.conf )中添加下面这行代码
SetEnv ZF2_PATH "E:\Zend\library"重启服务,修改init_autoloader.php 文件
if ($zf2Path) {
    if (isset($loader)) {
        $loader->add('Zend', $zf2Path);
        $loader->add('ZendXml', $zf2Path);
        include $zf2Path . '/Zend/Loader/AutoloaderFactory.php'; // add this
    } else {
        include $zf2Path . '/Zend/Loader/AutoloaderFactory.php';
        Zend\Loader\AutoloaderFactory::factory(array(
            'Zend\Loader\StandardAutoloader' => array(
                'autoregister_zf' => true
            )
        ));
    }
}
3、在 php 的 php.ini 文件(参考路径:D:\wampserver\wamp\bin\apache\apache2.4.18\bin\php.ini )中添加下面这行代码
zf2_path = "E:\Zend\library"重启服务,修改init_autoloader.php 文件
if ($zf2Path) {
    if (isset($loader)) {
        $loader->add('Zend', $zf2Path);
        $loader->add('ZendXml', $zf2Path);
        include $zf2Path . '/Zend/Loader/AutoloaderFactory.php'; // add this
    } else {
        include $zf2Path . '/Zend/Loader/AutoloaderFactory.php';
        Zend\Loader\AutoloaderFactory::factory(array(
            'Zend\Loader\StandardAutoloader' => array(
                'autoregister_zf' => true
            )
        ));
    }
}


 1525
1525


 被折叠的 条评论
为什么被折叠?
被折叠的 条评论
为什么被折叠?
 到【灌水乐园】发言


