


本篇文章主要从两方面来讲opencv中图像几何变换中有关缩放、旋转的原理和使用方法。其中重采样只讲最邻近插值法和双线性插值法,并附上相关代码。
目录
一、重采样的原理
1.1 最邻近插值法
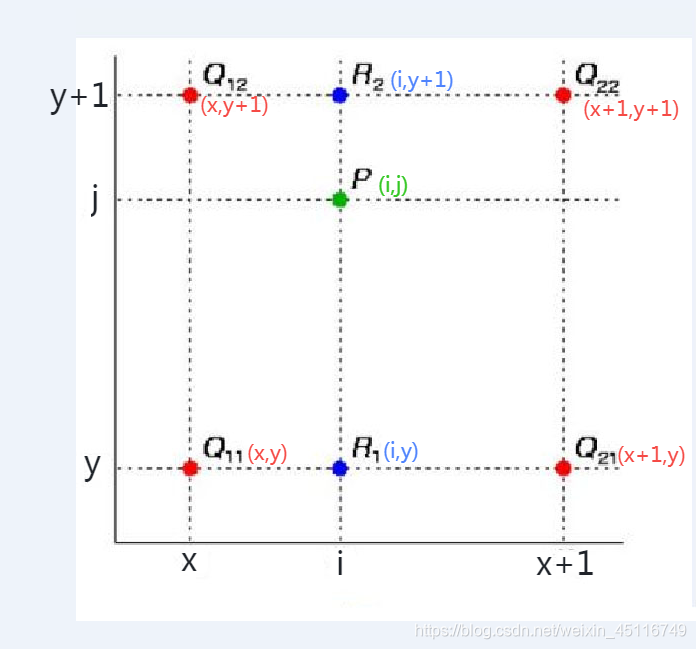
最邻近插值(The nearest interpolation)即是选取一个最靠近的像素为它的像素值,这是最简单的一种插值方法,不需要计算。在待求像素的四邻像素中,将距离待求像素最近的邻接像素灰度值赋予待求像素。设i+u, j+v (i, j为正整数, u, v为大于零小于1的小数, 下同)为待求象素坐标, 则待求象素灰度的值 f(i+u, j+v) 如下图所示:

如果(i+u, j+v)落在A区,即u<0.5, v<0.5,则将左上角象素的灰度值赋给待求象素,同理,落在B区则赋予右上角的象素灰度值,落在C区则赋予左下角象素的灰度值,落在D区则赋予右下角象素的灰度值。
特点:最邻近元法计算量较小,但可能会造成插值生成的图像灰度上的不连续,在灰度变化的地方可能出现明显的锯齿状。
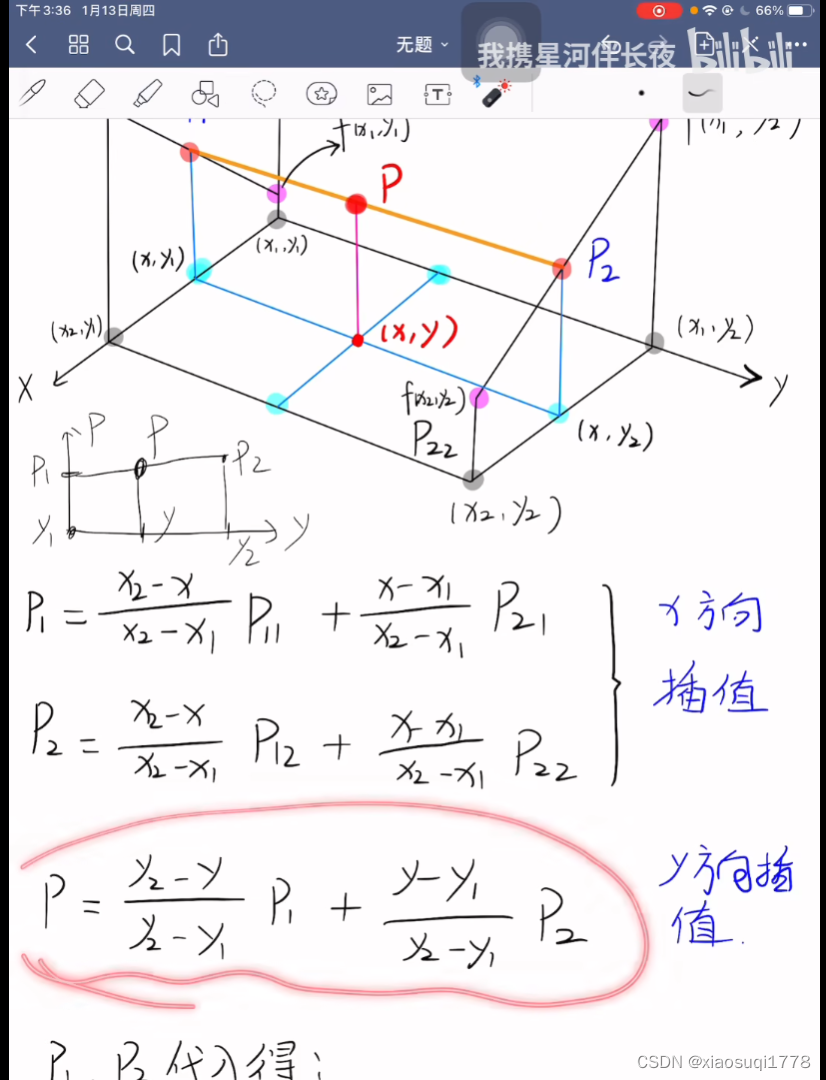
1.2 双线性插值法
更为直观的表达方式:
二、重采样函数实现
Vec3b inter_nearest(double row, double col, const Mat& img) {
	int r = int(row + 0.5);
	int c = int(col + 0.5);
	Vec3b vec3b;
	if (r < 0 || r >= img.rows || c < 0 || c >= img.cols)
		vec3b[0] = vec3b[1] = vec3b[2] = 0;
	else
		vec3b = img.at<Vec3b>(r, c);
	return vec3b;
}
//双线性插值
Vec3b inter_linear(double row, double col, const Mat& img) {
	Vec3b vec3b;//vector<uchar, 3>,即一个uchar类型、长度为3的vector向量。
	double x = col, y = row;
	int x1 = int(col), y1 = int(row);
	if (y1 < 0 || y1 >= img.rows || x1 < 0 || x1 >= img.cols) {
		vec3b[0] = vec3b[1] = vec3b[2] = 0;
		return vec3b;
	}
	int x2 = min(x1 + 1, img.cols - 1), y2 = min(y1 + 1, img.rows - 1);
	Vec3b q11 = img.at<Vec3b>(y1, x1);
	Vec3b q12 = img.at<Vec3b>(y2, x1);
	Vec3b q21 = img.at<Vec3b>(y1, x2);
	Vec3b q22 = img.at<Vec3b>(y2, x2);//at定位,返回3通道像素值
	for (int i = 0; i < 3; ++i) {//三通道BGR
		double r1 = (x2 - x) * q11[i] / (x2 - x1) + (x - x1) * q21[i] / (x2 - x1);
		double r2 = (x2 - x) * q12[i] / (x2 - x1) + (x - x1) * q22[i] / (x2 - x1);
		double p = (y2 - y) * r1 / (y2 - y1) + (y - y1) * r2 / (y2 - y1);
		vec3b[i] = saturate_cast<uchar>(p);//当运算完之后,结果为负,则转为0,结果超出255,则为255。
	}
	return vec3b;
}
以上是针对一个像素点的重采样,要针对整幅图像,用一个嵌套循环遍历即可。
至于ver3b是什么,可以参考:http://t.csdn.cn/QBwlD
三、仿射变换的部分代码实现及使用
对于一幅图像的旋转、缩放和重采样,我们可以使用opencv自带的函数。
利用opencv实现仿射变换一般会涉及到warpAffine和getRotationMatrix2D两个函数,其中warpAffine可以实现一些简单的重映射,而getRotationMatrix2D可以获得旋转矩阵。
我在这里重写了 getRotationMatrix2D()函数。
Mat getRound(Point2f center, double angle, double scale) {
	angle =angle* PI / 180.0;//转为弧度制
	Mat M(2, 3, CV_64F);//构造一个2*3的矩阵
	double* m = (double*)M.data;
	double alpha = cos(angle) * scale;
	double beta = sin(angle) * scale;
	//围绕图像的中心位置旋转的矩阵
	m[0] = alpha;
	m[1] = beta;
	m[2] = (1 - alpha) * center.x - beta * center.y;
	m[3] = -beta;
	m[4] = alpha;
	m[5] = beta * center.x + (1 - alpha) * center.y;
	return M;
}
使用方法:
double angle,size;
	cout << endl;
	cout << "请输入旋转角度(角度制)" << endl;
	cin >> angle;
	cout << "请输入缩放大小" << endl;
	cin >> size;
	float a = (height - 1) / 2.0;//获取图像中心坐标
	float b = (width - 1) / 2.0;
	Point2f center(a, b);
	Mat round_matix = getRound(center, angle, size);//获得旋转矩阵
	Mat round_img1, round_img2;
	warpAffine(ori_img, round_img1, round_matix, ori_img.size(),cv::INTER_NEAREST);
	string change_name1 = "Round_Img by Nearest";
	imshow(change_name1, round_img1);
	warpAffine(ori_img, round_img2, round_matix, ori_img.size(), cv::INTER_LINEAR);
	string change_name2 = "Round_Img by Linear";
	imshow(change_name2, round_img2);
四、.cpp文件具体代码实现
4.1 头文件和函数声明部分
#include <iostream>
#include <opencv2/opencv.hpp>
#include <opencv2/imgproc/imgproc.hpp>
#include <stdio.h>
#include <stdlib.h>
#include <cmath>
#include <string>

using namespace std;
using namespace cv;

#pragma comment(lib,"./opencv_world460d.lib")

const double PI = 3.1415926;

//旋转矩阵,可以实现放大和缩小
Mat getRound(Point2f center, double angle, double scale=1.0);

//插值算法
Mat Resize_by_nearest(Mat& ori_img, double Rewidth, double Relength);
Vec3b inter_nearest(double row, double col, const Mat& img);
Mat Resize_by_linear(Mat& ori_img, double Rewidth, double Relength);
Vec3b inter_linear(double row, double col, const Mat& img);
4.2 main函数部分
int main(int, char**) {
	//读取图像
	Mat ori_img = imread("D:\\HOME\\222.png");
	if (ori_img.empty())
	{
		fprintf(stderr, "Can not load image %s\n", ori_img);//????
		cerr << "ERROR!" << endl;
		waitKey(6000);
		exit(1);
	}
	waitKey(0);

	//------------------------------------------------
	//opencv自带函数配合自写旋转矩阵函数实现仿射变换
	//前文已列出,此处不再重复

	//***************************************************
	//***************************************************
	//自行编写函数实现任意比例缩放的插值算法
	Mat resize_img3, resize_img4;
	double rewidth, relength;
	cout << "请输入缩放大小(默认图片为400*300)" << endl;
	cin >> rewidth >> relength;

	resize_img3 = Resize_by_nearest(ori_img, rewidth,relength);
	string change_name3 = "Resize_Img by Nearest";
	namedWindow(change_name3, WINDOW_AUTOSIZE);
	imshow(change_name3, resize_img3);

	resize_img4 = Resize_by_linear(ori_img, rewidth, relength);
	string change_name4 = "Resize_Img by Linear";
	namedWindow(change_name4, WINDOW_AUTOSIZE);
	imshow(change_name4, resize_img4);

	string original_name = "Original_Img";
	namedWindow(original_name, WINDOW_AUTOSIZE); //新建一个标题为"Original_Image"的窗口,根据内容自适应大小
	imshow(original_name, ori_img); //将img显示在该窗口中

	waitKey(0);
	return 0;
}
4.3 函数实现部分
上面已有部分函数,这里不再重复列出
Mat Resize_by_nearest(Mat& ori_img, double Rewidth,double Relength )
{
	Mat aim_img(Relength, Rewidth, ori_img.type());//新建一个row*col的图像类对象
	double scale1 = Rewidth / (ori_img.cols * 1.0);
	double scale2 = Relength / (ori_img.rows * 1.0);
	for (int i = 0; i < Relength; i++)
	{
		double xx = i / scale1;//映射到原图像的坐标
		for (int j = 0; j < Rewidth; j++){
			double yy = j / scale2;
			aim_img.at<cv::Vec3b>(i, j) = inter_nearest(xx, yy, ori_img);
		}
	}
	return aim_img;
}
Mat Resize_by_linear(Mat& ori_img, double Rewidth, double Relength){
	Mat aim_img(Relength, Rewidth, ori_img.type());//新建一个row*col的图像类对象
	double scale1 = Rewidth / (ori_img.cols * 1.0);
	double scale2 = Relength / (ori_img.rows * 1.0);
	double scale = Rewidth / (ori_img.cols * 1.0);
	for (int i = 0; i < Relength; i++){
		double xx = i / scale;//映射到原图像的坐标
		for (int j = 0; j < Rewidth; j++){
			double yy = j / scale;
			aim_img.at<cv::Vec3b>(i, j) = inter_linear(xx, yy, ori_img);
		}
	}
	return aim_img;
}
五、 运行效果展示
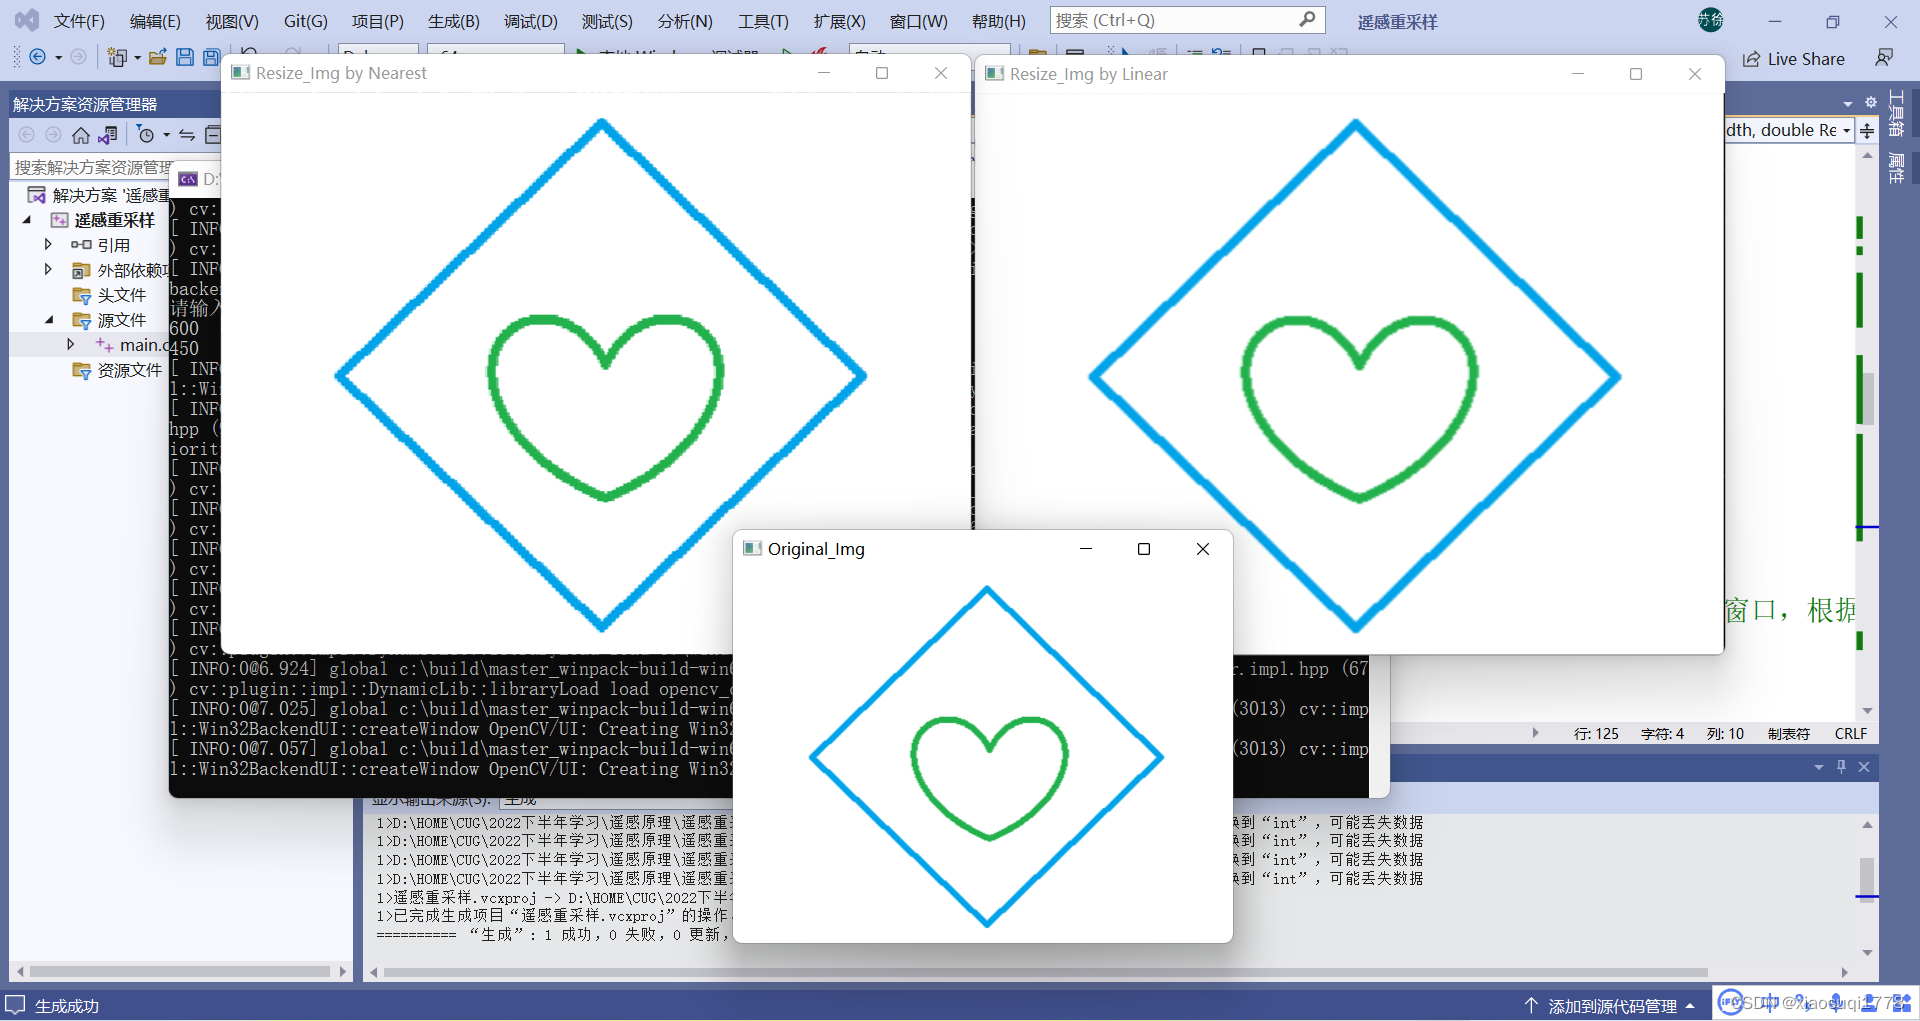
可以看到双线性插值法放大效果更好。


 4200
4200


 被折叠的 条评论
为什么被折叠?
被折叠的 条评论
为什么被折叠?
 到【灌水乐园】发言


