前言:在一篇中结合一个简单的示例介绍了UniversalImageLoader的使用步骤,由于UIL是一个相对比较复杂的框架,整体分析起来还是不好把控,仍旧是采用跟进代码调用的方式来分析它。
如果直接看到该篇文章的朋友建议先移步《UniversalImageLoader源码分析之一、开发入门》首先对UIL的使用有大致的了解以及了解这篇文章所要讲解的示例。
一、示例介绍
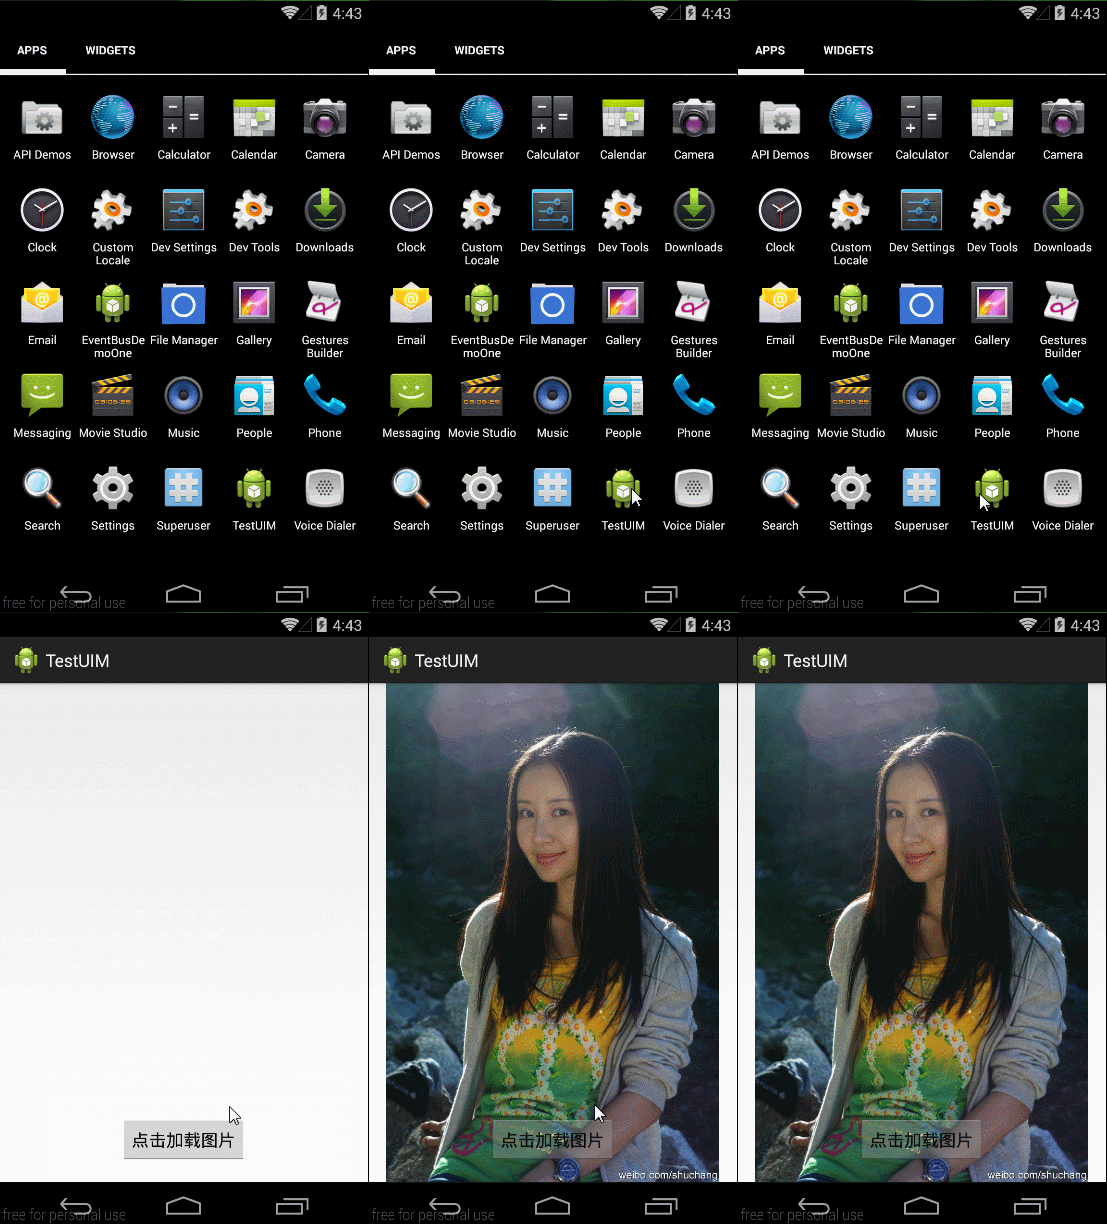
还是先把上篇中示例实现的效果展示下:
二、源码分析
接下来分析程序的调用过程:
在点击"点击加载图片"按钮的时候促发的操作是调用ImageLoader来加载图片:
	@Override
	public void onClick(View v) {
		String uri = "http://ww2.sinaimg.cn/large/49aaa343jw1dgwd0qvb4pj.jpg";
		ImageLoader.getInstance().displayImage(uri, iv, options);
}com.nostra13.universalimageloader.core.ImageLoader private volatile static ImageLoader instance;
/** Returns singleton class instance */
public static ImageLoader getInstance() {
if (instance == null) {
synchronized (ImageLoader.class) {
if (instance == null) {
instance = new ImageLoader();
}
}
}
return instance;
}
protected ImageLoader() {
}
在ImageLoader中定义了一堆重载的方法,这也为我们开发的时候提供了一个思想,如果你写的重载方法比较多由别人维护的代价就会越小。先看下在程序中调用的三个参数的方法:
com.nostra13.universalimageloader.core.ImageLoader public void displayImage(String uri, ImageAware imageAware, ImageLoadingListener listener) {
displayImage(uri, imageAware, null, listener, null);
}分析下这个方法:
第一个参数是:要展示到ImageView的图片的地址,可以是网络连接或者说sdcard的具体路径;
第二个参数是:要展示到的ImageView对象;
第三个参数是:图片编码和显示的option设置,这个是我们在调用该方法之前需要设置的,如果没有设置该options框架会采用默认的设置。
可见在三个参数的方法中是调用的五个参数的方法:
com.nostra13.universalimageloader.core.ImageLoader public void displayImage(String uri, ImageAware imageAware, DisplayImageOptions options,
ImageLoadingListener listener, ImageLoadingProgressListener progressListener) {
......
}分析下该方法的后两个参数:
第四个参数是:下载的监听;
第五个参数是:下载进度的监听;然后把该方法贴过来认真分析下:
	public void displayImage(String uri, ImageAware imageAware, DisplayImageOptions options,
			ImageLoadingListener listener, ImageLoadingProgressListener progressListener) {
		checkConfiguration();
		if (imageAware == null) {
			throw new IllegalArgumentException(ERROR_WRONG_ARGUMENTS);
		}
		if (listener == null) {
			listener = emptyListener;
		}
		if (options == null) {
			options = configuration.defaultDisplayImageOptions;
		}

		if (TextUtils.isEmpty(uri)) {
			engine.cancelDisplayTaskFor(imageAware);
			listener.onLoadingStarted(uri, imageAware.getWrappedView());
			if (options.shouldShowImageForEmptyUri()) {
				imageAware.setImageDrawable(options.getImageForEmptyUri(configuration.resources));
			} else {
				imageAware.setImageDrawable(null);
			}
			listener.onLoadingComplete(uri, imageAware.getWrappedView(), null);
			return;
		}
		......
	}
代码还是比较多的,先分析前半部分:
①. checkConfiguration(); 这里检测的是UniversalImageLoader的全局配置是否存在:
	private void checkConfiguration() {
		if (configuration == null) {
			throw new IllegalStateException(ERROR_NOT_INIT);
		}
}②. listener = emptyListener; 如果没有设置下载监听,框架会初始化一个空的监听,从名字也可以知道,该监听应该是空实现了ImageLoadingListener的所有方法,来看一下该类:
com.nostra13.universalimageloader.core.listener.SimpleImageLoadingListenerpublic class SimpleImageLoadingListener implements ImageLoadingListener {
@Override
public void onLoadingStarted(String imageUri, View view) {
// Empty implementation
}
@Override
public void onLoadingFailed(String imageUri, View view, FailReason failReason) {
// Empty implementation
}
@Override
public void onLoadingComplete(String imageUri, View view, Bitmap loadedImage) {
// Empty implementation
}
@Override
public void onLoadingCancelled(String imageUri, View view) {
// Empty implementation
}
}③. options = configuration.defaultDisplayImageOptions;如果没有设置下载图片的图片编码和显示的option,那么框架会帮我们初始化一个默认的编码展示配置,那么看下这个默认的配置是怎样的,向找到它还是要多跳转几次的。
com.nostra13.universalimageloader.core.listener.SimpleImageLoadingListener#displayImage() if (options == null) {
options = configuration.defaultDisplayImageOptions;
}跟踪到ImageLoaderConfiguration类中的成员变量:
com.nostra13.universalimageloader.core.ImageLoaderConfiguration final DisplayImageOptions defaultDisplayImageOptions;那么这个defaultDisplayImageOptions是何时被初始化的呢?
原来我们在UILApplication类中初始化的时候调用了一个Build(context), 方法。
com.kevin.testuim.UILApplication public static void initImageLoader(Context context) {
ImageLoaderConfiguration config = new ImageLoaderConfiguration.Builder(context)
......
.build();
// Initialize ImageLoader with configuration.
ImageLoader.getInstance().init(config);
}在该方法中我们做了一件重要的事情:
com.nostra13.universalimageloader.core.ImageLoaderConfiguration$Builder public ImageLoaderConfiguration build() {
initEmptyFieldsWithDefaultValues();
return new ImageLoaderConfiguration(this);
} private void initEmptyFieldsWithDefaultValues() {
......
if (defaultDisplayImageOptions == null) {
<strong>defaultDisplayImageOptions = DisplayImageOptions.createSimple();</strong>
}
}com.nostra13.universalimageloader.core.DisplayImageOptions public static DisplayImageOptions createSimple() {
return new Builder().build();
}com.nostra13.universalimageloader.core.DisplayImageOptions$Build public DisplayImageOptions build() {
return new DisplayImageOptions(this);
}可算找到了:
com.nostra13.universalimageloader.core.DisplayImageOptions. private DisplayImageOptions(Builder builder) {
imageResOnLoading = builder.imageResOnLoading;
imageResForEmptyUri = builder.imageResForEmptyUri;
imageResOnFail = builder.imageResOnFail;
imageOnLoading = builder.imageOnLoading;
imageForEmptyUri = builder.imageForEmptyUri;
imageOnFail = builder.imageOnFail;
resetViewBeforeLoading = builder.resetViewBeforeLoading;
cacheInMemory = builder.cacheInMemory;
cacheOnDisk = builder.cacheOnDisk;
imageScaleType = builder.imageScaleType;
decodingOptions = builder.decodingOptions;
delayBeforeLoading = builder.delayBeforeLoading;
considerExifParams = builder.considerExifParams;
extraForDownloader = builder.extraForDownloader;
preProcessor = builder.preProcessor;
postProcessor = builder.postProcessor;
displayer = builder.displayer;
handler = builder.handler;
isSyncLoading = builder.isSyncLoading;
}开看下这堆默认初始化的配置吧:
		private int imageResOnLoading = 0;
		private int imageResForEmptyUri = 0;
		private int imageResOnFail = 0;
		private Drawable imageOnLoading = null;
		private Drawable imageForEmptyUri = null;
		private Drawable imageOnFail = null;
		private boolean resetViewBeforeLoading = false;
		private boolean cacheInMemory = false;
		private boolean cacheOnDisk = false;
		private ImageScaleType imageScaleType = ImageScaleType.IN_SAMPLE_POWER_OF_2;
		private Options decodingOptions = new Options();
		private int delayBeforeLoading = 0;
		private boolean considerExifParams = false;
		private Object extraForDownloader = null;
		private BitmapProcessor preProcessor = null;
		private BitmapProcessor postProcessor = null;
		private BitmapDisplayer displayer = DefaultConfigurationFactory.createBitmapDisplayer();
		private Handler handler = null;
private boolean isSyncLoading = false;OK,默认的Options配置已经清楚了,接下来再回到displayImage()方法中的上半部分来,还有最后一段判断uri为空的操作:
com.nostra13.universalimageloader.core.ImageLoader if (TextUtils.isEmpty(uri)) {
engine.cancelDisplayTaskFor(imageAware);
listener.onLoadingStarted(uri, imageAware.getWrappedView());
if (options.shouldShowImageForEmptyUri()) {
imageAware.setImageDrawable(options.getImageForEmptyUri(configuration.resources));
} else {
imageAware.setImageDrawable(null);
}
listener.onLoadingComplete(uri, imageAware.getWrappedView(), null);
return;
}这里做了些取消的操作。
那么接下来看displayImage()的下半部分:
	public void displayImage(String uri, ImageAware imageAware, DisplayImageOptions options,
			ImageLoadingListener listener, ImageLoadingProgressListener progressListener) {
		......

		ImageSize targetSize = ImageSizeUtils.defineTargetSizeForView(imageAware, configuration.getMaxImageSize());
		String memoryCacheKey = MemoryCacheUtils.generateKey(uri, targetSize);
		engine.prepareDisplayTaskFor(imageAware, memoryCacheKey);

		listener.onLoadingStarted(uri, imageAware.getWrappedView());

		Bitmap bmp = configuration.memoryCache.get(memoryCacheKey);
		if (bmp != null && !bmp.isRecycled()) {
			L.d(LOG_LOAD_IMAGE_FROM_MEMORY_CACHE, memoryCacheKey);

			if (options.shouldPostProcess()) {
				ImageLoadingInfo imageLoadingInfo = new ImageLoadingInfo(uri, imageAware, targetSize, memoryCacheKey,
						options, listener, progressListener, engine.getLockForUri(uri));
				ProcessAndDisplayImageTask displayTask = new ProcessAndDisplayImageTask(engine, bmp, imageLoadingInfo,
						defineHandler(options));
				if (options.isSyncLoading()) {
					displayTask.run();
				} else {
					engine.submit(displayTask);
				}
			} else {
				options.getDisplayer().display(bmp, imageAware, LoadedFrom.MEMORY_CACHE);
				listener.onLoadingComplete(uri, imageAware.getWrappedView(), bmp);
			}
		} else {
			if (options.shouldShowImageOnLoading()) {
				imageAware.setImageDrawable(options.getImageOnLoading(configuration.resources));
			} else if (options.isResetViewBeforeLoading()) {
				imageAware.setImageDrawable(null);
			}

			ImageLoadingInfo imageLoadingInfo = new ImageLoadingInfo(uri, imageAware, targetSize, memoryCacheKey,
					options, listener, progressListener, engine.getLockForUri(uri));
			LoadAndDisplayImageTask displayTask = new LoadAndDisplayImageTask(engine, imageLoadingInfo,
					defineHandler(options));
			if (options.isSyncLoading()) {
				displayTask.run();
			} else {
				engine.submit(displayTask);
			}
		}
	}
④. ImageSize targetSize = ImageSizeUtils.defineTargetSizeForView(imageAware, configuration.getMaxImageSize());
这里获取了ImageView的宽度和高度。
com.nostra13.universalimageloader.utils.ImageSizeUtils public static ImageSize defineTargetSizeForView(ImageAware imageAware, ImageSize maxImageSize) {
int width = imageAware.getWidth();
if (width <= 0) width = maxImageSize.getWidth();
int height = imageAware.getHeight();
if (height <= 0) height = maxImageSize.getHeight();
return new ImageSize(width, height);
}生成在内存缓存中的Key, 可以推断在内存中是以Map的形式存放的,生成的key的形式为imageUri_widthxheight.
com.nostra13.universalimageloader.utils.MemoryCacheUtils public static String generateKey(String imageUri, ImageSize targetSize) {
return new StringBuilder(imageUri).append(URI_AND_SIZE_SEPARATOR).append(targetSize.getWidth()).append(WIDTH_AND_HEIGHT_SEPARATOR).append(targetSize.getHeight()).toString();
}⑥. engine.prepareDisplayTaskFor(imageAware, memoryCacheKey);
这里的engine是在ImageLoader初始化Init的时候创建的engine = new ImageLoaderEngine(configuration); ImageLoaderEngine类的主要作用通过名字也可以猜到大致意思,图片加载的业务类,接下来看下该类:
ImageLoader engine which responsible for display task execution.即imageloader引擎负责显示任务的执行。再回到prepareDisplayTaskFor()方法:
void com.nostra13.universalimageloader.core.ImageLoaderEngine#prepareDisplayTaskFor void prepareDisplayTaskFor(ImageAware imageAware, String memoryCacheKey) {
cacheKeysForImageAwares.put(imageAware.getId(), memoryCacheKey);
}该方法内只有一个向Map中存放ImageView的id,以及上一步中计算出来的图片在内存缓存中的名字。OK,这里就是把要显示图片的控件id作为key, 图片在内存中的名字作为value存放到cacheKeysForImageAwares的Map中。那么来验证下分析的是否正确:
	private final Map<Integer, String> cacheKeysForImageAwares = Collections
			.synchronizedMap(new HashMap<Integer, String>());
嗯,catchKeysForImageAwares的却是一个HashMap,并且范型为<Integer,String>;
⑦. listener.onLoadingStarted(uri, imageAware.getWrappedView());即执行监听回调的开始加载图片的接口回调。
⑧. Bitmap bmp = configuration.memoryCache.get(memoryCacheKey); 通过上一篇的SmartImageView的加载图片方式,这里也可以知道在访问网络之前肯定是首先读取缓存中的图片,没错这里就是首先读取缓存中的图片。也可以知道这里应该是整个框架的核心!
首先需要解决的第一个问题就是configguration.memoryCache这个memoryCache是MemoryCache接口的哪个子类实现的?
因为在程序之中我们没有去创建该内存缓存,那么肯定是框架创建的一个默认的了,那么问题又来了,这是框架什么时候偷偷创建的呢?是不是想到了③中去寻找Options的默认配置一样呢,没错就是在在UILApplication中配置全局的时候调用的build()方法中初始化的。
com.nostra13.universalimageloader.core.ImageLoaderConfiguration public ImageLoaderConfiguration build() {
initEmptyFieldsWithDefaultValues();
return new ImageLoaderConfiguration(this);
}在这里调用了初始化空的默认值:
		private void initEmptyFieldsWit hDefaultValues() {
			......
			if (diskCache == null) {
				if (diskCacheFileNameGenerator == null) {
					diskCacheFileNameGenerator = DefaultConfigurationFactory.createFileNameGenerator();
				}
				diskCache = DefaultConfigurationFactory
						.createDiskCache(context, diskCacheFileNameGenerator, diskCacheSize, diskCacheFileCount);
			}
			if (memoryCache == null) {
				memoryCache = DefaultConfigurationFactory.createMemoryCache(memoryCacheSize);
			}
			......
		}
}com.nostra13.universalimageloader.core.DefaultConfigurationFactory.createMemoryCache public static MemoryCache createMemoryCache(int memoryCacheSize) {
if (memoryCacheSize == 0) {
memoryCacheSize = (int) (Runtime.getRuntime().maxMemory() / 8);
}
return new LruMemoryCache(memoryCacheSize);
}由于传递的为默认的参数0,所以这里初始化的内存缓存的大小为当前应用程序可用内存的八分之一,并且也找到了默认的初始化内存缓存为LruMemoryCache,在LruMemoryCache中的构造函数创建了LinkedHashMap<String,Bitmap>用于存储内存缓存。
	public LruMemoryCache(int maxSize) {
		if (maxSize <= 0) {
			throw new IllegalArgumentException("maxSize <= 0");
		}
		this.maxSize = maxSize;
		this.map = new LinkedHashMap<String, Bitmap>(0, 0.75f, true);
}// 第一个参数是hash映射的初始大小
// 第二个参数0.75是加载因子为经验值
// 第三个参数true则表示按照最近访问量的高低排序,false则表示按照插入顺序排序
具体的缓存设计将开单独分析,这里不做展开。
未完待续。。。。。。
三、时序图
通过时序图的方式把程序调用的过程再分析下:
四、总结
通过以上的分析,对UniversalImageLoader有了大致的了解,其中的核心代码也在跟进的时候分析了,尽管不太深刻。。。。。。
五、下载传送
六、相关文章


 277
277


 被折叠的 条评论
为什么被折叠?


