


一、读取300W数据集中测试数据集pts标注文件,在原图中显示68个人脸关键点。
https://ibug.doc.ic.ac.uk/resources/facial-point-annotations/
#include <iostream>
#include <fstream>
#include <opencv2/opencv.hpp>
using namespace cv;
using namespace std;


int main()
{
	string Imagedir = "E:/人脸关键点检测/data/300W/afw/134212_1.jpg";
	Mat image = imread(Imagedir, -1);    //读取原图
	vector<Point2f> points;
	Point2f point;

	ifstream input;
	input.open("E:/人脸关键点检测/data/300W/afw/134212_1.pts");

	string s;
	for (int k = 0; k < 3; k++) {    //前三行
		getline(input, s);
		//cout << s << endl;
	}


	for (int i = 0; i < 68; i++) {
		input >> point.x >> point.y;
		//cout << point.x << " " << point.y << endl;
		points.push_back(point);
	}
	input.close();

	for (int i = 0; i < 68; i++) {
		//cout << points[i].x << "  " << points[i].y << endl;
		circle(image, points[i], 3, Scalar(0, 0, 255), CV_FILLED, CV_AA);
	}

	imshow("landmark", image);

	waitKey();
	return 0;
}
效果如下图所示:

二、将300W数据集中68个关键点转变为5个关键点,有三种方法。
方法一:
左眼中心:37,40中心点;
右眼中心:43,46中心点;
鼻尖: 31
左嘴角:49;
右嘴角:55。
方法二:
左眼中心:38,39,41,42中心点;
右眼中心:44,45,47,48中心点;
鼻尖: 31
左嘴角:49;
右嘴角:55。
方法三:
左眼中心:37,38,39,40,41,42中心点;
右眼中心:43,44,45,46,47,48中心点;
鼻尖: 31
左嘴角:49;
右嘴角:55。
300W测试数据集地址:
https://ibug.doc.ic.ac.uk/resources/facial-point-annotations/

试验发现:通过随机抽象比对发现: 方法二效果更好。
#include <iostream>
#include <fstream>
#include <opencv2/opencv.hpp>
using namespace cv;
using namespace std;


int main()
{
	ifstream infile;
	string image_name;
	string Imagedir = "E:/face_alignment/data/300W/ibug/";
	string Input_ptsdir = "E:/face_alignment/data/300W/ibug/";
	string Output_ptsdir = "E:/face_alignment/data/300W/68_5points/ibug/";
	infile.open("E:/face_alignment/data/300W/pts_name/ibug.txt");
	while (infile)
	{
		infile >> image_name;
		string image_funame = image_name + ".jpg";
		cout << image_funame << endl;

		string Imagedir_name = Imagedir + image_funame;
		Mat image = imread(Imagedir_name, -1);    //读取原图
		vector<Point2f> points;
		vector<Point2f> points_5;
		Point2f point;
		points_5.resize(5);

		//读取和写入pts文件
		string Inputdir_name = Input_ptsdir + image_name + ".pts";
		string Outputdir_name = Output_ptsdir + image_name + ".pts";
		ifstream input;
		input.open(Inputdir_name);
		ofstream output;
		output.open(Outputdir_name);

		string s;
		getline(input, s);    //前三行
		output << s << endl;
		getline(input, s);
		output << "n_points:  5" << endl;
		getline(input, s);
		output << s << endl;


		for (int i = 0; i < 68; i++) {    //读取68个关键点
			input >> point.x >> point.y;
			//cout << point.x << " " << point.y << endl;
			points.push_back(point);
		}
		string end;
		input >> end;
		input.close();

		method 1
		//points_5[0].x = (points[36].x + points[39].x) / 2.0f;
		//points_5[0].y = (points[36].y + points[39].y) / 2.0f;
		//points_5[1].x = (points[42].x + points[46].x) / 2.0f;
		//points_5[1].y = (points[42].y + points[46].y) / 2.0f;
		//points_5[2] = points[30];
		//points_5[3] = points[48];
		//points_5[4] = points[54];

		//method 2, 取5个新的人脸关键点
		points_5[0].x = (points[37].x + points[38].x + points[40].x + points[41].x) / 4.0f;
		points_5[0].y = (points[37].y + points[38].y + points[40].y + points[41].y) / 4.0f;
		points_5[1].x = (points[43].x + points[44].x + points[46].x + points[47].x) / 4.0f;
		points_5[1].y = (points[43].y + points[44].y + points[46].y + points[47].y) / 4.0f;
		points_5[2] = points[30];
		points_5[3] = points[48];
		points_5[4] = points[54];

		method 3
		//points_5[0].x = (points[36].x + points[37].x + points[38].x + points[39].x + points

[40].x + points[41].x) / 6.0f;
		//points_5[0].y = (points[36].y + points[37].y + points[38].y + points[39].y + points

[40].y + points[41].y) / 6.0f;
		//points_5[1].x = (points[42].x + points[43].x + points[44].x + points[45].x + points

[46].x + points[47].x) / 6.0f;
		//points_5[1].y = (points[42].y + points[43].y + points[44].y + points[45].y + points

[46].y + points[47].y) / 6.0f;
		//points_5[2] = points[30];
		//points_5[3] = points[48];
		//points_5[4] = points[54];


		//for (int i = 0; i < 68; i++) {
		//	cout << points[i].x << "  " << points[i].y << endl;
		//	circle(image, points[i], 3, Scalar(0, 0, 255), CV_FILLED, CV_AA);
		//}

		//在原图中显示5个人脸关键点,并将5个关键点写入新的pts文件中
		for (int i = 0; i < 5; i++)
		{
			//cout << points_5[i].x << "  " << points_5[i] << endl;
			output << points_5[i].x << " " << points_5[i].y << endl;
			circle(image, points_5[i], 3, Scalar(0, 0, 255), CV_FILLED, CV_AA);
		}

		output << end << endl;
		output.close();
		//imshow("landmark", image);
		//waitKey();

	}

	return 0;
}
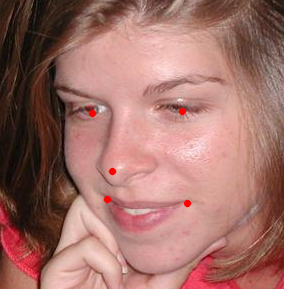
三、批量在原图中显示取出的5个关键点
#include <iostream>
#include <fstream>
#include <opencv2/opencv.hpp>
using namespace cv;
using namespace std;


int main()
{
	ifstream infile;
	string image_name;
	string Imagedir = "E:/face_alignment/data/300W_test_5points/ibug/";
	string Input_ptsdir = "E:/face_alignment/data/300W_test_5points/ibug/";
	infile.open("E:/face_alignment/data/300W_test_5points/ibug.txt");
	while (infile)
	{
		infile >> image_name;
		string image_funame = image_name + ".jpg";
		cout << image_funame << endl;

		string Imagedir_name = Imagedir + image_funame;
		Mat image = imread(Imagedir_name, -1);    //读取原图
		vector<Point2f> points;
		vector<Point2f> points_5;
		Point2f point;
		points_5.resize(5);

		string Inputdir_name = Input_ptsdir + image_name + ".pts";
		ifstream input;
		input.open(Inputdir_name);

		string s;
		getline(input, s);    //前三行
		getline(input, s);
		getline(input, s);

		for (int i = 0; i < 5; i++) {    //读取68个关键点
			input >> point.x >> point.y;
			//cout << point.x << " " << point.y << endl;
			points.push_back(point);
		}
		input.close();

		for (int i = 0; i < 5; i++) {
			cout << points[i].x << "  " << points[i].y << endl;
			circle(image, points[i], 3, Scalar(0, 0, 255), CV_FILLED, CV_AA);
		}

		imshow("landmark", image);
		waitKey();

	}

	return 0;
}
效果如下图所示:


 9524
9524

 被折叠的 条评论
为什么被折叠?
被折叠的 条评论
为什么被折叠?
 到【灌水乐园】发言


