


安装openvpn
[root@ c7-42 ~]# yum -y install epel-re*
[root@ c7-42 ~]# yum install -y openvpn
[root@ c7-42 ~]# rpm -qa |grep openvpn |cut -c 1-13
openvpn-2.4.8
安装open-rsa
[root@ c7-42 ~]# rz		#上传master,没有包则下载
[root@ c7-42 ~]# wget https://github.com/OpenVPN/easy-rsa/archive/master.zip
[root@ c7-42 ~]# unzip master.zip
[root@ c7-42 ~]# mv easy-rsa-master/ easy-rsa
[root@ c7-42 ~]# cp -R easy-rsa/ /etc/openvpn/
[root@ c7-42 ~]# ls /etc/openvpn/
client  easy-rsa  server
配置vars文件
[root@ c7-42 ~]# cd /etc/openvpn/easy-rsa/easyrsa3/
[root@ c7-42 easyrsa3]# cp vars.example vars
[root@ c7-42 easyrsa3]# cat >>vars<< EOF
> set_var EASYRSA_REQ_COUNTRY      "CN"
> set_var EASYRSA_REQ_PROVINCE     "BJ"
> set_var EASYRSA_REQ_CITY         "Beijing"
> set_var EASYRSA_REQ_ORG          "Benet"
> set_var EASYRSA_REQ_EMALL        "2382415876@qq.com"
> set_var EASYRSA_REQ_OU           "dynamic"
> EOF
set_var EASYRSA_REQ_COUNTRY "xxx" #国家
set_var EASYRSA_REQ_PROVINCE "xxx" #地区
set_var EASYRSA_REQ_CITY "xxx" #城市
set_var EASYRSA_REQ_ORG "xxx" #组织
set_var EASYRSA_REQ_EMAIL "xxx" #邮箱
set_var EASYRSA_REQ_OU  "xxx" 拥有者
创建server证书
初始化目录
[root@ c7-42 easyrsa3]# ./easyrsa init-pki

Note: using Easy-RSA configuration from: /etc/openvpn/easy-rsa/easyrsa3/vars

init-pki complete; you may now create a CA or requests.
Your newly created PKI dir is: /etc/openvpn/easy-rsa/easyrsa3/pki
创建CA证书
[root@ c7-42 easyrsa3]# ./easyrsa build-ca

Note: using Easy-RSA configuration from: /etc/openvpn/easy-rsa/easyrsa3/vars
Using SSL: openssl OpenSSL 1.0.2k-fips  26 Jan 2017

Enter New CA Key Passphrase:123456			#CA密码
Re-Enter New CA Key Passphrase:123456		#确认密码
Generating RSA private key, 2048 bit long modulus
.....+++
...........................................................................+++
e is 65537 (0x10001)
You are about to be asked to enter information that will be incorporated
into your certificate request.
What you are about to enter is what is called a Distinguished Name or a DN.
There are quite a few fields but you can leave some blank
For some fields there will be a default value,
If you enter '.', the field will be left blank.
-----
Common Name (eg: your user, host, or server name) [Easy-RSA CA]:dynamic		#CA名字

CA creation complete and you may now import and sign cert requests.
Your new CA certificate file for publishing is at:
/etc/openvpn/easy-rsa/easyrsa3/pki/ca.crt
创建服务器端证书
[root@ c7-42 easyrsa3]# ./easyrsa gen-req server nopass

Note: using Easy-RSA configuration from: /etc/openvpn/easy-rsa/easyrsa3/vars
Using SSL: openssl OpenSSL 1.0.2k-fips  26 Jan 2017
Generating a 2048 bit RSA private key
......................................+++
...........................+++
writing new private key to '/etc/openvpn/easy-rsa/easyrsa3/pki/easy-rsa-3239.zcSYGr/tmp.BCbxwC'
-----
You are about to be asked to enter information that will be incorporated
into your certificate request.
What you are about to enter is what is called a Distinguished Name or a DN.
There are quite a few fields but you can leave some blank
For some fields there will be a default value,
If you enter '.', the field will be left blank.
-----
Common Name (eg: your user, host, or server name) [server]:dynamic-server		#为server起名

Keypair and certificate request completed. Your files are:
req: /etc/openvpn/easy-rsa/easyrsa3/pki/reqs/server.req
key: /etc/openvpn/easy-rsa/easyrsa3/pki/private/server.key
签约服务端证书
[root@ c7-42 easyrsa3]# ./easyrsa sign server server

Note: using Easy-RSA configuration from: /etc/openvpn/easy-rsa/easyrsa3/vars
Using SSL: openssl OpenSSL 1.0.2k-fips  26 Jan 2017


You are about to sign the following certificate.
Please check over the details shown below for accuracy. Note that this request
has not been cryptographically verified. Please be sure it came from a trusted
source or that you have verified the request checksum with the sender.

Request subject, to be signed as a server certificate for 825 days:

subject=
    commonName                = dynamic-server


Type the word 'yes' to continue, or any other input to abort.
  Confirm request details: yes		#输入yes
Using configuration from /etc/openvpn/easy-rsa/easyrsa3/pki/easy-rsa-3272.RSgz33/tmp.igxBBz
Enter pass phrase for /etc/openvpn/easy-rsa/easyrsa3/pki/private/ca.key:123456		#输入之前CA密码
Check that the request matches the signature
Signature ok
The Subject's Distinguished Name is as follows
commonName            :ASN.1 12:'dynamic-server'
Certificate is to be certified until Aug  8 07:43:07 2022 GMT (825 days)

Write out database with 1 new entries
Data Base Updated

Certificate created at: /etc/openvpn/easy-rsa/easyrsa3/pki/issued/server.crt
创建数据穿越秘钥
[root@ c7-42 easyrsa3]# ./easyrsa gen-dh

Note: using Easy-RSA configuration from: /etc/openvpn/easy-rsa/easyrsa3/vars
Using SSL: openssl OpenSSL 1.0.2k-fips  26 Jan 2017
Generating DH parameters, 2048 bit long safe prime, generator 2
This is going to take a long time
............+.....................+.....................+..........................+..............
DH parameters of size 2048 created at /etc/openvpn/easy-rsa/easyrsa3/pki/dh.pem		#要等到这一步
创建client证书
初始化目录
[root@ c7-42 easyrsa3]# cd /etc/openvpn/client/
[root@ c7-42 client]# cp -R /root/easy-rsa/ client
[root@ c7-42 client]# cd client/easyrsa3/
[root@ c7-42 easyrsa3]# ls
easyrsa  openssl-easyrsa.cnf  vars.example  x509-types
[root@ c7-42 easyrsa3]# ./easyrsa init-pki

init-pki complete; you may now create a CA or requests.
Your newly created PKI dir is: /etc/openvpn/client/client/easyrsa3/pki
创建客户端CA证书
[root@ c7-42 easyrsa3]# ./easyrsa build-ca
Using SSL: openssl OpenSSL 1.0.2k-fips  26 Jan 2017

Enter New CA Key Passphrase:123456		#客户端CA密码
Re-Enter New CA Key Passphrase:123456  #再次输入客户端CA密码
Generating RSA private key, 2048 bit long modulus
.........................................................................................................................+++
.................................................+++
e is 65537 (0x10001)
You are about to be asked to enter information that will be incorporated
into your certificate request.
What you are about to enter is what is called a Distinguished Name or a DN.
There are quite a few fields but you can leave some blank
For some fields there will be a default value,
If you enter '.', the field will be left blank.
-----
Common Name (eg: your user, host, or server name) [Easy-RSA CA]:dynamic	#客户端名称

CA creation complete and you may now import and sign cert requests.
Your new CA certificate file for publishing is at:
/etc/openvpn/client/client/easyrsa3/pki/ca.crt
创建客户端证书
[root@ c7-42 easyrsa3]# ./easyrsa gen-req client1
Using SSL: openssl OpenSSL 1.0.2k-fips  26 Jan 2017
Generating a 2048 bit RSA private key
........................+++
................+++
writing new private key to '/etc/openvpn/client/client/easyrsa3/pki/easy-rsa-3451.gICjic/tmp.bvbaxC'
Enter PEM pass phrase:123456		#输入客户端CA密码,也是将来登陆VPN客户密码
Verifying - Enter PEM pass phrase:	#再输入一次
-----
You are about to be asked to enter information that will be incorporated
into your certificate request.
What you are about to enter is what is called a Distinguished Name or a DN.
There are quite a few fields but you can leave some blank
For some fields there will be a default value,
If you enter '.', the field will be left blank.
-----
Common Name (eg: your user, host, or server name) [client1]:dynamic-client1		#起名字

Keypair and certificate request completed. Your files are:
req: /etc/openvpn/client/client/easyrsa3/pki/reqs/client1.req
key: /etc/openvpn/client/client/easyrsa3/pki/private/client1.key
导入客户端证书
[root@ c7-42 easyrsa3]# cd /etc/openvpn/easy-rsa/easyrsa3/
[root@ c7-42 easyrsa3]# ./easyrsa import-req /etc/openvpn/client/client/easyrsa3/pki/reqs/client1.req client1

Note: using Easy-RSA configuration from: /etc/openvpn/easy-rsa/easyrsa3/vars
Using SSL: openssl OpenSSL 1.0.2k-fips  26 Jan 2017

The request has been successfully imported with a short name of: client1
You may now use this name to perform signing operations on this request.
[root@ c7-42 easyrsa3]# ls /etc/openvpn/client/client/easyrsa3/pki/reqs/
client1.req	#查看一下
签约客户端证书
[root@ c7-42 easyrsa3]# ./easyrsa sign client client1

Note: using Easy-RSA configuration from: /etc/openvpn/easy-rsa/easyrsa3/vars
Using SSL: openssl OpenSSL 1.0.2k-fips  26 Jan 2017


You are about to sign the following certificate.
Please check over the details shown below for accuracy. Note that this request
has not been cryptographically verified. Please be sure it came from a trusted
source or that you have verified the request checksum with the sender.

Request subject, to be signed as a client certificate for 825 days:

subject=
    commonName                = dynamic-client1


Type the word 'yes' to continue, or any other input to abort.
  Confirm request details: yes	#输入yes
Using configuration from /etc/openvpn/easy-rsa/easyrsa3/pki/easy-rsa-3506.VYBOKh/tmp.Le1lYR
Enter pass phrase for /etc/openvpn/easy-rsa/easyrsa3/pki/private/ca.key:123456		#输入登陆密码
Check that the request matches the signature
Signature ok
The Subject's Distinguished Name is as follows
commonName            :ASN.1 12:'dynamic-client1'
Certificate is to be certified until Aug  8 07:50:48 2022 GMT (825 days)

Write out database with 1 new entries
Data Base Updated

Certificate created at: /etc/openvpn/easy-rsa/easyrsa3/pki/issued/client1.crt
配置openvpn
拷贝证书文件
[root@ c7-42 easyrsa3]# cd /etc/openvpn/easy-rsa/easyrsa3/pki/
[root@ c7-42 pki]# cp ca.crt /etc/openvpn/server/
[root@ c7-42 pki]# cp private/server.key /etc/openvpn/server/
[root@ c7-42 pki]# cp issued/server.crt /etc/openvpn/server/
[root@ c7-42 pki]# cp dh.pem /etc/openvpn/server/
[root@ c7-42 pki]# cp ca.crt /etc/openvpn/client/
[root@ c7-42 pki]# cp issued/client1.crt /etc/openvpn/client/
[root@ c7-42 pki]# cp /etc/openvpn/client/client/easyrsa3/pki/private/client1.key /etc/openvpn/client/
[root@ c7-42 pki]#  ls /etc/openvpn/server
ca.crt  dh.pem  server.crt  server.key
[root@ c7-42 pki]# ls /etc/openvpn/client/
ca.crt  client  client1.crt  client1.key
配置server.conf
超链接配置文件server.conf
[root@ c7-42 pki]#  cp /usr/share/doc/openvpn-2.4.8/sample/sample-config-files/server.conf /etc/openvpn
[root@ c7-42 pki]# cd /etc/openvpn
[root@ c7-42 openvpn]# cp server.conf server.conf.bak
[root@ c7-42 openvpn]# egrep -v "^#|^;|^$" server.conf.bak > server.conf
[root@ c7-42 openvpn]# vim server.conf
local 0.0.0.0	#填自己openvpn服务器的ip,默认侦听服务器上的所有ip
port 55555		#侦听端口,默认1194
proto tcp		#端口协议,默认udp,也可以开启tcp方便映射转发
dev tun			#默认创建一个路由ip隧道
ca /etc/openvpn/server/ca.crt			#根证书
cert /etc/openvpn/server/server.crt		#证书
key /etc/openvpn/server/server.key		#私钥文件/重要保密
dh /etc/openvpn/server/dh.pem
server 10.8.0.0 255.255.255.0			#设置服务器端模式,并提供一个vpn子网,以便从中为客户端分配IP地址
push "route 172.16.0.0 255.255.255.0"	#推送路由信息到客户端,以允许客户端能够连接到服务器背后的其他私有子网
ifconfig-pool-persist ipp.txt			#指定用于记录客户端和虚拟ip地址的关联关系的文件。
keepalive 10 120	#keepalive指令将导致类似于ping命令被来回发送,以便于服务器端和客户端知道对方何时被关闭
persist-key
persist-tun
status openvpn-status.log		#状态日志
verb 3		#日志级别0-9,等级越高,记录越多
comp-lzo		#在VPN连接上启用压缩,如果你在此处启用了该指令,那么也应该在每个客户端配置文件中启用它
client-to-client		#允许客户端之间互通
log /var/log/openvpn.log
配置firewalld转发并启动openvpn
[root@ c7-42 openvpn]# systemctl stop firewalld
[root@ c7-42 openvpn]# echo "net.ipv4.ip_forward = 1" >> /etc/sysctl.d/99-sysctl.conf
[root@ c7-42 openvpn]# sysctl -p
net.ipv4.ip_forward = 1
[root@ c7-42 openvpn]# openvpn --daemon --config /etc/openvpn/server.conf
[root@ c7-42 openvpn]# echo "openvpn --daemon --config /etc/openvpn/server.conf">>/etc/rc.d/rc.local
[root@ c7-42 openvpn]#  ll /etc/rc.d/rc.local
-rw-r--r--. 1 root root 524 May  5 16:00 /etc/rc.d/rc.local
[root@ c7-42 openvpn]# chmod +x /etc/rc.d/rc.local
[root@ c7-42 openvpn]# ll /etc/rc.d/rc.local
-rwxr-xr-x. 1 root root 524 May  5 16:00 /etc/rc.d/rc.local
[root@ c7-42 openvpn]# ps -ef | grep openvpn
root       3622      1  0 15:59 ?        00:00:00 openvpn --daemon --config /etc/openvpn/server.conf
root       3642   3005  0 16:01 pts/1    00:00:00 grep --color=auto openvpn
[root@ c7-42 openvpn]# ss -anpt| grep 55555
LISTEN     0      32           *:55555                    *:*                   users:(("openvpn",pid=3622,fd=6))
开始配置openvpn客户端
匹配自己的电脑系统,然后右击管理员运行


看好选项


弹出这个就关闭就行

[root@ c7-42 ~]# cd /etc/openvpn/client/
[root@ c7-42 client]# sz ca.crt client1.crt client1.key


拷贝sample-config中client到config目录


编辑config文件中client,删除里面的所有
修改为这样子

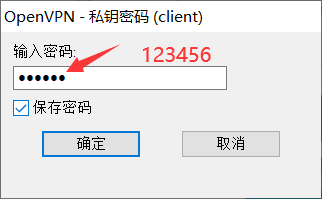
客户端连接测试

双击打开openvpn,会出现下面这个小电脑的标志,目前是未连接的状态


可以打开cmd尝试ping第二块网卡
C:\Users\Administrator>ping -n 1 172.16.0.42

正在 Ping 172.16.0.42 具有 32 字节的数据:
来自 172.16.0.42 的回复: 字节=32 时间<1ms TTL=64

172.16.0.42 的 Ping 统计信息:
    数据包: 已发送 = 1,已接收 = 1,丢失 = 0 (0% 丢失),
往返行程的估计时间(以毫秒为单位):
    最短 = 0ms,最长 = 0ms,平均 = 0ms


 176
176


 被折叠的 条评论
为什么被折叠?
被折叠的 条评论
为什么被折叠?
 到【灌水乐园】发言


