


文章目录
MHA简介:
MHA(Master High Availability)目前在MySQL高可用方面是一个相对成熟的解决方案,它由日本DeNA公司youshimaton(现就职于Facebook公司)开发,是一套优秀的作为MySQL高可用性环境下故障切换和主从提升的高可用软件。在MySQL故障切换过程中,MHA能做到在0~30秒之内自动完成数据库的故障切换操作,并且在进行故障切换的过程中,MHA能在最大程度上保证数据的一致性,以达到真正意义上的高可用。
该软件由两部分组成:MHA Manager(管理节点)和MHA Node(数据节点)。MHA Manager可以单独部署在一台独立的机器上管理多个master-slave集群,也可以部署在一台slave节点上。MHA Node运行在每台MySQL服务器上,MHA Manager会定时探测集群中的master节点,当master出现故障时,它可以自动将最新数据的slave提升为新的master,然后将所有其他的slave重新指向新的master。整个故障转移过程对应用程序完全透明。
在MHA自动故障切换过程中,MHA试图从宕机的主服务器上保存二进制日志,最大程度的保证数据的不丢失,但这并不总是可行的。例如,如果主服务器硬件故障或无法通过ssh访问,MHA没法保存二进制日志,只进行故障转移而丢失了最新的数据。使用MySQL 5.5的半同步复制,可以大大降低数据丢失的风险。MHA可以与半同步复制结合起来。如果只有一个slave已经收到了最新的二进制日志,MHA可以将最新的二进制日志应用于其他所有的slave服务器上,因此可以保证所有节点的数据一致性。
目前MHA主要支持一主多从的架构,要搭建MHA,要求一个复制集群中必须最少有三台数据库服务器,一主二从,即一台充当master,一台充当备用master,另外一台充当从库,因为至少需要三台服务器,出于机器成本的考虑,淘宝也在该基础上进行了改造,目前淘宝TMHA已经支持一主一从。(出自 :《深入浅出MySQL(第二版)》 )
官方介绍: https://code.google.com/p/mysql-master-ha/
下载地址: https://github.com/yoshinorim/mha4mysql-manager/releases/tag/v0.58
MHA常见报错以及解决方法:https://blog.51cto.com/u_14557905/2466478
下图展示了如何通过MHA Manager管理多组主从复制。

可以将MHA工作原理总结为如下:
(1 )从宕机崩溃的master保存:进制日志事件( binlog events );
(2)识别含有最新更新的slave ;
(3)应用差异的中继日志( relay log )到其他的slave ;
(4)应用从master保存的进制日志事件( binlog events) ;
(5)提升- -个slave为新的master ;
(6)使其他的slave连接新的masteri进行复制;
MHA软件由两部分组成, Manager工具包和Node工具包,具体的说明如下
Manager工具包主要包括一下几个工具:
masterha_check_ssh #检查MHA的SSH配置状况
masterha_check_repl #检查MySQL复制状况
masterha_check_status #检测当前MHA运行状态
masterha_master_monitor #检测master是否宕机
masterha_manger #启动MHA
masterha_master_switch #控制故障转移(自动或者手动)
masterha_conf_host #添加或删除配置的server信息
masterha_secondary_check #试图建立TCP连接从远程服务器
masterha_stop #停止MHA
Node工具包主要包括以下几个工具:
save_binary_logs #保存和复制master的二进制日志
apply_diff_relay_logs #识别差异的中继日志事件
filter_mysqlbinlog #去除不必要的ROLLBACK事件
purge_relay_logs #清除中继日志
一、安装
主机名:c7-41 ip:10.0.0.41(master)
主机名:c7-42 ip:10.0.0.42(slave1)
主机名:c7-43 ip:10.0.0.43(slave2)
主机名:c7-44 ip:10.0.0.44(mha+atlas)
vip:10.0.0.49
1.1环境准备
以下需要在四台机器上操作
时间同步
echo “*/5 * * * * /usr/sbin/ntpdate ntp1.aliyun.com >/dev/null 2>&1" >>/var/spool/cron/root
hosts解析
cat >>/etc/hosts<<EOF
> 10.0.0.41 master
> 10.0.0.42 slave1
> 10.0.0.43 slave2
> 10.0.0.44 mha
> EOF
关闭防火墙和selinux
互相配置ssh免密码登录
每台虚拟机都需要这么操作
[root@mha ~]# vim ssh.sh
#!/bin/bash
yum -y install sshpass &> /dev/null
read -p "请输入服务器密码:" passwd
UserName=root
IP="10.0.0."
#创建密钥
ssh-keygen -t dsa -f ~/.ssh/id_dsa -P "" &>/dev/null
#分发公钥
for i in 41 42 43 44  #这里的要改成自己机子的ip
  do
    sshpass -p "$passwd" ssh-copy-id -i ~/.ssh/id_dsa.pub -p 22 -o StrictHostKeyChecking=no $UserName@$IP$i &>
/dev/null
done
[root@mha ~]# chmod +x ssh.sh	#加入权限
[root@mha ~]# ./ssh.sh	#执行
请输入服务器密码:123456
1.2mysql主从配置
安装yum repo 在41、42、43三台机器上操作
wget http://repo.mysql.com/mysql-community-release-el7-5.noarch.rpm
rpm -ivh mysql-community-release-el7-5.noarch.rpm
yum -y install mysql-server
启动mysql 也是在41、42、43上面操作
systemctl restart mysql

update mysql.user set password=password('123456') where user='root' and host='localhost';	#进入mysql修改密码
flush privileges;	#刷新
配置主从
c7-41 主服务器操作(master)
[root@ master ~]# vim /etc/my.cnf
[mysqld]
server-id=1
log-bin=mysql-bin
#禁止mysql自动删除relaylog工能
relay_log_purge = 0
#mysql5.6已上的特性,开启gtid,必须主从全开
gtid_mode = on
enforce_gtid_consistency = 1
log_slave_updates = 1

#重启mysql

systemctl restart mysql
#重启完之后将mysql命令和mysql日志文件软连接到/usr/sbin,便于系统识别
ln -s /usr/local/mysql/bin/mysql /usr/sbin/
ln -s /usr/local/mysql/bin/mysqlbinlog /usr/sbin/
创建同步用户
mysql -uroot -p123456
mysql> grant replication slave on *.* to 'rep'@'10.0.0.%' identified by '123456';
mysql> flush privileges;
查看主库mysql的master状态
mysql> show master status \G;
*************************** 1. row ***************************
             File: mysql-bin.000001
         Position: 530
     Binlog_Do_DB:
 Binlog_Ignore_DB:
Executed_Gtid_Set: 4d4640d7-9c13-11ea-a1ee-000c29fda7cf:1-2
1 row in set (0.00 sec)
查看GTID的状态
mysql> show global variables like '%gtid%';
+---------------------------------+------------------------------------------------------------------------------------+
| Variable_name                   | Value         |
+---------------------------------+------------------------------------------------------------------------------------+
| binlog_gtid_simple_recovery     | OFF         |
| enforce_gtid_consistency        | ON         |
| gtid_executed                   | 4204746c-9e57-11ea-b0b4-000c29d82201:1-5,
422b53c2-9e57-11ea-b0b4-000c29695ea2:1-4 |
| gtid_mode                       | ON         |
| gtid_owned                      |         |
| gtid_purged                     |         |
| simplified_binlog_gtid_recovery | OFF         |
+---------------------------------+------------------------------------------------------------------------------------+
7 rows in set (0.00 sec)
c7-42从服务器操作(slave1)
[root@ master ~]# vim /etc/my.cnf
[mysqld]
server-id=2
log-bin=mysql-bin
#禁止mysql自动删除relaylog工能
relay_log_purge = 0
#mysql5.6已上的特性,开启gtid,必须主从全开
gtid_mode = on
enforce_gtid_consistency = 1
log_slave_updates = 1

#重启mysql

systemctl restart mysql
创建同步用户
mysql -uroot -p123456
mysql> grant replication slave on *.* to 'rep'@'10.0.0.%' identified by '123456';
mysql> flush privileges;
关闭从服务器的复制功能
mysql> stop slave;
配置从服务器指向master
change master to master_host='10.0.0.41',master_user='rep',master_password='123456',master_log_file='mysql-bin.000001',master_log_pos=530;

mysql> flush privileges;
开启从服务器的复制功能
mysql> start slave;
检查从服务器的复制功能状态
mysql> show slave status \G;
*************************** 1. row ***************************
               Slave_IO_State: Waiting for master to send event
                  Master_Host: 10.0.0.41
                  Master_User: rep
                  Master_Port: 3306
                Connect_Retry: 60
              Master_Log_File: mysql-bin.000001
          Read_Master_Log_Pos: 530
               Relay_Log_File: mysqld-relay-bin.000002
                Relay_Log_Pos: 314
        Relay_Master_Log_File: mysql-bin.000001
             Slave_IO_Running: Yes
            Slave_SQL_Running: Yes
是否双Yes
c7-43从服务器操作(slave2)
[root@ master ~]# vim /etc/my.cnf
[mysqld]
server-id=3
log-bin=mysql-bin
#禁止mysql自动删除relaylog工能
relay_log_purge = 0
#mysql5.6已上的特性,开启gtid,必须主从全开
gtid_mode = on
enforce_gtid_consistency = 1
log_slave_updates = 1

#重启mysql

systemctl restart mysql
创建同步用户
mysql -uroot -p123456
mysql> grant replication slave on *.* to 'rep'@'10.0.0.%' identified by '123456';
mysql> flush privileges;
关闭从服务器的复制功能
mysql> stop slave;
配置从服务器指向master
change master to master_host='10.0.0.41',master_user='rep',master_password='123456',master_log_file='mysql-bin.000001',master_log_pos=530;

mysql> flush privileges;
开启从服务器的复制功能
mysql> start slave;
检查从服务器的复制功能状态
一般io县城出现No,可能是你/etc/my.cnf配置有误,出现connecting可能是你指定的服务器有误
mysql> show slave status\G;
*************************** 1. row ***************************
               Slave_IO_State: Waiting for master to send event
                  Master_Host: 10.0.0.41
                  Master_User: rep
                  Master_Port: 3306
                Connect_Retry: 60
              Master_Log_File: mysql-bin.000001
          Read_Master_Log_Pos: 530
               Relay_Log_File: mysqld-relay-bin.000002
                Relay_Log_Pos: 314
        Relay_Master_Log_File: mysql-bin.000001
             Slave_IO_Running: Yes
            Slave_SQL_Running: Yes
是否为双Yes
所有MySQL服务器进行MySQL授权
三台mysql服务器进行授权,允许rep用户在10.0.0.0网段数据库进行从服务器复制操作,密码:123456
允许mha用户在10.0.0.0网段数据库进行所有操作,密码:mha
防止10.0.0.0网段失效,再外加允许master,slave1,slave2数据库上进行所有操作
mysql -uroot -p123456 -e "grant privileges slave on *.* to 'rep'@'10.0.0.%' identified by '123456';"
mysql -uroot -p123456 -e "grant all privileges on *.* to 'mha'@'0.0.0.%' identified by 'mha';"
mysql -uroot -p123456 -e "grant all privileges on *.* to 'mha'@'master1' identified by 'mha';"
mysql -uroot -p123456 -e "grant all privileges on *.* to 'mha'@'master2' identified by 'mha';"
mysql -uroot -p123456 -e "grant all privileges on *.* to 'mha'@'master3' identified by 'mha';"
Slave1、Slave2 节点设置为只读模式
mysql -e "set global read_only=1;"
1.3安装MHA
所有节点操作
安装依赖
[root@master ~]# yum install perl-DBD-MySQL -y
[root@master ~]# yum install -y perl-Config-Tiny epel-release perl-Log-Dispatch perl-Parallel-ForkManager
授权MHA管理用户 #前三台授权就可以(41、42、43)
mysql> grant all privileges on *.* to mha@'10.0.0.%' identified by 'mha';
Query OK, 0 rows affected (0.00 sec)

mysql> flush privileges;
Query OK, 0 rows affected (0.00 sec)
安装MHA node节点 四台都要安装
[root@master ~]# rz

[root@master ~]# ll	#上传centos7包
total 132
-rw-r--r--  1 root root 108566 May 20 15:08 centos7_mha4mysql_0.58_rpm.zip
[root@master ~]# unzip centos7_mha4mysql_0.58_rpm.zip	#解压
[root@master ~]# cd centos7_mha4mysql_0.58_rpm/	#进入路径
[root@master centos7_mha4mysql_0.58_rpm]# rpm -ivh mha4mysql-node-0.58-0.el7.centos.noarch.rpm	#安装
安装MHA管理节点
注意:MHA管理节点不要装到mysql主库和切换的从库上(备用的主库),否则会在后面的vip无法漂移
先查看node节点有没有安装,不然是安装不上manage节点的
[root@mha centos7_mha4mysql_0.58_rpm]# rpm -ivh mha4mysql-manager-0.58-0.el7.centos.noarch.rpm #只在44也就是(mha)安装
附带源码安装方式:
yum -y install epel-release --nogpgcheck
yum -y install perl-DBD-MySQL perl-Config-Tiny perl-PAR ams-validate perl-CPAN perl-devel perl-ExtUtils-CBuilder perl-ExtUtils-MakeMaker


yum install -y perl-DBD-MySQL perl-Config-Tiny perl-Log-Dispatch perl-Parallel-ForkManager perl-ExtUtils-CBuilder perl-ExtUtils-MakeMaker perl-CPAN

node节点:
tar xf mha4mysq1-node-0. 58.tar .gz
cd mha4mysq1-node-0. 58
perl Makefile.PL
make && make insta11

manager节点:
tar xf mha4mysq1 -manager-0.58. tar .gz
cd mha4mysq1-manager-0. 58
perl Makefile.PL
make & make install
#manager组件安装后在/usr/local/bin下面会生成几个工具,主要包括以下几个:
masterha_check_ssh	#检查 MHA 的 SSH 配置状况
masterha_check_repl	#检查 MySQL 复制状况
masterha_manger	#启动 manager 的脚本
masterha_check_status	#检测当前 MHA 运行状态
masterha_master_monitor	#检测 master 是否宕机
masterha_master_switch	#控制故障转移(自动或者手动)
masterha_conf_host	#添加或删除配置的 server 信息
masterha_stop	#关闭 manager
#安装完成后会在/usr/1oca1/bin目录下面生成以下脚本文件
save_binary_logs	#保存和复制 master 的二进制日志
apply_diff_relay_logs	#识别差异的中继日志事件并将其差异的事件应用于其他的 slave
filter_mysqlbinlog	#去除不必要的 ROLLBACK 事件

[root@mha mha4mysql-manager-0.58]#  ll /usr/local/bin/
总用量 88
-r-xr-xr-x. 1 root root 17639 10月 19 05:15 apply_diff_relay_logs
-r-xr-xr-x. 1 root root  4807 10月 19 05:15 filter_mysqlbinlog
-r-xr-xr-x. 1 root root  1995 10月 19 05:18 masterha_check_repl
-r-xr-xr-x. 1 root root  1779 10月 19 05:18 masterha_check_ssh
-r-xr-xr-x. 1 root root  1865 10月 19 05:18 masterha_check_status
-r-xr-xr-x. 1 root root  3201 10月 19 05:17 masterha_conf_host
-r-xr-xr-x. 1 root root  2517 10月 19 05:18 masterha_manager
-r-xr-xr-x. 1 root root  2165 10月 19 05:18 masterha_master_monitor
-r-xr-xr-x. 1 root root  2373 10月 19 05:18 masterha_master_switch
-r-xr-xr-x. 1 root root  5172 10月 19 05:18 masterha_secondary_check
-r-xr-xr-x. 1 root root  1739 10月 19 05:17 masterha_stop
-r-xr-xr-x. 1 root root  8337 10月 19 05:15 purge_relay_logs
-r-xr-xr-x. 1 root root  7525 10月 19 05:15 save_binary_logs
配置MHA
[root@mha scripts]# cp -rp /opt/mha4mysql-manager-0.58/samples/scripts /usr/local/bin/
#-r:递归复制目录  -p:保存源文件属性:属主、属组、可执行权限等
[root@mha scripts]# ll /usr/local/bin/scripts/
总用量 32
-rwxr-xr-x. 1 fei fei  3648 3月  23 2018 master_ip_failover
-rwxr-xr-x. 1 fei fei  9870 3月  23 2018 master_ip_online_change
-rwxr-xr-x. 1 fei fei 11867 3月  23 2018 power_manager
-rwxr-xr-x. 1 fei fei  1360 3月  23 2018 send_report

master_ip_failover	#自动切换时 VIP 管理的脚本
master_ip_online_change	#在线切换时 vip 的管理
power_manager	#故障发生后关闭主机的脚本
send_report	#因故障切换后发送报警的脚本
2、复制上述的自动切换时 VIP 管理的脚本到 /usr/local/bin 目录,这里使用master_ip_failover脚本来管理 VIP 和故障切换
[root@mha scripts]# cp /usr/local/bin/scripts/master_ip_failover /usr/local/bin/
#将上面的master_ip_failover脚本复制到/usr/local/bin目录,该脚本用户管理vip和故障切换
3、修改内容如下:(删除原有内容,直接复制并修改vip相关参数,vip自定义)
[root@mha scripts]# echo '' > /usr/local/bin/master_ip_failover
[root@mha ~]# vim /usr/local/bin/master_ip_failover
#!/usr/bin/env perl
use strict;
use warnings FATAL => 'all';

use Getopt::Long;

my (
$command, $ssh_user, $orig_master_host, $orig_master_ip,
$orig_master_port, $new_master_host, $new_master_ip, $new_master_port
);
#############################添加内容部分#########################################
my $vip = '172.16.50.100';								#指定vip的地址
my $brdc = '172.16.50.255';								#指定vip的广播地址
my $ifdev = 'ens33';										#指定vip绑定的网卡
my $key = '1';												#指定vip绑定的虚拟网卡序列号
my $ssh_start_vip = "/sbin/ifconfig ens33:$key $vip";		#代表此变量值为ifconfig ens33:1 192.168.184.200
my $ssh_stop_vip = "/sbin/ifconfig ens33:$key down";		#代表此变量值为ifconfig ens33:1 192.168.184.200 down
my $exit_code = 0;											#指定退出状态码为0
#my $ssh_start_vip = "/usr/sbin/ip addr add $vip/24 brd $brdc dev $ifdev label $ifdev:$key;/usr/sbin/arping -q -A -c 1 -I $ifdev $vip;iptables -F;";
#my $ssh_stop_vip = "/usr/sbin/ip addr del $vip/24 dev $ifdev label $ifdev:$key";
##################################################################################
GetOptions(
'command=s' => \$command,
'ssh_user=s' => \$ssh_user,
'orig_master_host=s' => \$orig_master_host,
'orig_master_ip=s' => \$orig_master_ip,
'orig_master_port=i' => \$orig_master_port,
'new_master_host=s' => \$new_master_host,
'new_master_ip=s' => \$new_master_ip,
'new_master_port=i' => \$new_master_port,
);

exit &main();

sub main {

print "\n\nIN SCRIPT TEST====$ssh_stop_vip==$ssh_start_vip===\n\n";

if ( $command eq "stop" || $command eq "stopssh" ) {

my $exit_code = 1;
eval {
print "Disabling the VIP on old master: $orig_master_host \n";
&stop_vip();
$exit_code = 0;
};
if ($@) {
warn "Got Error: $@\n";
exit $exit_code;
}
exit $exit_code;
}
elsif ( $command eq "start" ) {

my $exit_code = 10;
eval {
print "Enabling the VIP - $vip on the new master - $new_master_host \n";
&start_vip();
$exit_code = 0;
};
if ($@) {
warn $@;
exit $exit_code;
}
exit $exit_code;
}
elsif ( $command eq "status" ) {
print "Checking the Status of the script.. OK \n";
exit 0;
}
else {
&usage();
exit 1;
}
}
sub start_vip() {
`ssh $ssh_user\@$new_master_host \" $ssh_start_vip \"`;
}
## A simple system call that disable the VIP on the old_master
sub stop_vip() {
`ssh $ssh_user\@$orig_master_host \" $ssh_stop_vip \"`;
}

sub usage {
print
"Usage: master_ip_failover --command=start|stop|stopssh|status --orig_master_host=host --orig_master_ip=ip --orig_master_port=port --new_master_host=host --new_master_ip=ip --new_master_port=port\n";
}
4、创建 MHA 软件目录并复制配置文件,使用app1.cnf配置文件来管理 mysql 节点服务器,配置文件一般放在/etc/目录下
[root@mha ~]# mkdir -p /etc/mha
[root@ c44 ~] mkdir -p /var/log/mha/app1
[root@mha]# cp /opt/mha4mysql-manager-0.58/samples/conf/app1.cnf /etc/mha/
#删除原有内容,直接复制并修改节点服务器的IP地址
[root@mha mha]# echo '' > /etc/mha/app1.cnf
[root@mha mha]# vim /etc/mha/app1.cnf
[server default]
manager_log=/var/log/mha/app1/manager.log
manager_workdir=/var/log/mha/app1
master_binlog_dir=/data/mysql
master_ip_failover_script=/usr/local/bin/master_ip_failover
master_ip_online_change_script=/usr/local/bin/master_ip_online_change
password=mha
ping_interval=1
remote_workdir=/tmp
repl_password=123456
repl_user=rep
secondary_check_script=/usr/local/bin/masterha_secondary_check -s 10.0.0.42 -s 10.0.0.43
shutdown_script=""
ssh_user=root
user=mha

[server1]
hostname=10.0.0.41
port=3306

[server2]
hostname=10.0.0.42
port=3306
candidate_master=1
check_repl_delay=0

[server3]
hostname=10.0.0.43
port=3306
app1.cnf配置文件详解
[server default]
manager_log=/var/log/mha/app1/manager.log       #manager日志
manager_workdir=/var/log/mha/app1.log    		#manager工作目录
master_binlog_dir=/data/mysql          #master保存binlog的位置,这里的路径要与master里配置的binlog的路径一致,以便MHA能找到
master_ip_failover_script=/usr/local/bin/master_ip_failover            #设置自动failover时候的切换脚本,也就是上面的那个脚本
master_ip_online_change_script=/usr/local/bin/master_ip_online_change  #设置手动切换时候的切换脚本
password=mha			#设置mysql中root用户的密码,这个密码是前文中创建监控用户的那个密码
ping_interval=1				#设置监控主库,发送ping包的时间间隔1秒,默认是3秒,尝试三次没有回应的时候自动进行failover
remote_workdir=/tmp			#设置远端mysql在发生切换时binlog的保存位置
repl_password=123456		#设置复制用户的密码
repl_user=rep			#设置复制用户的用户
report_script=/usr/local/send_report     #设置发生切换后发送的报警的脚本
secondary_check_script=/usr/local/bin/masterha_secondary_check -s 10.0.0.42 -s 10.0.0.43	#指定检查的从服务器IP地址
shutdown_script=""			#设置故障发生后关闭故障主机脚本(该脚本的主要作用是关闭主机防止发生脑裂,这里没有使用)
ssh_user=root				#设置ssh的登录用户名
user=mha					#设置监控用户root

[server1]
hostname=10.0.0.41
port=3306

[server2]
hostname=10.0.0.42
port=3306
candidate_master=1
#设置为候选master,设置该参数以后,发生主从切换以后将会将此从库提升为主库,即使这个主库不是集群中最新的slave

check_repl_delay=0
#默认情况下如果一个slave落后master 超过100M的relay logs的话,MHA将不会选择该slave作为一个新的master, 因为对于这个slave的恢复需要花费很长时间;通过设置check_repl_delay=0,MHA触发切换在选择一个新的master的时候将会忽略复制延时,这个参数对于设置了candidate_master=1的主机非常有用,因为这个候选主在切换的过程中一定是新的master

[server3]
hostname=10.0.0.43
port=3306
在Master服务器上手动开启vip
注:只是在别的机器上操作一下这个命令
[root@master1 mysql]# ifconfig ens33:1 172.16.50.100/24
[root@master1 mysql]# ifconfig
ens33: flags=4163<UP,BROADCAST,RUNNING,MULTICAST>  mtu 1500
        inet 172.16.50.3  netmask 255.255.252.0  broadcast 172.16.51.255
        inet6 fe80::20c:29ff:fe4c:8008  prefixlen 64  scopeid 0x20<link>
        ether 00:0c:29:4c:80:08  txqueuelen 1000  (Ethernet)
        RX packets 1554122  bytes 258837497 (246.8 MiB)
        RX errors 0  dropped 251  overruns 0  frame 0
        TX packets 442622  bytes 37367503 (35.6 MiB)
        TX errors 0  dropped 0 overruns 0  carrier 0  collisions 0

ens33:1: flags=4163<UP,BROADCAST,RUNNING,MULTICAST>  mtu 1500
        inet 172.16.50.100  netmask 255.255.255.0  broadcast 172.16.50.255
        ether 00:0c:29:4c:80:08  txqueuelen 1000  (Ethernet)

lo: flags=73<UP,LOOPBACK,RUNNING>  mtu 65536
        inet 127.0.0.1  netmask 255.0.0.0
        inet6 ::1  prefixlen 128  scopeid 0x10<host>
        loop  txqueuelen 1000  (Local Loopback)
        RX packets 16636  bytes 1851266 (1.7 MiB)
        RX errors 0  dropped 0  overruns 0  frame 0
        TX packets 16636  bytes 1851266 (1.7 MiB)
        TX errors 0  dropped 0 overruns 0  carrier 0  collisions 0
ssh检查检测
在 manager 节点上测试 ssh 无密码认证,如果正常最后会输出 successfully。
[root@mha ~]# masterha_check_ssh -conf=/etc/mha/app1.cnf
Mon May 25 14:24:20 2020 - [warning] Global configuration file /etc/masterha_default.cnf not found. Skipping.
Mon May 25 14:24:20 2020 - [info] Reading application default configuration from /etc/mha/app1.cnf..
Mon May 25 14:24:20 2020 - [info] Reading server configuration from /etc/mha/app1.cnf..
Mon May 25 14:24:20 2020 - [info] Starting SSH connection tests..
Mon May 25 14:24:21 2020 - [debug]
Mon May 25 14:24:20 2020 - [debug]  Connecting via SSH from root@10.0.0.41(10.0.0.41:22) to root@10.0.0.42(10.0.0.42:22)..
Mon May 25 14:24:21 2020 - [debug]   ok.
Mon May 25 14:24:21 2020 - [debug]  Connecting via SSH from root@10.0.0.41(10.0.0.41:22) to root@10.0.0.43(10.0.0.43:22)..
Mon May 25 14:24:21 2020 - [debug]   ok.
Mon May 25 14:24:22 2020 - [debug]
Mon May 25 14:24:21 2020 - [debug]  Connecting via SSH from root@10.0.0.42(10.0.0.42:22) to root@10.0.0.41(10.0.0.41:22)..
Mon May 25 14:24:21 2020 - [debug]   ok.
Mon May 25 14:24:21 2020 - [debug]  Connecting via SSH from root@10.0.0.42(10.0.0.42:22) to root@10.0.0.43(10.0.0.43:22)..
Mon May 25 14:24:21 2020 - [debug]   ok.
Mon May 25 14:24:23 2020 - [debug]
Mon May 25 14:24:21 2020 - [debug]  Connecting via SSH from root@10.0.0.43(10.0.0.43:22) to root@10.0.0.41(10.0.0.41:22)..
Mon May 25 14:24:21 2020 - [debug]   ok.
Mon May 25 14:24:21 2020 - [debug]  Connecting via SSH from root@10.0.0.43(10.0.0.43:22) to root@10.0.0.42(10.0.0.42:22)..
Mon May 25 14:24:22 2020 - [debug]   ok.
Mon May 25 14:24:23 2020 - [info] All SSH connection tests passed successfully.
#如果出错,一般是服务器密钥漏输,输错等问题,具体看以上报错
主从复制检测
在 manager 节点上测试 mysql 主从连接情况,最后出现 MySQL Replication Health is OK 字样说明正常
[root@mha ~]# masterha_check_repl -conf=/etc/mha/app1.cnf
Mon May 25 14:24:42 2020 - [warning] Global configuration file /etc/masterha_default.cnf not found. Skipping.
Mon May 25 14:24:42 2020 - [info] Reading application default configuration from /etc/mha/app1.cnf..
Mon May 25 14:24:42 2020 - [info] Reading server configuration from /etc/mha/app1.cnf..
Mon May 25 14:24:42 2020 - [info] MHA::MasterMonitor version 0.58.
Mon May 25 14:24:43 2020 - [info] GTID failover mode = 1
Mon May 25 14:24:43 2020 - [info] Dead Servers:
Mon May 25 14:24:43 2020 - [info] Alive Servers:
Mon May 25 14:24:43 2020 - [info]   10.0.0.41(10.0.0.41:3306)
Mon May 25 14:24:43 2020 - [info]   10.0.0.42(10.0.0.42:3306)
Mon May 25 14:24:43 2020 - [info]   10.0.0.43(10.0.0.43:3306)
Mon May 25 14:24:43 2020 - [info] Alive Slaves:
Mon May 25 14:24:43 2020 - [info]   10.0.0.42(10.0.0.42:3306)  Version=5.6.48-log (oldest major version between slaves) log-bin:enabled
Mon May 25 14:24:43 2020 - [info]     GTID ON
Mon May 25 14:24:43 2020 - [info]     Replicating from 10.0.0.41(10.0.0.41:3306)
Mon May 25 14:24:43 2020 - [info]   10.0.0.43(10.0.0.43:3306)  Version=5.6.48-log (oldest major version between slaves) log-bin:enabled
Mon May 25 14:24:43 2020 - [info]     GTID ON
Mon May 25 14:24:43 2020 - [info]     Replicating from 10.0.0.41(10.0.0.41:3306)
Mon May 25 14:24:43 2020 - [info]     Not candidate for the new Master (no_master is set)
Mon May 25 14:24:43 2020 - [info] Current Alive Master: 10.0.0.41(10.0.0.41:3306)
Mon May 25 14:24:43 2020 - [info] Checking slave configurations..
Mon May 25 14:24:43 2020 - [info]  read_only=1 is not set on slave 10.0.0.42(10.0.0.42:3306).
Mon May 25 14:24:43 2020 - [info]  read_only=1 is not set on slave 10.0.0.43(10.0.0.43:3306).
Mon May 25 14:24:43 2020 - [info] Checking replication filtering settings..
Mon May 25 14:24:43 2020 - [info]  binlog_do_db= , binlog_ignore_db=
Mon May 25 14:24:43 2020 - [info]  Replication filtering check ok.
Mon May 25 14:24:43 2020 - [info] GTID (with auto-pos) is supported. Skipping all SSH and Node package checking.
Mon May 25 14:24:43 2020 - [info] Checking SSH publickey authentication settings on the current master..
Mon May 25 14:24:44 2020 - [info] HealthCheck: SSH to 10.0.0.41 is reachable.
Mon May 25 14:24:44 2020 - [info]
10.0.0.41(10.0.0.41:3306) (current master)
 +--10.0.0.42(10.0.0.42:3306)
 +--10.0.0.43(10.0.0.43:3306)

Mon May 25 14:24:44 2020 - [info] Checking replication health on 10.0.0.42..
Mon May 25 14:24:44 2020 - [info]  ok.
Mon May 25 14:24:44 2020 - [info] Checking replication health on 10.0.0.43..
Mon May 25 14:24:44 2020 - [info]  ok.
Mon May 25 14:24:44 2020 - [warning] master_ip_failover_script is not defined.
Mon May 25 14:24:44 2020 - [warning] shutdown_script is not defined.
Mon May 25 14:24:44 2020 - [info] Got exit code 0 (Not master dead).

MySQL Replication Health is OK.
常见报错:
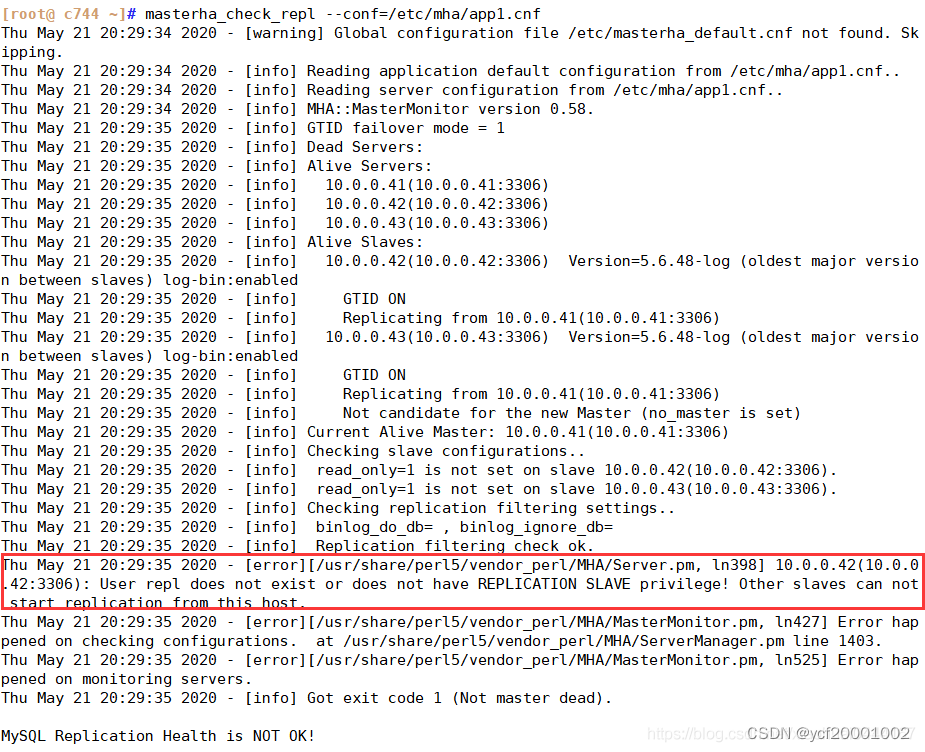
注:用户rep不存在或没有复制从特权;或者是三台mysql服务器可能少了那两条软连接,若不是具体问题看报错信息
解决方法:
(1)在一主二从的数据库中重新同步授权repl用户
mysql> grant replication slave on *.* to 'repl'@'10.0.0.%' identified by '123456';
mysql> flush privileges;
(2)再进行主从复制检测
[root@ c44 ~] masterha_check_repl --conf=/etc/mha/app1.cnf
启动MHA
[root@mha ~]# nohup masterha_manager --conf=/etc/mha/app1.cnf --remove_dead_master_conf --ignore_last_failover < /dev/null > /var/log/mha/app1/manager.log 2>&1 &	#后台启动
[1] 3513

- -remove_dead_master_conf	#该参数代表当发生主从切换后,老的主库的 ip 将会从配置文件中移除。
- -manger_log	#日志存放位置。
查看MHA状态
[root@mha ~]# masterha_check_status --conf=/etc/mha/app1.cnf
app1 master maybe down(20:PING_FAILING). master:10.0.0.41
cat /var/log/masterha/app1/manager.log | grep "current master"
#查看MHA日志,也可以看到当前的master
查看mysql1的VIP地址是否存在,这个VIP地址不会因为manager节点停止MHA服务而消失
ifconfig
若要关闭manager服务,可以使用如下命令
[root@mha ~]# masterha_stop --conf=/etc/mha/app1.cnf
活着可以直接采用kill进程ID的方式关闭
从库从新加入新主
[root@mha ~]#grep -i "CHANGE MASTER TO MASTER" /var/log/mha/app1/manager.log | tail -1
[root@mha ~]#tail -1 /var/log/mha/app1/manager.log	#查看日志
Thu Oct 20 02:35:47 2022 - [info] Ping(SELECT) succeeded, waiting until MySQL doesn't respond..
常见报错:
会导致MHA故障转移后,主从不一致,一般是后台启动MHA没有正常退出造成的。

解决办法
反复多试几次启动和关闭命令
#启动命令
nohup masterha_manager --conf=/etc/mha/app1.cnf  --remove_dead_master_conf --ignore_last_failover < /dev/null >  /var/log/mha/app1/manager.log  2>&1 &
#停止命令
masterha_stop --conf=/etc/mha/app1.cnf
1.4测试MHA故障漂移
在manager节点上健康观察日志记录
tail -f /var/log/masterha/app1/manager.log
动态查看日志信息
故障切换备选主库的算法:
1、一般判断从库的是从(position/GTID)判断优劣,数据有差异,最接近于master的slave,成为备选主。
2、数据一致的情况下,按照配置文件顺序,选择备选主库。
3、设定有权重(candidate_master=1),按照权重强制指定备选主。
默认情况下如果一个slave落后master 100M的relay logs的话,即使有权重,也会失效。
如果check_repl_delay=0的话,即使落后很多日志,也强制选择其为备选主。
停掉c7-41主库的10.0.0.41
[root@ master ~]# systemctl stop mysql
或者service mysqld stop	#模拟master节点故障关闭服务
ifconfig	#查看VIP,发现消失了,去到了第二台虚拟机
发生故障时,MHA做了什么?
①当作为主库的c7-41上的MySQL宕机以后,mha通过检测发现c7-41的mysql宕机了,那么会将binlog日志最全的从库(c7-42)立刻提升为主库,而其他的从库会指向新的主库进行再次同步。
②MHA会自己结束自己的进程,还会将/etc/mha/app1.cnf配置文件中,坏掉的那台机器剔除。
MHA故障还原
查看c7-42的master状态
mysql> show master status;
#或者 mysql -uroot -p123456 -e "show master status \G;"

+------------------+----------+--------------+------------------+------------------------------------------+
| File             | Position | Binlog_Do_DB | Binlog_Ignore_DB | Executed_Gtid_Set                        |
+------------------+----------+--------------+------------------+------------------------------------------+
| mysql-bin.000001 |      906 |              |                  | 422b53c2-9e57-11ea-b0b4-000c29695ea2:1-4 |
+------------------+----------+--------------+------------------+------------------------------------------+
1 row in set (0.00 sec)
先将宕机的mysql修复
(在c7-41上面操作)
service mysqld restart 或者 systemctl restart mysqld	#虚拟机模拟修复完成

mysql -uroot -p123456 -e "change master to master_host='172.16.50.4',master_user='rep',master_password='123456',master_log_file='mysql-bin.000001',master_log_pos=906;"	#在原master节点执行同步,二进制日志名和偏移量使用刚刚从现master获取到的

mysql -uroot -p123456 -e "start slave;"	#开启同步

[root@master1 ~]# mysql -uroot -p123456 -e "show slave status\G;" |awk '/Running:/{print}'	#查询slave服务器的线程相关参数信息,用awk过滤,双yes成功完成
mysql: [Warning] Using a password on the command line interface can be insecure.
             Slave_IO_Running: Yes
            Slave_SQL_Running: Yes
在 manager 节点上修改配置文件app1.cnf(再把这个记录添加进去,因为它检测掉失效时候会自动消失)
[root@mha ~]# vim /etc/mha/app1.cnf
[server default]
manager_log=/var/log/mha/app1/manager.log
manager_workdir=/var/log/mha/app1
master_binlog_dir=/data/mysql
master_ip_failover_script=/usr/local/bin/master_ip_failover
master_ip_online_change_script=/usr/local/bin/master_ip_online_change
password=mha
ping_interval=1
remote_workdir=/tmp
repl_password=123456
repl_user=rep
secondary_check_script=/usr/local/bin/masterha_secondary_check -s 10.0.0.41 -s 10.0.0.43	#指定检查的slave服务器此时也要修改为41和43
shutdown_script=""
ssh_user=root
user=mha

[server1]
hostname=10.0.0.42		#添加一个server1,不过此时修改为10.0.0.42
port=3306

[server2]
hostname=10.0.0.41	#41作为slave节点了
port=3306
candidate_master=1
check_repl_delay=0

[server3]
hostname=10.0.0.43
port=3306
重新启动MHA
[root@mha ~]# nohup masterha_manager --conf=/etc/mha/app1.cnf --remove_dead_master_conf --ignore_last_failover < /dev/null > /var/log/mha/app1/manager.log 2>&1 &
[1] 3619
[root@mha ~]# masterha_check_status --conf=/etc/mha/app1.cnf
app1 (pid:3619) is running(0:PING_OK), master:10.0.0.42
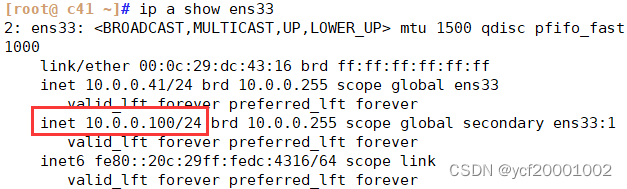
模拟master主库宕机,vip漂移
关闭c42上的备份主库mysql
root@ c42 ~] systemctl stop mysql
[root@ c42 ~] ip a show ens33
2: ens33: <BROADCAST,MULTICAST,UP,LOWER_UP> mtu 1500 qdisc pfifo_fast state UP group default qlen 1000
    link/ether 00:0c:29:60:cb:77 brd ff:ff:ff:ff:ff:ff
    inet 10.0.0.42/24 brd 10.0.0.255 scope global ens33
       valid_lft forever preferred_lft forever
    inet6 fe80::20c:29ff:fe60:cb77/64 scope link
       valid_lft forever preferred_lft forever
查看c41上vip和mysql状态
[root@ c41 ~] ip a show ens33
Mysql之Atlas(读写分离)
数据库中间件Atlas与Mycat比较分库分表压测报告https://blog.csdn.net/izhitao/article/details/71680714
Atlas是由Qihoo 360公司Web平台部基础架构团队开发维护的一-个基于MySQL协议的数据中间层项目。它在MySQL言
方推出的MySQL-Proxy 0.8.2版本的基础上,修改了大量bug ,添加了很多功能特性。目前该项目在360公司内部得到了广
泛应用,很多MySQL业务已经接入了Atlas平台,每天承载的读写请求数达几十亿条。 源码Github :
https://github.com/Qihoo360/Atlas
读写分离定义: 读写分离,基本的原理是让主数据库处理事务性增、删、改操作( INSERT. DELETE、 UPDATE ) ,
而从数据库处理SELECT查询操作。数据库复制把主数据库操作的变更同步到集群中的从数据库。
读写分离作用: 因为数据库的“写" (写10000条数据到oracle可能要3分钟)操作是比较耗时的。但是数据库的“读"
(从oracle读10000条数据可能只要5秒钟)。所以读写分离,解决的是,数据库的写入,影响了查询的效率。
读写分离意义: 数据库不一定要读写分离,如果程序使用数据库较多时,而更新少,查询多的情况下会考虑使用,利用数据库主从同步
可以减少数据库压力,提高性能。当然,数据库也有其它优化方案。memcache 或是表折分,或是搜索引学。都是解 决方法。
Atlas的功能有:
读写分离、从库负载均衡、自动分表、IP过滤、 SQL语句黑白名单、DBA可平滑上下线DB、自动摘除宕机的DB。
Atlas的使用场景:
Atlas是一个位于前端
应用与后端MySQL数据库之间的中间件,它使得应用程序员无需再关心读写分离、分表等与MySQL相关的细节,可以专注于编写业务逻辑,同时使得DBA的运维工作对前端应用透明,上下线DB前端应用无感知。
Atlas读写分离
安装
注意:
1,Atlas只能安装运行在64位的系统上
2,Centos 5.X安装Atlas-XX.el5.x86_ _64.rpm , Centos 6.X安装Atlas-XX.el6.x86 _64.rpm(经过测试centos7也可以使用6的版本)
3、后端mysq|版本应大于5.1 ,建议使用Mysql 5.6以上
安装Atlas
[root@mha bin]# wget https://github.com/Qihoo360/Atlas/releases/download/2.2.1/Atlas-2.2.1.el6.x86_64.rpm
	[root@mha ~]# rpm -ivh Atlas-2.2.1.el6.x86_64.rpm
Preparing...                          ################################# [100%]
Updating / installing...
   1:Atlas-2.2.1-1                    ################################# [100%]

修改配置文件
[root@mha ~]# egrep -v '^#|^$' /usr/local/m	ysql-proxy/conf/test.cnf
[mysql-proxy]
admin-username = user
admin-password = pwd
proxy-backend-addresses = 10.0.0.49:3306	 #设置写入主库地址或vip的地址
proxy-read-only-backend-addresses = 10.0.0.42:3306,10.0.0.43:3306	#设置只读的从库地址
pwds = rep:/iZxz+0GRoA=,mha:O2jBXONX098=
daemon = true
keepalive = true
event-threads = 8
log-level = message
log-path = /usr/local/mysql-proxy/log
sql-log = ON
proxy-address = 0.0.0.0:1234
admin-address = 0.0.0.0:2345
charset = utf8

加密方式/usr/local/mysql-proxy/bin/encrypt 密码
[root@mha ~]# /usr/local/mysql-proxy/bin/encrypt 123456
/iZxz+0GRoA=
[root@mha ~]#  /usr/local/mysql-proxy/bin/encrypt mha
O2jBXONX098=

启动Atlas
[root@mha ~]# /usr/local/mysql-proxy/bin/mysql-proxyd test start
OK: MySQL-Proxy of test is started
#Atlas可以通过不同配置文件,同时启动多个Atlas代理多套MHA节点;

#/usr/local/mysql-proxy/bin/mysql-proxyd test start
#/usr/local/mysql-proxy/bin/mysql-proxyd test stop
#/usr/local/mysql-proxy/bin/mysql-proxyd test restart

查看Atlas
[root@mha ~]#  ps -ef|grep mysql-proxy
root       4131      1  0 19:11 ?        00:00:00 /usr/local/mysql-proxy/bin/mysql-proxy --defaults-file=/usr/local/mysql-proxy/conf/test.cnf
root       4132   4131  0 19:11 ?        00:00:00 /usr/local/mysql-proxy/bin/mysql-proxy --defaults-file=/usr/local/mysql-proxy/conf/test.cnf
root       4143   3097  0 19:11 pts/0    00:00:00 grep --color=auto mysql-proxy
Atlas读写分离测试
读测试
yum -y install mysql
systemctl start mysql
[root@mha ~]# mysql -umha -pmha -P1234 -h10.0.0.44
Welcome to the MariaDB monitor.  Commands end with ; or \g.
Your MySQL connection id is 5
Server version: 5.0.81-log MySQL Community Server (GPL)

Copyright (c) 2000, 2018, Oracle, MariaDB Corporation Ab and others.

  pe 'help;' or '\h' for help. Type '\c' to clear the current input statement.

MySQL [(none)]> select @@server_id;
+-------------+
| @@server_id |
+-------------+
|           3 |
+-------------+
1 row in set (0.00 sec)

MySQL [(none)]> select @@server_id;
+-------------+
| @@server_id |
+-------------+
|           2 |
+-------------+
1 row in set (0.00 sec)

#注:发现上面'server_id每次的结果都不-样,分别是2台从库的server_id ,并且每执行一次命令 , server_id就会变换一次,这是因为默认读操作的权重都是1,两台从DB默认就是负载均衡。
写测试:
[root@mha ~]# mysql -umha -pmha -P1234 -h10.0.0.44
Welcome to the MariaDB monitor.  Commands end with ; or \g.
Your MySQL connection id is 2
Server version: 5.0.81-log MySQL Community Server (GPL)

Copyright (c) 2000, 2018, Oracle, MariaDB Corporation Ab and others.

Type 'help;' or '\h' for help. Type '\c' to clear the current input statement.

MySQL [(none)]> begin;select @@server_id;commit;
Query OK, 0 rows affected (0.01 sec)

+-------------+
| @@server_id |
+-------------+
|           1 |
+-------------+
1 row in set (0.00 sec)

Query OK, 0 rows affected (0.00 sec)

MySQL [(none)]> create database ycf;
Query OK, 1 row affected (0.00 sec)

MySQL [(none)]> show databases;
+--------------------+
| Database           |
+--------------------+
| information_schema |
| mysql              |
| performance_schema |
| ycf                |
+--------------------+
4 rows in set (0.00 sec)
在41上查看
[root@ master ~]# mysql -uroot -p123456 -e "show databases"
Warning: Using a password on the command line interface can be insecure.
+--------------------+
| Database           |
+--------------------+
| information_schema |
| mysql              |
| performance_schema |
| ycf                |
+--------------------+
在43上查看
[root@ slave2 ~]# mysql -uroot -p123456 -e "show databases"
Warning: Using a password on the command line interface can be insecure.
+--------------------+
| Database           |
+--------------------+
| information_schema |
| mysql              |
| performance_schema |
| ycf                |
+--------------------+
Atlas管理操作
登陆管理接口
[root@mha ~]# mysql -uuser -ppwd -P2345 -h10.0.0.44
Welcome to the MariaDB monitor.  Commands end with ; or \g.
Your MySQL connection id is 1
Server version: 5.0.99-agent-admin

Copyright (c) 2000, 2018, Oracle, MariaDB Corporation Ab and others.

Type 'help;' or '\h' for help. Type '\c' to clear the current input statement.

MySQL [(none)]>
查看帮助信息
MySQL [(none)]>  select * from help;
+----------------------------+---------------------------------------------------------+
| command                    | description                                             |
+----------------------------+---------------------------------------------------------+
| SELECT * FROM help         | shows this help                                         |
| SELECT * FROM backends     | lists the backends and their state                      |
| SET OFFLINE $backend_id    | offline backend server, $backend_id is backend_ndx's id |
| SET ONLINE $backend_id     | online backend server, ...                              |
| ADD MASTER $backend        | example: "add master 127.0.0.1:3306", ...               |
| ADD SLAVE $backend         | example: "add slave 127.0.0.1:3306", ...                |
| REMOVE BACKEND $backend_id | example: "remove backend 1", ...                        |
| SELECT * FROM clients      | lists the clients                                       |
| ADD CLIENT $client         | example: "add client 192.168.1.2", ...                  |
| REMOVE CLIENT $client      | example: "remove client 192.168.1.2", ...               |
| SELECT * FROM pwds         | lists the pwds                                          |
| ADD PWD $pwd               | example: "add pwd user:raw_password", ...               |
| ADD ENPWD $pwd             | example: "add enpwd user:encrypted_password", ...       |
| REMOVE PWD $pwd            | example: "remove pwd user", ...                         |
| SAVE CONFIG                | save the backends to config file                        |
| SELECT VERSION             | display the version of Atlas                            |
+----------------------------+---------------------------------------------------------+
16 rows in set (0.00 sec)
查看后端代理库
MySQL [(none)]> select * from backends;
+-------------+----------------+-------+------+
| backend_ndx | address        | state | type |
+-------------+----------------+-------+------+
|           1 | 10.0.0.49:3306 | up    | rw   |
|           2 | 10.0.0.42:3306 | down  | ro   |
|           3 | 10.0.0.43:3306 | up    | ro   |
+-------------+----------------+-------+------+
3 rows in set (0.00 sec)
下线后端节点
MySQL [(none)]> set offline 3;
+-------------+----------------+---------+------+
| backend_ndx | address        | state   | type |
+-------------+----------------+---------+------+
|           3 | 10.0.0.43:3306 | offline | ro   |
+-------------+----------------+---------+------+
1 row in set (0.00 sec)

MySQL [(none)]> select * from backends;
+-------------+----------------+---------+------+
| backend_ndx | address        | state   | type |
+-------------+----------------+---------+------+
|           1 | 10.0.0.49:3306 | up      | rw   |
|           2 | 10.0.0.42:3306 | down    | ro   |
|           3 | 10.0.0.43:3306 | offline | ro   |
+-------------+----------------+---------+------+
3 rows in set (0.00 sec)
上线后端节点
MySQL [(none)]> set  online 3;
  ------------+----------------+---------+------+
| backend_ndx | address        | state   | type |
+-------------+----------------+---------+------+
|           3 | 10.0.0.43:3306 | unknown | ro   |
+-------------+----------------+---------+------+
1 row in set (0.00 sec)

MySQL [(none)]> select * from backends;
+-------------+----------------+-------+------+
| backend_ndx | address        | state | type |
+-------------+----------------+-------+------+
|           1 | 10.0.0.49:3306 | up    | rw   |
|           2 | 10.0.0.42:3306 | down  | ro   |
|           3 | 10.0.0.43:3306 | up    | ro   |
+-------------+----------------+-------+------+
3 rows in set (0.00 sec)


 1765
1765


 被折叠的 条评论
为什么被折叠?
被折叠的 条评论
为什么被折叠?
 到【灌水乐园】发言


