


assimp的配置见此:assimp配置
1.流程
1.1 头文件
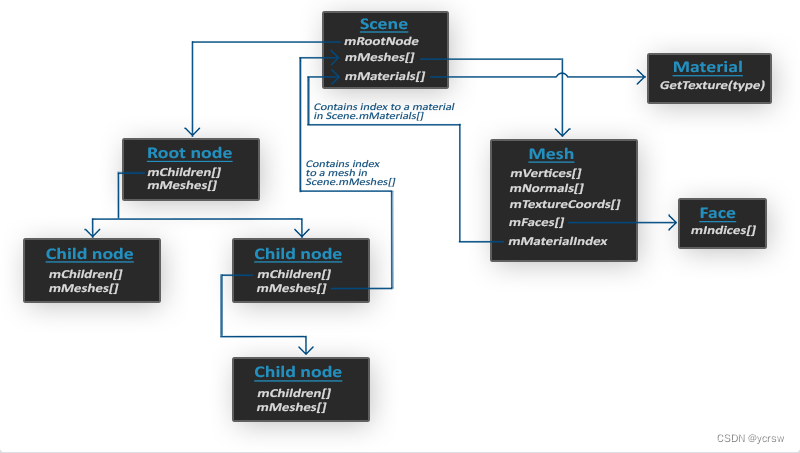
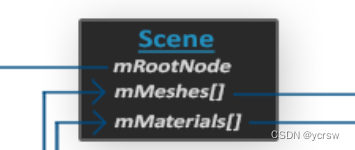
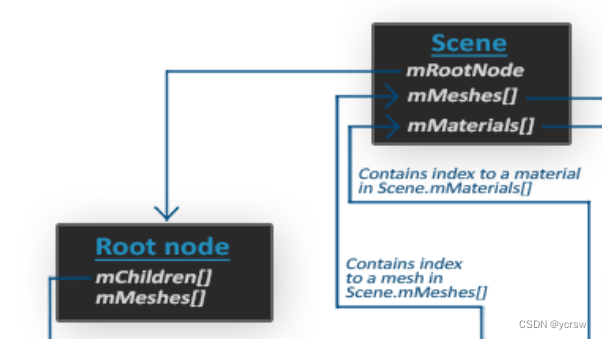
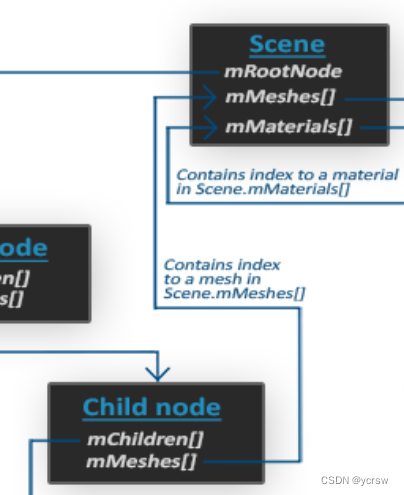
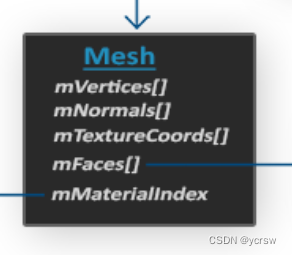
经过上节网格类的设置以后,我们现在开始正式接触assimp(上图为其简化结构),加载自己的模型,首先我们要使用assimp,就需要它的头文件:
#include <assimp/Importer.hpp>
#include <assimp/scene.h>
#include <assimp/postprocess.h>
1.2 Model类
其次我们要定义一个Model类,包含一个构造函数用于读取数据,一个Draw函数用于渲染,一个上节定义的Mesh类数组用于存储读取的Mesh数据,一个directory用于存储目录,剩下的loadModel,processNode,processMesh和loadMaterialTextures函数都是用于具体处理数据的,后面我们会提到:
class Model
{
    public:
        /*  函数   */
        Model(char *path)
        {
            loadModel(path);
        }
        void Draw(Shader shader);
    private:
        /*  模型数据  */
        vector<Mesh> meshes;
        string directory;
        /*  函数   */
        void loadModel(string path);
        void processNode(aiNode *node, const aiScene *scene);
        Mesh processMesh(aiMesh *mesh, const aiScene *scene);
        vector<Texture> loadMaterialTextures(aiMaterial *mat, aiTextureType type,
                                             string typeName);
};
1.3 Scene的读取(loadModel)
loadModel函数就是根据构造函数传入的模型路径来读取和加载数据,首先利用Assimp中Importer的ReadFile方法获取Scene结构体,后面的参数:
aiProcess_Triangulate指如果模型不是(全部)由三角形组成,它需要将模型所有的图元形状变换为三角形
aiProcess_FlipUVs指在处理的时候翻转y轴的纹理坐标(之前读取纹理的时候我们做过垂直翻转的处理,这里只用设置一个参数就直接翻转了)
还有其他参数:
aiProcess_GenNormals:如果模型不包含法向量的话,就为每个顶点创建法线。
aiProcess_SplitLargeMeshes:将比较大的网格分割成更小的子网格,如果你的渲染有最大顶点数限制,只能渲染较小的网格,那么它会非常有用。
aiProcess_OptimizeMeshes:和上个选项相反,它会将多个小网格拼接为一个大的网格,减少绘制调用从而进行优化。
void loadModel(string path)
{
    Assimp::Importer import;
    const aiScene *scene = import.ReadFile(path, aiProcess_Triangulate | aiProcess_FlipUVs);
接下来检查场景和其根节点不为null,并且检查了它的一个标记(Flag),来查看返回的数据是不是不完整的。如果遇到了任何错误,我们都会通过导入器的GetErrorString函数来报告错误并返回,我们也获取了文件路径的目录路径(不包含文件名)。
    if(!scene || scene->mFlags & AI_SCENE_FLAGS_INCOMPLETE || !scene->mRootNode)
    {
        cout << "ERROR::ASSIMP::" << import.GetErrorString() << endl;
        return;
    }
    directory = path.substr(0, path.find_last_of('/'));
接下来我们就从Scene的根节点中开始处理每个节点中的mesh:
    processNode(scene->mRootNode, scene);
}
1.4 Mesh的读取(processNode)
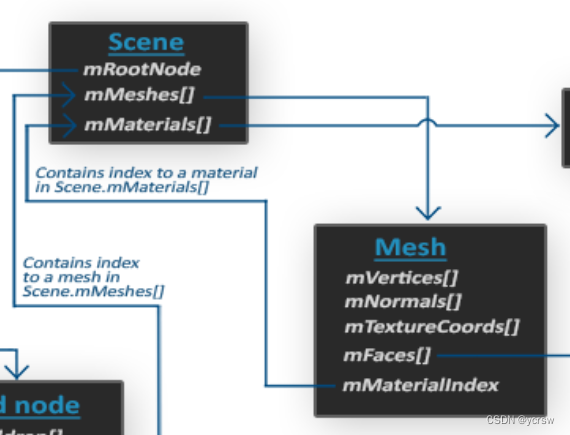
进入到每个节点中,我们首先要做的就是读取每个节点的mesh,而根据之前的结构来看,节点中存储的mMeshes只是一个索引,所以我们还要配合传入的scene来读取保存每个节点中的mesh:
void processNode(aiNode *node, const aiScene *scene)
{
    // 处理节点所有的网格(如果有的话)
    for(unsigned int i = 0; i < node->mNumMeshes; i++)
    {
        aiMesh *mesh = scene->mMeshes[node->mMeshes[i]];
        meshes.push_back(processMesh(mesh, scene));
    }
该节点的mesh存储完以后,我们再对它的子节点进行递归处理:

    // 接下来对它的子节点重复这一过程
    for(unsigned int i = 0; i < node->mNumChildren; i++)
    {
        processNode(node->mChildren[i], scene);
    }
}
1.5 Mesh的处理(processMesh)
读取了Mesh结构体数据,我们现在要把它放到上一节中定义的Mesh类里,而上一步的processNode中,有这么一句:
meshes.push_back(processMesh(mesh, scene));
这里的processMesh函数就是将读取到的数据存储为Mesh类返回到meshes数组中,我们来看看它具体是怎么实现的:
1.5.1 获取Mesh中的顶点位置、法线和纹理坐标
这一步非常简单,我们定义了一个Vertex结构体,我们将在每个迭代之后将它加到vertices数组中。我们会遍历网格中的所有顶点(使用mesh->mNumVertices来获取)。
(纹理坐标比较特殊,Assimp允许一个模型在一个顶点上有最多8个不同的纹理坐标,我们不会用到那么多,我们只关心第一组纹理坐标。我们同样也想检查网格是否真的包含了纹理坐标)
Mesh processMesh(aiMesh *mesh, const aiScene *scene)
{
    vector<Vertex> vertices;
    vector<unsigned int> indices;
    vector<Texture> textures;
    for(unsigned int i = 0; i < mesh->mNumVertices; i++)
    {
        Vertex vertex;
        //顶点位置
        glm::vec3 vector;
			vector.x = mesh->mVertices[i].x;
			vector.y = mesh->mVertices[i].y;
			vector.z = mesh->mVertices[i].z;
			vertex.Position = vector;
			//法线
			vector.x = mesh->mNormals[i].x;
			vector.y = mesh->mNormals[i].y;
			vector.z = mesh->mNormals[i].z;
			vertex.Normal = vector;
			//纹理坐标
			if(mesh->mTextureCoords[0]) // 网格是否有纹理坐标?
			{
			    glm::vec2 vec;
			    vec.x = mesh->mTextureCoords[0][i].x;
			    vec.y = mesh->mTextureCoords[0][i].y;
			    vertex.TexCoords = vec;
			}
			else
			    vertex.TexCoords = glm::vec2(0.0f, 0.0f);
        vertices.push_back(vertex);
    }
1.5.2 获取Mesh中的索引
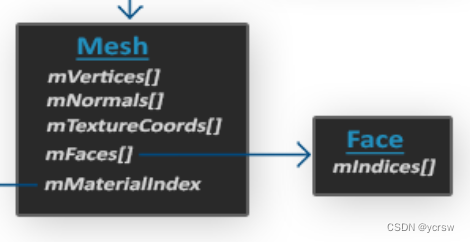
读取了顶点数据之后,自然要读取顶点的索引,我们也利用同样的原理从mesh的mFaces中读取Face,并从中提取索引
	for(unsigned int i = 0; i < mesh->mNumFaces; i++)
	{
	    aiFace face = mesh->mFaces[i];
	    for(unsigned int j = 0; j < face.mNumIndices; j++)
	        indices.push_back(face.mIndices[j]);
	}
1.5.3 获取Mesh中的材质
我们可以利用Mesh的mMaterialIndex变量(材质序号)进到Scene中利用工具函数loadMaterialTextures读取mMaterials(获取漫反射和/或镜面光贴图),存储在之前Mesh类中定义的Texture结构体中:
(我们这里同样也可以先判断是否有材质存在)
	if(mesh->mMaterialIndex >= 0)
	{
	    aiMaterial *material = scene->mMaterials[mesh->mMaterialIndex];
	    vector<Texture> diffuseMaps = loadMaterialTextures(material,
	                                        aiTextureType_DIFFUSE, "texture_diffuse");
	    textures.insert(textures.end(), diffuseMaps.begin(), diffuseMaps.end());
	    vector<Texture> specularMaps = loadMaterialTextures(material,
	                                        aiTextureType_SPECULAR, "texture_specular");
	    textures.insert(textures.end(), specularMaps.begin(), specularMaps.end());
	}
1.5.3.1 loadMaterialTextures
这个函数首先通过GetTextureCount函数检查储存在材质中某类纹理的数量,这个函数需要一个纹理类型。我们会使用GetTexture获取每个纹理的文件位置,它会将结果储存在一个aiString中。我们接下来使用另外一个叫做TextureFromFile的工具函数,它将会(用stb_image.h)加载一个纹理并返回该纹理的ID。
vector<Texture> loadMaterialTextures(aiMaterial *mat, aiTextureType type, string typeName)
{
    vector<Texture> textures;
    for(unsigned int i = 0; i < mat->GetTextureCount(type); i++)
    {
        aiString str;
        mat->GetTexture(type, i, &str);
        Texture texture;
        texture.id = TextureFromFile(str.C_Str(), directory);
        texture.type = typeName;
        texture.path = str;
        textures.push_back(texture);
    }
    return textures;
}
1.5.3.2 TextureFromFile
这一步就是利用传入的路径去读取、创建纹理,最后返回生成的纹理ID,其他基本与之前介绍的一致,就不赘述了
unsigned int TextureFromFile(const char* path, const string& directory)
{
    string filename = string(path);
    filename = directory + '/' + filename;

    unsigned int textureID;
    glGenTextures(1, &textureID);

    int width, height, nrComponents;
    unsigned char* data = stbi_load(filename.c_str(), &width, &height, &nrComponents, 0);
    if (data)
    {
        GLenum format;
        if (nrComponents == 1)
            format = GL_RED;
        else if (nrComponents == 3)
            format = GL_RGB;
        else if (nrComponents == 4)
            format = GL_RGBA;

        glBindTexture(GL_TEXTURE_2D, textureID);
        glTexImage2D(GL_TEXTURE_2D, 0, format, width, height, 0, format, GL_UNSIGNED_BYTE, data);
        glGenerateMipmap(GL_TEXTURE_2D);

        glTexParameteri(GL_TEXTURE_2D, GL_TEXTURE_WRAP_S, GL_REPEAT);
        glTexParameteri(GL_TEXTURE_2D, GL_TEXTURE_WRAP_T, GL_REPEAT);
        glTexParameteri(GL_TEXTURE_2D, GL_TEXTURE_MIN_FILTER, GL_LINEAR_MIPMAP_LINEAR);
        glTexParameteri(GL_TEXTURE_2D, GL_TEXTURE_MAG_FILTER, GL_LINEAR);

        stbi_image_free(data);
    }
    else
    {
        std::cout << "Texture failed to load at path: " << path << std::endl;
        stbi_image_free(data);
    }

    return textureID;
}
自此,加载模型的流程已全部完毕
2. 纹理读取优化
很多时候,我们需要重复使用一个纹理,但是按照上面介绍的流程的话,可能会导致重复加载纹理,这个过程的耗时是不可忽视的,所以我们应该考虑一种方法来节省加载纹理的耗时,为此,我们在之前的Texture结构体中加入纹理的路径变量:
struct Texture {
    unsigned int id;
    string type;
    aiString path;  // 我们储存纹理的路径用于与其它纹理进行比较
};
接下来我们将所有加载过的纹理储存在另一个vector中,在模型类的顶部声明为一个私有变量:
vector<Texture> textures_loaded;
之后,在loadMaterialTextures函数中,我们希望将纹理的路径与储存在textures_loaded这个vector中的所有纹理进行比较,看看当前纹理的路径是否与其中的一个相同。如果是的话,则跳过纹理加载/生成的部分,直接使用定位到的纹理结构体为网格的纹理。更新后的函数如下:
vector<Texture> loadMaterialTextures(aiMaterial *mat, aiTextureType type, string typeName)
{
    vector<Texture> textures;
    for(unsigned int i = 0; i < mat->GetTextureCount(type); i++)
    {
        aiString str;
        mat->GetTexture(type, i, &str);
        bool skip = false;
        for(unsigned int j = 0; j < textures_loaded.size(); j++)
        {
            if(std::strcmp(textures_loaded[j].path.data(), str.C_Str()) == 0)
            {
                textures.push_back(textures_loaded[j]);
                skip = true;
                break;
            }
        }
        if(!skip)
        {   // 如果纹理还没有被加载,则加载它
            Texture texture;
            texture.id = TextureFromFile(str.C_Str(), directory);
            texture.type = typeName;
            texture.path = str.C_Str();
            textures.push_back(texture);
            textures_loaded.push_back(texture); // 添加到已加载的纹理中
        }
    }
    return textures;
}
3. 实战
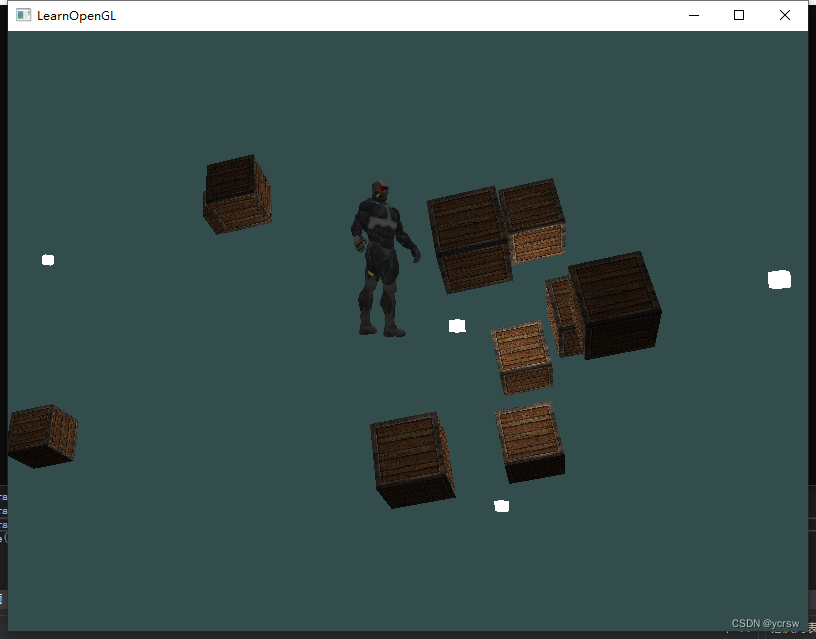
接下来我们加载一个孤岛危机游戏中的纳米装,有一个obj文件,一个mtl文件(包含漫反射,镜面高光和法线贴图),还有其他的一些纹理图片,我们这里只用加载obj文件,然后在着色器里让他只有漫反射颜色就行了:
	Model ourModel("Models/nanosuit/nanosuit.obj");
    Shader modelShader("Shaders/mshader.vs","Shaders/mshader.fs");
		modelShader.use();
        glm::mat4 model = glm::mat4(1.0f);
        model = glm::translate(model, glm::vec3(0.0f, 0.0f, -5.0f)); // translate it down so it's at the center of the scene
        model = glm::scale(model, glm::vec3(0.2f, 0.2f, 0.2f));	// it's a bit too big for our scene, so scale it down
        modelShader.setMat4("model", model);
        modelShader.setMat4("view", view);
        modelShader.setMat4("projection", projection);
        ourModel.Draw(modelShader);
(如果退出时有报Run-Time Check Failure #2 - Stack around the variable was corrupte问题,把 project->配置属性->c/c+±>代码生成->基本运行时检查 为 默认值 就不会报本异常。)
接下来,为了让这个模型更好地融入画面,我们还可以像其他的箱子那样,给他加上多光源:
#version 330 core
layout (location = 0) in vec3 aPos;
layout (location = 1) in vec3 aNormal;
layout (location = 2) in vec2 Texcoord;

out vec3 Normal;
out vec3 FragPos;
out vec2 TexCoords;

uniform mat4 model;
uniform mat4 view;
uniform mat4 projection;


void main()
{
    gl_Position = projection * view * model * vec4(aPos, 1.0);
    Normal = mat3(transpose(inverse(model))) * aNormal;
    FragPos = vec3(model * vec4(aPos, 1.0));
    TexCoords = Texcoord;
}
#version 330 core
struct Material {
    sampler2D texture_diffuse1;
    sampler2D texture_specular1;
    sampler2D texture_normal1;
    sampler2D texture_height1;
    float shininess;
};

struct PointLight {
    vec3 position;

    float constant;
    float linear;
    float quadratic;

    vec3 ambient;
    vec3 diffuse;
    vec3 specular;
};
#define NR_POINT_LIGHTS 4


struct DirLight {
    vec3 direction;

    vec3 ambient;
    vec3 diffuse;
    vec3 specular;
};

struct SpotLight {
    vec3 position;
    vec3 direction;

    float cutOff;
    float outerCutOff;
    float constant;
    float linear;
    float quadratic;

    vec3 ambient;
    vec3 diffuse;
    vec3 specular;
};

out vec4 FragColor;

in vec3 Normal;
in vec3 FragPos;
in vec2 TexCoords;

uniform vec3 viewPos;
uniform Material material;
uniform PointLight pointLights[NR_POINT_LIGHTS];
uniform DirLight dirLight;
uniform SpotLight spotLight;
//uniform sampler2D emission;

vec3 CalcDirLight(DirLight light, vec3 normal, vec3 viewDir);
vec3 CalcPointLight(PointLight light, vec3 normal, vec3 fragPos, vec3 viewDir);
vec3 CalcSpotLight(SpotLight light, vec3 norm, vec3 FragPos, vec3 viewDir);

void main()
{
    // 属性
    vec3 norm = normalize(Normal);
    vec3 viewDir = normalize(viewPos - FragPos);

    // 第一阶段:定向光照
    vec3 result = CalcDirLight(dirLight, norm, viewDir);
    // 第二阶段:点光源
    for(int i = 0; i < NR_POINT_LIGHTS; i++)
        result += CalcPointLight(pointLights[i], norm, FragPos, viewDir);
    // 第三阶段:聚光
    result += CalcSpotLight(spotLight, norm, FragPos, viewDir);

    FragColor = vec4(result, 1.0);
}

vec3 CalcDirLight(DirLight light, vec3 normal, vec3 viewDir)
{
    vec3 lightDir = normalize(-light.direction);
    // 漫反射着色
    float diff = max(dot(normal, lightDir), 0.0);
    // 镜面光着色
    vec3 reflectDir = reflect(-lightDir, normal);
    float spec = pow(max(dot(viewDir, reflectDir), 0.0), material.shininess);
    // 合并结果
    vec3 ambient  = light.ambient  * vec3(texture(material.texture_diffuse1, TexCoords));
    vec3 diffuse  = light.diffuse  * diff * vec3(texture(material.texture_diffuse1, TexCoords));
    vec3 specular = light.specular * spec * vec3(texture(material.texture_specular1, TexCoords));
    return (ambient + diffuse + specular);
}

vec3 CalcPointLight(PointLight light, vec3 normal, vec3 fragPos, vec3 viewDir)
{
    vec3 lightDir = normalize(light.position - fragPos);
    // 漫反射着色
    float diff = max(dot(normal, lightDir), 0.0);
    // 镜面光着色
    vec3 reflectDir = reflect(-lightDir, normal);
    float spec = pow(max(dot(viewDir, reflectDir), 0.0), material.shininess);
    // 衰减
    float distance    = length(light.position - fragPos);
    float attenuation = 1.0 / (light.constant + light.linear * distance +
                 light.quadratic * (distance * distance));
    // 合并结果
    vec3 ambient  = light.ambient  * vec3(texture(material.texture_diffuse1, TexCoords));
    vec3 diffuse  = light.diffuse  * diff * vec3(texture(material.texture_diffuse1, TexCoords));
    vec3 specular = light.specular * spec * vec3(texture(material.texture_specular1, TexCoords));
    ambient  *= attenuation;
    diffuse  *= attenuation;
    specular *= attenuation;
    return (ambient + diffuse + specular);
}

vec3 CalcSpotLight(SpotLight light, vec3 norm, vec3 FragPos, vec3 viewDir)
{
    vec3 lightDir = normalize(light.position - FragPos);
    float theta = dot(lightDir, normalize(-light.direction));
    float epsilon   = light.cutOff - light.outerCutOff;
    float intensity = clamp((theta - light.outerCutOff) / epsilon, 0.0, 1.0);
    vec3 result;
    // 执行光照计算
    // 环境光
    vec3 ambient = light.ambient * vec3(texture(material.texture_diffuse1, TexCoords));

    // 漫反射
    float diff = max(dot(norm, lightDir), 0.0);
    vec3 diffuse = light.diffuse * (diff * vec3(texture(material.texture_diffuse1, TexCoords)));

    // 镜面光
    vec3 reflectDir = reflect(-lightDir, norm);
    float spec = pow(max(dot(viewDir, reflectDir), 0.0), material.shininess);
    vec3 specular = light.specular * (spec * vec3(texture(material.texture_specular1, TexCoords)));

    float distance = length(light.position - FragPos);
    float attenuation = 1.0 / (light.constant + light.linear * distance +
                    light.quadratic * (distance * distance));

    diffuse *= attenuation * intensity;
    specular *= attenuation * intensity;
    return  ambient + diffuse + specular;
}
效果:
4. 附件
这里是全部代码,如果有问题的话可以对照一下:模型加载


 381
381


 被折叠的 条评论
为什么被折叠?
被折叠的 条评论
为什么被折叠?
 到【灌水乐园】发言


