


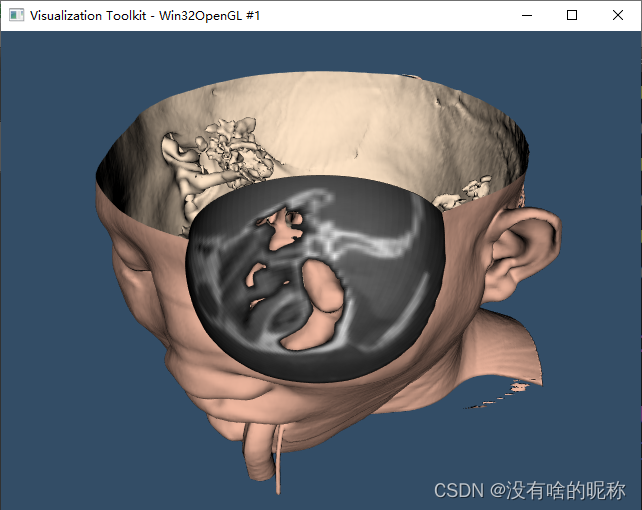
 该代码示例展示了如何使用vtk库创建组织透镜效果,通过结合vtkClipDataSet和vtkFlyingEdges3D或vtkMarchingCubes等工具,对体数据进行剪裁和采样,以揭示被遮挡区域的细节。代码中包含了数据读取、等值面提取、球体剪裁以及渲染过程。
组织透镜效果,可以适当看下被遮挡的地方究竟是什么样子的,比单独看切片要好一些,当然实际效果还需要综合考量。
此示例使用两个vtkClipDataSet过滤器来实现“组织透镜”效果。首先,使用vtkSphere隐式函数在用vtkFlyingEdges3D或vtkMarchingCubes提取的等值面中剪裁球面孔。然后是几何[vtkSphere](VTK: vtkSphere Class Reference)Source使用vtkProbeFilter对原始卷数据进行采样。vtkClipDataSet使用生成的标量点数据来剪裁具有等值面的球面。
具体看代码
#include <vtkActor.h>
#include <vtkCamera.h>
#include <vtkClipDataSet.h>
#include <vtkDataSetMapper.h>
#include <vtkFlyingEdges3D.h>
#include <vtkImplicitVolume.h>
#include <vtkLookupTable.h>
#include <vtkMetaImageReader.h>
#include <vtkNamedColors.h>
#include <vtkNew.h>
#include <vtkPolyDataMapper.h>
#include <vtkProbeFilter.h>
#include <vtkProperty.h>
#include <vtkRenderWindow.h>
#include <vtkRenderWindowInteractor.h>
#include <vtkRenderer.h>
#include <vtkSphere.h>
#include <vtkSphereSource.h>
#include <vtkUnstructuredGrid.h>
#include <vtkVersion.h>
#include <vtkOpenGLRenderer.h>
#include <vtkWin32OpenGLRenderWindow.h>
//#include <vtkGPUVolumeRayCastMapper.h>
//GPUVolumeRenderMapper
#include <vtkLODProp3D.h>

// vtkFlyingEdges3D was introduced in VTK >= 8.2
#if VTK_MAJOR_VERSION >= 9 || (VTK_MAJOR_VERSION >= 8 && VTK_MINOR_VERSION >= 2)
#define USE_FLYING_EDGES
#else
#undef USE_FLYING_EDGES
#endif

#ifdef USE_FLYING_EDGES
#include <vtkFlyingEdges3D.h>
#else
#include <vtkMarchingCubes.h>
#endif

#include <array>
#include <vtkAutoInit.h>
VTK_MODULE_INIT(vtkRenderingOpenGL2);
VTK_MODULE_INIT(vtkInteractionStyle);
VTK_MODULE_INIT(vtkRenderingContextOpenGL2);
VTK_MODULE_INIT(vtkRenderingVolumeOpenGL2);  //新的

int main(int argc, char* argv[])
{
  vtkNew<vtkNamedColors> colors;

  std::array<unsigned char, 4> skinColor{{240, 184, 160, 255}};
  colors->SetColor("SkinColor", skinColor.data());
  std::array<unsigned char, 4> backColor{{255, 229, 200, 255}};
  colors->SetColor("BackfaceColor", backColor.data());
  std::array<unsigned char, 4> bkg{{51, 77, 102, 255}};
  colors->SetColor("BkgColor", bkg.data());

  if (argc < 2)
  {
    cout << "Usage: " << argv[0] << " file.mhd e.g. FullHead.mhd" << endl;
    return EXIT_FAILURE;
  }

  // 读取体数据
  vtkNew<vtkMetaImageReader> reader;
  reader->SetFileName(argv[1]);
  reader->Update();

  //已知对应于患者的皮肤,数值是500的等值面或轮廓值。
#ifdef USE_FLYING_EDGES
  vtkNew<vtkFlyingEdges3D> skinExtractor;
#else
  vtkNew<vtkMarchingCubes> skinExtractor;
#endif
  skinExtractor->SetInputConnection(reader->GetOutputPort());
  skinExtractor->SetValue(0, 500);  //500

  //定义一个球形剪裁函数来剪裁等值面
  vtkNew<vtkSphere> clipFunction;
  clipFunction->SetRadius(50);
  clipFunction->SetCenter(73, 52, 15);

  //用球体剪裁等值面
  vtkNew<vtkClipDataSet> skinClip;
  skinClip->SetInputConnection(skinExtractor->GetOutputPort());
  skinClip->SetClipFunction(clipFunction);
  skinClip->SetValue(0);
  skinClip->GenerateClipScalarsOn();
  skinClip->Update();

  vtkNew<vtkDataSetMapper> skinMapper;
  skinMapper->SetInputConnection(skinClip->GetOutputPort());
  skinMapper->ScalarVisibilityOff();

  vtkNew<vtkActor> skin;
  skin->SetMapper(skinMapper);
  skin->GetProperty()->SetDiffuseColor(
      colors->GetColor3d("SkinColor").GetData());

  vtkNew<vtkProperty> backProp;
  backProp->SetDiffuseColor(colors->GetColor3d("BackfaceColor").GetData());
  skin->SetBackfaceProperty(backProp);

  //为“镜头”定义一个模型。其几何图形与用于剪裁等值面的隐式球体相匹配
  vtkNew<vtkSphereSource> lensModel;
  lensModel->SetRadius(50);
  lensModel->SetCenter(73, 52, 15);
  lensModel->SetPhiResolution(201);
  lensModel->SetThetaResolution(101);

  // 使用透镜模型几何结构对输入体数据进行采样
  vtkNew<vtkProbeFilter> lensProbe;
  lensProbe->SetInputConnection(lensModel->GetOutputPort());
  lensProbe->SetSourceConnection(reader->GetOutputPort());

  // 使用等值面值剪裁镜头数据
  vtkNew<vtkClipDataSet> lensClip;
  lensClip->SetInputConnection(lensProbe->GetOutputPort());
  lensClip->SetValue(500);
  lensClip->GenerateClipScalarsOff();
  lensClip->Update();

  // 定义合适的灰度lut表
  vtkNew<vtkLookupTable> bwLut;
  bwLut->SetTableRange(0, 2048);
  bwLut->SetSaturationRange(0, 0);
  bwLut->SetHueRange(0, 0);
  bwLut->SetValueRange(0.2, 1);
  bwLut->Build();

  vtkNew<vtkDataSetMapper> lensMapper;
  lensMapper->SetInputConnection(lensClip->GetOutputPort());
  lensMapper->SetScalarRange(lensClip->GetOutput()->GetScalarRange());
  lensMapper->SetLookupTable(bwLut);

  vtkNew<vtkActor> lens;
  lens->SetMapper(lensMapper);

  // 创建数据的初始视图很方便。FocalPoint和Position形成一个矢量方向。稍后(ResetCamera方法),此向量用于定位相机,以查看此方向上的数据。
  vtkNew<vtkCamera> aCamera;
  aCamera->SetViewUp(0, 0, -1);
  aCamera->SetPosition(0, -1, 0);
  aCamera->SetFocalPoint(0, 0, 0);
  aCamera->ComputeViewPlaneNormal();
  aCamera->Azimuth(30.0);
  aCamera->Elevation(30.0);

  创建渲染器、渲染窗口和交互器等
  vtkNew<vtkRenderer> aRenderer;
  vtkNew<vtkRenderWindow> renWin;
  renWin->AddRenderer(aRenderer);
  vtkNew<vtkRenderWindowInteractor> iren;
  iren->SetRenderWindow(renWin);
  // actor将添加到渲染器中。将创建初始摄影机视图。Dolly方法将摄影机移向FocalPoint,从而放大图像。
  aRenderer->AddActor(lens);
  aRenderer->AddActor(skin);
  aRenderer->SetActiveCamera(aCamera);
  aRenderer->ResetCamera();
  aCamera->Dolly(1.5);
//设置背景
  aRenderer->SetBackground(colors->GetColor3d("BkgColor").GetData());
  renWin->SetSize(640, 480);
  renWin->SetWindowName("TissueLens");

  aRenderer->ResetCameraClippingRange();

  renWin->Render();
  iren->Initialize();
  iren->Start();

  return EXIT_SUCCESS;
}


 被折叠的 条评论
为什么被折叠?
被折叠的 条评论
为什么被折叠?
 到【灌水乐园】发言


