


这篇文章主要介绍了如何安装vscode并配置python环境,具有一定借鉴价值,需要的朋友可以参考下。希望大家阅读完这篇文章后大有收获,下面让小编带着大家一起了解一下。

大家好,小编来为大家解答以下问题,如何安装vscode并配置python环境,vscode安装python插件后怎么用,现在让我们一起来看看吧!

Visual Studio Code - Python Install - Packages
新的笔记本装机,大家都在用 VS Code,试试
- 安装VS Code ,看看能支持的最新的Python 版本;
- 安装 python 3.7.3;
- VS Code 中 Menu 选 View -> Extensions (Ctrl+Shitf+X) ; 打开extension 的窗口 ;
- 搜索 Python 并且 安装 ,后面就会有 MS-python 的安装指导 ,Install
- VSCode updated 1.58.2 (pylance) Select an interpreter 使用 Python: Select Interpreter 设置 python 的安装目录
常用的whm 和 Plugin
open the TERMINAL window
go to the PS C:\Program Files (x86)\Microsoft Visual Studio\Shared\Python37_64\s>
目前 Python 升级 pip 以后会 提示 使用 python -m pip 取代原有的pip
回到 Python 目录下 (Python37_64)
python -m pip install -i https://pypi.tuna.tsinghua.edu.cn/simple flask-mail
-i 后面跟的是 国内的 python simple 库的 url, 有效防止install time-out 的问题
清华: https://pypi.tuna.tsinghua.edu.cn/simple
阿里: https://mirrors.aliyun.com/pypi/simple
如果提示 权限有问题可以试试 加上 --user
解决SSLError
在pip install 上加上 --trusted-host pypi.tuna.tsinghua.edu.cn
通常的安装目录:C:\Users\{{USER}}\AppData\Roaming\Python\Python37\site-packages\C:\Users\{{USER}}\AppData\Local\Programs\Python\Python38\Lib\site-packages
- Excel https://openpyxl.readthedocs.io/en/stable/
.\pip install --user openpyxl - Jupyter Notebook - install jupyter
- FASTAPI “C:/Program Files (x86)/Microsoft Visual Studio/Shared/Python37_64/python.exe” -m pip install -i https://pypi.tuna.tsinghua.edu.cn/simple fastapi --user
- UVICORN “C:/Program Files (x86)/Microsoft Visual Studio/Shared/Python37_64/python.exe” -m pip install -i https://pypi.tuna.tsinghua.edu.cn/simple uvicorn --user
- BaseModel “C:/Program Files (x86)/Microsoft Visual Studio/Shared/Python37_64/python.exe” -m pip install -i https://pypi.tuna.tsinghua.edu.cn/simple BaseModel --user
- simplexml
"C:/Program Files (x86)/Microsoft Visual Studio/Shared/Python37_64/python.exe" -m pip install -i https://pypi.tuna.tsinghua.edu.cn/simple python-simplexml --user - MongoDB “C:/Program Files (x86)/Microsoft Visual Studio/Shared/Python37_64/python.exe” -m pip install -i https://pypi.tuna.tsinghua.edu.cn/simple pymongo --user
- records “C:/Program Files (x86)/Microsoft Visual Studio/Shared/Python37_64/python.exe” -m pip install -i https://pypi.tuna.tsinghua.edu.cn/simple records --user
- MYSQL-Connector
python.exe -m pip install -i https://pypi.tuna.tsinghua.edu.cn/simple mysql-connector-python --user - mysql (import MySQLdb)
pip install mysql使用 import mysql.connector
一定要记得按装 mysql 的 mysql-python-connector。 否则python import 就会报错:pylint import error;或者会报 mysql.connector.errors.NotSupportedError
mysql-python-connector download - pymysql
pip install pymysql - BeautifulSoup
python.exe -m pip install -i https://pypi.tuna.tsinghua.edu.cn/simple BeautifulSoup4 --user(BeautifulSoup is an very old version, need to install BeautifulSoup4) - Selenium: python.exe -m pip install -i https://pypi.tuna.tsinghua.edu.cn/simple selenium --user (如果没有装wheel,会提示装wheel) (ChromeDriver 和 FireFoxDriver ) (ChromeDriver 要放到Python.exe 所在目录下)
- WHEEL:
python.exe -m pip install -i https://pypi.tuna.tsinghua.edu.cn/simple wheel --user - pandas-profiling: 三行 code 生产数据 report, - install pandas-profiling.
Windows 上 打开 CMD 使用 where pandas-profiling 找到安装目录,找到父目录下的site-package/pandas-profiling 文件夹,找到配置文件 .yaml - Gensim:最好先查看一下 scipy 和 numpy 的版本,或者先uninstall 这两兄弟python有趣作品python创意作品。然后再安装
"C:/Program Files (x86)/Microsoft Visual Studio/Shared/Python36_64/python.exe" -m pip install gensim -i https://pypi.tuna.tsinghua.edu.cn/simple --user - Jieba (结巴)Jieba on Git
- SnowNLP SnowNLP on Git
- THULAC THULAC on Git
- NLPIR: pip install pynlpir NLPIR on Git
- PKUseg: PKUseg on Git
- NLTK: pip install nltk
- HanLP: HanLP on Git
- Pyecharts Pyecharts intro
文件所在的包,可能会更新哟,注意Import 的路径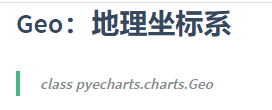
Pyecharts on Github
实例 地图实例 - mplfinance mplfinance on pypi
- XML to Dict :转XML到JSON
python.exe -m pip install -i https://pypi.tuna.tsinghua.edu.cn/simple xmltodict - Logging
python.exe -m pip install -i https://pypi.tuna.tsinghua.edu.cn/simple logging - 地理编码 geopy
pip install geopy - fbjson2table fbjson2table on Pypi.org
pip install fbjson2table - tabulate console 输出表格
pip install tabulate - torch
"C:/Program Files (x86)/Microsoft Visual Studio/Shared/Python36_64/python.exe" -m pip install torch -i https://pypi.tuna.tsinghua.edu.cn/simple
如果使用cuda,需要去 pytorch 的官网,来选择安装工具,根据提示来生成安装命令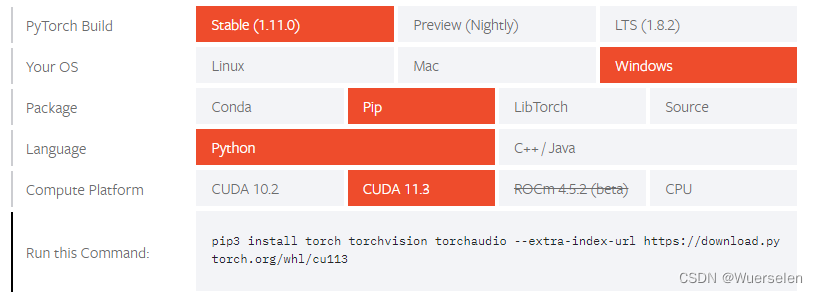
- pandasgui 依赖于 PyQt
"C:/Program Files (x86)/Microsoft Visual Studio/Shared/Python36_64/python.exe" -m pip install pandasgui -i https://pypi.tuna.tsinghua.edu.cn/simple - pywin32
pip install pypiwin32 -i https://pypi.tuna.tsinghua.edu.cn/simple
ModuleNotFoundError: No module named ‘win32api’ - paddle: initial Install: common, dual, tight, data for paddle
- cv2: import cv2:
pip install opencv-python - Scrapy:
pip install scrapy
install scrapy
Scrapy 教程
Scrapy详解之Response - Dash:
Dash Install - PySimpleGUI
pip install pySimpleGUI
Install demo:pip install psgdemos
CMD Line: psgdemos 启动 DEMO 例子
demo: Demo_All_Elements_Simple.py - Could not find a version that satisfies the requirement jaxlib ==> StackOverflow: Thanks to cloudhan’s jax-windows-builder, it is now rather easy to install JAX and jaxlib on windows. E.g.
pip install jax==0.3.13 https://whls.blob.core.windows.net/unstable/cuda111/jaxlib-0.3.7+cuda11.cudnn82-cp38-none-win_amd64.whl - redis
pip install python-redis
- 使用 requirements.txt
"C:/Program Files (x86)/Microsoft Visual Studio/Shared/Python36_64/python.exe" -m pip install -r "D:/workspace/MyPy/TEST/requirements.txt" -i https://pypi.tuna.tsinghua.edu.cn/simple --user
n_freq_table_max: 10 # 更改Variable下面,每个变量显示的最大参数个数
-
目前可以看到 VS Code 按照插件时的 命令如下: “C:/Program Files (x86)/Microsoft Visual Studio/Shared/Python36_64/python.exe” -m pip install -U pylint --user
-
Add Python install folder into WINDOW PATH -> 编辑系统环境变量


Python Import
Jupyter
git clone https://github.com/ipython/ipython-in-depth
Start Jupyter in Command Window
jupyter notebook
查看jupyter配置文件
jupyter notebook --generate-config
Jupyter Notebook修改默认的工作目录
jupyter安装步骤
jupyter使用
MySQL
SQLAlchemy
Python之Mysql及SQLAlchemy操作总结
sqlalchemy 原生sql查询 返回字典形式数据
SQLAlchemy映射已有数据表
sqlalchemy批量插入
sqlalchemy批量插入数据(性能问题)
Thread and Process
python线程池ThreadPoolExecutor与进程池ProcessPoolExecutor
Python 并发编程:PoolExecutor 篇
- 任务通过 executor.submit 提交到 executor 的任务队列,返回一个 future 对象。=> Future 是常见的一种并发设计模式。一个Future对象代表了一些尚未就绪(完成)的结果,在「将来」的某个时间就绪了之后就可以获取到这个结果。
- 任务被调度到各个 workers 中执行。但是要注意,一个任务一旦被执行,在执行完毕前,会一直占用该 worker!=> 如果 workers 不够用,其他的任务会一直等待!因此 PoolExecutor 不适合实时任务。
add_done_callback(fn):future 完成后,会执行fn(future)
future = executor.submit(funciton, args)
future.add_done_callback(callback_function)
FASTAPI
- CAUTIONS:
- 生产环境部署时,注意:host=‘0.0.0.0’
- gunicorn (守护进程让fastapi一直运行着)
py -m pip install gunicorn --user
安装目录: C:\Users\Administrator\AppData\Roaming\Python\Python37\Scripts,gunicorn main:app -w 4 -k uvicorn.workers.UvicornWorker
FAILED TO START due to no fcntl
FAILED TO Indstall fcntl: py -m pip install -i https://pypi.tuna.tsinghua.edu.cn/simple micropython-fcntl --user
FastAPI official site
FastApi应用和部署生产环境
uvicorn support the FastAPI
从零开始学FastAPI(1)-简明的部分官方文档抽取学习篇
FastApi教程|直接返回响应
HHTP request/response with application-content = text/xml
MongoDB
FLASK
Flask-Babel
Flask-Babel使用简易教程(一)
pybabel --list-locales 命令,查看本机支持的语言
Gensim
Gensim Word2vec
Gensim Core Concepts
Gensim Doc2vec
在Python上怎么也用不了的 gensim(IDE VScode)
训练Word2Vec报错:RuntimeError: you must first build vocabulary before training the model
python中gensim库详解
gensim实现python对word2vec的训练和计算 ==> 一些word2vec模型的查询方法
机器学习算法Python实现:doc2vec 求句子相似度
gensim Word2Vec 训练和使用(Model一定要加载到内存中,节省时间!!!)
分词
自然语言处理入门(4)——中文分词原理及分词工具介绍
Thulac
Loggin 日志
PYTHON 之 LOG日志
Python之日志处理(logging模块)
Python Logger使用 -> Log Class
python处理logger日志 -->Log Method
MPIFinance
mplfinance tutorials
Python的mpl_finance模块从2020年已经提醒弃用,新mplfinance模块详解(一)
fbjson2tabel
- get the json format using 查看产生的表的结构和字段名字
from fbjson2table.func_lib import parse_fb_json
from fbjson2table.table_class import TempDFs
json_content = parse_fb_json($PATH_OF_JSON)
temp_dfs = TempDFs(json_content)
for df in temp_dfs.df_list:
    print(df)
- get detail view of the tables
Scrapy
Python爬虫系列:Scrapy爬取实例(End~)
create project folder
create a project scrapy startproject test
进入proj1 目录,使用template生成spider 文件
进入目录里下面的 spiders 目录,找到刚才用 scrapy gensider 时使用的名字生成的 stocks.pyproj1\proj1\spiders\proj.py
start_urls = ['https://www.xyz.com/aaa/1.html'] # 设置初始的 URL
进入 spiders 文件夹,使用 scrapy runspider "D:/tttt/ttttt/abcd.py" -O quotes.json来测试
scrapy runspider in VScode on WIN10(Enterprise) 找不到下载的output 文件
输出文件用 UTF8 编码
通过执行scrapy crawl spidername -o filename.json输出到文件
此时仅需要在工程的根目录下setting.py文件中设置:FEED_EXPORT_ENCODING = ‘utf-8’
CUDA
install
CUDA安装教程(超详细)
一定要装cuDNN
Package | 解决 Windows10 Anaconda环境 CUDA11.5 pytorch运行报错 No CUDA runtime is found
CUDA Error handling
- C:\Users\work\AppData\Local\Programs\Python\Python38\lib\site-packages\torch\utils\cpp_extension.py:323: UserWarning: Error checking compiler version for cl: [WinError 2] 系统找不到指定的文件。
warnings.warn(f’Error checking compiler version for {compiler}: {error}')
pytorch c++混编报错 Error checking compiler version for cl: [WinError 2] 系统找 不到指定的文件
解决Windows 10下PyTorch报错“Error checking compiler version for cl”
安装VSStudio 2022 后需要根据系统自己查看cl.exe所在目录
目前VSStudio cl.exe -64 所在位置C:\Program Files\Microsoft Visual Studio\2022\Community\VC\Tools\MSVC\14.32.31326\bin\Hostx64\x64 - Package | 解决 Windows10 Anaconda环境 CUDA11.5 pytorch运行报错 No CUDA runtime is found
看下里当前(2022June)的主要问题是,Pytorch.org 目前只支持到 cuda 11.3,而我是最近装的11.6,所以,版本差异存在,可能导致显示 cuda.is_cuda_available() 报错:AttributeError: module 'torch' has no attribute 'is_cuda_available',正确的语法应该是torch.cuda.is_available()。现在显示为False,说明目前不支持,这个应该就和pytorch.org 最新支持的版本有关系了。
pandas-profiling
official site
change settings
default_config_example
TensorFlow
Study
tensor flow install
基本分类:对服装图像进行分类


 571
571


 被折叠的 条评论
为什么被折叠?
被折叠的 条评论
为什么被折叠?
 到【灌水乐园】发言


