


近年来,随着深度学习的迅猛发展,计算机视觉领域取得了巨大的突破。其中,目标检测是计算机视觉中的一个重要任务,它在许多应用领域中起到了至关重要的作用。然而,目标检测所需的大量标注数据集的制作却是一项耗时且繁琐的工作。
为了解决这个问题,本文实现了一个基于YOLOv5的自动数据集标注功能脚本。YOLOv5是当今目标检测领域的一种优秀模型,其高效准确的检测能力被广泛认可。
我们的自动数据集标注工具通过使用已经训练好的YOLOv5模型,可以快速而准确地对输入的图像进行目标检测,将检测结果存储为标签文件(xml格式),生成标注数据集。这样,用户无需手动进行标注,大大提高了数据集标注的效率和准确性,为研究者和开发者节省宝贵的时间和精力。
说明:该工具还是一个基线版本,后续会根据用户反馈不定时更新
该工具是在之前yolov5剪枝与知识蒸馏项目的基础上更新的脚本功能,所以直接clone该项目即可,或者将我的代码复制到你自己代码中。
使用说明
先下载完整项目代码
1.git clone https://github.com/YINYIPENG-EN/Knowledge_distillation_Pruning_Yolov5.git
2.cd tools
3.python auto_label.py --weights [权重路径] --source [需要标注的数据集路径]
运行脚本后会自动对数据集进行目标检测,标注后的xml标签文件和检测效果图会自动保存在项目下的runs/ Datasets/DetectImages中。检测结果和标注结果如下图:
 | 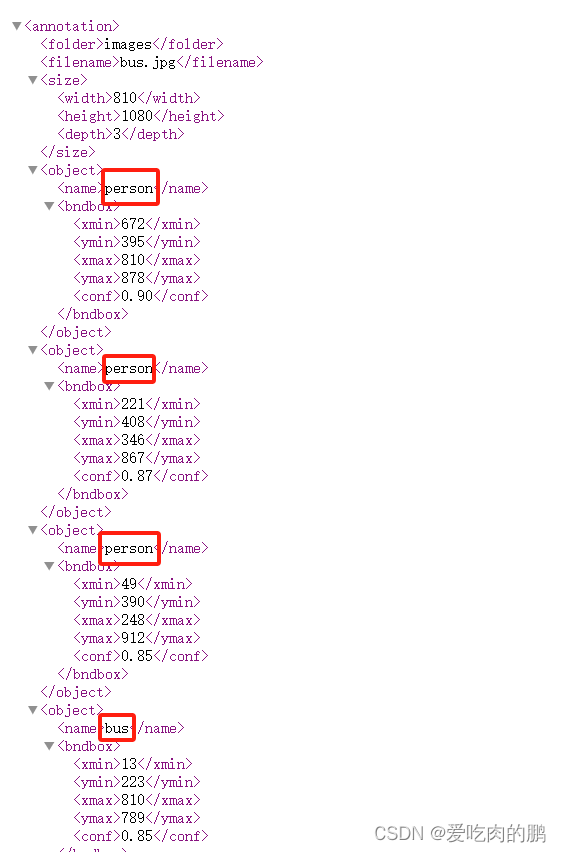 |
可以根据检测结果图像来看标注结果是否准确。
xml格式说明:<size>存放的是图像的大小,<name>标签存放的是类名,<bndbox>标签中存放的是box标签,分别对应标注框的左上角和右下角以及检测结果的置信度。【这里并未转成center_x,center_y,w,h】。xyxy->xywh的部分在我项目voc_label.py中有,具体使用说明可以参考我项目readme.md训练自己的数据集。
如果需要指定类别进行标注,可以在运行代码的时候加上--classes 以指定特定的类。
注意事项:
自动标注的结果取决于训练好的YOLOv5模型的准确率。因此,我们建议在使用自动标注功能时,用户应该先对所使用的模型进行准确性检验,以确保标注结果的可靠性。对于那些标注结果不准确的样本,用户可以通过标注工具进行手动调整,以进一步提高数据集的准确性。
需要特别说明的是,虽然我们的自动标注功能可以大大减少标注工作量,但我们并不能保证所有的标注结果都是完全准确的。这是因为目标检测本身就具有一定的误差率,而且自动标注功能仍然处于发展阶段,还有待不断的改进和优化。
在未来的更新中,我们计划增加调整边界框的功能,以帮助用户更方便地对标注结果进行调整。我们会继续努力改进自动标注功能,提高其准确率和稳定性,以满足用户在目标检测任务中的需求。
标注代码如下(建议还是clone我项目代码中使用):
# 该脚本的功能是通过已训练好的模型自动标注数据集
# 2024.01.28
# 作者:yinyipeng
# 邮箱:15930920977@163.com
import os
import argparse
import torch
from pathlib import Path
import cv2
import xml.etree.cElementTree as ET
from models.experimental import attempt_load
from utils.datasets import LoadImages
from utils.general import set_logging, check_img_size, non_max_suppression, scale_coords, colorstr, increment_path, \
    print_args
from utils.plots import Annotator, colors
from utils.torch_utils import select_device, time_sync

FILE = Path(__file__).resolve()

def create_xml_file(image_name, img0, detections, save_path):
    '''
    image_name:图像名称
    img0:原始图像
    detections:检测结果。列表形式,每个列表中对应该图像所有目标(dict形式)
    '''
    h, w, c = img0.shape
    root = ET.Element('annotation')
    folder = ET.SubElement(root, "folder")
    folder.text = 'images'
    filename = ET.SubElement(root, "filename")
    filename.text = image_name
    size = ET.SubElement(root, "size")
    width = ET.SubElement(size, "width")
    width.text = str(w)
    height = ET.SubElement(size, "height")
    height.text = str(h)
    depth = ET.SubElement(size, "depth")
    depth.text = str(c)

    for detection in detections:
        object = ET.SubElement(root, "object")
        name = ET.SubElement(object, "name")
        name.text = detection["class"]  # 获得类名
        # boxes信息
        bndbox = ET.SubElement(object, "bndbox")
        xmin = ET.SubElement(bndbox, "xmin")
        xmin.text = str(detection["xmin"])
        ymin = ET.SubElement(bndbox, "ymin")
        ymin.text = str(detection["ymin"])
        xmax = ET.SubElement(bndbox, "xmax")
        xmax.text = str(detection["xmax"])
        ymax = ET.SubElement(bndbox, "ymax")
        ymax.text = str(detection["ymax"])
        conf = ET.SubElement(bndbox, "conf")
        conf.text = detection["conf"]
    tree = ET.ElementTree(root)
    xml_file_path = f"{image_name.split('.')[0]}.xml"  # 生成的XML文件名与图像文件名相同
    tree.write(os.path.join(save_path, xml_file_path))

@torch.no_grad()
def run(weights='yolov5s.pt',  # model.pt path(s)
        source='data/images',  # file/dir/URL/glob, 0 for webcam
        imgsz=640,  # inference size (pixels)
        conf_thres=0.25,  # confidence threshold
        iou_thres=0.45,  # NMS IOU threshold
        max_det=1000,  # maximum detections per image
        device='',  # cuda device, i.e. 0 or 0,1,2,3 or cpu
        nosave=False,  # do not save images/videos
        classes=None,  # filter by class: --class 0, or --class 0 2 3
        agnostic_nms=False,  # class-agnostic NMS
        augment=False,  # augmented inference
        project='runs/Datasets',  # save results to project/name
        name='DetectImages',  # save results to project/name
        line_thickness=3,  # bounding box thickness (pixels)
        hide_labels=False,  # hide labels
        hide_conf=False,  # hide confidences
        half=False,  # use FP16 half-precision inference
        exist_ok=False
        ):
    source = str(source)
    save_img = not nosave and not source.endswith('.txt')  # save inference images
    save_dir = increment_path(Path(project) / name, exist_ok=exist_ok)  # increment run
    (save_dir).mkdir(parents=True, exist_ok=True)  # make dir
    # Initialize
    set_logging()
    device = select_device(device)
    half &= device.type != 'cpu'  # half precision only supported on CUDA

    # Load model
    w = str(weights[0] if isinstance(weights, list) else weights)
    _, _ = 64, [f'class{i}' for i in range(1000)]  # assign defaults

    model = torch.jit.load(w) if 'torchscript' in w else attempt_load(weights, map_location=device)
    stride = int(model.stride.max())  # model stride
    names = model.module.names if hasattr(model, 'module') else model.names  # get class names
    if half:
        model.half()  # to FP16
    imgsz = check_img_size(imgsz, s=stride)  # check image size

    # Dataloader
    dataset = LoadImages(source, img_size=imgsz, stride=stride, auto=True)
    bs = 1  # batch_size

    # Run inference
    if device.type != 'cpu':  # 如果为pt文件且为GPU
        model(torch.zeros(1, 3, *imgsz).to(device).type_as(next(model.parameters())))  # run once
    dt, seen = [0.0, 0.0, 0.0], 0
    for path, img, im0s, vid_cap in dataset:
        pred_list = []

        t1 = time_sync()
        img = torch.from_numpy(img).to(device)
        img = img.half() if half else img.float()  # uint8 to fp16/32
        img = img / 255.0  # 0 - 255 to 0.0 - 1.0
        if len(img.shape) == 3:
            img = img[None]  # expand for batch dim
        t2 = time_sync()
        dt[0] += t2 - t1  # 记录图像处理时间

        # Inference
        visualize = False
        pred = model(img, augment=augment, visualize=visualize)[0]
        t3 = time_sync()
        dt[1] += t3 - t2  # 记录推理时间(不含NMS)

        # NMS
        pred = non_max_suppression(pred, conf_thres, iou_thres, classes, agnostic_nms, max_det=max_det)
        dt[2] += time_sync() - t3  # 记录含NMS时间

        # Process predictions
        for i, det in enumerate(pred):  # per image
            seen += 1
            p, s, im0, frame = path, '', im0s.copy(), getattr(dataset, 'frame', 0)

            p = Path(p)  # to Path
            save_path = str(save_dir / p.name)  # img.jpg
            s += '%gx%g ' % img.shape[2:]  # print string
            annotator = Annotator(im0, line_width=line_thickness, example=str(names))
            if len(det):  # 获取目标数量
                # Rescale boxes from img_size to im0 size
                det[:, :4] = scale_coords(img.shape[2:], det[:, :4], im0.shape).round()
                # det shape [number of targets,6],6:x1y1x2y2,conf,cls
                # Print results
                for c in det[:, -1].unique():
                    n = (det[:, -1] == c).sum()  # detections per class
                    s += f"{n} {names[int(c)]}{'s' * (n > 1)}, "  # add to string
                for i in range(len(det)):
                    # get class name
                    class_name = names[int(det[i, -1].cpu())]
                    pred_dict = {}
                    pred_dict['class'] = class_name
                    pred_dict['xmin'] = int(det[i, 0].cpu())
                    pred_dict['ymin'] = int(det[i, 1].cpu())
                    pred_dict['xmax'] = int(det[i, 2].cpu())
                    pred_dict['ymax'] = int(det[i, 3].cpu())
                    pred_dict['conf'] = f'{det[i, -2]:.2f}'
                    pred_list.append(pred_dict)
                # Write results
                for *xyxy, conf, cls in reversed(det):

                    if save_img:  # Add bbox to image
                        c = int(cls)  # integer class
                        label = None if hide_labels else (names[c] if hide_conf else f'{names[c]} {conf:.2f}')
                        annotator.box_label(xyxy, label, color=colors(c, True))

            # Print time (inference-only)
            print(f'{s}Done. ({t3 - t2:.3f}s)')
            create_xml_file(p.name, im0, pred_list, save_dir)
            # Stream results
            im0 = annotator.result()
            # Save results (image with detections)
            if save_img:
                if dataset.mode == 'image':
                    cv2.imwrite(save_path, im0)


    # Print results
    t = tuple(x / seen * 1E3 for x in dt)  # speeds per image
    print(f'Speed: %.1fms pre-process, %.1fms inference, %.1fms NMS per image at shape {(1, 3, *imgsz)}' % t)
    if save_img:
        print(f"Results saved to {colorstr('bold', save_dir)}{''}")

def parse_opt():
    parser = argparse.ArgumentParser()
    parser.add_argument('--weights', nargs='+', type=str, default='../yolov5s.pt', help='model path(s)')
    parser.add_argument('--source', type=str, default='../data/images', help='file/dir/')
    parser.add_argument('--imgsz', '--img', '--img-size', nargs='+', type=int, default=[640], help='inference size h,w')
    parser.add_argument('--conf-thres', type=float, default=0.25, help='confidence threshold')
    parser.add_argument('--iou-thres', type=float, default=0.45, help='NMS IoU threshold')
    parser.add_argument('--max-det', type=int, default=1000, help='maximum detections per image')
    parser.add_argument('--device', default='0', help='cuda device, i.e. 0 or 0,1,2,3 or cpu')
    parser.add_argument('--nosave', action='store_true', help='do not save images/videos')
    parser.add_argument('--classes', nargs='+', type=int, help='filter by class: --classes 0, or --classes 0 2 3')
    parser.add_argument('--agnostic-nms', action='store_true', help='class-agnostic NMS')
    parser.add_argument('--augment', action='store_true', help='augmented inference')
    parser.add_argument('--project', default='../runs/Datasets', help='save results to project/name')
    parser.add_argument('--name', default='DetectImages', help='save results to project/name')
    parser.add_argument('--line-thickness', default=3, type=int, help='bounding box thickness (pixels)')
    parser.add_argument('--hide-labels', default=False, action='store_true', help='hide labels')
    parser.add_argument('--hide-conf', default=False, action='store_true', help='hide confidences')
    parser.add_argument('--half', action='store_true', help='use FP16 half-precision inference')
    parser.add_argument('--exist-ok', action='store_true', help='existing project/name ok, do not increment')
    opt = parser.parse_args()
    opt.imgsz *= 2 if len(opt.imgsz) == 1 else 1  # expand
    print_args(FILE.stem, opt)
    return opt


def main(opt):
    run(**vars(opt))


if __name__ == "__main__":
    opt = parse_opt()
    main(opt)


 723
723


 被折叠的 条评论
为什么被折叠?
被折叠的 条评论
为什么被折叠?
 到【灌水乐园】发言


