


一、 系统调用的概念
系统调用在Wikipedia中的解释为:
In computing, a system call is the programmatic way in which a computer program requests a service from the kernel of the operating system it is executed on. This may include hardware-related services (for example, accessing a hard disk drive), creation and execution of new processes, and communication with integral kernel services such as process scheduling. System calls provide an essential interface between a process and the operating system.
In most systems, system calls can only be made from userspace processes, while in some systems, OS/360 and successors for example, privileged system code also issues system calls
主要意思是:
- 系统调用是程序以程序化的方式向其执行的操作系统请求服务。
- 请求的服务可能包括硬件相关服务(访问磁盘驱动器)、新进程创建和执行等。
- 系统调用在程序和操作系统之间提供一个基本接口。
- 大多数系统中,系统调用只由处于用户态的进程发出。
陈莉君老师的《Linux操作系统原理与应用(第二版)》对Linux系统调用解释为:
系统调用的实质就是函数调用,只是调用的函数是系统函数,处于内核态而已。用户在调用系统调用时会向内核传递一个系统调用号,然后系统调用处理程序通过此号从系统调用表中找到相应地内核函数执行(系统调用服务例程),最后返回。
总结:
操作系统内核提供了许多服务,服务在物理表现上为内核空间的函数,系统调用即为在用户空间对这些内核提供服务的请求,即在用户空间程序 “调用”内核空间的函数完成相应地服务。
二、系统调用实现分析
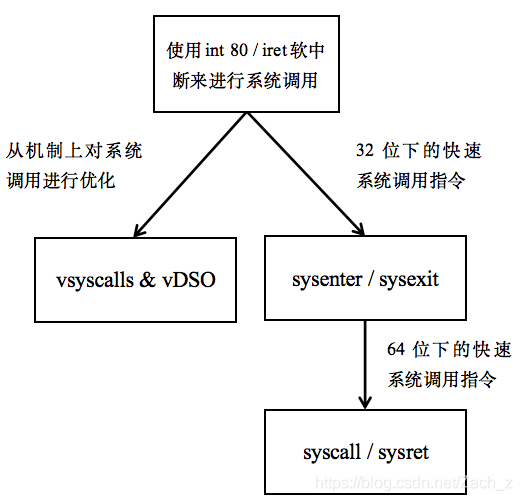
2.1 int/iret
早些时候,通过int 80来进行系统调用;
调用一个系统调用示意图:

下面基于linux-2.6.39内核进行分析
2.1.1 初始化系统调用
内核在初始化期间调用trap_init()函数建立中断描述符表(IDT)中128个向量对应的表项。
在arch/x86/kernel/traps.c的trap_init()函数中可以看到:
#ifdef CONFIG_X86_32
    set_system_trap_gate(SYSCALL_VECTOR, &system_call);
    set_bit(SYSCALL_VECTOR, used_vectors);
#endif
- SYSCALL_VECTOR在arch/x86/include/asm/irq_vectors.h可以看到值为0x80
- set_system_trap_gate即用来在IDT上设置系统调用门,在arch/x86/include/asm/desc.h可以看到:
static inline void set_system_trap_gate(unsigned int n, void *addr)
{
    BUG_ON((unsigned)n > 0xFF);
    _set_gate(n, GATE_TRAP, addr, 0x3, 0, __KERNEL_CS);
}
- 实际上执行的是__set_gate()函数,这个函数把相关值装入门描述符的相应域
- n:即为0x80这一中断号
- GATE_TRAP: 在arch/x86/include/asm/desc_defs.h中定义为0x0F,表示这一中断(异常)是陷阱
- addr:即为&system_call,系统调用处理程序入口
- 0x3: 描述符特权级(DPL),表示允许用户态进程调用这一异常处理程序
- __KERNEL_CS: 由于系统调用处理程序处于内核当中,所以应选择__KERNEL_CS填充段寄存器
2.1.2 系统调用处理(system_call())
执行int 80指令后,根据向量号在IDT中找到对应的表项,执行system_call()函数,
在arch/x86/kernel/entry_32.S中可以看到system_call()函数:
ENTRY(system_call)
    RING0_INT_FRAME         # can't unwind into user space anyway
    pushl_cfi %eax          # save orig_eax
    SAVE_ALL
    GET_THREAD_INFO(%ebp)
            # system call tracing in operation / emulation
    testl $_TIF_WORK_SYSCALL_ENTRY,TI_flags(%ebp)
    jnz syscall_trace_entry
    cmpl $(nr_syscalls), %eax
    jae syscall_badsys
syscall_call:
    call *sys_call_table(,%eax,4)
    movl %eax,PT_EAX(%esp)      # store the return value
syscall_exit:
    LOCKDEP_SYS_EXIT
    DISABLE_INTERRUPTS(CLBR_ANY)    # make sure we don't miss an interrupt
            # setting need_resched or sigpending
            # between sampling and the iret
    TRACE_IRQS_OFF
    movl TI_flags(%ebp), %ecx
    testl $_TIF_ALLWORK_MASK, %ecx  # current->work
    jne syscall_exit_work

restore_all:
    TRACE_IRQS_IRET
restore_all_notrace:
    movl PT_EFLAGS(%esp), %eax  # mix EFLAGS, SS and CS
        # Warning: PT_OLDSS(%esp) contains the wrong/random values if we
        # are returning to the kernel.
        # See comments in process.c:copy_thread() for details.
    movb PT_OLDSS(%esp), %ah
    movb PT_CS(%esp), %al
    andl $(X86_EFLAGS_VM | (SEGMENT_TI_MASK << 8) | SEGMENT_RPL_MASK), %eax
    cmpl $((SEGMENT_LDT << 8) | USER_RPL), %eax
    CFI_REMEMBER_STATE
    je ldt_ss           # returning to user-space with LDT SS
restore_nocheck:
    RESTORE_REGS 4          # skip orig_eax/error_code
irq_return:
    INTERRUPT_RETURN
主要工作有:
- 保存现场:
- pushl_cfi %eax:先把系统调用号保存栈中
- SAVE_ALL:把异常处理程序可以用到的所有CPU寄存器保存到栈中
- GET_THREAD_INFO(%ebp):将当前进程PCB地址存放到ebp中,GET_THREAD_INFO()定义在arch/x86/include/asm/thread_info.h
- 跳转到相应服务程序:
- cmpl $(nr_syscalls), %eax:先检查用户态进程传来的系统调用号是否有效,如果大于等于NR_syscalls,则跳转到syscall_badsys,终止系统调用程序,返回用户空间
- syscall_badsys:将-ENOSYS存放到eax寄存器所在栈中位置,再跳转到resume_userspace返回用户空间,返回后EAX中产生负的ENOSYS
- call *sys_call_table(,%eax,4):根据EAX中的系统调用号调用对应的服务程序
- 退出系统调用:
- movl %eax, PT_EAX(%esp):保存返回值
- syscall_exit_work -> work_pending -> work_notifysig来处理信号
- 可能执行call schedule来进行进程调度;或者跳转到resume_userspace,调用restall_all恢复现场,返回用户态
2.1.3 系统调用表
在system_call()函数中的 call *sys_call_table(,%eax,4) 语句中,根据eax寄存器中所存的系统调用号到sys_call_table系统调用表中找到对应的系统调用服务程序
由于是32位即每个sys_call_table是4个字节,如果是64位则程序语句为call *sys_call_table(, %eax, 8)
在linux-2.6.39内核源码中:
- 32位下系统调用表在arch/x86/kernel/syscall_table_32.S中定义,每个表项包含一个系统调用服务例程的地址:
ENTRY(sys_call_table) .long sys_restart_syscall /* 0 - old "setup()" system call, used for r estarting */ .long sys_exit .long ptregs_fork .long sys_read .long sys_write .long sys_open /* 5 */ ... - 64位系统的系统调用表在arch/x86/kernel/syscall_64.c中定义:
#define __SYSCALL(nr, sym) [nr] = sym, const sys_call_ptr_t sys_call_table[__NR_syscall_max+1] = { [0 ... __NR_syscall_max] = &sys_ni_syscall, #include <asm/unistd_64.h> };- arch/x86/include/asm/unistd_64.h中放着:
#define __NR_read 0 __SYSCALL(__NR_read, sys_read) #define __NR_write 1 __SYSCALL(__NR_write, sys_write) #define __NR_open 2 __SYSCALL(__NR_open, sys_open) ...- 在宏__SYSCALL的作用下,系统调用表为如下定义
const sys_call_ptr_t sys_call_table[__NR_syscall_max+1] = {
    [0 ... __NR_syscall_max] = &sys_ni_syscall,
    [0] = sys_read,
    [1] = sys_write,
    [2] = sys_open,
    ...
    };
2.2 vsyscalls和vDSO
在Linux中调用系统调用的操作代价很大,因为处理器必须中断当前正在执行的任务并从用户态切换到内核态,执行完系统调用程序后又从内核态切换回用户态。
vsycalls和vDSO目的在于加快系统调用的速度。
下面基于linux-4.20内核进行分析
2.2.1 vsyscalls
vsyscalls的工作原理即为:Linux内核将第一个页面映射到用户空间,该页面包含一些变量和一些系统调用的实现。
执行命令如下命令可以看到有关vsyscalls内存空间的信息:
$ sudo cat /proc/1/maps | grep vsyscall
ffffffffff600000-ffffffffff601000 r-xp 00000000 00:00 0                  [vsyscall]
被映射到用户空间的系统调用可以在用户空间执行,不需要进行上下文切换。
vsyscall页面映射从内核启动开始start_kernel() -> setup_arch() -> map_vsyscall(),map_vsyscall()函数源码在arch/x86/entry/vsyscall/vsyscall_64.c中:
void __init map_vsyscall(void)
{
    extern char __vsyscall_page;
    unsigned long physaddr_vsyscall = __pa_symbol(&__vsyscall_page);

    if (vsyscall_mode != NONE) {
        __set_fixmap(VSYSCALL_PAGE, physaddr_vsyscall,
        PAGE_KERNEL_VVAR);
        set_vsyscall_pgtable_user_bits(swapper_pg_dir);
    }

    BUILD_BUG_ON((unsigned long)__fix_to_virt(VSYSCALL_PAGE) !=
    (unsigned long)VSYSCALL_ADDR);
}
- 使用__pa_symbol宏获取页面的物理地址
- __vsyscall_page在arch/x86/entry/vsysall/vsyscall_emu_64.S中定义,可以看出来__vsyscall_page包含三个系统调用:gettimeofday, time, getcpu:
__vsyscall_page: mov $__NR_gettimeofday, %rax syscall ret .balign 1024, 0xcc mov $__NR_time, %rax syscall ret .balign 1024, 0xcc mov $__NR_getcpu, %rax syscall ret - 之后检查vsyscall_mode变量的值并使用__set_fixmap宏来设置页面的修复映射地址(Fix-Mapped Address),__set_fixmap在arch/x86/include/asm/fixmap.h中定义
- 第一个参数是枚举类型fixed_addresses,这里传入参数实际值为(0xfffff000 - (-10UL << 20)) >> 12:
#ifdef CONFIG_X86_VSYSCALL_EMULATION VSYSCALL_PAGE = (FIXADDR_TOP - VSYSCALL_ADDR) >> PAGE_SHIFT, #endif - 第二个参数是必须映射的页面的物理地址,这里传入通过__pa_symbol宏定义获取到的物理地址
- 第三个参数是页面的flags,传入的是PAGE_KERNEL_VVAR,在arch/x86/include/asm/pgtable_types.h中定义,_PAGE_USER意味着可以通过用户模式的进程访问该页面:
#define default_pgprot(x)   __pgprot((x) & __default_kernel_pte_mask)
#define __PAGE_KERNEL_VVAR      (__PAGE_KERNEL_RO | _PAGE_USER)
#define PAGE_KERNEL_VVAR    default_pgprot(__PAGE_KERNEL_VVAR | _PAGE_ENC)
- 第一个参数是枚举类型fixed_addresses,这里传入参数实际值为(0xfffff000 - (-10UL << 20)) >> 12:
- 调用set_vsyscall_pgtable_user_bits()函数对覆盖VSYSCALL_ADDR的表设置_PAGE_USER
- 最后使用BUILD_BUG_ON宏来检查vsyscall页面的虚拟地址等于VSTSCALL_ADDR的值
2.2.2 vDSO
虽然引入了vsyscall机制,但是vsyscall存在着问题:
- vsyscall的用户空间映射的地址是固定不变的,容易被黑客利用
- vsyscall能支持的系统调用数有限,不易扩展
vDSO是vsyscall的主要替代方案,是一个虚拟动态链接库,将内存页面以共享对象形式映射到每个进程,用户程序在启动的时候通过动态链接操作,把vDSO链接到自己的内存空间中。动态链接保证了vDSO每次所在的地址都不一样,并且可以支持数量较多的系统
执行下列命令:
$ ldd /bin/uname
linux-vdso.so.1 =>  (0x00007ffcb75de000)
libc.so.6 => /lib/x86_64-linux-gnu/libc.so.6 (0x00007f3c36e1d000)
/lib64/ld-linux-x86-64.so.2 (0x00007f3c371e7000)
- 可以看到uname util与三个库链接:
- linux-vdso.so.1:提供vDSO功能
- lib.so.6:C标准库
- ld-linux-x86-64.so.2:程序解释器(链接器)
初始化vDSO发生在arch/x86/entry/vdso/vma.c的init_vdso()函数中:
static int __init init_vdso(void)
{
    init_vdso_image(&vdso_image_64);

#ifdef CONFIG_X86_X32_ABI
    init_vdso_image(&vdso_image_x32);
#endif

    return 0;
}
- 使用init_dso_image()函数来初始化vdso_image结构体,vdso_image_64和vdso_image_x32在arch/x86/entry/vdso/vdso-image-64.c和arch/x86/entry/vdso/vdso-image-x32.c,例如vdso_image_64
对vDOS系统调用的内存页面相关的结构体初始化后,使用从arch/x86/entry/vdso/vma.c中调用函数arch_setup_additional_pages()来检查并调用map_vdso_randomized() -> map_vdso()函数来进行内存页面映射:
int arch_setup_additional_pages(struct linux_binprm *bprm, int uses_interp)
{
    if (!vdso64_enabled)
        return 0;

    return map_vdso_randomized(&vdso_image_64);
}
2.3 sysenter/sysexit
由于使用软中断指令int来实现系统调用需要从用户态(Ring3)进入内核态(Ring0),执行系统调用服务程序后,又要从内核态(Ring0)返回用户态(Ring3),特权级的切换花费了很多CPU时间周期。
Intel x86 CPU从Pentium II (Family6, Model 3, Stepping 3)之后,开始支持快速系统调用指令sysenter/sysexit
根据 英特尔®64和IA-32架构软件开发人员手册合并卷 找到sysenter指令的相关描述:
Executes a fast call to a level 0 system procedure or routine. SYSENTER is a companion instruction to SYSEXIT. The instruction is optimized to provide the maximum performance for system calls from user code running at privilege level 3 to operating system or executive procedures running at privilege level 0.
When executed in IA-32e mode, the SYSENTER instruction transitions the logical processor to 64-bit mode; otherwise, the logical processor remains in protected mode.
Prior to executing the SYSENTER instruction, software must specify the privilege level 0 code segment and code entry point, and the privilege level 0 stack segment and stack pointer by writing values to the following MSRs:
• IA32_SYSENTER_CS (MSR address 174H) — The lower 16 bits of this MSR are the segment selector for the privilege level 0 code segment. This value is also used to determine the segment selector of the privilege level 0 stack segment (see the Operation section). This value cannot indicate a null selector.
• IA32_SYSENTER_EIP (MSR address 176H) — The value of this MSR is loaded into RIP (thus, this value references the first instruction of the selected operating procedure or routine). In protected mode, only bits 31:0 are loaded.
• IA32_SYSENTER_ESP (MSR address 175H) — The value of this MSR is loaded into RSP (thus, this value contains the stack pointer for the privilege level 0 stack). This value cannot represent a non-canonical address. In protected mode, only bits 31:0 are loaded.
These MSRs can be read from and written to using RDMSR/WRMSR. The WRMSR instruction ensures that the IA32_SYSENTER_EIP and IA32_SYSENTER_ESP MSRs always contain canonical addresses.
主要的信息有:
- sysenter与sysexit指令配套,可以以比较高的执行效率在用户态执行要在系统态执行的系统调用
- 在IA-32e模式下执行时,sysenter指令将逻辑处理器转换为64位模式,否则逻辑处理器保持在保护模式
- 执行sysenter指令之前,需要将下列值写入MSR(Model Specific Registers)来指定Ring0代码段、代码入口点、Ring0堆栈段和堆栈指针
- IA32_SYSENTER_CS(174H):指定要执行Ring0代码的代码段选择符,也能得出目标Ring0所用堆栈段的段选择符
- IA32_SYSENTER_EIP(176H):指定要执行的Ring0代码的起始地址
- IA32_SYSENTER_ESP(175H):指定要执行的Ring0代码所使用的栈指针
- 使用rdmsr/wrmsr读取和写入MSR
下面基于linux-2.6.39内核进行分析
2.3.1 系统调用初始化
从linux内核启动流程来看,start_kernel() -> chenk_bugs() -> identify_boot_cpu() -> sysenter_setup() & enable_sep_cpu()
2.3.1.1 页面初始化和映射
首先执行sysenter_setup()函数支持之前提到的vDSO机制,将vdso32-sysenter.so动态链接库装载进vsyscall页中,
在arch/x86/vdso/vdso32-setup.c可以找到sysenter_setup()函数:
int __init sysenter_setup(void)
{
    void *syscall_page = (void *)get_zeroed_page(GFP_ATOMIC);
    const void *vsyscall;
    size_t vsyscall_len;

    vdso32_pages[0] = virt_to_page(syscall_page);

#ifdef CONFIG_X86_32
    gate_vma_init();
#endif

    if (vdso32_syscall()) {
        vsyscall = &vdso32_syscall_start;
        vsyscall_len = &vdso32_syscall_end - &vdso32_syscall_start;
    } else if (vdso32_sysenter()){
        vsyscall = &vdso32_sysenter_start;
        vsyscall_len = &vdso32_sysenter_end - &vdso32_sysenter_start;
    } else {
        vsyscall = &vdso32_int80_start;
        vsyscall_len = &vdso32_int80_end - &vdso32_int80_start;
    }

    memcpy(syscall_page, vsyscall, vsyscall_len);
    relocate_vdso(syscall_page);

    return 0;
}
主要的工作:
- 调用get_zeroed_page()获得一个被填充为0的物理页,返回该页在内核地址空间的线性地址
- 调用宏virt_to_page得到syscall_page地址对应的page管理结构地址并赋值给vdso32_page[0]
- 随后判断支持哪些指令,从而做不同处理,可以看到优先级是syscall > sysenter > int80
- 将vdso32_sysenter_start地址赋给vsyscall,然后用memcpy()将vsyscall拷贝到对应的页,最后用relocate_vdso()进行重定向
- 在arch/x86/vdso/vdso32.S中可以看到vdso32_sysenter_start就是vdso32-sysenter.so:
vdso32_sysenter_start: .incbin "arch/x86/vdso/vdso32-sysenter.so" - 即将vdso32-sysenter.so拷贝到对应的页中,在2.2.3 vDSO中提到的arch_setup_additional_pages函数便是把拷贝到的页的内容映射到用户空间
2.3.1.2 相关MSR寄存器的初始化
在arch/x86/vdso/vdso32-setup.c中的enable_sep_cpu()函数完成相关MSR寄存器的初始化:
void enable_sep_cpu(void)
{
    int cpu = get_cpu();
    struct tss_struct *tss = &per_cpu(init_tss, cpu);

    if (!boot_cpu_has(X86_FEATURE_SEP)) {
        put_cpu();
        eturn;
    }

    tss->x86_tss.ss1 = __KERNEL_CS;
    tss->x86_tss.sp1 = sizeof(struct tss_struct) + (unsigned long) tss;
    wrmsr(MSR_IA32_SYSENTER_CS, __KERNEL_CS, 0);
    wrmsr(MSR_IA32_SYSENTER_ESP, tss->x86_tss.sp1, 0);
    wrmsr(MSR_IA32_SYSENTER_EIP, (unsigned long) ia32_sysenter_target, 0);
    put_cpu();
}
- MSR_IA32_SYSENTER_…的声明在arch/x86/include/asm/msr-index.h中
#define MSR_IA32_SYSENTER_CS 0x00000174 #define MSR_IA32_SYSENTER_ESP 0x00000175 #define MSR_IA32_SYSENTER_EIP 0x00000176 - 将__KERNEL_CS设置到MSR_IA_SYSENTER_CS中
- 将tss->x86_tss.sp1栈地址设置到MSR_IA32_SYSENTER_ESP中
- 将ia32_sysenter_target(sysenter指令的接口函数)设置到MSR_IA32_SYSENTER_EIP
2.3.2 sysenter和sysexit的指令操作
在Ring3的代码调用sysenter指令之后,CPU做出如下操作:
- 将SYSENTER_CS_MSR的值装在到cs寄存器
- 将SYSENTER_EIP_MSR的值装在到eip寄存器
- 将SYSENTER_CS_MSR的值加8(Ring0的堆栈段描述符)装载到ss寄存器
- 将SYSENTER_ESP_MSR的值装载到esp寄存器
- 将特权级切换到Ring0
- 如果EFLAGS寄存器的VM标志被置位,则清除该标志
- 开始执行指定的Ring0代码
在Ring0代码执行完毕,调用sysexit指令退回Ring3时,CPU会做出如下操作:
- 将SYSENTER_CS_MSR的值加16(Ring3的代码段描述符)装载到cs寄存器
- 将寄存器edx的值装载到eip寄存器
- 将SYSENTER_CS_MSR的值加24(Ring3的堆栈段描述符)装载到ss寄存器
- 将寄存器ecx的值装载到esp寄存器
- 将特权级切换到Ring3
- 继续执行Ring3的代码
2.3.3 sysenter的系统调用处理
linux2.6.39内核sysenter系统调用
正如刚才对IA32_SYSENTER_EIP寄存器中传入sysenter的系统调用函数入口地址ia32_sysenter_target
在arch/x86/ia32/ia32entry.S中可以看到sysenter指令所要执行的系统调用处理程序ia32_sysenter_target的代码,其中执行系统调用的代码是:
sysenter_dispatch:
    call    *ia32_sys_call_table(,%rax,8)

...
ia32_sys_call_table:
    .quad sys_restart_syscall
    .quad sys_exit
    .quad stub32_fork
    .quad sys_read
    .quad sys_write
    .quad compat_sys_open       /* 5 */
- 可以看到sysenter指令会直接到系统调用表中找到相应系统调用处理程序去执行
linux4.20内核sysenter系统调用
在linux4.20内核中,对IA32_SYSENTER_EIP寄存器中传入的是entry_SYSENTER_32函数
在arch/x86/entry/entry_32.S中可以看到entry_SYSENTER_32()函数:
ENTRY(entry_SYSENTER_32)
    pushfl
    pushl   %eax
    BUG_IF_WRONG_CR3 no_user_check=1
    SWITCH_TO_KERNEL_CR3 scratch_reg=%eax
    popl    %eax
    popfl
    movl    TSS_entry2task_stack(%esp), %esp

.Lsysenter_past_esp:
    pushl   $__USER_DS      /* pt_regs->ss */
    pushl   %ebp            /* pt_regs->sp (stashed in bp) */
    pushfl              /* pt_regs->flags (except IF = 0) */
    orl $X86_EFLAGS_IF, (%esp)  /* Fix IF */
    pushl   $__USER_CS      /* pt_regs->cs */
    pushl   $0          /* pt_regs->ip = 0 (placeholder) */
    pushl   %eax            /* pt_regs->orig_ax */
    SAVE_ALL pt_regs_ax=$-ENOSYS    /* save rest, stack already switched */
    testl   $X86_EFLAGS_NT|X86_EFLAGS_AC|X86_EFLAGS_TF, PT_EFLAGS(%esp)
    jnz .Lsysenter_fix_flags

.Lsysenter_flags_fixed:
    TRACE_IRQS_OFF
    movl    %esp, %eax
    call    do_fast_syscall_32
...
    sysexit
...
主要工作:
- 之前说到sysenter指令会将SYSENTER_ESP_MSR的值装载到esp寄存器,但是里面保存的是sysenter_stack的地址,所以通过movl TSS_entry2task_stack(%esp), %esp语句,修正esp寄存器保存进程的内核栈
- SAVE_ALL和pushl等操作将相关寄存器压栈,保存现场
- 调用do_fast_syscall_32 -> do_syscall_32_irqs_on() 从系统调用表中找到相应处理函数进行调用
- 最后popl相关寄存器返回现场,调用sysexit指令返回
2.4 syscall/sysret
在32位下Intel提出快速系统调用指令sysenter/sysexit,AMD提出syscall/sysret;到64位时统一使用syscall指令
英特尔®64和IA-32架构软件开发人员手册合并卷中可以找到syscall指令的相关信息:

SYSCALL invokes an OS system-call handler at privilege level 0. It does so by loading RIP from the IA32_LSTAR MSR (after saving the address of the instruction following SYSCALL into RCX). (The WRMSR instruction ensures that the IA32_LSTAR MSR always contain a canonical address.)
SYSCALL also saves RFLAGS into R11 and then masks RFLAGS using the IA32_FMASK MSR (MSR address C0000084H); specifically, the processor clears in RFLAGS every bit corresponding to a bit that is set in the IA32_FMASK MSR.
SYSCALL loads the CS and SS selectors with values derived from bits 47:32 of the IA32_STAR MSR. However, the CS and SS descriptor caches are not loaded from the descriptors (in GDT or LDT) referenced by those selectors. Instead, the descriptor caches are loaded with fixed values. See the Operation section for details. It is the responsibility of OS software to ensure that the descriptors (in GDT or LDT) referenced by those selector values correspond to the fixed values loaded into the descriptor caches; the SYSCALL instruction does not ensure this correspondence.
The SYSCALL instruction does not save the stack pointer (RSP). If the OS system-call handler will change the stack pointer, it is the responsibility of software to save the previous value of the stack pointer. This might be done prior to executing SYSCALL, with software restoring the stack pointer with the instruction following SYSCALL (which will be executed after SYSRET). Alternatively, the OS system-call handler may save the stack pointer and restore it before executing SYSRET.
2.4.1 系统调用追踪
编写用户态程序进行系统调用,使用gdb追踪运行调用过程, 分析过程如下:
- 编写包含系统调用的程序
#include <fcntl.h>
#include <unistd.h>
#include <sys/types.h>
#include <sys/stat.h>

int main(void)
{
    pid_t ret;
    ret = open("./1.txt", O_RDWR);
    close(ret);
}
- 编译生成可执行文件
$ gcc -o open -g -static open.c
$ file open
open: ELF 64-bit LSB executable, x86-64, version 1 (GNU/Linux), statically linked, for GNU/Linux 2.6.32, BuildID[sha1]=c7781966fa4acbecf2b489a3eea145912f3f81d0, not stripped
- gdb调试跟踪
(gdb) disas main
Dump of assembler code for function main:
   0x00000000004009ae <+0>:     push   %rbp
   0x00000000004009af <+1>:     mov    %rsp,%rbp
   0x00000000004009b2 <+4>:     sub    $0x10,%rsp
   0x00000000004009b6 <+8>:     mov    $0x2,%esi
   0x00000000004009bb <+13>:    mov    $0x4a0ec4,%edi
   0x00000000004009c0 <+18>:    mov    $0x0,%eax
   0x00000000004009c5 <+23>:    callq  0x43f130 <open64>
   0x00000000004009ca <+28>:    mov    %eax,-0x4(%rbp)
   0x00000000004009cd <+31>:    mov    -0x4(%rbp),%eax
   0x00000000004009d0 <+34>:    mov    %eax,%edi
   0x00000000004009d2 <+36>:    callq  0x43f3e0 <close>
   0x00000000004009d7 <+41>:    mov    $0x0,%eax
   0x00000000004009dc <+46>:    leaveq
   0x00000000004009dd <+47>:    retq
End of assembler dump.

(gdb) disas 0x43f130
Dump of assembler code for function open64:
   0x000000000043f130 <+0>:     cmpl   $0x0,0x28e085(%rip)        # 0x6cd1bc <__libc_multiple_threads>
   0x000000000043f137 <+7>:     jne    0x43f14d <open64+29>
   0x000000000043f139 <+0>:     mov    $0x2,%eax
   0x000000000043f13e <+5>:     syscall
   0x000000000043f140 <+7>:     cmp    $0xfffffffffffff001,%rax
   0x000000000043f146 <+13>:    jae    0x4441c0 <__syscall_error>
   0x000000000043f14c <+19>:    retq
   0x000000000043f14d <+29>:    sub    $0x8,%rsp
   0x000000000043f151 <+33>:    callq  0x442690 <__libc_enable_asynccancel>
   0x000000000043f156 <+38>:    mov    %rax,(%rsp)
   0x000000000043f15a <+42>:    mov    $0x2,%eax
   0x000000000043f15f <+47>:    syscall
   0x000000000043f161 <+49>:    mov    (%rsp),%rdi
   0x000000000043f165 <+53>:    mov    %rax,%rdx
   0x000000000043f168 <+56>:    callq  0x4426f0 <__libc_disable_asynccancel>
   0x000000000043f16d <+61>:    mov    %rdx,%rax
   0x000000000043f170 <+64>:    add    $0x8,%rsp
   0x000000000043f174 <+68>:    cmp    $0xfffffffffffff001,%rax
   0x000000000043f17a <+74>:    jae    0x4441c0 <__syscall_error>
   0x000000000043f180 <+80>:    retq
End of assembler dump.
- open64定义在glibc源码路径sysdeps/posix/open64.c中:
#include <fcntl.h>
#include <stdarg.h>
#include <sysdep-cancel.h>

/* Open FILE with access OFLAG.  If O_CREAT or O_TMPFILE is in OFLAG,
a third argument is the file protection.  */
int
__libc_open64 (const char *file, int oflag, ...)
{
    int mode = 0;

    if (__OPEN_NEEDS_MODE (oflag))
    {
        va_list arg;
        va_start (arg, oflag);
        mode = va_arg (arg, int);
        va_end (arg);
    }
    if (SINGLE_THREAD_P)
        return __libc_open (file, oflag | O_LARGEFILE, mode);

    int oldtype = LIBC_CANCEL_ASYNC ();

    int result = __libc_open (file, oflag | O_LARGEFILE, mode);

    LIBC_CANCEL_RESET (oldtype);

    return result;
}
weak_alias (__libc_open64, __open64)
libc_hidden_weak (__open64)
weak_alias (__libc_open64, open64)
- __libc定义在glibc源码路径sysdeps/unix/sysv/linux/generic/open.c:
int
__libc_open (const char *file, int oflag, ...)
{
    int mode = 0;

    if (__OPEN_NEEDS_MODE (oflag))
    {
        va_list arg;
        va_start (arg, oflag);
        mode = va_arg (arg, int);
        va_end (arg);
    }

    return SYSCALL_CANCEL (openat, AT_FDCWD, file, oflag, mode);
}
- glibc源码路径sysdeps/unix/sysdep.h里有着SYSCALL_CANCEL宏定义:
#define __SYSCALL4(name, a1, a2, a3, a4, a5) \
 INLINE_SYSCALL (name, 4, a1, a2, a3, a4, a5)

#define __SYSCALL_NARGS_X(a,b,c,d,e,f,g,h,n,...) n
#define __SYSCALL_NARGS(...) \
    __SYSCALL_NARGS_X (__VA_ARGS__,7,6,5,4,3,2,1,0,)
#define __SYSCALL_CONCAT_X(a,b)     a##b
#define __SYSCALL_CONCAT(a,b)       __SYSCALL_CONCAT_X (a, b)
#define __SYSCALL_DISP(b,...) \
    __SYSCALL_CONCAT (b,__SYSCALL_NARGS(__VA_ARGS__))(__VA_ARGS__)

#define __SYSCALL_CALL(...) __SYSCALL_DISP (__SYSCALL, __VA_ARGS__)

#define SYSCALL_CANCEL(...) \
({                                         \
    long int sc_ret;                                 \
    if (SINGLE_THREAD_P)                             \
    sc_ret = __SYSCALL_CALL (__VA_ARGS__);                     \
    else                                     \
    {                                      \
        int sc_cancel_oldtype = LIBC_CANCEL_ASYNC ();                \
        sc_ret = __SYSCALL_CALL (__VA_ARGS__);                   \
        LIBC_CANCEL_RESET (sc_cancel_oldtype);                   \
    }                                      \
    sc_ret;                                  \
})
- 根据相关宏定义进行展开:
SYSCALL_CANCEL (openat, AT_FDCWD, file, oflag, mode);
-> __SYSCALL_CALL (penat, AT_FDCWD, file, oflag, mode);
-> __SYSCALL_DISP (__SYSCALL, openat, AT_FDCWD, file, oflag, mode);
-> __SYSCALL_CONCAT(__SYSCALL, 4)(openat, AT_FDCWD, file, oflag, mode)
-> __SYSCALL_CONCAT_X(__SYSCALL, 4)(openat, AT_FDCWD, file, oflag, mode)
-> __SYSCALL4(openat, AT_FDCWD, file, oflag, mode)
-> INLINE_SYSCALL(openat, 4, AT_FDCWD, file, oflag, mode)
- INLINE_SYSCALL之后宏定义与硬件和os有关,在glibc源码路径sysdeps/unix/sysv/linux/x86_64/sysdep.h中定义:
# define INLINE_SYSCALL(name, nr, args...) \
({                                          \
    unsigned long int resultvar = INTERNAL_SYSCALL (name, , nr, args);            \
    if (__glibc_unlikely (INTERNAL_SYSCALL_ERROR_P (resultvar, )))        \
    {                                       \
        __set_errno (INTERNAL_SYSCALL_ERRNO (resultvar, ));           \
        resultvar = (unsigned long int) -1;                   \
    }                                       \
    (long int) resultvar; })

# define INTERNAL_SYSCALL(name, err, nr, args...) \
    INTERNAL_SYSCALL_NCS (__NR_##name, err, nr, ##args)
- 相关宏定义展开:
INLINE_SYSCALL(openat, 4, AT_FDCWD, file, oflag, mode)
-> INTERNAL_SYSCALL(openat,  , 4, AT_FDCWD, file, oflag, mode)
-> INTERNAL_SYSCALL_NCS(__NR_openat,  , 4, AT_FDCWD, file, oflag, mode )
- 经过一系列的展开,最终到达INTERNAL_SYSCALL_NCS
# define INTERNAL_SYSCALL_NCS(name, err, nr, args...) \
({                                          \
    unsigned long int resultvar;                          \
    LOAD_ARGS_##nr (args)                             \
    LOAD_REGS_##nr                                \
    asm volatile (                                \
    "syscall\n\t"                                 \
    : "=a" (resultvar)                                \
    : "0" (name) ASM_ARGS_##nr : "memory", REGISTERS_CLOBBERED_BY_SYSCALL);       \
    (long int) resultvar; })
- 可以看到LOAD_ARGS_##nr把参数args展开,LOAD_REGS_##nr设置相应参数到相应地寄存器中
- 调用syscall指令执行系统调用
2.4.2 syscall系统调用初始化
syacall系统调用初始化在内核初始化执行路径中:start_kernel() -> trap_init() -> cpu_init() -> syscall_init()
在arch/x86/kernel/cpu/common.c中可以看到syscall_init()函数:
void syscall_init(void)
{
    wrmsr(MSR_STAR, 0, (__USER32_CS << 16) | __KERNEL_CS);
    wrmsrl(MSR_LSTAR, (unsigned long)entry_SYSCALL_64);
    ...
}
- syscall_init()函数源码可以看到对相应地MSR寄存器进行初始化:
- 向MSR_STAR的32 ~ 47位写入内核态的cs,向48 ~ 64位设置用户态的cs
- 向MSR_LSTAR写入entry_SYSCALL_64函数入口地址
2.4.3 执行syscall
执行syscall,会跳转到entry_SYSCALL_64,在arch/x86/entry/entry_64.S中可以找到entry_SYSCALL_64:
ENTRY(entry_SYSCALL_64)
    UNWIND_HINT_EMPTY

    swapgs

    movq    %rsp, PER_CPU_VAR(cpu_tss_rw + TSS_sp2)
    SWITCH_TO_KERNEL_CR3 scratch_reg=%rsp
    movq    PER_CPU_VAR(cpu_current_top_of_stack), %rsp

    pushq   $__USER_DS              /* pt_regs->ss */
    pushq  PER_CPU_VAR(cpu_tss_rw + TSS_sp2)   /* pt_regs->sp */
    pushq   %r11                    /* pt_regs->flags */
    pushq   $__USER_CS              /* pt_regs->cs */
    pushq   %rcx                    /* pt_regs->ip */
GLOBAL(entry_SYSCALL_64_after_hwframe)
    pushq   %rax                    /* pt_regs->orig_ax */

    PUSH_AND_CLEAR_REGS rax=$-ENOSYS

    TRACE_IRQS_OFF

    /* IRQs are off. */
    movq    %rax, %rdi
    movq    %rsp, %rsi
    call    do_syscall_64
    ...
-
保存现场将相关寄存器中的值压栈,包括:
- rax system call number
- rcx return address
- r11 saved rflags (note: r11 is callee-clobbered register in C ABI)
- rdi arg0
- rsi arg1
- rdx arg2
- r10 arg3 (needs to be moved to rcx to conform to C ABI)
- r8 arg4
- r9 arg5
-
调用do_syscall_64来继续执行,在arch/x86/entry/common.c中:
__visible void do_syscall_64(unsigned long nr, struct pt_regs *regs) { ... nr = syscall_trace_enter(regs); nr &= __SYSCALL_MASK; if (likely(nr < NR_syscalls)) { nr = array_index_nospec(nr, NR_syscalls); regs->ax = sys_call_table[nr](regs); } syscall_return_slowpath(regs); }- syscall_trace_enter取出系统调用号 nr
- 到sys_call_table中去找到nr号对应的系统调用服务程序去执行后返回值放入ax
-
全部执行完毕后会调用USERGS_SYSRET64返回:
ENTRY(entry_SYSCALL_64)
    ...
    USERGS_SYSRET64
END(entry_SYSCALL_64)


#define USERGS_SYSRET64             \
swapgs;                 \
sysretq;
三、添加系统调用
完成一个系统调用日志收集系统:
3.1 系统调用日志收集系统目的
系统调用是用户程序与系统打交道的入口,系统调用的安全直接关系到系统的安全,如果一个用户恶意地不断调用fork()将导致系统负载增加,所以如果能收集到是谁调用了一些有危险的系统调用,以及系统调用的时间和其他信息,将有助于系统管理员进行事后追踪,从而提高系统的安全性。
3.2 系统调用日志收集系统示意图

3.3 系统调用日志收集系统实现
3.3.1 增加系统调用表的表项
打开arch/x86/entry/syscalls/syscall_64.tbl, 添加两个系统调用表项:
335 common  syscall_audit       __x64_sys_syscall_audit
336 common  myaudit         __x64_sys_myaudit
3.3.2 添加系统调用函数
- 在**arch/x86/kernel/**目录下添加myaudit.c文件完成系统调用函数:
#include <linux/uaccess.h>
#include <linux/proc_fs.h>
#include <linux/init.h>
#include <linux/types.h>
#include <asm/current.h>
#include <linux/sched.h>
#include <linux/syscalls.h>
#include <linux/kernel.h>

void (*my_audit) (int, int) = 0;
SYSCALL_DEFINE2(syscall_audit, int, syscall, int, return_value)
{
    if (my_audit) {
        (*my_audit)(syscall, return_value);
        printk("IN KERNEL: %s(%d), syscall: %d, return: %d\n", current->comm    , current->comm, current->pid, return_value);
    } else
        printk("my_audit is not exist\n");
    return ;
}

int (*my_sysaudit)(u8, u8 *, u16, u8) = 0;
SYSCALL_DEFINE4(myaudit, u8, type, u8 *, us_buf, u16, us_buf_size, u8, reset    )
{
    if (my_sysaudit) {
        return (*my_sysaudit)(type, us_buf, us_buf_size, reset);
        printk("IN KERNEL: my system call sys_myaudit() working\n");
    } else
    printk("my_sysadit is not exist\n");
    return 1;
}

EXPORT_SYMBOL(my_audit);
EXPORT_SYMBOL(my_sysaudit);
这里可以看到实际上定义两个钩子函数,在我们系统调用里去调用这两个钩子函数,这样可以以模块的方式添加这两个函数的具体内容,方便调试
- 修改arch/x86/kernel/Makefile,将myaduit.c文件加入内核编译
obj-y += myaudit.o
- 在include/linux/syscalls.h最后的endif前添加函数声明:
asmlinkage long sys_syscall_audit(int, int);
asmlinkage long sys_myaudit(u8, u8 *, u16 , u8);
extern void (*my_audit) (int, int);
3.3.3 拦截相关系统调用
正如前面对syscall执行的分析,修改do_syscall_64()函数,对系统调用号nr进行判断,如果是我们日志收集系统需要记录的系统调用,就调用我们的记录函数进行记录:
__visible void do_syscall_64(unsigned long nr, struct pt_regs *regs)
{
    ...
    nr = syscall_trace_enter(regs);

    nr &= __SYSCALL_MASK;
    if (likely(nr < NR_syscalls)) {
        nr = array_index_nospec(nr, NR_syscalls);
        regs->ax = sys_call_table[nr](regs);
        if (nr == 57 || nr == 2 || nr == 3 || nr == 59 || nr == 39 || nr == 56) {
            if (my_audit)
                (*my_audit)(nr, regs->ax);
            else
                printk("my_audit is not exist.\n");
        }

    }
    syscall_return_slowpath(regs);
}
- 可以看到要记录的系统调用有:
- 2:open
- 3:close
- 39:getpid
- 56:clone
- 57:fork
- 59:execve
3.3.4 重新编译内核
sudo make menuconfig
sudo make olddefconfig
sudo make bzImage -j2
sudo make modules
sudo make modules_install
sudo make install
sudo update-grub2
sudo reboot
3.3.5 添加实现钩子函数的内核模块
my_audit.c:
#include <linux/init.h>
#include <linux/module.h>
#include <linux/slab.h>
#include <linux/sched.h>
#include <linux/uaccess.h>
#define COMM_SIZE 16
#define AUDIT_BUF_SIZE 100

MODULE_LICENSE("GPL v2");

struct syscall_buf {
	u32 serial;
	u64 ts_sec;
	u64 ts_micro;
	u32 syscall;
	u32 status;
	pid_t pid;
	uid_t uid;
	u8 comm[COMM_SIZE];
};
DECLARE_WAIT_QUEUE_HEAD(buffer_wait);
static struct syscall_buf audit_buf[AUDIT_BUF_SIZE];
static int current_pos = 0;
static u32 serial = 0;

void syscall_audit(int syscall, int return_status)
{
	struct syscall_buf *ppb_temp;
	struct timeval nowtime;
	do_gettimeofday(&nowtime);
	if (current_pos < AUDIT_BUF_SIZE) {
		ppb_temp = &audit_buf[current_pos];
		ppb_temp->serial = serial++;
		ppb_temp->ts_sec = nowtime.tv_sec;
		ppb_temp->ts_micro = nowtime.tv_usec;
		ppb_temp->syscall = syscall;
		ppb_temp->status = return_status;
		ppb_temp->pid = current->pid;
		ppb_temp->uid = current->tgid;

		memcpy(ppb_temp->comm, current->comm, COMM_SIZE);

		if (++current_pos == AUDIT_BUF_SIZE * 8 / 10)
		{
			printk("IN MODULE_audit: yes, it near full\n");
			wake_up_interruptible(&buffer_wait);
		}
	}
}

int sys_audit(u8 type, u8 *us_buf, u16 us_buf_size, u8 reset)
{
	int ret = 0;
	if (!type) {
		if (clear_user(us_buf, us_buf_size)) {
			printk("Error:clear_user\n");
			return 0;
		}
		printk("IN MODULE_systemcall:starting...\n");
		ret = wait_event_interruptible(buffer_wait, current_pos >= AUDIT_BUF_SIZE * 8 / 10);
		printk("IN MODULE_systemcall:over, current_pos is %d\n", current_pos);
		if(copy_to_user(us_buf, audit_buf, (current_pos)*sizeof(struct syscall_buf))) {
			printk("Error: copy error\n");
			return 0;
		}
		ret = current_pos;
		current_pos = 0;
	}
	return ret;
}

static int __init audit_init(void)
{
	my_sysaudit = sys_audit;
	my_audit =  syscall_audit;
	printk("Starting System Call Auditing\n");
	return 0;
}
module_init(audit_init);

static void __exit audit_exit(void)
{
	my_audit = NULL;
	my_sysaudit = NULL;
	printk("Exiting System Call Auditing\n");
	return ;
}
module_exit(audit_exit);
编译并插入模块
3.3.6 实现用户空间收集日志进程程序
test_syscall.c:
#include <stdlib.h>
#include <stdio.h>
#include <errno.h>
#include <signal.h>
#include <sys/resource.h>
#include <sys/syscall.h>
#include <sys/types.h>
#define COMM_SIZE 16
typedef unsigned char u8;
typedef unsigned int u32;
typedef unsigned long long u64;
struct syscall_buf {
u32 serial;
u64 ts_sec;
u64 ts_micro;
u32 syscall;
u32 status;
pid_t pid;
uid_t uid;
u8 comm[COMM_SIZE];
};
#define AUDIT_BUF_SIZE (20 * sizeof(struct syscall_buf))
int main(int argc, char *argv[])
{
u8 col_buf[AUDIT_BUF_SIZE];
unsigned char reset = 1;
int num = 0;
int i, j;
struct syscall_buf *p;
while(1) {
num = syscall(336, 0, col_buf, AUDIT_BUF_SIZE, reset);
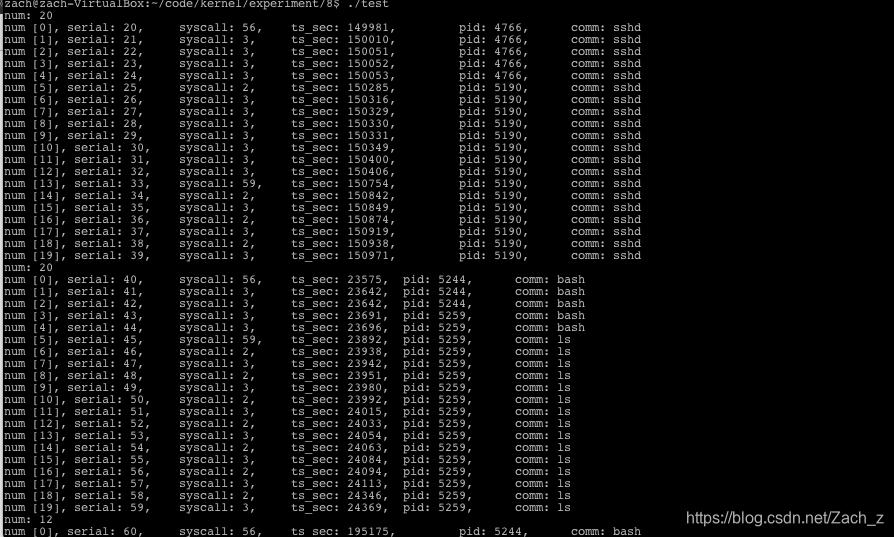
printf("num: %d\n", num);
p = (struct syscall_buf *)col_buf;
for(i = 0; i < num; i++) {
printf("num [%d], serial: %d,\t syscall: %d,\t ts_sec: %ld,\t pid: %d,\t comm: %s\n", i, p[i].serial, p[i].syscall, p[i].ts_micro, p[i].pid, p[i].comm);
}
}
return 1;
}
3.3.6 测试系统
四、总结
本次报告,先从最早的系统调用方法——int 80开始,基于Linux-2.6.39内核开始分析,对用软中断系统调用的初始化、处理流程和系统调用表进行了学习探究。随后,基于Linux-4.20内核分析学习了从机制上对系统调用进行优化的方法——vsyscalls和vDSO。之后对32位下的快速系统调用指令——sysenter/sysexit进行指令学习和对相关Linux源码分析。然后在Linux-4.20内核下编写调用系统调用的程序,使用gdb进行调试跟踪并分析出最后使用syscall指令执行系统调用,再对64位下的快速系统调用指令syscall/sysret进行指令学习和对相关Linux源码分析。最后在Linux4.20内核上完成一个系统调用日志收集系统,其中包含着添加系统调用,编译内核,修改内核代码,添加内核模块,编写用户态程序测试。


 2068
2068


 被折叠的 条评论
为什么被折叠?
被折叠的 条评论
为什么被折叠?
 到【灌水乐园】发言


