


- 安装python3.5以上版本
目前Tensorflow只支持64位python3.5以上版本
在如何在windows上同时安装python2和python3可以参考 http://blog.csdn.net/zd_nupt/article/details/77507891 - 安装tensorflow
pip3 install --upgrade tensorflow-gpu
目前最新版本为tensorflow-gpu1.3.0
3. 安装CUDA 8.0 和 cuDNN
可以去官网下载cuda8.0,貌似8.0.60版本安装会出现不匹配现象,建议安装8.0.44版本。
tensorflow1.3版本支持cuDNN 6版本
安装cuda8.0后,解压cuDNN,然后把cuDNN中的文件放入cuda对应的文件夹内,如图: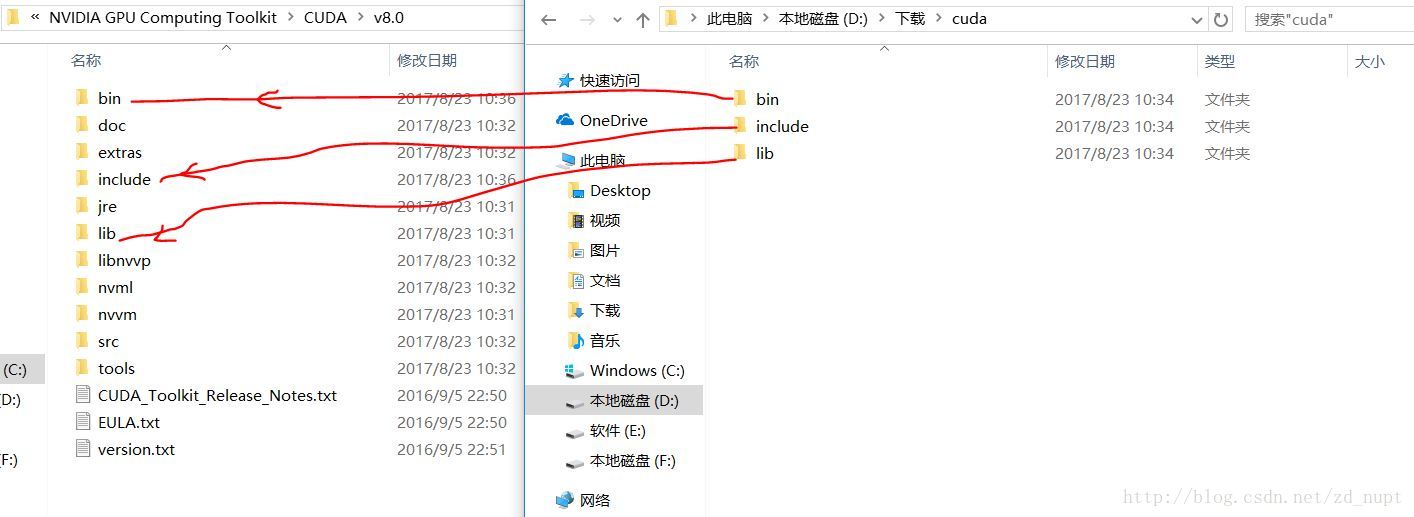
添加系统变量:
cuda安装后自动会添加系统变量的(黑色框内为自动添加的),不过还需要设置一下新的系统变量(红色框):如图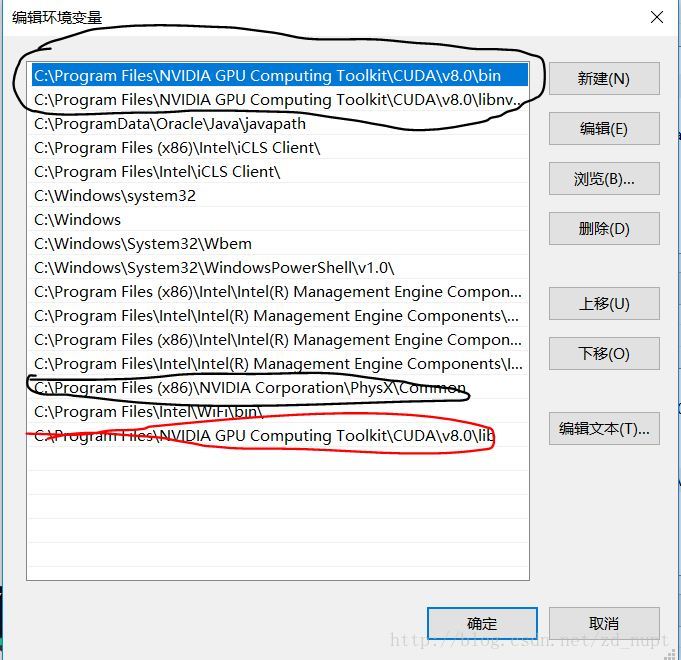
检测是否安装成功:
打开cmd,输入nvcc -V,有返回信息则安装成功。

软件云盘下载链接:链接:http://pan.baidu.com/s/1miwZhjy 密码:s9z6
4. 测试
import tensorflow as tf
sess = tf.InteractiveSession()

output:
2017-08-23 16:18:53.427529: W C:\tf_jenkins\home\workspace\rel-win\M\windows-gpu\PY\36\tensorflow\core\platform\cpu_feature_guard.cc:45] The TensorFlow library wasn't compiled to use AVX instructions, but these are available on your machine and could speed up CPU computations.
2017-08-23 16:18:53.427772: W C:\tf_jenkins\home\workspace\rel-win\M\windows-gpu\PY\36\tensorflow\core\platform\cpu_feature_guard.cc:45] The TensorFlow library wasn't compiled to use AVX2 instructions, but these are available on your machine and could speed up CPU computations.
2017-08-23 16:18:55.448241: I C:\tf_jenkins\home\workspace\rel-win\M\windows-gpu\PY\36\tensorflow\core\common_runtime\gpu\gpu_device.cc:955] Found device 0 with properties:
name: GeForce GTX 950M
major: 5 minor: 0 memoryClockRate (GHz) 1.124
pciBusID 0000:01:00.0
Total memory: 4.00GiB
Free memory: 3.35GiB
2017-08-23 16:18:55.448530: I C:\tf_jenkins\home\workspace\rel-win\M\windows-gpu\PY\36\tensorflow\core\common_runtime\gpu\gpu_device.cc:976] DMA: 0
2017-08-23 16:18:55.448658: I C:\tf_jenkins\home\workspace\rel-win\M\windows-gpu\PY\36\tensorflow\core\common_runtime\gpu\gpu_device.cc:986] 0:   Y
2017-08-23 16:18:55.448800: I C:\tf_jenkins\home\workspace\rel-win\M\windows-gpu\PY\36\tensorflow\core\common_runtime\gpu\gpu_device.cc:1045] Creating TensorFlow device (/gpu:0) -> (device: 0, name: GeForce GTX 950M, pci bus id: 0000:01:00.0)
运行mnist测试:
import tensorflow as tf
from tensorflow.examples.tutorials.mnist import input_data
import os
import time
os.environ['TF_CPP_MIN_LOG_LEVEL'] = '3'

start = time.time()

mnist = input_data.read_data_sets('MNIST_data',one_hot=True)

# print mnist.train.images.shape,mnist.train.labels.shape
# (55000, 784) (55000, 10)
# 784 = 28*28
# print mnist.test.images.shape,mnist.test.labels.shape\
# (10000, 784) (10000, 10)
# print mnist.validation.images.shape,mnist.validation.labels.shape
# (5000, 784) (5000, 10)

def Weight_value(shape):
    init = tf.random_normal(shape, stddev=0.1)
    return tf.Variable(init, name="weight")
def bias_value(shape):
    init = tf.constant(0.1, shape=shape)
    return tf.Variable(init)
def conv2d(x, W):
    return tf.nn.conv2d(x, W, strides=[1, 1, 1, 1], padding="SAME")
def pool_2x2(x):
    return tf.nn.max_pool(x, ksize=[1, 2, 2, 1], strides=[1, 2, 2, 1], padding="SAME")

xs = tf.placeholder(tf.float32, [None, 784])
ys = tf.placeholder(tf.float32, [None, 10])

x_image = tf.reshape(xs, [-1, 28, 28, 1])

# layer1 conv1  [-1, 28, 28, 32]
W_conv1 = Weight_value([5, 5, 1, 32])
b_conv1 = bias_value([32])
h_conv1 = tf.nn.relu(conv2d(x_image, W_conv1)+b_conv1)
# layer2 pool1 [-1, 14, 14, 32]
h_pool1 = pool_2x2(h_conv1)
# layer3 conv2 [-1, 14, 14, 64]
W_conv2 = Weight_value([5, 5, 32, 64])
b_conv2 = bias_value([64])
h_conv2 = tf.nn.relu(conv2d(h_pool1, W_conv2)+b_conv2)
# layer4 pool2 [-1,7,7,64]
h_pool2 = pool_2x2(h_conv2)
# layer5 fc1 [-1,1024]
h_pool2_flat = tf.reshape(h_pool2, [-1, 7*7*64])
W_fc1 = Weight_value([7*7*64, 1024])
b_fc1 = bias_value([1024])
h_fc1 = tf.nn.relu(tf.matmul(h_pool2_flat, W_fc1)+b_fc1)
#layer6 dropout
keep_prob = tf.placeholder(tf.float32)
h_fc1_drop = tf.nn.dropout(h_fc1, keep_prob)
# layer7 fc2 [-1,10]
W_fc2 = Weight_value([1024, 10])
b_fc2 = bias_value([10])
y_conv = tf.nn.softmax(tf.matmul(h_fc1_drop, W_fc2)+b_fc2)

# cross_entropy
cross_entropy = tf.reduce_mean(-tf.reduce_sum(ys*tf.log(y_conv), reduction_indices=[1]))
# optimizer
train_step = tf.train.AdamOptimizer(1e-4).minimize(cross_entropy)
# accuracy
correct_prediction = tf.equal(tf.argmax(ys, 1), tf.argmax(y_conv, 1))
accuracy = tf.reduce_mean(tf.cast(correct_prediction, tf.float32))
# init
init = tf.global_variables_initializer()
# sess
config = tf.ConfigProto()
config.gpu_options.allow_growth = True

with tf.Session(config=config) as sess:
    sess.run(init)
    for i in range(1001):
        x_batch, y_batch = mnist.train.next_batch(50)
        sess.run(train_step, feed_dict={xs:x_batch, ys:y_batch, keep_prob:0.5})
        if i%100 == 0:
            x_test, y_test = mnist.test.next_batch(50)
            print(i, ' step train ', sess.run(accuracy, feed_dict={xs: x_batch, ys: y_batch, keep_prob: 1}))
            print(i, ' step test', sess.run(accuracy, feed_dict={xs:x_test, ys:y_test, keep_prob: 1}))

end = time.time()
print("function time is : ", end-start)

# 0  step train  0.08
# 0  step test 0.14
# 100  step train  0.82
# 100  step test 0.82
# 200  step train  0.84
# 200  step test 0.96
# 300  step train  0.92
# 300  step test 0.9
# 400  step train  0.96
# 400  step test 0.92
# 500  step train  0.9
# 500  step test 0.96
# 600  step train  0.94
# 600  step test 1.0
# 700  step train  0.96
# 700  step test 0.96
# 800  step train  0.96
# 800  step test 1.0
# 900  step train  0.96
# 900  step test 0.96
# 1000  step train  0.94
# 1000  step test 0.96
# function time is :  25.16685461997986
# 使用cpu function time is :  269.778738022
# 速度提高了10倍


 2435
2435

 被折叠的 条评论
为什么被折叠?
被折叠的 条评论
为什么被折叠?
 到【灌水乐园】发言


