


仅仅看Bert的论文其实对我们的帮助并不大,我们一般更关注于实践中对Bert结构的搭建。BERT原文的代码为:https://github.com/google-research/bert,但是其为TF写的,然而我并不会TF。因此本文参考Hugging Face的Transformers库的实现,学习Bert结构。首先我们观察BERT最基本的Feature Extraction的部分,最后再考虑在不同的自监督任务或是下游任务条件时,其输出头部的概况。
BERT结构
我们知到,BERT使用了Transformer的encoder作为主体的编码结构。原文如是说:BERT’s model architecture is a multi-layer bidirectional Transformer encoder based on the original implementation described in Vaswani et al. (2017) and released in the tensor2tensor library.1
回顾一下原论文的整体工作:
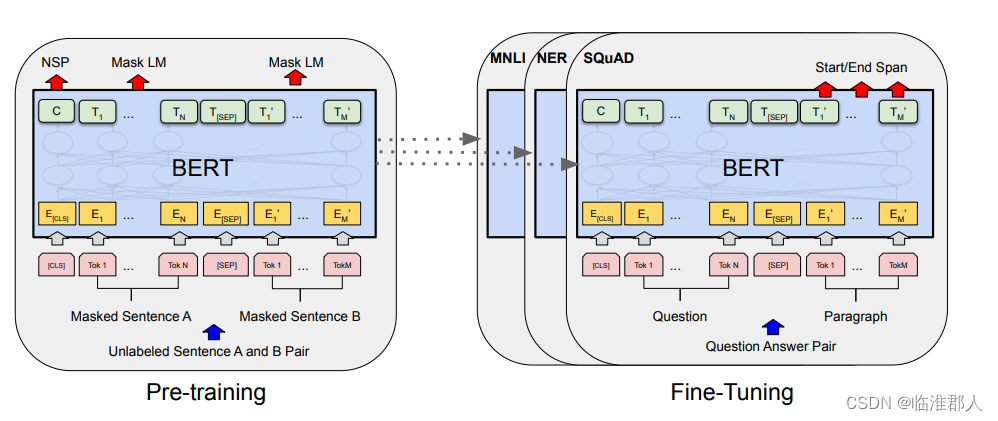
实际上我们光看这个图,或者只知到BERT的编码部分用的是Transformer的encoder(正如我们只知到GPT的编码部分用的是Transformer的decoder一样),那么我们距离深入理解BERT其实还很远。以下我们深入了解一下其结构。如果我们先不看BERT的任务相关部分,而关注其结构,那么其主要结构由以下几个类别组成。

以下按照三个橙色的大模块学习BERT。
BertEmbedding
原文做自监督预训练时的任务是MLM(masked language model)和NSP(next sentence prediction)。在embedding过程中,除了原本Transformer必备的Token和Position的Embedding,Segement Embedding也是必要的,因为这需要用来区别句子从属于哪一个Segment。得到三个embedding后,直接相加得到最终的Embedding。

因此,本结构的词嵌入的主要结构,如下所示,即3个Embedding矩阵。此外,还有一个LN层和Dropout层:
class BertEmbeddings(nn.Module):
    """Construct the embeddings from word, position and token_type embeddings."""

    def __init__(self, config):
        super().__init__()
        self.word_embeddings = nn.Embedding(config.vocab_size, config.hidden_size, padding_idx=config.pad_token_id)
        self.position_embeddings = nn.Embedding(config.max_position_embeddings, config.hidden_size)
        self.token_type_embeddings = nn.Embedding(config.type_vocab_size, config.hidden_size)

        # self.LayerNorm is not snake-cased to stick with TensorFlow model variable name and be able to load
        # any TensorFlow checkpoint file
        self.LayerNorm = BertLayerNorm(config.hidden_size, eps=config.layer_norm_eps)
        self.dropout = nn.Dropout(config.hidden_dropout_prob)
其前馈过程也是比较简单的,主体如下所示:
def forward(self, input_ids=None, token_type_ids=None, position_ids=None, inputs_embeds=None):
        seq_length = input_shape[1]

        if position_ids is None:
            position_ids = self.position_ids[:, :seq_length]

        if token_type_ids is None:
            token_type_ids = torch.zeros(input_shape, dtype=torch.long, device=self.position_ids.device)

        if inputs_embeds is None:
            inputs_embeds = self.word_embeddings(input_ids)
        position_embeddings = self.position_embeddings(position_ids)
        token_type_embeddings = self.token_type_embeddings(token_type_ids)

        embeddings = inputs_embeds + position_embeddings + token_type_embeddings
        embeddings = self.LayerNorm(embeddings)
        embeddings = self.dropout(embeddings)
还记得,我们在LEBert实践中,不知道是什么含义的token_type_id嘛,其实是用于区别分段的。如果分段为空,那么也会被初始化为全0的内容。
BERTEncoder
BERT的Encoder主要就是Transformer的Encoder,也就是由Transformer的Encoder Layer堆叠而成的。此处具体的是由BertLayer堆叠而成,我们需要仔细关注BertLayer。
我们可以将具体部署与Transformer模块的大致对应关系如下所示:
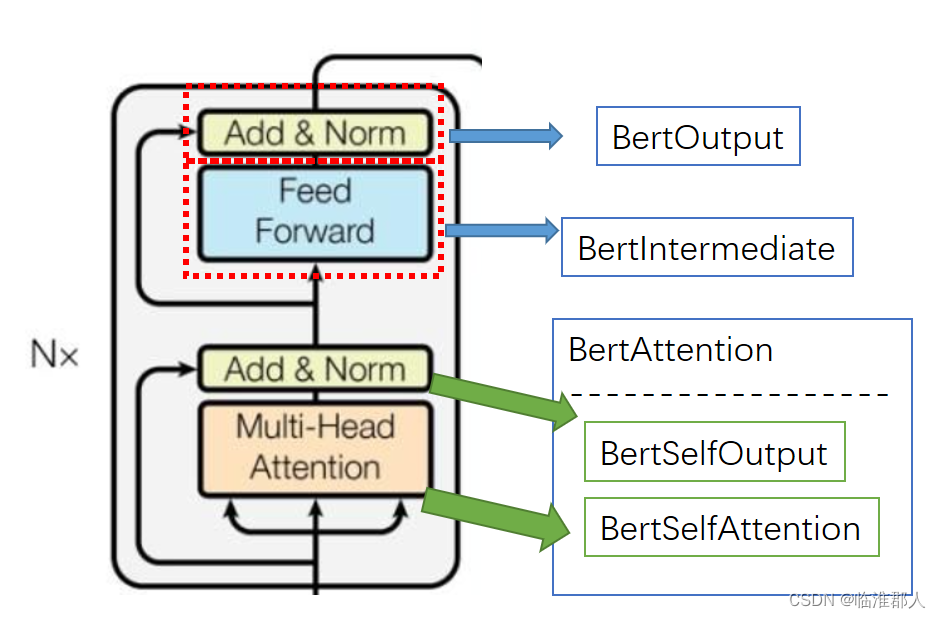
不过其实我们仔细看一下BertSelfOutput部分,其中多增加了一个全连接的映射。
BertLayer主体结构如下,如果用于生成任务,则增加一个交叉注意力模块,我们暂时先不关注它。
class BertLayer(nn.Module):
    def __init__(self, config):
        super().__init__()
        self.chunk_size_feed_forward = config.chunk_size_feed_forward
        self.seq_len_dim = 1
        self.is_decoder = config.is_decoder
        self.add_cross_attention = config.add_cross_attention
        self.attention = BertAttention(config)
        if self.add_cross_attention:
            assert self.is_decoder, f"{self} should be used as a decoder model if cross attention is added"
            self.crossattention = BertAttention(config)
        self.intermediate = BertIntermediate(config)
        self.output = BertOutput(config)
其前馈过程,如果只学习编码,那么是比较简单的;如果是用作解码生成,那么需要增加一个互注意力(cross attention)。
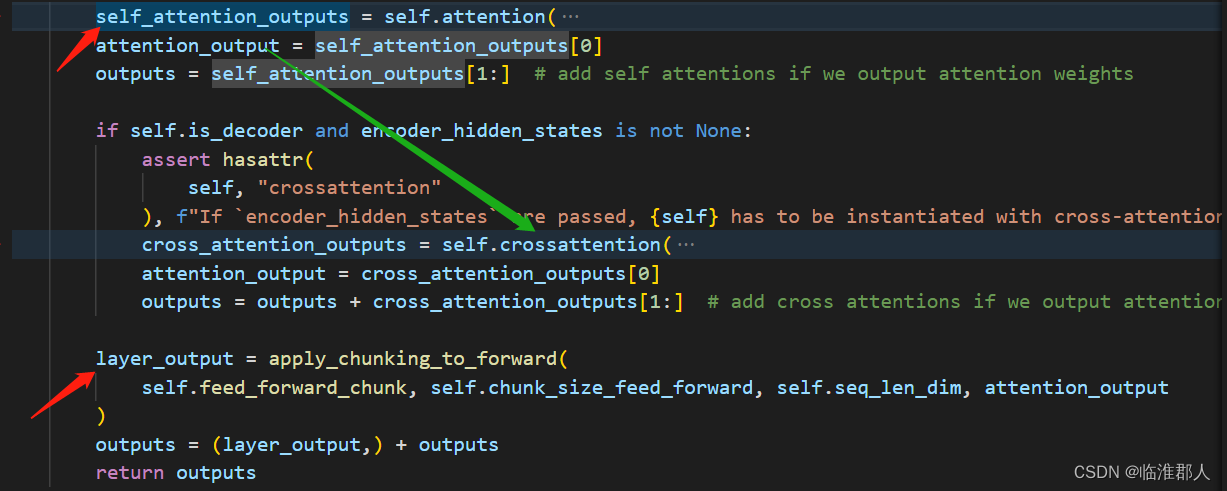
其中,Bert的self.attention是多头自注意力机制,具体其实还有点啰嗦,这里就不赘述了。
self.output多了一个全连接层,问题不大。
self.crossattention()的输入包含self_attention_outputs。
apply_chunking_to_forward()看起来比较迷惑,主要目的是降低存储空间消耗,这里暂时不详细解释了,但是其中调用的feed_forward_chunk,如下所示:
    def feed_forward_chunk(self, attention_output):
        intermediate_output = self.intermediate(attention_output)
        layer_output = self.output(intermediate_output, attention_output)
        return layer_output
其中,我们首先了解一下其中的self.intermediate、self.output
def mish(x):
    return x * torch.tanh(nn.functional.softplus(x))

ACT2FN = {"gelu": gelu, "relu": torch.nn.functional.relu, "swish": swish, "gelu_new": gelu_new, "mish": mish}
class BertIntermediate(nn.Module):
    def __init__(self, config):
        super().__init__()
        self.dense = nn.Linear(config.hidden_size, config.intermediate_size)
        if isinstance(config.hidden_act, str):
            self.intermediate_act_fn = ACT2FN[config.hidden_act]
        else:
            self.intermediate_act_fn = config.hidden_act

    def forward(self, hidden_states):
        hidden_states = self.dense(hidden_states)
        hidden_states = self.intermediate_act_fn(hidden_states)
        return hidden_states

   class BertOutput(nn.Module):
    def __init__(self, config):
        super().__init__()
        self.dense = nn.Linear(config.intermediate_size, config.hidden_size)
        self.LayerNorm = BertLayerNorm(config.hidden_size, eps=config.layer_norm_eps)
        self.dropout = nn.Dropout(config.hidden_dropout_prob)

    def forward(self, hidden_states, input_tensor):
        hidden_states = self.dense(hidden_states)
        hidden_states = self.dropout(hidden_states)
        hidden_states = self.LayerNorm(hidden_states + input_tensor)
        return hidden_states
BERTPooler
BERTPooler的名字看起来挺奇怪的,我们观察一下它的上下文:
        encoder_outputs = self.encoder(
            embedding_output,
            word_embeddings=word_embeddings,
            word_mask=word_mask,
            attention_mask=extended_attention_mask,
            head_mask=head_mask,
            encoder_hidden_states=encoder_hidden_states,
            encoder_attention_mask=encoder_extended_attention_mask,
            output_attentions=output_attentions,
            output_hidden_states=output_hidden_states,
            return_dict=return_dict,
        )
        sequence_output = encoder_outputs[0]
        pooled_output = self.pooler(sequence_output) #(batch,seqlen,embedding)

class BertPooler(nn.Module):
    def __init__(self, config):
        super().__init__()
        self.dense = nn.Linear(config.hidden_size, config.hidden_size)
        self.activation = nn.Tanh()

    def forward(self, hidden_states):
        # We "pool" the model by simply taking the hidden state corresponding
        # to the first token.
        first_token_tensor = hidden_states[:, 0]
        pooled_output = self.dense(first_token_tensor)
        pooled_output = self.activation(pooled_output)
        return pooled_output
于是我们就明白,Pooler就是将Bert输入的首部标签[CLS]的feature取出,然后通过一个简单的“全连接+激活函数”的神经网络。
BERT与多种下游任务
我们可以在transformers.modeling_bert中找到BERT的具体实现。其中,包括了对多种BERT下游任务的包装,说实话有点多,暂时也没有真实的实践、研究过它们到底用在哪些任务上,输入、输出、结构如何。但是以下我们根据注释,以及引用关系。但是它们普遍都是由BertModel+推理部分两大部分,或者更具体的看作BertModel+具体任务的“分类头”+输出部分共三个部分组成。

在未来,我们将进一步的了解BertConfig的参数设置,输入输出设置以及具体在不同任务上的使用方法。这里暂时到此为止。


 313
313


 被折叠的 条评论
为什么被折叠?
被折叠的 条评论
为什么被折叠?
 到【灌水乐园】发言


