unity shader texCUBE,对cubemap进行采样

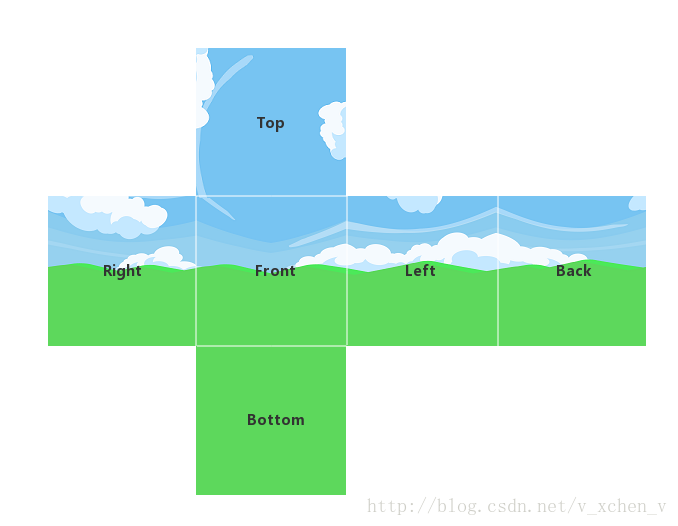
Cubemap是一个由六个独立的正方形纹理组成的集合,它将多个纹理组合起来映射到一个单一纹理。

基本上说CubeMap包含6个2D纹理,这每个2D纹理是一个立方体(cube)的一个面,也就是说它是一个有贴图的立方体。

CubeMap通常被用来作为具有反射属性物体的反射源。

这里写图片描述
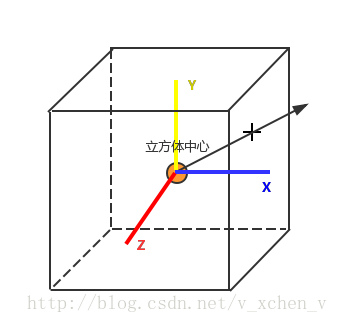
你可能会奇怪这样的立方体有什么用?为什么费事地把6个独立纹理结合为一个单独的纹理,只使用6个各自独立的不行吗?这是因为cubemap有自己特有的属性,可以使用方向向量对它们索引和采样

想象一下,我们有一个1×1×1的单位立方体,有个以原点为起点的方向向量在它的中心。方向向量的大小无关紧要,当方向向量向外延伸时,就会和立方体表面上的相应纹理发生相交,我们可以根据该交点进行采样。
这里写图片描述

Shader中对CubeMap采样

Shader提供了CubeMap的内置类型samplerCube,samplerCube和sampler2D一样,都是贴图,不同的是,需要使用textureCube进行采样,采样的时候需要传递规范化的方向向量而不是uv坐标。

texCUBE(_CubeMap, directionVec);
  •  

texCUBE会采样方向向量directionVec在CubeMap上的交点。

如果texCube采样时,传入模型中心到定点的向量,就可以将CubeMap纹理贴到模型上了。

Shader "Hidden/CubemapSampler"
{
    Properties
    {
        _CubeMap("CubeMap", CUBE) = ""{}
    }
    SubShader
    {
        Pass
        {
            CGPROGRAM
            #pragma vertex vert
            #pragma fragment frag

            #include "UnityCG.cginc"

            struct appdata
            {
                float4 vertex : POSITION;   
                float3 normal : NORMAL;
            };

            struct v2f
            {
                float4 vertex : SV_POSITION;
                float4 vertexLocal : TEXCOORD1;
            };

            v2f vert (appdata v)
            {
                v2f o;
                o.vertexLocal = v.vertex;
                o.vertex = UnityObjectToClipPos(v.vertex);

                return o;
            }

            samplerCUBE _CubeMap;
            fixed4 frag (v2f i) : SV_Target
            {
                fixed4 col = texCUBE(_CubeMap, normalize(i.vertexLocal.xyz));
                return col;
            }
            ENDCG
        }
    }
}

这里写图片描述

  • 1
    点赞
  • 5
    收藏
    觉得还不错? 一键收藏
  • 0
    评论
Unity中动态生成Cubemap可以使用RenderTexture和Camera来实现。下面是一个简单的示例代码: ```csharp using UnityEngine; public class GenerateCubemap : MonoBehaviour { public int resolution = 512; public Cubemap cubemap; public Camera camera; private RenderTexture renderTexture; void Start() { // 创建RenderTexture作为Cubemap的渲染目标 renderTexture = new RenderTexture(resolution, resolution, 0, RenderTextureFormat.Default); renderTexture.dimension = UnityEngine.Rendering.TextureDimension.Cube; renderTexture.hideFlags = HideFlags.HideAndDontSave; // 将RenderTexture赋值给Cubemap cubemap = new Cubemap(resolution, TextureFormat.RGB24, false); cubemap.SetPixelData(Color.black, CubemapFace.PositiveX); cubemap.SetPixelData(Color.black, CubemapFace.NegativeX); cubemap.SetPixelData(Color.black, CubemapFace.PositiveY); cubemap.SetPixelData(Color.black, CubemapFace.NegativeY); cubemap.SetPixelData(Color.black, CubemapFace.PositiveZ); cubemap.SetPixelData(Color.black, CubemapFace.NegativeZ); // 将Cubemap设置到Material中进行显示 GetComponent<Renderer>().sharedMaterial.SetTexture("_Cube", cubemap); // 将Camera的渲染目标设置为RenderTexture camera.targetTexture = renderTexture; } void Update() { // 渲染到RenderTexture camera.Render(); // 将RenderTexture的像素数据拷贝到Cubemap中 Graphics.CopyTexture(renderTexture, cubemap); // 更新Cubemap cubemap.Apply(); } } ``` 上述代码将在场景中创建一个空物体,并将脚本`GenerateCubemap`附加到该物体上。在Inspector面板中,可以设置Cubemap的分辨率和渲染的Camera。 该脚本会在每一帧更新时,将Camera渲染的结果拷贝到RenderTexture,并将RenderTexture的像素数据拷贝到Cubemap中,以实现动态生成Cubemap的效果。

“相关推荐”对你有帮助么?

  • 非常没帮助
  • 没帮助
  • 一般
  • 有帮助
  • 非常有帮助
提交
评论
添加红包

请填写红包祝福语或标题

红包个数最小为10个

红包金额最低5元

当前余额3.43前往充值 >
需支付:10.00
成就一亿技术人!
领取后你会自动成为博主和红包主的粉丝 规则
hope_wisdom
发出的红包
实付
使用余额支付
点击重新获取
扫码支付
钱包余额 0

抵扣说明:

1.余额是钱包充值的虚拟货币,按照1:1的比例进行支付金额的抵扣。
2.余额无法直接购买下载,可以购买VIP、付费专栏及课程。

余额充值