


一、实现ColorBar
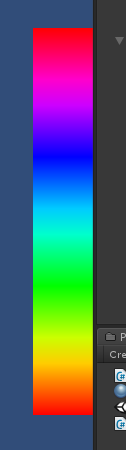
什么是ColorBar???直接上效果图:

就是一组数据映射到一组颜色上,类似于伪彩图。首先我们需要准备一组颜色,我们可以选择HSV颜色模型,HSV颜色模型在这不做详细解释,不了解的同学可以自行学习。
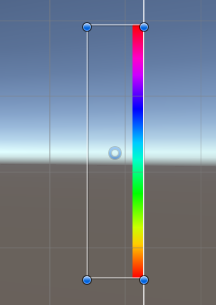
那么如何将颜色填充到顶点上呢?我们可以用矩形顶点,矩形上面两个顶点用同一个颜色,矩形下面两个顶点用其他的同一个颜色,这个矩形下面的两个顶点会和下一个矩形的上面两个顶点重合。
    /// <summary>
    ///
    /// </summary>
    /// <param name="h">0-1</param>
    /// <param name="s">0-1</param>
    /// <param name="v">0-1</param>
    /// <returns></returns>
    private Color HSVToRGB(float h)
    {
        return Color.HSVToRGB(h, 1, 1);
    }

    protected override void OnPopulateMesh(VertexHelper vh)
    {
        var rect = this.GetPixelAdjustedRect();
        vh.Clear();

        var count = 15;//定义矩形的个数,个数越多颜色越精细,但是算力也会越大。对应的颜色值则会+1.
        var posStep = (rect.yMax - rect.yMin) / count;
        var colorStep = (1f - 0f) / count;//在0-1中间插值count-1个 则一共有count+1个颜色值
        //当然,你也可以不需要h在0-1的范围 可自行修改最大值和最小值。

        for (int i = 0; i < count; i++)
        {
            UIVertex[] verts = new UIVertex[4];
            verts[0].position = new Vector3(rect.xMin, rect.yMin + i * posStep);
            verts[0].color = HSVToRGB(i * colorStep);
            verts[0].uv0 = Vector2.zero;

            verts[1].position = new Vector3(rect.xMax, rect.yMin + i * posStep);
            verts[1].color = HSVToRGB(i * colorStep);
            verts[1].uv0 = Vector2.zero;

            verts[2].position = new Vector3(rect.xMax, rect.yMin + (i + 1) * posStep);
            verts[2].color = HSVToRGB((i + 1) * colorStep);
            verts[2].uv0 = Vector2.zero;

            verts[3].position = new Vector3(rect.xMin, rect.yMin + (i + 1) * posStep);
            verts[3].color = HSVToRGB((i + 1) * colorStep);
            verts[3].uv0 = Vector2.zero;

            vh.AddUIVertexQuad(verts);
        }
    }
接下来我们要给颜色加上刻度线。为了给刻度线在左侧预留一个位置,我们在设置顶点位置的时候不能设置为xMin,所以我们改成这样:
public class CreateRectangle : Graphic
{
    int count = 15;//定义矩形的个数,个数越多颜色越精细,但是算力也会越大。对应的颜色值则会+1.
    float hMin = 0;
    float hMax = 1;
    float leftMargin = 60;

    protected override void Start()
    {
        base.Start();
        StartCoroutine(MUpdateGeometry());
    }

    IEnumerator MUpdateGeometry()
    {
        while (true)
        {
            UpdateGeometry();
            //SetVerticesDirty();
            yield return new WaitForSeconds(2);
        }
    }

    /// <summary>
    ///
    /// </summary>
    /// <param name="h">0-1</param>
    /// <param name="s">0-1</param>
    /// <param name="v">0-1</param>
    /// <returns></returns>
    private Color HSVToRGB(float h)
    {
        return Color.HSVToRGB(h, 1, 1);
    }

    protected override void OnPopulateMesh(VertexHelper vh)
    {
        var rect = this.GetPixelAdjustedRect();
        vh.Clear();
        var posStep = (rect.yMax - rect.yMin) / count;
        var colorStep = (hMax - hMin) / count;//在0-1中间插值count-1个 则一共有count+1个颜色值
        //当然,你也可以不需要h在0-1的范围 可自行修改最大值和最小值。

        for (int i = 0; i < count; i++)
        {
            UIVertex[] verts = new UIVertex[4];
            verts[0].position = new Vector3(rect.xMin + leftMargin, rect.yMin + i * posStep);
            verts[0].color = HSVToRGB(i * colorStep);
            verts[0].uv0 = Vector2.zero;

            verts[1].position = new Vector3(rect.xMax, rect.yMin + i * posStep);
            verts[1].color = HSVToRGB(i * colorStep);
            verts[1].uv0 = Vector2.zero;

            verts[2].position = new Vector3(rect.xMax, rect.yMin + (i + 1) * posStep);
            verts[2].color = HSVToRGB((i + 1) * colorStep);
            verts[2].uv0 = Vector2.zero;

            verts[3].position = new Vector3(rect.xMin + leftMargin, rect.yMin + (i + 1) * posStep);
            verts[3].color = HSVToRGB((i + 1) * colorStep);
            verts[3].uv0 = Vector2.zero;

            vh.AddUIVertexQuad(verts);
        }
    }
}
刻度线我们会使用一个Text放在左侧,所以我们创建了一个预制体:

这个预制体的Width我们会设置为刚才预留的位置的宽度,高度就不改变了,然后PosX可以算出来固定不变,根据实际的位置计算得到PosY即可。
public class CreateRectangle : Graphic
{
    int count = 15;//定义矩形的个数,个数越多颜色越精细,但是算力也会越大。对应的颜色值则会+1.
    float hMin = 0;
    float hMax = 1;
    float leftMargin = 60;
    float markMax = 6000;
    float markMin = 0;
    GameObject markTextPrefab;

    protected override void Start()
    {
        base.Start();
        markTextPrefab = InitMarkTextPrefab();
        StartCoroutine(MUpdateGeometry());
    }

    IEnumerator MUpdateGeometry()
    {
        while (true)
        {
            UpdateGeometry();
            //SetVerticesDirty();
            yield return new WaitForSeconds(2);
        }
    }

    private GameObject InitMarkTextPrefab()
    {
        var prefab = (GameObject)Resources.Load("MarkText", typeof(GameObject));

        var x = this.gameObject.GetComponent<RectTransform>().rect.width / 2 - leftMargin / 2;

        prefab.GetComponent<RectTransform>().rect.Set(-x, 0, leftMargin, 20);
        return prefab;
    }

    private void CreateOneMarkText(float yPos, string msg, string name)
    {
        var markText = (GameObject)Instantiate(markTextPrefab);
        markText.name = "MarkText" + name;
        markText.transform.SetParent(this.transform);
        var originRect = markText.GetComponent<RectTransform>().rect;
        markText.GetComponent<RectTransform>().rect.Set(originRect.x, yPos, originRect.width, originRect.height);
    }

    /// <summary>
    ///
    /// </summary>
    /// <param name="h">0-1</param>
    /// <param name="s">0-1</param>
    /// <param name="v">0-1</param>
    /// <returns></returns>
    private Color HSVToRGB(float h)
    {
        return Color.HSVToRGB(h, 1, 1);
    }

    protected override void OnPopulateMesh(VertexHelper vh)
    {
        var rect = this.GetPixelAdjustedRect();
        vh.Clear();
        var posStep = (rect.yMax - rect.yMin) / count;
        var colorStep = (hMax - hMin) / count;//在0-1中间插值count-1个 则一共有count+1个颜色值
        //当然,你也可以不需要h在0-1的范围 可自行修改最大值和最小值。

        var markStep = (markMax - markMin) / count;

        for (int i = 0; i < count; i++)
        {
            UIVertex[] verts = new UIVertex[4];
            var y0 = rect.yMin + i * posStep;
            var h0 = i * colorStep;
            verts[0].position = new Vector3(rect.xMin + leftMargin, y0);
            verts[0].color = HSVToRGB(h0);
            verts[0].uv0 = Vector2.zero;

            verts[1].position = new Vector3(rect.xMax, y0);
            verts[1].color = HSVToRGB(h0);
            verts[1].uv0 = Vector2.zero;
            CreateOneMarkText(y0, (i * markStep).ToString(), i.ToString());

            var y1 = y0 + posStep;
            var h1 = h0 + colorStep;
            verts[2].position = new Vector3(rect.xMax, y1);
            verts[2].color = HSVToRGB(h1);
            verts[2].uv0 = Vector2.zero;

            verts[3].position = new Vector3(rect.xMin + leftMargin, y1);
            verts[3].color = HSVToRGB(h1);
            verts[3].uv0 = Vector2.zero;
            CreateOneMarkText(y1, ((i + 1) * markStep).ToString(), (i + 1).ToString());

            vh.AddUIVertexQuad(verts);
        }
    }
}
但是,出问题了!!!
Trying to add MarkText15 (UnityEngine.UI.Text) for graphic rebuild while we are already inside a graphic rebuild loop. This is not supported.
这是因为:实例化一个UI控件时调用了graphic rebuild操作,而OnPopulateMesh(),函数是在graphic rebuild操作中被调用的,所以若在OnPopulateMesh(), 中创建一个新的UI控件时系统会提示错误:graphic rebuild操作被循环调用了,所以这里需要使用协程操作(IEnumerator),在进入协程操作后,必须立即执行yield return new WaitForSeconds(0),使当前协程暂时退出,让graphic rebuild操作先执行。
所以我们需要将CreateOneMarkText修改为协程:
    IEnumerator CreateOneMarkText(float yPos, string msg, string name)
    {
        yield return new WaitForSeconds(0);
        name = "MarkText" + name;
        var markText = this.transform.Find(name)?.gameObject;
        if (markText == null)
        {
            markText = (GameObject)Instantiate(markTextPrefab);
            markText.name = name;
        }
        markText.transform.SetParent(this.transform);
        var x = this.gameObject.GetComponent<RectTransform>().rect.width / 2 - leftMargin / 2;
        markText.GetComponent<RectTransform>().anchoredPosition = new Vector2(-x, yPos);
        markText.GetComponent<Text>().text = msg + "-";
    }
然后再调用的地方修改为:
StartCoroutine(CreateOneMarkText(y0, (i * markStep).ToString(), i.ToString()));
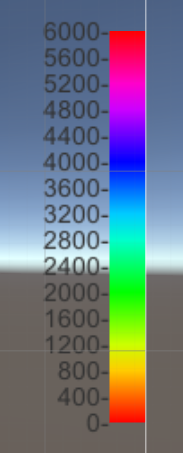
二、添加单位
上面完成后你会发现个问题,最底部和最顶部的刻度信息是超出控件大小的,所以我们也需要留一个余量,然后还需要考虑单位放置的位置。还需要给ColorBar添加一个背景,完整代码如下:
public class ColorBar : Graphic
{
    public Color MarkTextColor;
    public int UIVertexQuadCount = 15;//定义矩形的个数,个数越多颜色越精细,但是算力也会越大。对应的颜色值则会+1.
    float hMin = 0;
    float hMax = 1;
    public float MarkTextWidth = 40;
    public float MarkTextHeight = 16;
    float markMax = 6000;
    float markMin = 0;
    GameObject markTextPrefab;

    protected override void Start()
    {
        base.Start();
        markTextPrefab = InitMarkTextPrefab();
    }

    IEnumerator MUpdateGeometry()
    {
        while (true)
        {
            UpdateGeometry();
            //SetVerticesDirty();
            yield return new WaitForSeconds(2);
        }
    }

    private GameObject InitMarkTextPrefab()
    {
        var game = (GameObject)Resources.Load("MarkText", typeof(GameObject));
        return game;
    }

    IEnumerator CreateOneMarkText(float yPos, string msg, string name)
    {
        yield return new WaitForSeconds(0);
        name = "MarkText" + name;
        var markText = this.transform.Find(name)?.gameObject;
        if (markText == null)
        {
            markText = (GameObject)Instantiate(markTextPrefab);
            markText.name = name;
        }
        markText.transform.SetParent(this.transform);
        var x = this.gameObject.GetComponent<RectTransform>().rect.width / 2 - MarkTextWidth / 2;
        markText.GetComponent<RectTransform>().sizeDelta = new Vector2(MarkTextWidth, MarkTextHeight);
        markText.GetComponent<RectTransform>().anchoredPosition = new Vector2(-x, yPos);
        markText.GetComponent<Text>().text = msg;
        markText.GetComponent<Text>().color = MarkTextColor;
    }

    private Color CreateOneColor(float h)
    {
        return Color.HSVToRGB(h, 1, 1);
    }

    protected override void OnPopulateMesh(VertexHelper vh)
    {
        var rect = this.GetPixelAdjustedRect();
        vh.Clear();
        float yMax, yMin;
        yMax = rect.yMax - MarkTextHeight / 2;
        //是因为底部需要预留单位信息,所以多加了一个空间。
        yMin = rect.yMin + MarkTextHeight / 2 + MarkTextHeight / 2;

        var posStep = (yMax - yMin) / UIVertexQuadCount;
        var colorStep = (hMax - hMin) / UIVertexQuadCount;//中间插值count-1个 则一共有count+1个颜色值

        var markStep = (markMax - markMin) / UIVertexQuadCount;

        //添加单位
        StartCoroutine(CreateOneMarkText(yMin - MarkTextHeight / 2, "mm", "unit"));

        for (int i = 0; i < UIVertexQuadCount; i++)
        {
            UIVertex[] verts = new UIVertex[4];
            var y0 = yMin + i * posStep;
            var h0 = hMin + i * colorStep;
            verts[0] = CreateOneUIVertex(new Vector2(rect.xMin + MarkTextWidth, y0), h0);
            verts[1] = CreateOneUIVertex(new Vector2(rect.xMax, y0), h0);

            var m0 = markMin + (i * markStep);
            StartCoroutine(CreateOneMarkText(y0, m0.ToString() + "-", i.ToString()));

            var y1 = y0 + posStep;
            var h1 = h0 + colorStep;
            verts[2] = CreateOneUIVertex(new Vector2(rect.xMax, y1), h1);
            verts[3] = CreateOneUIVertex(new Vector2(rect.xMin + MarkTextWidth, y1), h1);

            var m1 = m0 + markStep;
            StartCoroutine(CreateOneMarkText(y1, m1.ToString() + "-", (i + 1).ToString()));

            vh.AddUIVertexQuad(verts);
        }
    }

    private UIVertex CreateOneUIVertex(Vector2 pos, float h)
    {
        UIVertex vert = new UIVertex();
        vert.position = new Vector3(pos.x, pos.y);
        vert.color = CreateOneColor(h);
        vert.uv0 = Vector2.zero;

        return vert;
    }
}

三、反思
上面添加单位后似乎就完结了???不,其实上面我们犯了一个错,那就是我们先画了颜色带,然后添加了刻度线,这里怎么会错呢?因为刻度线的数量不是固定的,在控件大小发生变化的时候会也需要刻度线做相应的变化。所以,我们重新梳理一下:
- 我们首先有一个值和颜色的映射关系
- 我们将取值范围线性平铺在界面上(坐标轴),坐标轴的创建过程大致为:根据一个坐标刻度的高度和坐标轴的高度计算刻度的个数,然后再与坐标轴范围计算刻度步长。
- 创建好坐标轴后再根据值和颜色的映射关系画出颜色带(画几个颜色取决于刻度数量)
所以,我们的代码又改动了很多:
public class ColorBar : Graphic
{
    public int UIVertexQuadNumBetweenTwoMarkText = 3;
    const string MarkTextNameBase = "MarkText";
    public string unit = "unknown";
    readonly float[] MarkTabs = new float[] { 1, 2, 5 };
    public Color MarkTextColor = Color.white;
    public float MarkTextWidth = 40;
    public float MarkTextHeight = 16;
    private float markTextMax = 6200;
    public Func<float, float, float, Color> CalcOneColor;
    public float MarkTextMax
    {
        get { return markTextMax; }
        set
        {
            if (value > markTextMin)
            {
                markTextMax = value;
                UpdateGeometry();//调用OnPopulateMesh
            }
        }
    }
    private float markTextMin = 100;
    public float MarkTextMin
    {
        get { return markTextMin; }
        set
        {
            if (value < markTextMax)
            {
                markTextMin = value;
                UpdateGeometry();//调用OnPopulateMesh
            }
        }
    }

    GameObject markTextPrefab;

    protected override void Start()
    {
        base.Start();
        markTextPrefab = InitMarkTextPrefab();
    }

    private GameObject InitMarkTextPrefab()
    {
        var game = (GameObject)Resources.Load("MarkText", typeof(GameObject));
        return game;
    }

    void CreateOneMarkText(float yPos, string msg)
    {
        string name = MarkTextNameBase + msg;
        var markText = this.transform.Find(name)?.gameObject;
        if (markText == null)
        {
            markText = (GameObject)Instantiate(markTextPrefab);
            markText.name = name;
        }
        markText.transform.SetParent(this.transform);
        var x = this.gameObject.GetComponent<RectTransform>().rect.width / 2 - MarkTextWidth / 2;
        var rectTransform = markText.GetComponent<RectTransform>();
        rectTransform.sizeDelta = new Vector2(MarkTextWidth, MarkTextHeight);
        rectTransform.anchoredPosition = new Vector2(-x, yPos);
        var text = markText.GetComponent<Text>();
        text.text = msg;
        text.color = MarkTextColor;
        text.enabled = true;
    }

    IEnumerator CreateMarkTextUnit(float yPos, string msg)
    {
        yield return new WaitForSeconds(0);
        CreateOneMarkText(yPos, msg);
    }

    IEnumerator CreateMarkText(float markTextYPos, float markText)
    {
        yield return new WaitForSeconds(0);
        CreateOneMarkText(markTextYPos, markText.ToString() + "-");
    }

    IEnumerator DisableAllMarkTextWithoutUnit()
    {
        yield return new WaitForSeconds(0);
        var children = this.GetComponentsInChildren<Text>();
        foreach (var child in children)
        {
            if (child.name != MarkTextNameBase + unit)
                child.enabled = false;
        }
    }

    IEnumerator DestoryAllDisabledMarkText()
    {
        yield return new WaitForSeconds(0);
        var children = this.GetComponentsInChildren<Text>();
        foreach (var child in children)
        {
            if (!child.enabled)
                DestroyImmediate(child.gameObject);
        }
    }

    private float CalcRealStartMarkText(float markText)
    {
        int basePrecision = 1;
        while (markText < basePrecision || markText > basePrecision * 10)
        {
            if (markText < basePrecision)
                basePrecision /= 10;
            else if (markText > basePrecision * 10)
                basePrecision *= 10;
            else
                break;
        }
        basePrecision /= 10;

        return Mathf.CeilToInt(markText / basePrecision) * basePrecision;
    }

    protected override void OnPopulateMesh(VertexHelper vh)
    {
        var rect = this.GetPixelAdjustedRect();
        vh.Clear();
        //ColorBar矩形的坐标位置(像素单位)
        float yMax, yMin, xMin, xMax;
        yMax = rect.yMax - MarkTextHeight / 2;
        //是因为底部需要预留单位信息,所以多加了一个空间。
        yMin = rect.yMin + MarkTextHeight / 2 + MarkTextHeight / 2;
        xMin = rect.xMin + MarkTextWidth;
        xMax = rect.xMax;

        var markTextNum = CalcMarkTextNum(MarkTextHeight, yMax - yMin);
        float markTextStep = CalcMarkTextStep(MarkTabs, markTextNum, markTextMax - markTextMin);
        var rate = (yMax - yMin) / (markTextMax - markTextMin);
        var realMarkTextMin = CalcRealStartMarkText(markTextMin);

        //添加单位
        StartCoroutine(CreateMarkTextUnit(yMin - MarkTextHeight / 2, unit));
        StartCoroutine(DisableAllMarkTextWithoutUnit());

        var markText = realMarkTextMin;
        while (markText <= markTextMax)
        {
            //当前刻度线
            var markTextYPos = (markText - markTextMin) * rate + yMin;
            StartCoroutine(CreateMarkText(markTextYPos, markText));

            //由于两个刻度线之间的跨度较大,只画一个矩形颜色过渡不太好,所以这里在两个刻度线之间画多个
            var uiVertexQuadStep = markTextStep / UIVertexQuadNumBetweenTwoMarkText;
            for (int i = 0; i < UIVertexQuadNumBetweenTwoMarkText; i++)
            {
                //前一个刻度线
                var markTextPre = markText - (i + 1) * uiVertexQuadStep;
                if (markTextPre < markTextMin)
                    markTextPre = markTextMin;

                var markTextYPosPre = (markTextPre - markTextMin) * rate + yMin;

                var verts = CreateUIVertexQuad(xMin, xMax, markTextYPosPre, markTextYPos, markTextPre, markText);
                vh.AddUIVertexQuad(verts);

                if (markTextPre < markTextMin)
                    break;
            }
            //下一个刻度线
            markText += markTextStep;
        }

        //跳到这里说明刻度线已经大于最大值了,超出最大刻度线的肯定不需要画出来
        //最大刻度线也不需要画出来,应该它可能不是我们想要的一个数据精度
        //但是最大刻度线对应的颜色值需要我们画出来的,就相当于最小刻度颜色值也需要画出来
        var lastmarkText = markText - markTextStep;//这是画的最大的一条刻度线
        var lastmarkTextYPos = (lastmarkText - markTextMin) * rate + yMin;

        var lastverts = CreateUIVertexQuad(xMin, xMax, lastmarkTextYPos, yMax, lastmarkText, markTextMax);
        vh.AddUIVertexQuad(lastverts);

        StartCoroutine(DestoryAllDisabledMarkText());
    }

    private UIVertex[] CreateUIVertexQuad(float xMin, float xMax,
        float yBottomPos, float yTopPos, float markBottom, float markTop)
    {
        UIVertex[] verts = new UIVertex[4];
        verts[0] = CreateOneUIVertex(new Vector2(xMin, yBottomPos), markBottom);
        verts[1] = CreateOneUIVertex(new Vector2(xMax, yBottomPos), markBottom);

        verts[2] = CreateOneUIVertex(new Vector2(xMax, yTopPos), markTop);
        verts[3] = CreateOneUIVertex(new Vector2(xMin, yTopPos), markTop);

        return verts;
    }

    private UIVertex CreateOneUIVertex(Vector2 pos, float h)
    {
        UIVertex vert = new UIVertex();
        vert.position = new Vector3(pos.x, pos.y);
        if (CalcOneColor != null)
            vert.color = CalcOneColor.Invoke(h, markTextMin, markTextMax);
        vert.uv0 = Vector2.zero;

        return vert;
    }

    /// <summary>
    /// 计算刻度线的个数,乘以3是因为给予刻度线之间的间隔
    /// </summary>
    /// <param name="markTextHeigh">一个刻度线占的高度</param>
    /// <param name="colorBarHeigh">整个轴的长度</param>
    /// <returns></returns>
    private int CalcMarkTextNum(float markTextHeigh, float colorBarHeigh)
    {
        return Mathf.FloorToInt(colorBarHeigh / (markTextHeigh * 3));
    }

    /// <summary>
    /// 寻找最佳的一个刻度步长
    /// </summary>
    /// <param name="markTab">提供备选的步长基数</param>
    /// <param name="markNum">刻度个数</param>
    /// <param name="MarkTextRange">需要跨越的整个范围</param>
    /// <returns>最佳步长</returns>
    private float CalcMarkTextStep(float[] markTab, int markNum, float MarkTextRange)
    {
        float step = MarkTextRange / (markNum > 0 ? markNum : 1);
        float markScale = 1;
        float mark = markTab[0];
        while (step < mark * markScale || step > mark * markScale * 10)
        {
            if (step < mark * markScale)
                markScale /= 10;
            else if (step > mark * markScale * 10)
                markScale *= 10;
            else
                break;
        }

        step /= markScale;
        for (int i = 1; i < markTab.Length; i++)
        {
            if (Mathf.Abs(markTab[i] - step) < Mathf.Abs(mark - step))
                mark = markTab[i];
        }

        return mark * markScale;
    }
}
考虑到想做成控件,所以我们将可变的东西写在了另外一个用户脚本中:
public class CustomColorBar : MonoBehaviour
{
    public ColorBar Bar;
    public float Max
    {
        get { return Bar.MarkTextMax; }
        set { Bar.MarkTextMax = value; }
    }

    public float Min
    {
        get { return Bar.MarkTextMin; }
        set { Bar.MarkTextMin = value; }
    }

    // Use this for initialization
    void Start()
    {
        Bar.CalcOneColor = CreateOneColor;
        StartCoroutine(UpdateMaxAndMin());
    }

    IEnumerator UpdateMaxAndMin()
    {
        while (true)
        {
            Min= Random.Range(0, 3000);
            yield return new WaitForSeconds(5);
            Max = Random.Range(Min, 7000);
            yield return new WaitForSeconds(5);
        }
    }

    // Update is called once per frame
    void Update()
    {

    }

    private Color CreateOneColor(float value, float min, float max)
    {
        float hMin = 0, hMax = 0.80f;

        var h = (hMax - hMin) / (max - min) * (value - min) + hMin;

        return Color.HSVToRGB(h, 1, 1);
    }
}

四、自定义控件

然后在Editor文件夹中增加了一个脚本:
public class ColorBarMenu : MonoBehaviour
{
    ///如果要让Hierarchy里面的Gameobject通过鼠标右键单击
    ///弹出对话框中出现该选项,则需要将该选项加入到"GameObject"目录下
    [MenuItem("GameObject/UI/ColorBar")]
    public static void AddColorBarInGameObject()
    {

        GameObject parent = null;
        if (null != Selection.activeTransform)
        {
            parent = Selection.activeTransform.gameObject;
        }
        else
        {
            parent = null;
        }

        if ((null == parent) || (null == parent.GetComponentInParent<Canvas>()))
        {
            Canvas canvas = FindObjectOfType<Canvas>();
            if (null == canvas)
            {
                Debug.LogError("AddColorBar : can not find a canvas in scene!");
                return;
            }
            else
            {
                parent = FindObjectOfType<Canvas>().gameObject;
            }
        }

        GameObject prefab = Resources.Load("Prefabs/ColorBar") as GameObject;
        if (null == prefab)
        {
            Debug.LogError("AddColorBar : Load ColorBar Error!");
            return;
        }

        GameObject colorBar;
        if (null != parent)
            colorBar = Instantiate(prefab, parent.transform);
        else
            colorBar = Instantiate(prefab);

        if (null == colorBar)
        {
            Debug.LogError("AddColorBar : Instantiate ColorBar Error!");
            return;
        }

        Undo.RegisterCreatedObjectUndo(colorBar, "Created ColorBar");
        colorBar.name = "ColorBar";
    }
}
这个脚本就是为了右键可以直接添加该控件。所有源码在:heater404/ColorBar (github.com)
源码中有两个示例:


 3539
3539


 被折叠的 条评论
为什么被折叠?
被折叠的 条评论
为什么被折叠?
 到【灌水乐园】发言


