


开发基于Jersey的RESTful Web Service
前言
REST是Representational State Transfer的缩写,意思是“表述状态转移”。本文的主要目的是说明如何开发基于Jersey的RESTful WebService,记录一些关键的步骤的方法。希望进一步了解REST的朋友,请点击这里。
关键词
maven,netbean,jersey,RESTful,
摘要
本文从实战的角度说明了如何使用maven,netbean以及jersey框架开发一个简单的RESTful Web Service。最后,说明了如何使用SoapUI测试刚刚编写的RESTful Web Service.
业务需求
Android开发的小伙伴们需要定期将apk发布到服务器上,并且能够获得服务器上app的最新版本号。一旦版本有更新,app可以提示用户有新版本,用户可以立即对app进行更新。
主要实现两个功能,一个是获取最新的app版本信息,一个是将app版本信息通过RESTful Web Service更新到数据库中。
架构设计
app使用RESTful API与服务器进行交互。时序如下
服务端定义了一个名为appversion的实体模型,其结构如下
| 字段名 | 描述 |
|---|---|
| id | app版本标识号 |
| updatelog | 更新说明 |
| url | apk的URL |
URI概述
URI是Uniform Resource Identifier的缩写,意思是统一资源标识符。URI的结构如下
http://host:port/path?queryString
- http
协议名称,可以是http或https - host
DNS域名或IP地址 - port
端口 - path
资源地址,使用“/”符号分隔逻辑上的层次结构 - ?
分隔资源地址和查询字符串的符号 - queryString
查询字符串,包含三种形式的查询字符串
- 使用“&”符号分隔查询条件;
- 使用逗号分隔有次序的作用域信息
- 使用分号分隔无次序的作用域信息
资源地址设计
| 功能 | 资源地址 |
|---|---|
| 查询最新的app版本信息 | GET /appversion |
| 添加或创建app版本信息 | PUT /appversion |
编程活动
下面进入实际编程环节,我们使用maven创建项目,管理项目依赖,使用netbean编写代码,使用tomcat发布RESTful服务。
准备工作
- maven 3.1.1
- netbean 8.0.2
- tomcat 7.0.57
- windows 7
创建项目
我把java源码都放在E:\dev\mars目录下。读者可以按照自己的喜好设置源代码目录。
打开命令行窗口,输入
mvn archetype:generate将进入交互式创建项目的过程。
下面摘录一部分输出的信息
257: remote -> com.sun.jersey.archetypes:jersey-quickstart-ejb (An archetype which contains a simple Jersey based EJB pr
oject.)
258: remote -> com.sun.jersey.archetypes:jersey-quickstart-grizzly (An archetype which contains a quickstart Jersey proj
ect based on Grizzly container.)
259: remote -> com.sun.jersey.archetypes:jersey-quickstart-grizzly2 (An archetype which contains a quickstart Jersey pro
ject based on Grizzly2 container.)
260: remote -> com.sun.jersey.archetypes:jersey-quickstart-webapp (An archetype which contains a sample Jersey based Web
app project.)
261: remote -> com.sun.mep:mep-connector-archetype-rar (Maven archetype to create a RAR-based connector for the Sun Glas
sFish Mobility Platform version 1.1_01.)
...(此处略过1477行)
Choose a number or apply filter (format: [groupId:]artifactId, case sensitive contains):
输出的信息提示我们选择一个项目类型,只需输入项目编号即可。输入260,其类型是
com.sun.jersey.archetypes:jersey-quickstart-webapp
Choose com.sun.jersey.archetypes:jersey-quickstart-webapp version:
1: 1.0.1
2: 1.0.2
3: 1.0.3
4: 1.0.3.1
5: 1.1.0-ea
6: 1.1.1-ea
7: 1.1.2-ea
8: 1.1.3-ea
9: 1.1.4
10: 1.1.4.1
11: 1.1.5
12: 1.1.5.1
13: 1.1.5.2
14: 1.2
15: 1.3
16: 1.4
17: 1.4-ea01
18: 1.4-ea02
19: 1.4-ea03
20: 1.4-ea04
21: 1.4-ea05
22: 1.4-ea06
23: 1.5
24: 1.5-ea01
25: 1.5-ea02
26: 1.5-ea03
27: 1.5-ea04
28: 1.5-ea05
29: 1.5-ea06
30: 1.5-ea07
31: 1.5-ea08
32: 1.5-ea09
33: 1.6
34: 1.6-ea01
35: 1.6-ea02
36: 1.6-ea03
37: 1.6-ea04
38: 1.6-ea05
39: 1.6-ea06
40: 1.7
41: 1.7-ea01
42: 1.7-ea02
43: 1.7-ea03
44: 1.7-ea04
45: 1.7-ea05
46: 1.7-ea06
47: 1.7-ea07
48: 1.8
49: 1.8-ea01
50: 1.8-ea02
51: 1.8-ea03
52: 1.8-ea04
53: 1.9
54: 1.9-ea01
55: 1.9-ea02
56: 1.9-ea03
57: 1.9-ea04
58: 1.9-ea06
59: 1.9-ea07
60: 1.9.1
61: 1.10-b01
62: 1.10-b02
63: 1.10-b03
64: 1.10-b04
65: 1.10-b05
66: 1.10
67: 1.11-b01
68: 1.11-b02
69: 1.11-b03
70: 1.11-b04
71: 1.11
72: 1.11.1
73: 1.11.2
74: 1.12-b01
75: 1.12
76: 1.13-b01
77: 1.13
78: 1.14
79: 1.15
80: 1.16
81: 1.17
82: 1.17.1
83: 1.18
84: 1.18.1
85: 1.18.2
86: 1.18.3
87: 1.18.4
88: 1.19
Choose a number: 88: 88
Downloading: http://maven.oschina.net/content/groups/public/com/sun/jersey/archetypes/jersey-quickstart-webapp/1.19/jers
ey-quickstart-webapp-1.19.jar
Downloaded: http://maven.oschina.net/content/groups/public/com/sun/jersey/archetypes/jersey-quickstart-webapp/1.19/jerse
y-quickstart-webapp-1.19.jar (8 KB at 5.9 KB/sec)
Downloading: http://maven.oschina.net/content/groups/public/com/sun/jersey/archetypes/jersey-quickstart-webapp/1.19/jers
ey-quickstart-webapp-1.19.pom
Downloaded: http://maven.oschina.net/content/groups/public/com/sun/jersey/archetypes/jersey-quickstart-webapp/1.19/jerse
y-quickstart-webapp-1.19.pom (3 KB at 4.3 KB/sec)
Define value for property 'groupId': : com.example
Define value for property 'artifactId': : restdemo
Define value for property 'version':  1.0-SNAPSHOT: :
Define value for property 'package':  com.example: : com.example.appversion
Confirm properties configuration:
groupId: com.example
artifactId: restdemo
version: 1.0-SNAPSHOT
package: com.example.appversion
 Y: : y
最后,项目创建成功
[INFO] ----------------------------------------------------------------------------
[INFO] Using following parameters for creating project from Old (1.x) Archetype: jersey-quickstart-webapp:1.19
[INFO] ----------------------------------------------------------------------------
[INFO] Parameter: groupId, Value: com.example
[INFO] Parameter: packageName, Value: com.example.appversion
[INFO] Parameter: package, Value: com.example.appversion
[INFO] Parameter: artifactId, Value: restdemo
[INFO] Parameter: basedir, Value: E:\dev\mars
[INFO] Parameter: version, Value: 1.0-SNAPSHOT
[INFO] project created from Old (1.x) Archetype in dir: E:\dev\mars\restdemo
[INFO] ------------------------------------------------------------------------
[INFO] BUILD SUCCESS
[INFO] ------------------------------------------------------------------------
[INFO] Total time: 10:27.196s
[INFO] Finished at: Wed Dec 02 10:01:43 CST 2015
[INFO] Final Memory: 11M/27M
[INFO] ------------------------------------------------------------------------
我们在E:\dev\mars目录下看到新创建的项目。接下来,使用netbeans打开项目。
打开项目
说点题外话,我最初一直使用eclipse,后来发现eclipse对maven的支持很差,总是莫名奇妙的提示错误,即使使用最新版本的也是如此。我尝试使用netbeans,发现netbeans与maven配合的很默契,而且不需要安装插件。
我觉得使用netbeans,有几个好处
1.不需要下载maven插件,天生支持maven.目前我使用的版本是8.0.2
2.不会在磁盘上产生netbeans特有的项目文件。
3.eclipse能做的,netbeans都做的很好。
项目结构

由于项目是用向导创建的,其名称是 restdemo Jersey Webapp。后面我们将考虑如何将它改成我们需要的名称。
从目录结构上看,它包含了源代码目录src/main/java,在源代码目录中有包com.example.appversion,包中有一个java文件MyResource.java.
webapp目录里面是web.xml,这是web服务最重要的描述文件。
pom.xml
我们看看向导在pom.xml中都填写了什么内容:
<project xmlns="http://maven.apache.org/POM/4.0.0" xmlns:xsi="http://www.w3.org/2001/XMLSchema-instance"
  xsi:schemaLocation="http://maven.apache.org/POM/4.0.0 http://maven.apache.org/maven-v4_0_0.xsd">
    <modelVersion>4.0.0</modelVersion>
    <groupId>com.example</groupId>
    <artifactId>restdemo</artifactId>
    <packaging>war</packaging>
    <version>1.0-SNAPSHOT</version>
    <name>restdemo Jersey Webapp</name>
    <build>
        <finalName>restdemo</finalName>
        <plugins>
            <plugin>
                <groupId>org.apache.maven.plugins</groupId>
                <artifactId>maven-compiler-plugin</artifactId>
                <inherited>true</inherited>
                <configuration>
                    <source>1.6</source>
                    <target>1.6</target>
                </configuration>
            </plugin>
            <!-- Run the application using "mvn embedded-glassfish:run" -->
            <plugin>
                <groupId>org.glassfish</groupId>
                <artifactId>maven-embedded-glassfish-plugin</artifactId>
                <version>${glassfish.version}</version>
                <configuration>
                    <goalPrefix>embedded-glassfish</goalPrefix>
                    <app>E:\dev\mars/target/${project.build.finalName}.war</app>
                    <autoDelete>true</autoDelete>
                    <port>8080</port>
                </configuration>
                <dependencies>
                    <dependency>
                        <groupId>com.sun.jersey</groupId>
                        <artifactId>jersey-servlet</artifactId>
                        <version>${project.version}</version>
                    </dependency>
                    <dependency>
                        <groupId>javax.servlet</groupId>
                        <artifactId>javax.servlet-api</artifactId>
                        <version>3.0.1</version>
                    </dependency>
                </dependencies>
            </plugin>
        </plugins>
    </build>
    <dependencies>
        <dependency>
            <groupId>com.sun.jersey</groupId>
            <artifactId>jersey-servlet</artifactId>
            <version>${jersey.version}</version>
        </dependency>
        <dependency>
            <groupId>com.sun.jersey</groupId>
            <artifactId>jersey-json</artifactId>
            <version>${jersey.version}</version>
        </dependency>
        <dependency>
            <groupId>junit</groupId>
            <artifactId>junit</artifactId>
            <version>4.8.2</version>
            <scope>test</scope>
        </dependency>
        <dependency>
            <groupId>com.sun.jersey</groupId>
            <artifactId>jersey-client</artifactId>
            <version>${jersey.version}</version>
            <scope>test</scope>
        </dependency>
        <dependency>
            <groupId>org.glassfish.extras</groupId>
            <artifactId>glassfish-embedded-web</artifactId>
            <version>${glassfish.version}</version>
            <scope>test</scope>
        </dependency>
    </dependencies>
    <properties>
        <jersey.version>1.19</jersey.version>
        <glassfish.version>3.1.1</glassfish.version>
        <project.build.sourceEncoding>UTF-8</project.build.sourceEncoding>
    </properties>
</project>
从pom.xml来看,项目依赖以下几个jar包
com.sun.jersey.jersey-servlet
com.sun.jersey.jersey-client
com.sun.jersey.jersey-json
而从netbeans解析得到的结果来看,项目依赖的jar包远远多于三个:
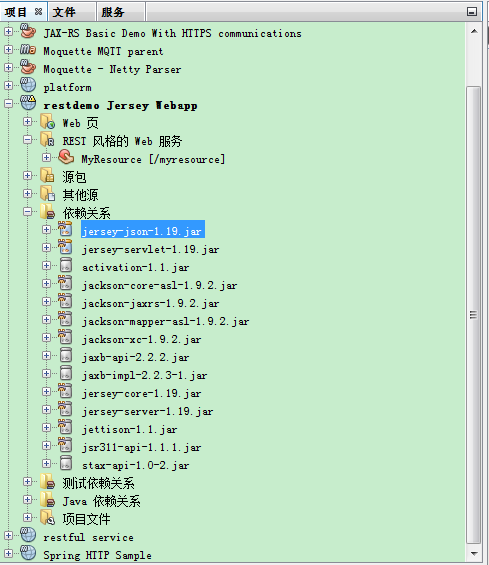
这其中蕴含着什么秘密呢?我分析是这些多出来的的jar包是上面列出的三个包依赖的包。这部分的道理我们暂时不予考虑。
运行项目
1.在netbeans的项目视图中,右击 restdemo Jersey Web App,弹出快捷菜单
2.在弹出菜单中,选择设为主项目
3.在菜单“调试”中选择调试主项目,即可启动调试。
默认弹出web 页面地址栏显示的是
http://localhost:8080/restdemo
页面源码是
<html>
<body>
<h2>Jersey RESTful Web Application!</h2>
<p><a href="webresources/myresource">Jersey resource</a>
<p>Visit the <a href="http://jersey.java.net">Project Jersey website</a>
for more information on Jersey!
</body>
</html>
点击Jersey resource的链接,将跳转到
http://localhost:8080/restdemo/webresources/myresource
页面显示
Hi There!
现在让我们分析一下这背后发生的事情。
原理分析
localhost:8080是tomcat对外提供web服务的主机名与端口号,对应了一个端点(end point)。
restdemo是web服务的名称,对应着pom.xml文件中的
<artifactId>restdemo</artifactId>http://localhost:8080/restdemo则唯一指定了restdemo服务的地址。
webresources是在web.xml中指定的:
<servlet-mapping>
        <servlet-name>Jersey Web Application</servlet-name>
        <url-pattern>**/webresources/***</url-pattern>
    </servlet-mapping>
最后看MyResource.java的源代码
package com.example.appversion;

import javax.ws.rs.GET;
import javax.ws.rs.Path;
import javax.ws.rs.Produces;

/** Example resource class hosted at the URI path "/myresource"
 */
@Path("/myresource")
public class MyResource {

    /** Method processing HTTP GET requests, producing "text/plain" MIME media
     * type.
     * @return String that will be send back as a response of type "text/plain".
     */
    @GET
    @Produces("text/plain")
    public String getIt() {
        return "Hi there!";
    }
}
我们看到/myresource是映射到类MyResource的路径,而GET方法则映射到MyResource的方法getIt().
为了搞清楚客户端和服务端之间的HTTP报文,下面将使用SoapUI来测试这个服务。
接口测试
启动soapui后,创建一个REST测试项目,输入要测试的URI
http://localhost:8080/restdemo/webresources/myresource
看到如下界面
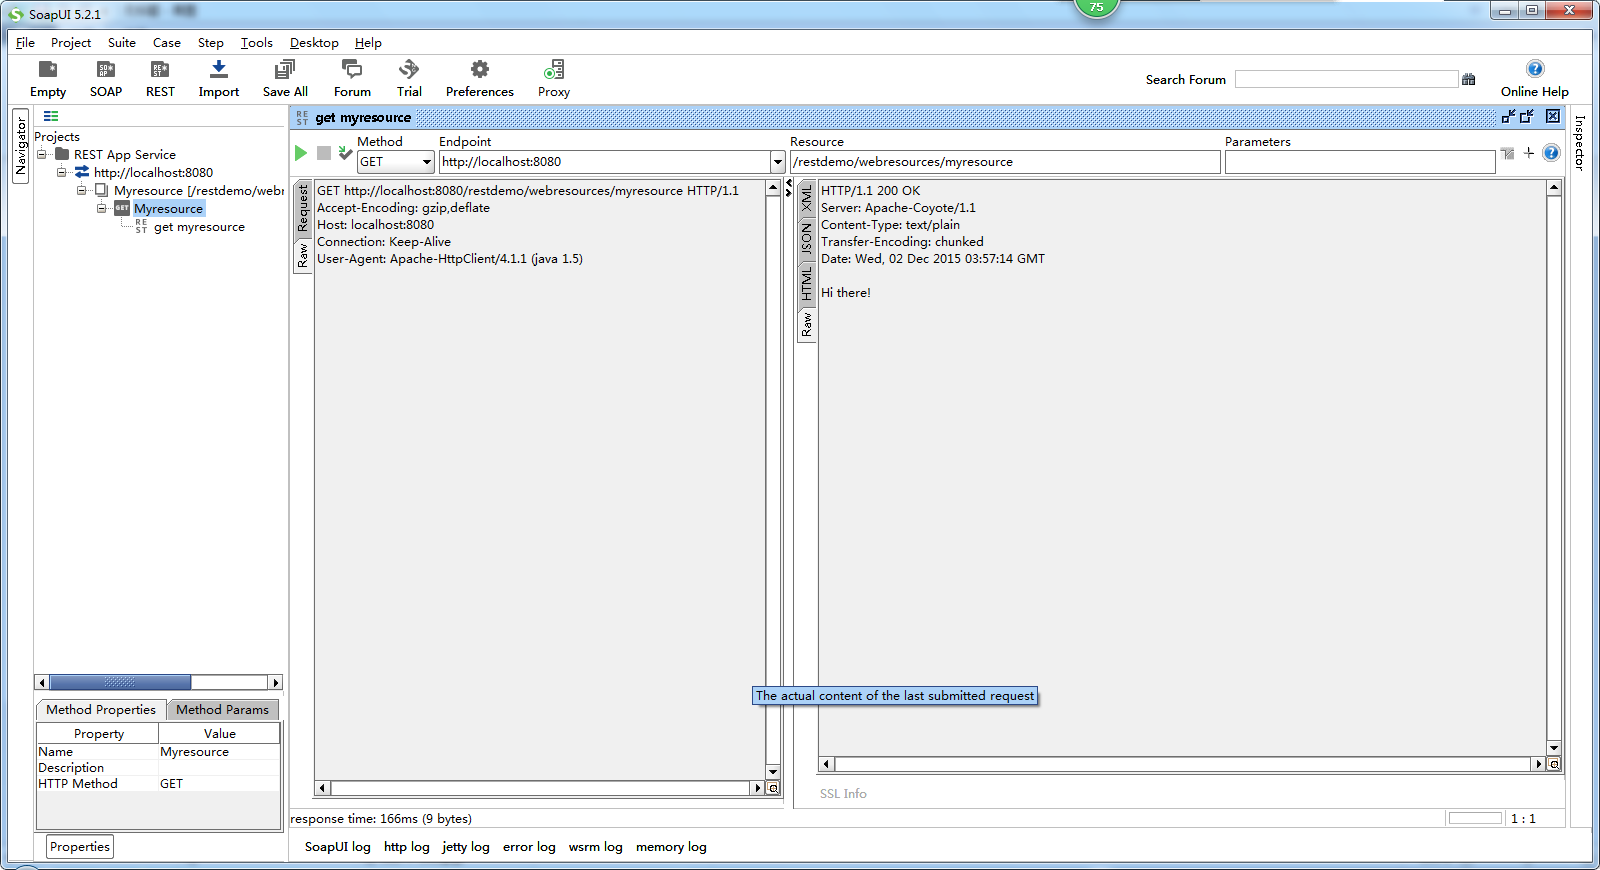
选择Method为GET,然后点击绿色箭头运行测试,就能看到请求和响应的报文:
请求:
GET http://localhost:8080/restdemo/webresources/myresource HTTP/1.1
Accept-Encoding: gzip,deflate
Host: localhost:8080
Connection: Keep-Alive
User-Agent: Apache-HttpClient/4.1.1 (java 1.5)
响应:
HTTP/1.1 200 OK
Server: Apache-Coyote/1.1
Content-Type: text/plain
Transfer-Encoding: chunked
Date: Wed, 02 Dec 2015 03:57:14 GMT

Hi there!
后面我们将会扩展这个例子和测试,实现实际的业务逻辑。


 9934
9934


 被折叠的 条评论
为什么被折叠?
被折叠的 条评论
为什么被折叠?
 到【灌水乐园】发言


