


接着上面的写,下面就说到整个协议栈的主循环来了,一个osal_start_system()函数,进入这个函数可以看到是一个死循环
for(;;) 以后,整个程序就一直在这里面不停的轮询查找,进行各种处理操作。
我们跳转到osal_run_system()函数,看看里面的内容
void osal_run_system( void )
{
  uint8 idx = 0;

  osalTimeUpdate();//见1.1
  Hal_ProcessPoll();  // This replaces MT_SerialPoll() and osal_check_timer().
  //这部分是对串口啊这些进行处理,暂时不做介绍//这部分

  do {
    if (tasksEvents[idx])  // Task is highest priority that is ready.
    {
      break;
    }
  } while (++idx < tasksCnt);//见1.2

  if (idx < tasksCnt)
  {
    uint16 events;
    halIntState_t intState;

    HAL_ENTER_CRITICAL_SECTION(intState);
    events = tasksEvents[idx];
    tasksEvents[idx] = 0;  // Clear the Events for this task.
    HAL_EXIT_CRITICAL_SECTION(intState);

    events = (tasksArr[idx])( idx, events );

    HAL_ENTER_CRITICAL_SECTION(intState);
    tasksEvents[idx] |= events;  // Add back unprocessed events to the current task.
    HAL_EXIT_CRITICAL_SECTION(intState);
  }
#if defined( POWER_SAVING )
  else  // Complete pass through all task events with no activity?
  {
    osal_pwrmgr_powerconserve();  // Put the processor/system into sleep
  }
#endif

  /* Yield in case cooperative scheduling is being used. */
#if defined (configUSE_PREEMPTION) && (configUSE_PREEMPTION == 0)
  {
    osal_task_yield();
  }
#endif
}
1.1、函数osalTimeUpdate()
void osalTimeUpdate( void )
{
  uint32 tmp;
  uint32 ticks320us;
  uint16 elapsedMSec = 0;

  // Get the free-running count of 320us timer ticks
  tmp = macMcuPrecisionCount();
  //每320us定时器2溢出一次,tmp里计的溢出次数

  if ( tmp != previousMacTimerTick )
  {
    // Calculate the elapsed ticks of the free-running timer.
    ticks320us = tmp - previousMacTimerTick;

    // Store the MAC Timer tick count for the next time through this function.
    previousMacTimerTick = tmp;

    // update converted number with remaining ticks from loop and the
    // accumulated remainder from loop
    tmp = (ticks320us * 8) + remUsTicks;//*8/25其实是*320/1000,转换成ms

    // Convert the 320 us ticks into milliseconds and a remainder
    CONVERT_320US_TO_MS_ELAPSED_REMINDER( tmp, elapsedMSec, remUsTicks );
    //这个里面除以25了。temp是被除数,elapsedMSec商,remUsTicks是余数

    // Update OSAL Clock and Timers
//判断时间是否到了1ms,如果等于或者超过1ms(elapsedMSec  >= 1),则需要轮询任务列表
    {
      osalClockUpdate( elapsedMSec );
      osalTimerUpdate( elapsedMSec );
    }
  }
}
在上面代码部分,大部分已经做出注释了,大家可以结合cc2530的T2定时器看看,涉及到具体的硬件。下面我们需要知道的是上面代码结束时候的函数:
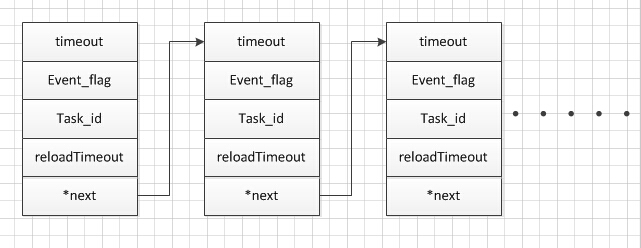
osalTimerUpdate( elapsedMSec );这个部分涉及到osal中一个非常重要的数据链表,是对每个任务的时间操作计时。当有一个事件触发的时候,该事件对应的数据就被添加到这个数据链表中,包括它的任务id,轮询时间,以及事件id,重新加载时间,以及next
OK,现在我们看看osalTimerUpdata里的内容:
void osalTimerUpdate( uint16 updateTime )
{
  halIntState_t intState;
  osalTimerRec_t *srchTimer;
  osalTimerRec_t *prevTimer;

  HAL_ENTER_CRITICAL_SECTION( intState );  // Hold off interrupts.
  // Update the system time
  osal_systemClock += updateTime;
  HAL_EXIT_CRITICAL_SECTION( intState );   // Re-enable interrupts.

  // Look for open timer slot
  if ( timerHead != NULL )
  {
    // Add it to the end of the timer list
    srchTimer = timerHead;
    prevTimer = (void *)NULL;

    // Look for open timer slot
    while ( srchTimer )//从头到尾遍历这个链表
    {
      osalTimerRec_t *freeTimer = NULL;

      HAL_ENTER_CRITICAL_SECTION( intState );  // Hold off interrupts.

      if (srchTimer->timeout <= updateTime)
      {
        srchTimer->timeout = 0;//timeout时间置0,下面设置事件
      }
      else
      {
        srchTimer->timeout = srchTimer->timeout - updateTime;//timeout时间减1
      }

      // Check for reloading
      if ( (srchTimer->timeout == 0) && (srchTimer->reloadTimeout)
      && (srchTimer->event_flag) )//这三个条件都为1
      {
        // Notify the task of a timeout
        osal_set_event( srchTimer->task_id, srchTimer->event_flag );//设置该事件为1

        // Reload the timer timeout value
        srchTimer->timeout = srchTimer->reloadTimeout;
      }

      // When timeout or delete (event_flag == 0)
//该事件不需要看,删除事件
      {
        // Take out of list
        if ( prevTimer == NULL )
          timerHead = srchTimer->next;
        else
          prevTimer->next = srchTimer->next;

        // Setup to free memory
        freeTimer = srchTimer;

        // Next
        srchTimer = srchTimer->next;
      }
      else
      {
        // Get next
        prevTimer = srchTimer;
        srchTimer = srchTimer->next;
      }

      HAL_EXIT_CRITICAL_SECTION( intState );
        // Re-enable interrupts.

      if ( freeTimer )
      {
        if ( freeTimer->timeout == 0 )
        {
          osal_set_event( freeTimer->task_id, freeTimer->event_flag );
        }
        osal_mem_free( freeTimer );
      }
    }
  }
}
可以看到,当运行这个函数的时候,会对这个链表进行遍历,对timeout减1,当减到0时,有选择性的重新加载时间或者从该链表中删除该成员,并且将对应的事件置1,以便后边程序处理。
1.2 事件处理操作部分
这里我们先对数组tasksEvents和tasksArr[idx]做出简要介绍。
tasksEvents是一个指针,在z-stack中使用的时候都是当数组使用的,他里面记录的是有没有事件发生,如有有,则相应的位置置1。而taskArr是与tasksEvent里面一一对应的时间处理函数,这部分是一个函数数组。当taskEvents对应位置置1的时候,taskArr相对应的函数进行处理。
在上一篇的叙述的最后,我们提到
osal_set_event(Hal_TaskID, HAL_KEY_EVENT);这个部分已经把对应的tasksEvents[Hal_TaskID]置1,然后通过这段代码
  do {
    if (tasksEvents[idx])  // Task is highest priority that is ready.
    {
      break;
    }
  } while (++idx < tasksCnt);
发现已经置1,所以调用
events = (tasksArr[idx])( idx, events );进入Hal_ProcessEvent函数进行处理。接下来调用这段代码
  if (events & HAL_KEY_EVENT)
  {

#if (defined HAL_KEY) && (HAL_KEY == TRUE)
    /* Check for keys */
    HalKeyPoll();

    /* if interrupt disabled, do next polling */
    if (!Hal_KeyIntEnable)
    {
      osal_start_timerEx( Hal_TaskID, HAL_KEY_EVENT, 100);
    }
#endif // HAL_KEY

    return events ^ HAL_KEY_EVENT;
  }
函数HalKeyPoll()是关于按键读取及回调处理函数
void HalKeyPoll (void)
{
  uint8 keys = 0;

  if ((HAL_KEY_JOY_MOVE_PORT & HAL_KEY_JOY_MOVE_BIT))  /* Key is active HIGH */
  {
    keys = halGetJoyKeyInput();//按键AD读取,判断是哪个按键
  }

  /* If interrupts are not enabled, previous key status and current key status
   * are compared to find out if a key has changed status.
   */
  if (!Hal_KeyIntEnable)//如果不使用中断
  {
    if (keys == halKeySavedKeys)//如果按键没有变化
    {
      /* Exit - since no keys have changed */
      return;
    }
    /* Store the current keys for comparation next time */
    halKeySavedKeys = keys;
  }
  else
  {
    /* Key interrupt handled here */
  }

  if (HAL_PUSH_BUTTON1())
  {
    keys |= HAL_KEY_SW_6;
  }

  /* Invoke Callback if new keys were depressed */
  if (keys && (pHalKeyProcessFunction))
  {
    (pHalKeyProcessFunction) (keys, HAL_KEY_STATE_NORMAL);//按键回调函数
  }
}
下面就转到回调函数
void OnBoard_KeyCallback ( uint8 keys, uint8 state )
{
  uint8 shift;
  (void)state;

  shift = (keys & HAL_KEY_SW_6) ? true : false;

  if ( OnBoard_SendKeys( keys, shift ) != ZSuccess )
  {
    // Process SW1 here
    if ( keys & HAL_KEY_SW_1 )  // Switch 1
    {
    }
    // Process SW2 here
    if ( keys & HAL_KEY_SW_2 )  // Switch 2
    {
    }
    // Process SW3 here
    if ( keys & HAL_KEY_SW_3 )  // Switch 3
    {
    }
    // Process SW4 here
    if ( keys & HAL_KEY_SW_4 )  // Switch 4
    {
    }
    // Process SW5 here
    if ( keys & HAL_KEY_SW_5 )  // Switch 5
    {
    }
    // Process SW6 here
    if ( keys & HAL_KEY_SW_6 )  // Switch 6
    {
    }
  }
}
需要重点注意的这句代码:
nBoard_SendKeys( keys, shift ) != ZSuccess这句代码的意思就是发送数据到app层,进行数据处理
uint8 OnBoard_SendKeys( uint8 keys, uint8 state )
{
  keyChange_t *msgPtr;

  if ( registeredKeysTaskID != NO_TASK_ID )
  {
    // Send the address to the task
    msgPtr = (keyChange_t *)osal_msg_allocate( sizeof(keyChange_t) );
    if ( msgPtr )
    {
      msgPtr->hdr.event = KEY_CHANGE;
      msgPtr->state = state;
      msgPtr->keys = keys;

      osal_msg_send( registeredKeysTaskID, (uint8 *)msgPtr );
    }
    return ( ZSuccess );
  }
  else
    return ( ZFailure );
}
可以看到把KEY_CHANGE,state,key保存到结构体msgPtr中,然后通过osal_msg_send传递到另外一个重要的链表中,以便应用层处理。
这个链表是用于对两个进程之间进行任务传递的,相当于信号或者邮箱机制。
通过osal_msg_send()函数调用的osal_msg_enqueue()函数,这部分可以发现这里的链表中存的成员可以是不同结构的成员,这部分代码写的比较牛逼。
void osal_msg_enqueue( osal_msg_q_t *q_ptr, void *msg_ptr )
{
  void *list;
  halIntState_t intState;

  // Hold off interrupts
  HAL_ENTER_CRITICAL_SECTION(intState);

  OSAL_MSG_NEXT( msg_ptr ) = NULL;
  // If first message in queue
  if ( *q_ptr == NULL )
  {
    *q_ptr = msg_ptr;
  }
  else
  {
    // Find end of queue
    for ( list = *q_ptr; OSAL_MSG_NEXT( list ) != NULL; list = OSAL_MSG_NEXT( list ) );

    // Add message to end of queue
    OSAL_MSG_NEXT( list ) = msg_ptr;
  }

  // Re-enable interrupts
  HAL_EXIT_CRITICAL_SECTION(intState);
}
最后通过osal_msg_send()函数将sampleapp的任务置1,实现任务调度。


 1万+
1万+


 被折叠的 条评论
为什么被折叠?
被折叠的 条评论
为什么被折叠?
 到【灌水乐园】发言


