windows上搭建sbt和scala环境:
首先下载 然后离线安装scala插件,再在本地安装scala和sbt
sbt版本要注意最好和linux服务器上的一致,编译所依赖的包全部都在linux服务器上面,不建议将/root目录下面的.ivy2目录下的cache目录整个拷贝到windows上来,最好联网自动去下载
sbt的话可以直接将linux上的sbt安装目录拷贝过来,主要就是bin和conf目录,bin目录里面sbt-launch.jar包是依赖的sbt包
注意修改配置conf目录下的sbtconfig.txt文件可参考我的配置:
# Set the java args to high
-Xmx512M
-XX:MaxPermSize=256m
-XX:ReservedCodeCacheSize=128m
-Dsbt.ivy.home=D:\Software\sbt\ivy2_cache_backup
# Set the extra SBT options
-Dsbt.log.format=true
加红的地方就是刚才将sbt依赖库cache目录(默认本地仓库)拷贝过来的地址(最好配置在D盘以免重启后丢失),这个的话在intellij ide里面的sbt配置中也可以进行配置具体参考下面图片:
修改sbt远程镜像地址:
(1)sbt的安装目录中找到sbt-launch.jar包,利用压缩工具打开盖jar包,找到\sbt\sbt.boot.properties文件
[scala]
version: ${sbt.scala.version-auto}
[app]
org: ${sbt.organization-org.scala-sbt}
name: sbt
version: ${sbt.version-read(sbt.version)[0.13.11]}
class: ${sbt.main.class-sbt.xMain}
components: xsbti,extra
cross-versioned: ${sbt.cross.versioned-false}
resources: ${sbt.extraClasspath-}
[repositories]
local
local-repository: http://172.7.1.216:8081/nexus/content/groups/public
aliyun-maven: http://maven.aliyun.com/nexus/content/groups/public
maven-central
typesafe-ivy-releases: https://repo.typesafe.com/typesafe/ivy-releases/, [organization]/[module]/[revision]/[type]s/[artifact](-[classifier]).[ext], bootOnly
sbt-ivy-snapshots: https://repo.scala-sbt.org/scalasbt/ivy-snapshots/, [organization]/[module]/[revision]/[type]s/[artifact](-[classifier]).[ext], bootOnly
[boot]
directory: ${sbt.boot.directory-${sbt.global.base-${user.home}/.sbt}/boot/}
[ivy]
ivy-home: ${sbt.ivy.home-${user.home}/.ivy2/}(可改成与上面提到的sbt的conf目录下sbtconfig.txt文件中一样的内容)
checksums: ${sbt.checksums-sha1,md5}
override-build-repos: ${sbt.override.build.repos-false}
repository-config: ${sbt.repository.config-${sbt.global.base-${user.home}/.sbt}/repositories}
加红的地方就是修改添加的默认远程仓库地址,建议打开文件时使用notepad++,修改完毕后,在压缩包工具中右击编辑使用note打开,将刚才的修改复制进去即可(否则可能会无法保存修改结果,kill掉javaw进程即可)
在未联网的windows IDE环境下测试多次,始终有个问题,每次会先访问本地,然后访问maven-central,无论怎样更改远程镜像地址的顺序或者直接删除maven-central选项都不行!!!!!
(2)另外网上还有一种方法修改远程镜像地址:
在当前用户的home目录下的.sbt/目录下添加一个repositories文件(也可以添加到sbt的conf目录下,然后在sbtconfig.txt文件中显示指明路径即可,放D盘重启后可以不丢失),内容如下:
[repositories]
local
local-repository: http://172.7.1.216:8081/nexus/content/groups/public
aliyun-maven: http://maven.aliyun.com/nexus/content/groups/public
maven-central
typesafe-ivy-releases: https://repo.typesafe.com/typesafe/ivy-releases/, [organization]/[module]/[revision]/[type]s/[artifact](-[classifier]).[ext], bootOnly
sbt-ivy-snapshots: https://repo.scala-sbt.org/scalasbt/ivy-snapshots/, [organization]/[module]/[revision]/[type]s/[artifact](-[classifier]).[ext], bootOnly
跟上面的其实是一样的,只不过这种方法在windows下的保存路径为C:\Users\32942\.sbt 很显然重启之后就丢失了,linux上建议采用这种方法
(3)目前最为靠谱的方法就是直接在build.sbt文件中显式的添加如下一句:
resolvers+= "Maven"at "http://maven.aliyun.com/nexus/content/groups/public"
externalResolvers := Resolver.withDefaultResolvers(resolvers.value,mavenCentral = false)
更新一下这种方法,比较全的源解析方案:
resolvers+= "Maven"at "http://maven.aliyun.com/nexus/content/groups/public"
resolvers +="typesafe-ivy-releases" at"https://repo.typesafe.com/typesafe/ivy-releases"
resolvers +="sbt-ivy-snapshots" at"https://repo.scala-sbt.org/scalasbt/ivy-snapshots"
resolvers +="Local Maven Repository" at"file:///" + Path.userHome.absolutePath +"/.m2/repository"
根据项目的实际情况,手动去添加源依赖,防止windows上编译器报错下载不到依赖。
maven配置:
ide在安装的时候绑定安装了多个版本的maven,但是在重启以后会导致c盘下的setting.xml文件丢失,会导致使用的时候有问题。
当前的环境下干脆使用c盘中自带的maven,并配置好setting.xml和local repository的地址,这样不怕重启丢配置文件了(也可以在一开始安装的时候将要丢失的配置文件换个地方保存,并更改配置)
系统自带的maven的镜像地址是我司的maven库地址
<mirror>
<id>certainReposity</id>
<name>certainReposity</name>
<url>http://172.7.1.216:8081/nexus/content/groups/public/</url>
<mirrorOf>*</mirrorOf>
</mirror>
local repository 目录(系统自带的maven中的setting.xml指定的本地缓存目录) 我们可以将linux编译服务器上/root目录下的.m2目录下repository中的所有文件拷贝到该目录下
现在的配置全是 windows系统自带的maven配置不怕重启丢失文件了。
上述配置如果对于其他很多工程都适用的话可以在file->otherSetting->defaultSetting中设置成默认配置
这样加载和新建maven工程就能正确的解析依赖、构建工程和编译运行了,编译的话建议还是使用linux编译服务器吧,又快又好
3、修改默认的存放目录
默认的配置缓存路径在c盘下面,可以在intellij idea安装目录的bin目录下idea.properties文件中更改,最好将配置文件存放在D盘,这样重启后不用重新配置ide了
主要配置如下,参考一下
# Use ${idea.home.path} macro to specify location relative to IDE installation home.
# Use ${xxx} where xxx is any Java property (including defined in previous lines of this file) to refer to its value.
# Note for Windows users: please make sure you're using forward slashes (e.g. c:/idea/system).
idea.home.path=D:/Software/IntelliJ IDEA Community Edition 2016.2.4/run_data
#---------------------------------------------------------------------
# Uncomment this option if you want to customize path to IDE config folder. Make sure you're using forward slashes.
#---------------------------------------------------------------------
# idea.config.path=${user.home}/.IdeaIC/config
idea.config.path=D:/Software/IntelliJ IDEA Community Edition 2016.2.4/run_data/.IdeaIC/config
#---------------------------------------------------------------------
# Uncomment this option if you want to customize path to IDE system folder. Make sure you're using forward slashes.
#---------------------------------------------------------------------
# idea.system.path=${user.home}/.IdeaIC/system
idea.system.path=D:/Software/IntelliJ IDEA Community Edition 2016.2.4/run_data/.IdeaIC/system
。。。。。
4、在intellij idea上打开sbt项目
我的步骤是先在linux服务器上使用sbt np插件建好工程,然后利用idea的open 打开,这时候建议不要在工程中写build.sbt文件,idea可能识别不了(未在本地安装assembly插件)
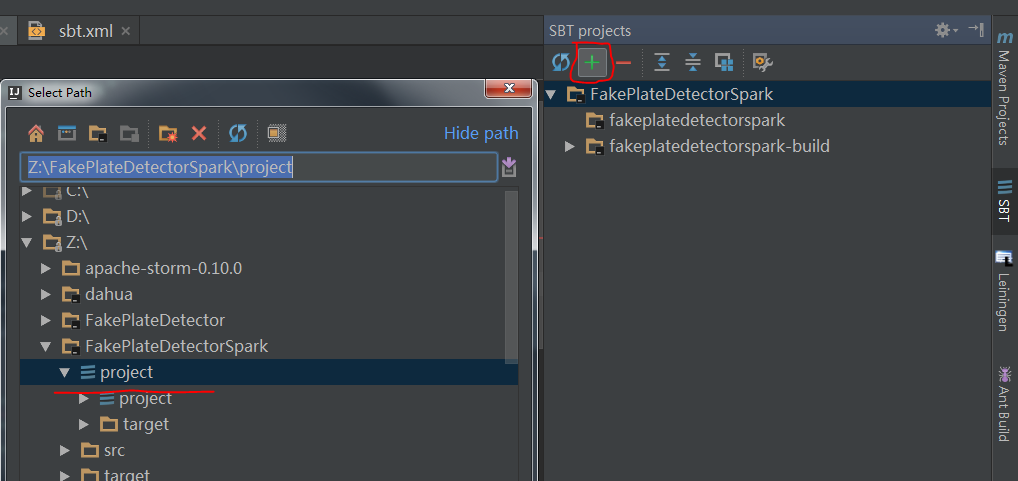
5、build.sbt文件中语句报红不识别
有时候项目中的build.sbt中的语句不识别 报错。
在右侧的sbt标签 点击“+”号 将源代码工程目录下的project目录添加进来即可,如下图:
6、idea sbt依赖适配的时候报错
sbt在导入项目或者更新项目的时候回去更新依赖关系,有时候会莫名其妙出现类似如下错误:
[debug] [NOT REQUIRED] org.scala-sbt#test-interface;1.0!test-interface.jar(src)
[debug] :: resolution report :: resolve 305ms :: artifacts dl 32ms
[debug] report for default#fakeplatedetectorspark$sources_2.10;1.0 default produced in Z:\FakePlateDetectorSpark\target\resolution-cache\reports\default-fakeplatedetectorspark$sources_2.10-default.xml
[debug] resolve done (305ms resolve - 32ms download)
[trace] Stack trace suppressed: run 'last *:update' for the full output.
[trace] Stack trace suppressed: run 'last *:ssExtractDependencies' for the full output.
[error] (*:update) java.lang.IllegalArgumentException: net.jpountz.lz4#lz4;1.2.0!lz4.jar origin location must be absolute:file:/root/.m2/repository/net/jpountz/lz4/lz4/1.2.0/lz4-1.2.0.jar
[error] (*:ssExtractDependencies) java.lang.IllegalArgumentException: net.jpountz.lz4#lz4;1.2.0!lz4.jar origin location must be absolute: file:/root/.m2/repository/net/jpountz/lz4/lz4/1.2.0/lz4-1.2.0.jar
[error] Total time: 97 s, completed 2017-3-6 17:53:39
为什么在windows上配置的idea会去匹配linux上的内容?
问题出在我们在windows上的本地仓库,因为当时是直接从linux下拷贝过来的,所以有些内容肯定与具体的linux环境有关,像上面这个问题,只需要在本地仓库中找到对应的目录
D:\Software\sbt\ivy2_cache_backup\cache\net.jpountz.lz4\lz4
会发现下面有这么个文件:
查看更新日期,是最新的,点击发现里面配置了错误的jar包路径即/root/.m2/repository/net/jpountz/lz4/lz4/1.2.0/lz4-1.2.0.jar,修改成正确的windows路径就可以解决问题了!
ivydata-1.2.0.properties内容如下所示:
#ivy cached data file for net.jpountz.lz4#lz4;1.2.0
#Tue Mar 07 14:02:27 CST 2017
artifact\:lz4\#jar\#jar\#1111663733.original=artifact\:lz4\#jar\#jar\#1111663733
artifact\:lz4\#src\#jar\#-1336224836.is-local=false
artifact\:lz4\#src\#jar\#-1336224836.location=http\://maven.aliyun.com/nexus/content/groups/public/net/jpountz/lz4/lz4/1.2.0/lz4-1.2.0-sources.jar
resolver=sbt-chain
artifact\:lz4\#pom.original\#pom\#-1530740901.location=https\://repo1.maven.org/maven2/net/jpountz/lz4/lz4/1.2.0/lz4-1.2.0.pom
artifact\:lz4\#src\#jar\#-1336224836.exists=true
artifact\:lz4\#pom.original\#pom\#-1530740901.is-local=false
artifact\:ivy\#ivy\#xml\#1107226804.is-local=false
artifact\:lz4\#pom.original\#pom\#-1530740901.exists=true
artifact\:ivy\#ivy\#xml\#1107226804.location=https\://repo1.maven.org/maven2/net/jpountz/lz4/lz4/1.2.0/lz4-1.2.0.pom
artifact.resolver=list
artifact\:ivy\#ivy\#xml\#1107226804.exists=true
artifact\:lz4\#jar\#jar\#1111663733.location=D\:/Software/sbt/ivy2_cache_backup/cache/net.jpountz.lz4/lz4/jars/lz4-1.2.0.jar
artifact\:lz4\#jar\#jar\#1111663733.exists=true
artifact\:lz4\#jar\#jar\#1111663733.is-local=true
7、在windows上编译spark可以运行提交的jar包
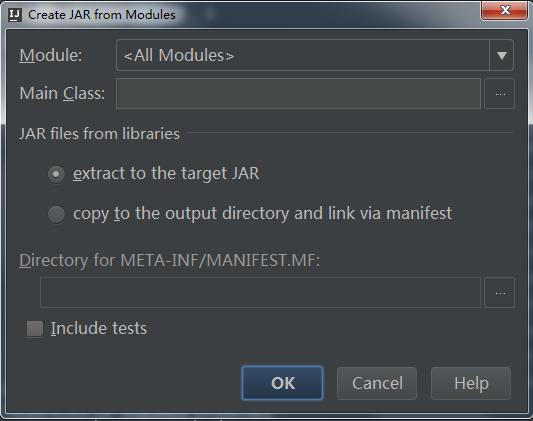
这里其实是在idea上编译jar包,若要在idea上运行并测试程序就需要将原先设置为provide的包也一起打包,若只是想在idea上测试的话(测试的时候可能会报class not found exception,可能是依赖包被设置成了provide的问题,这个问题暂时还没搞清楚,为什么在idea上运行还需要将provide包改为compile),不一定要配置这个artifacts选项
idea 上的scala sbt都已正确安装配置
设置setting中的Project Structure
这里可以配置
个人暂时没搞懂,直接选择的 OK
接下来
jar包输出目录也可以配置
build on make 可以不勾选,下面会有介绍
最后
如果刚才勾选了build on make那就点击make project编译成jar包,否则就使用 Build Artifact
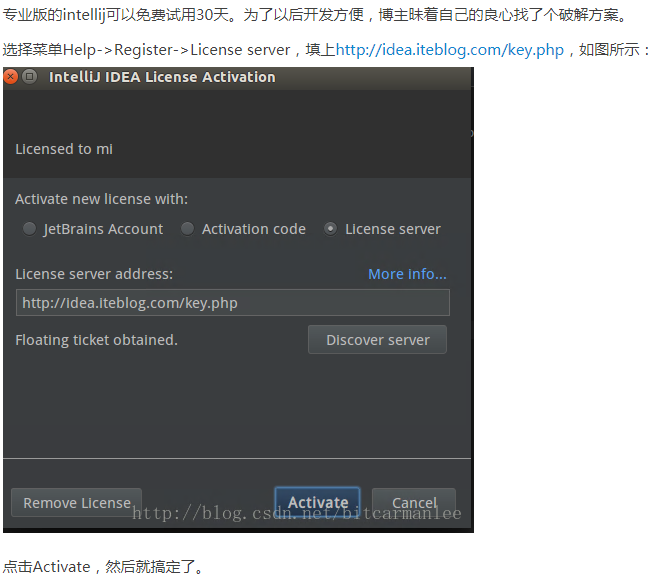
8、破解专业版
http://idea.iteblog.com/key.php
9、在idea上调试运行spark或者flink
很多时候在linux服务器上编译出来的jar包可以直接运行,但是在idea上就会报错,类似于下面这种错误:
这是由于在pom或者sbt文件中将spark或者flink依赖的某些包设置为了:
意思是打包的时候不加入,这些包在linux服务器的环境中有,已经被加入到了classpath里面了,但是当前windows环境一般情况下是没有配的,所以找不到
而且idea里面的依赖的生效范围也是对应的provide,如下图:
设为provide仅会在 编译 阶段被加入 classpath 但是在运行阶段没有加入,所以报错 找不带类!!!
解决办法是改为compile。


 415
415

 被折叠的 条评论
为什么被折叠?


